Page 18 of 276

18
1. CONTROLS AND FEATURES
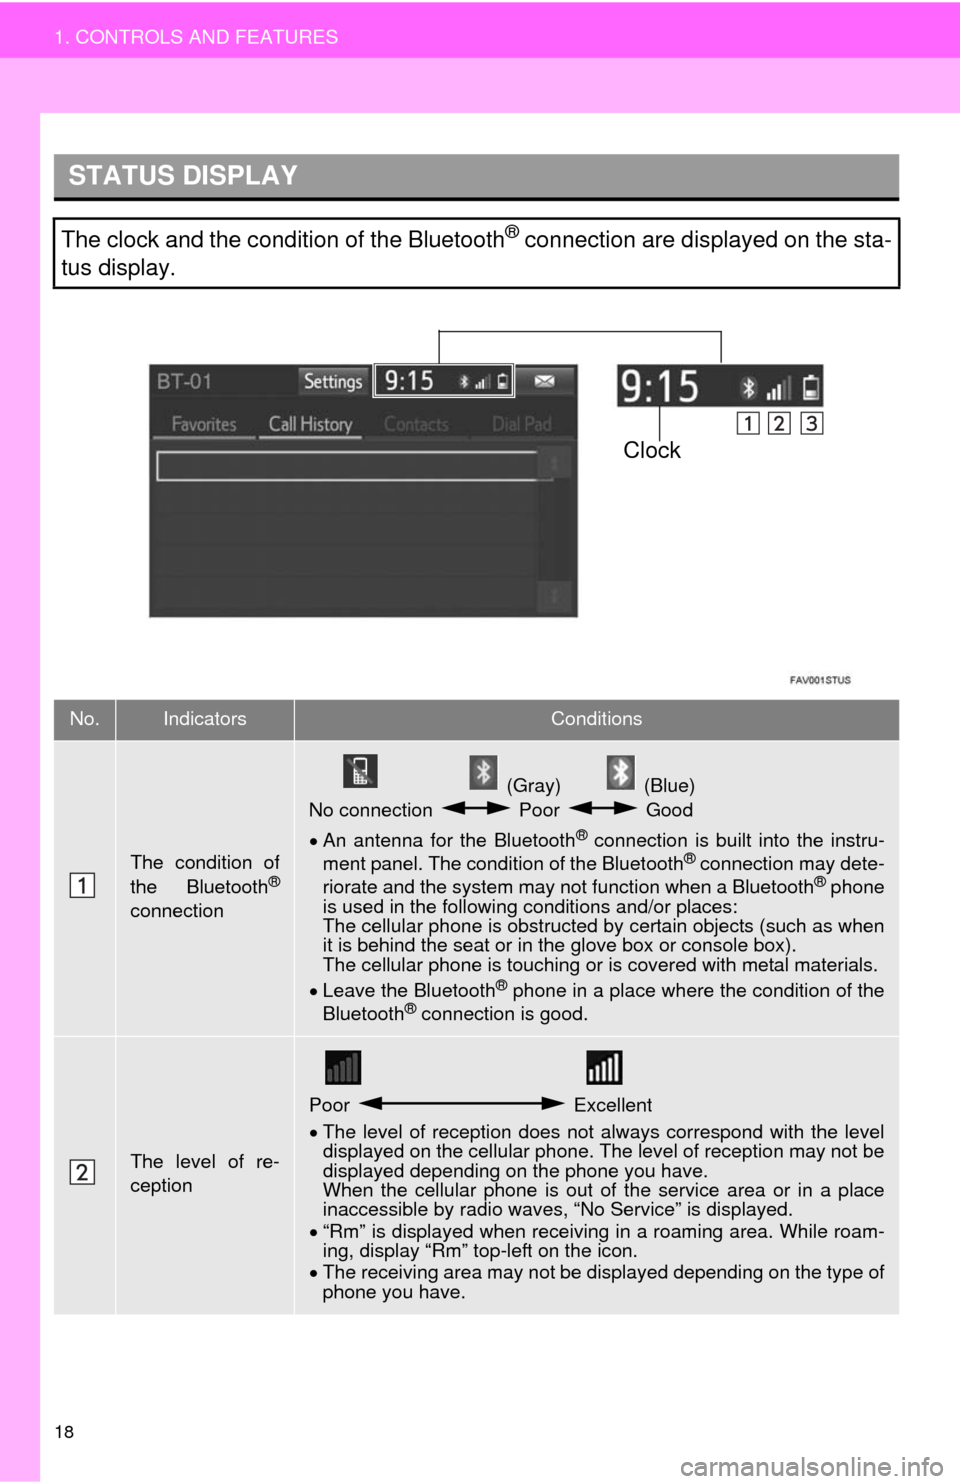
STATUS DISPLAY
The clock and the condition of the Bluetooth® connection are displayed on the sta-
tus display.
No.IndicatorsConditions
The condition of
the Bluetooth®
connection
(Gray) (Blue)
No connection Poor Good
An antenna for the Bluetooth
® connection is built into the instru-
ment panel. The condition of the Bluetooth® connection may dete-
riorate and the system may not function when a Bluetooth® phone
is used in the following conditions and/or places:
The cellular phone is obstructed by certain objects (such as when
it is behind the seat or in the glove box or console box).
The cellular phone is touching or is covered with metal materials.
Leave the Bluetooth
® phone in a place where the condition of the
Bluetooth® connection is good.
The level of re-
ception
Poor Excellent
The level of reception does not always correspond with the level
displayed on the cellular phone. The level of reception may not be
displayed depending on the phone you have.
When the cellular phone is out of the service area or in a place
inaccessible by radio waves, “No Service” is displayed.
“Rm” is displayed when receiving in a roaming area. While roam-
ing, display “Rm” top-left on the icon.
The receiving area may not be displayed depending on the type of
phone you have.
Clock
Page 54 of 276

54
3. OTHER SETTINGS
No.Function
Select to adjust the clock, time zone,
etc. (P.55)
Select to change the language.
Select to change the unit of measure
for distance.
Select to change the unit of tempera-
ture.
Select to sound beeps.
Select to change the screen color.
Select to change the keyboard lay-
out.
Select to set automatic screen
changes from the audio control
screen to the “Home” screen to on/
off. When set to on, the screen will
automatically return to the “Home”
screen from the audio control screen
after 20 seconds.
Select to turn the animations on/off.
Select to customize the startup imag-
es. (P.56)
Select to customize the screen off
image. (P.56)
Select to delete personal data.
(P.57)
Select to update software versions.
For details, contact your Toyota deal-
er.
Select to update “Gracenote” data-
base versions. For details, contact
your Toyota dealer.
Select to display the software infor-
mation. Notices related to third party
software used in this product are en-
listed. (This includes instructions for
obtaining such software, where ap-
plicable.)
No.Function
Page 55 of 276
55
3. OTHER SETTINGS
2
BASIC FUNCTION
1Display the “General Settings” screen.
(P.53)
2Select “Clock”.
3Select the items to be set.
*: Entune Premium Audio only
4Select “OK”.
■SETTING THE TIME ZONE
1Select “Time Zone”.
2Select the desired time zone.
Entune Premium Audio
When “Auto” is selected, the time zone is
automatically adjusted by the GPS.
CLOCK SETTINGS
Used for adjusting the clock, time
zone, etc.
No.Function
Select to adjust the clock manually.
Select to set the minutes to “00”.
Select to change the clock to 24-hour
format.
Select to adjust the clock automati-
cally by the GPS. When selected, the
clock cannot adjust manually.
Select to change the time zone.
(P.55)
Select to set daylight saving time
“Auto”*, “On” or “Off”. When “Au-
to”* is selected, the daylight saving
time is automatically set by the GPS.