Page 243 of 872
243
2-1. Driving procedures
2
When driving
SIENNA_OM_OM45483U_(U)
Tur n signal lever
■Turn signals can be operated when
Vehicles without a smart key system:
The engine switch is in the “ON” position.
Vehicles with a smart key system:
The “ENGINE START STOP” switch is in IGNITION ON mode.
■ If the indicator flashes faster than usual
Check that a light bulb in the front or rear turn signal lights has not burned
out.
The turn signal lever can be used to show the following intentions of
the driver:
Right turn
Left turn
Lane change to the right
(push and hold the lever
partway)
The right hand signal will flash
until you release the lever.
Lane change to the left
(push and hold the lever
partway)
The left hand signal will flash
until you release the lever.
Page 724 of 872
724
4-3. Do-it-yourself maintenance
SIENNA_OM_OM45483U_(U)
Light bulbs
You may replace the following bulbs by yourself. The difficulty level
of replacement varies depending on the bulb. If necessary bulb
replacement seems difficult to perfor m, contact your Toyota dealer.
For more information about replacing other light bulbs, contact your
Toyota dealer.
■ Preparing for light bulb replacement
Check the wattage of the light bulb to be replaced. ( P. 809)
■ Turning off the power back door main switch
P. 8 4
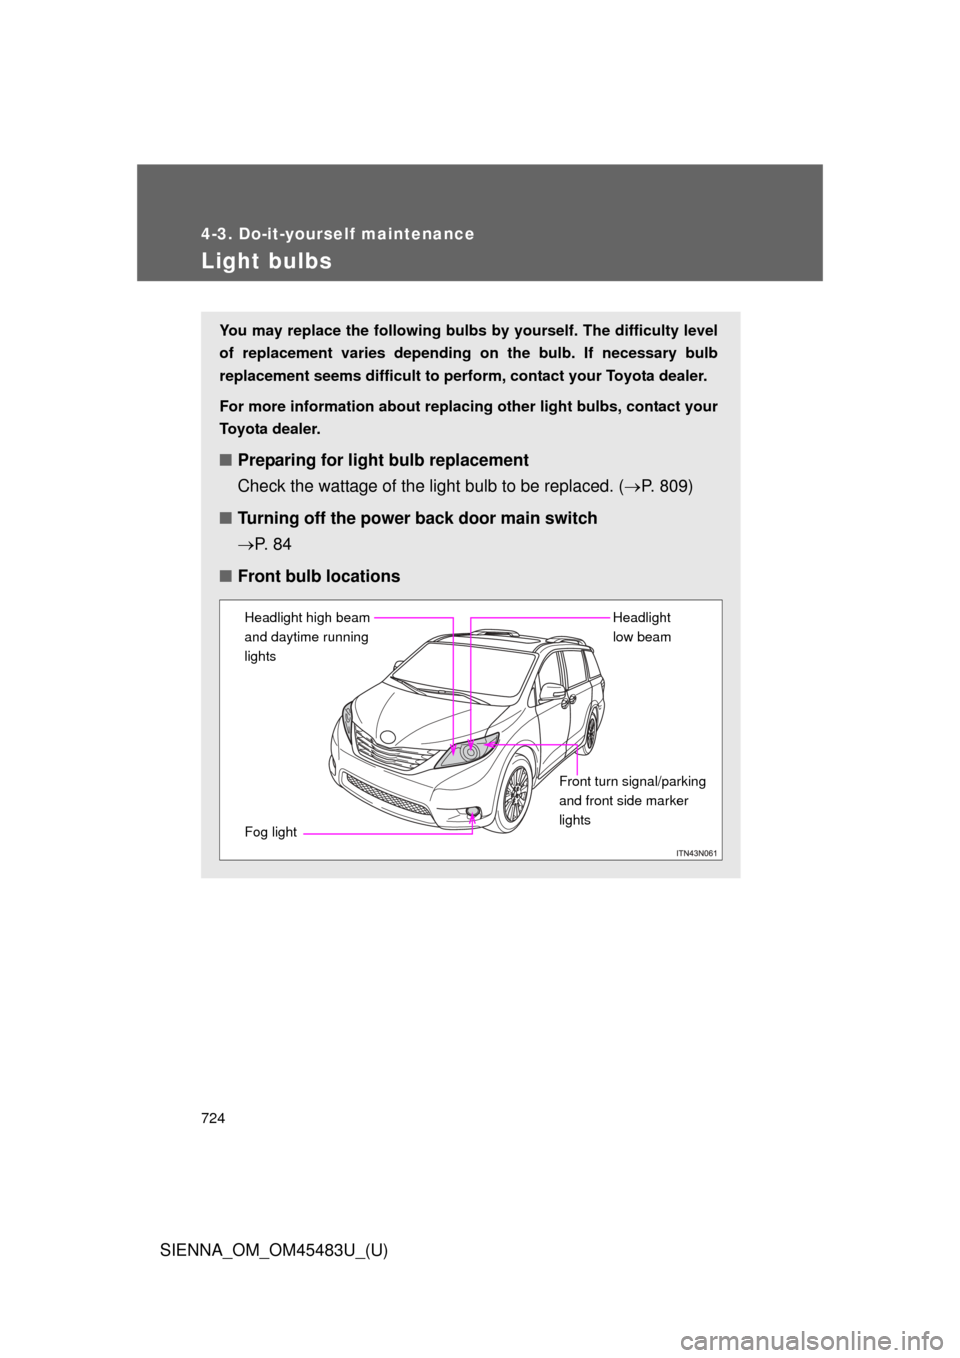
■ Front bulb locations
Fog light Headlight high beam
and daytime running
lights Headlight
low beam
Front turn signal/parking
and front side marker
lights
Page 725 of 872
725
4-3. Do-it-yourself maintenance
4
Maintenance and care
SIENNA_OM_OM45483U_(U)
Replacing light bulbs
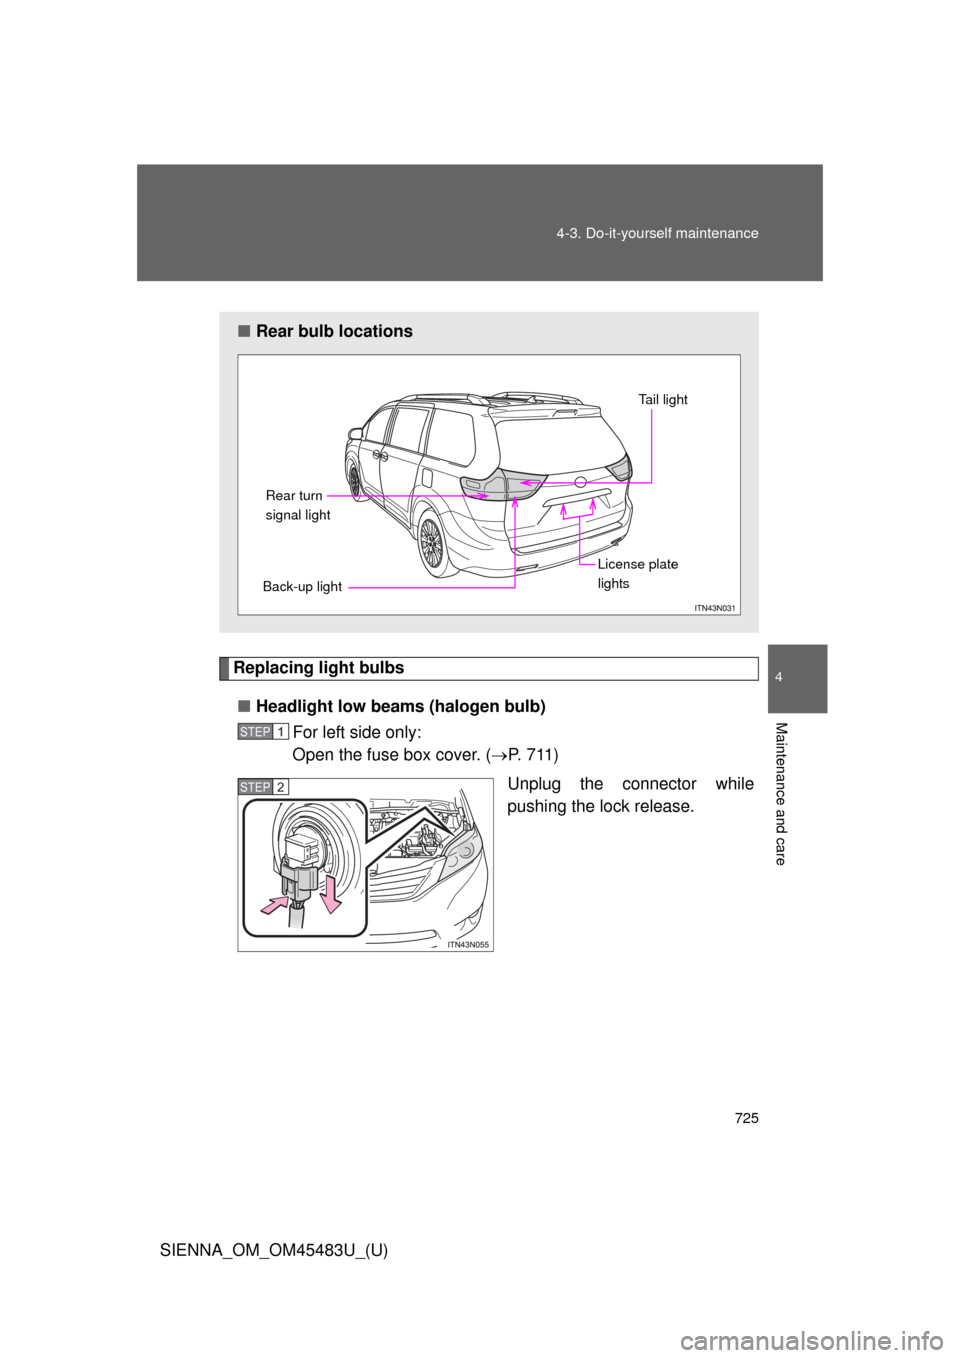
■ Headlight low beams (halogen bulb)
For left side only:
Open the fuse box cover. ( P. 7 1 1 )
Unplug the connector while
pushing the lock release.
■ Rear bulb locations
Back-up lightRear turn
signal light
License plate
lightsTail light
STEP1
STEP2
Page 728 of 872
728 4-3. Do-it-yourself maintenance
SIENNA_OM_OM45483U_(U)■
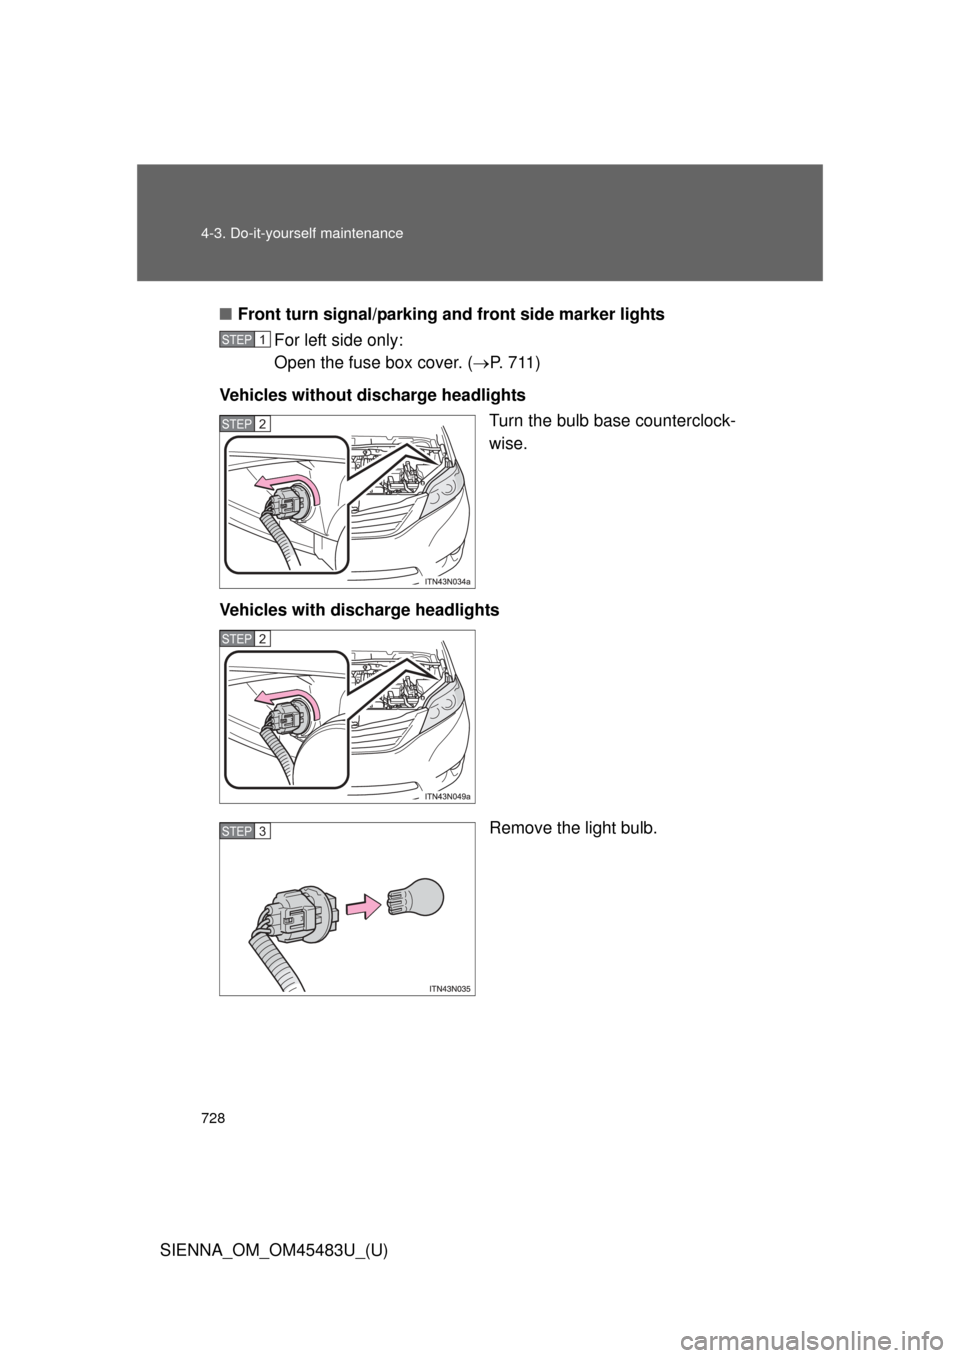
Front turn signal/parking and front side marker lights
For left side only:
Open the fuse box cover. ( P. 7 1 1 )
Vehicles without discharge headlights Turn the bulb base counterclock-
wise.
Vehicles with discharge headlights
Remove the light bulb.
STEP1
STEP2
STEP2
STEP3
Page 729 of 872
729
4-3. Do-it-yourself maintenance
4
Maintenance and care
SIENNA_OM_OM45483U_(U)
■
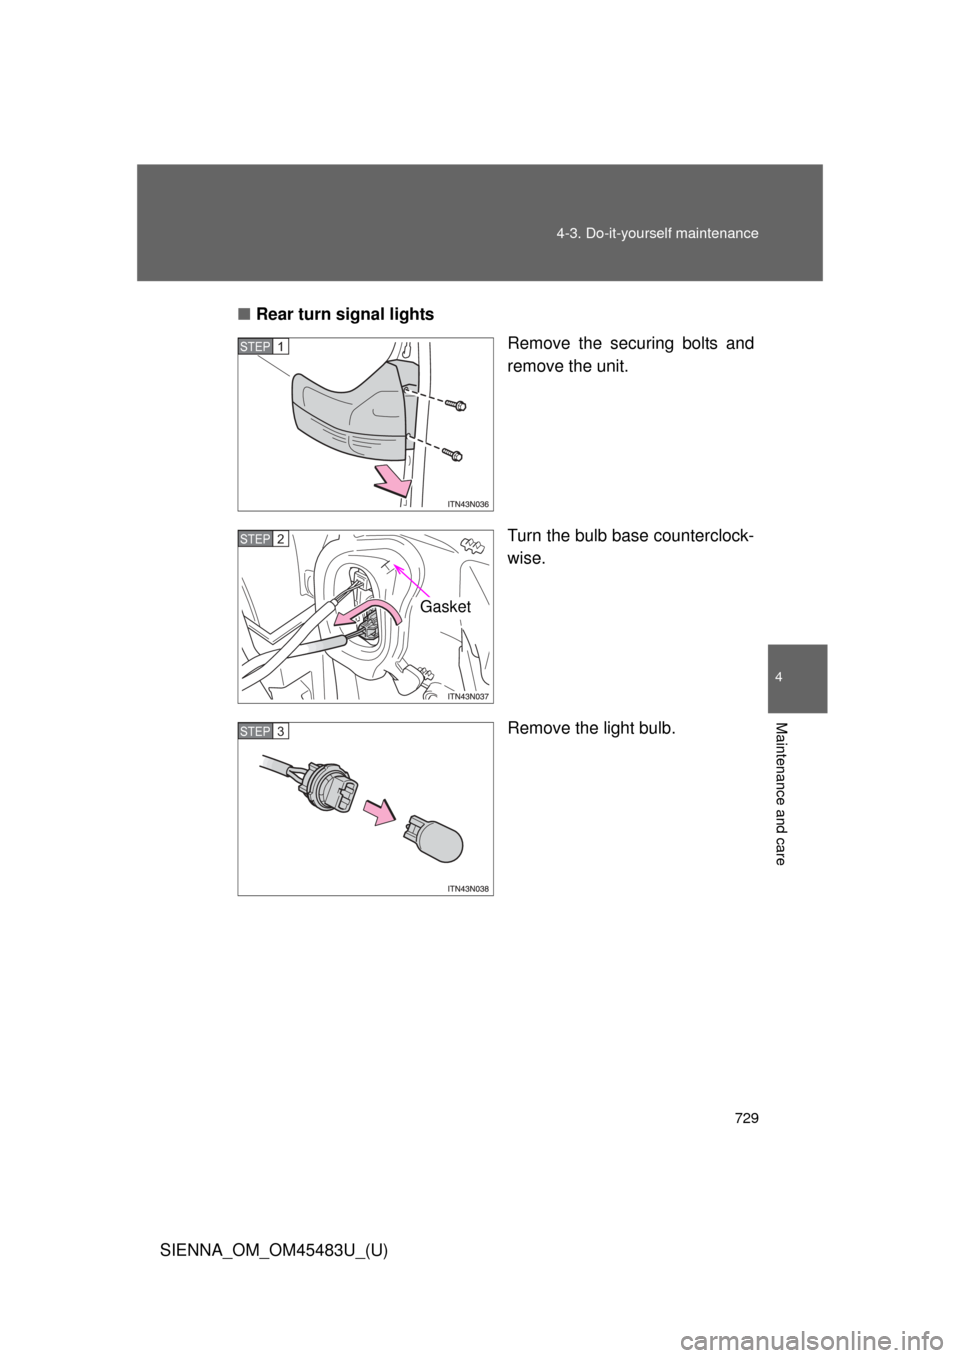
Rear turn signal lights
Remove the securing bolts and
remove the unit.
Turn the bulb base counterclock-
wise.
Remove the light bulb.
STEP1
STEP2
Gasket
STEP3
Page 732 of 872
732 4-3. Do-it-yourself maintenance
SIENNA_OM_OM45483U_(U)■
Lights other than the above
If any of the lights listed below has burnt out, have it replaced by
your Toyota dealer.
● Headlight low beams (discharge bulbs)
● High mounted stoplight
● Side turn signal light (if equipped)
● Stop/tail and rear side marker lights
● Outer foot lights (if equipped)
■Discharge headligh ts (if equipped)
If voltage to the discharge bulbs is insufficient, the bulbs may not come on,
or may go out temporarily. The discharge bulbs will come on when normal
power is restored.
■ LED lights
The stop/tail, side turn signal light, rear side marker lights and high mounted
stoplight consists of a number of LEDs. If any of the LEDs burn out, take
your vehicle to your Toyota dealer to have the light replaced.
■ Condensation build-up on the inside of the lens
Temporary condensation build-up on the inside of the headlight lens does
not indicate a malfunction. Contact your Toyota dealer for more information
in the following situations:
● Large drops of water have built up on the inside of the lens.
● Water has built up inside the headlight.
■ When replacing light bulbs
P. 723
Page 734 of 872
734 4-3. Do-it-yourself maintenance
SIENNA_OM_OM45483U_(U)
CAUTION
■Discharge headligh ts (if equipped)
● Contact your Toyota dealer before replacing discharge headlights (includ-
ing light bulbs).
● Do not touch the discharge headlight’s high voltage socket when the head-
lights are turned on.
An extremely high voltage of 30000 V will be discharged and could result
in serious injury or death by electric shock.
● Do not attempt to take apart or repair the low beam headlight bulbs, con-
nectors, power supply circuits, or related components.
Doing so could result in electric shock and serious injury or death.
■ When replacing the rear turn signal lights
Inspect the gasket for any damage (rip, tear, hole, etc.). If there is any dam-
age, please contact your Toyota dealer and have the gasket replaced.
Improper installation of the gasket may result in water entering the rear light
unit.
■ To prevent damage or fire
Make sure bulbs are fully seated and locked.
NOTICE
■When installing the back door trim
To prevent damage, be careful not to pinch any of the wire harnesses or
connectors with the back door trim.
Page 809 of 872
809
6-1. Specifications
6
Vehicle specifications
SIENNA_OM_OM45483U_(U)
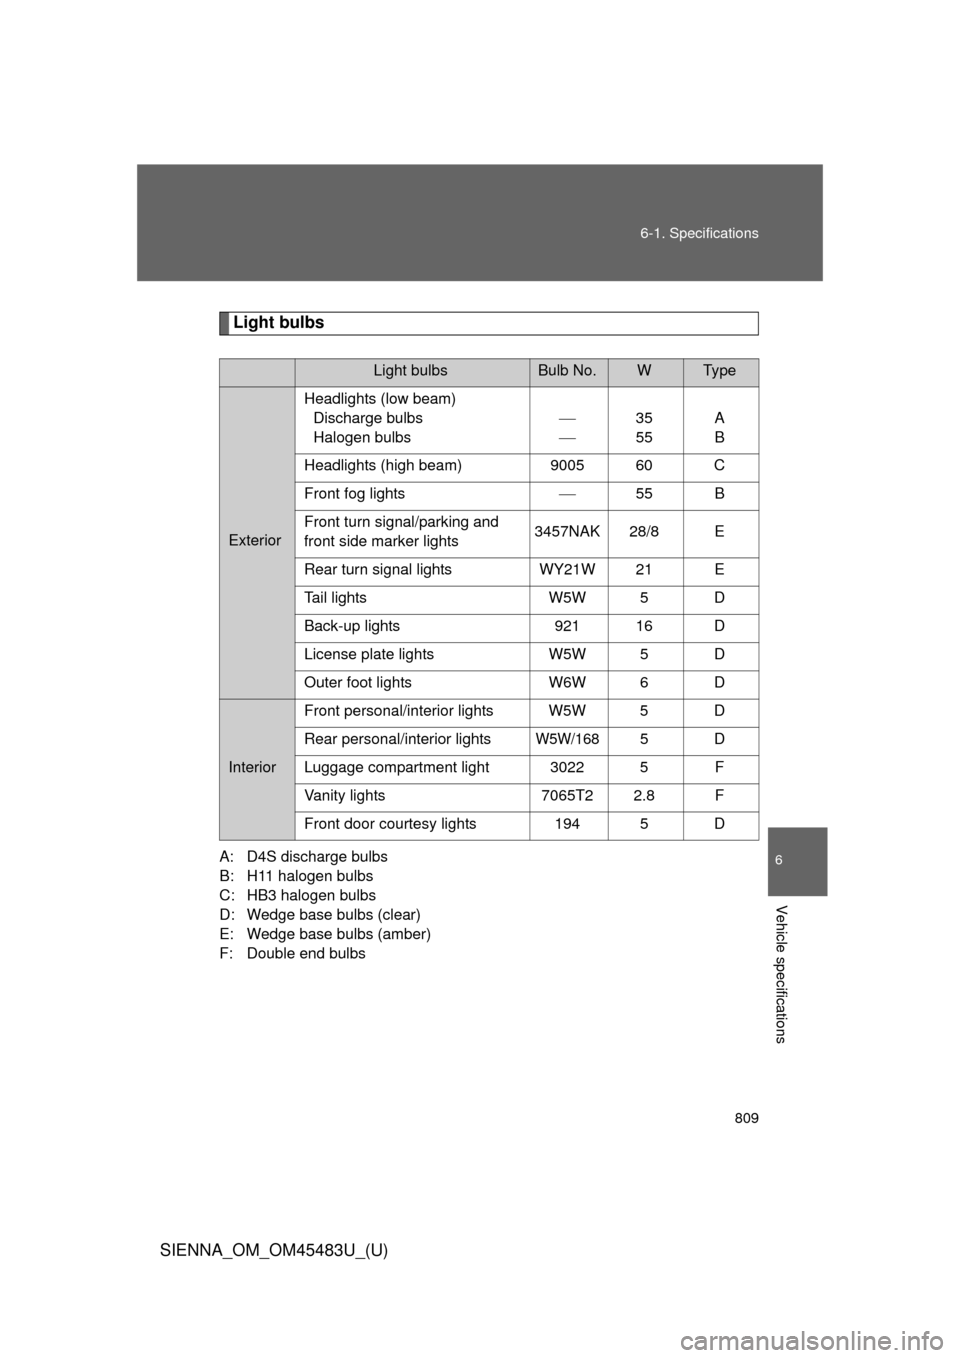
Light bulbs
A: D4S discharge bulbs
B: H11 halogen bulbs
C: HB3 halogen bulbs
D: Wedge base bulbs (clear)
E: Wedge base bulbs (amber)
F: Double end bulbs
Light bulbsBulb No.WTy pe
Exterior
Headlights (low beam)
Discharge bulbs
Halogen bulbs
35
55 A
B
Headlights (high beam) 9005 60 C
Front fog lights 55 B
Front turn signal/parking and
front side marker lights 3457NAK 28/8 E
Rear turn signal lights WY21W 21 E
Tail lights W5W 5 D
Back-up lights 921 16 D
License plate lights W5W 5 D
Outer foot lights W6W 6 D
InteriorFront personal/interior lights W5W 5 D
Rear personal/interior lights
W5W/1685D
Luggage compartment light 3022 5 F
Vanity lights 7065T2 2.8 F
Front door courtesy lights 194 5 D