Page 25 of 52
OVERVIEW ELECTRIC VEHICLE SYSTEMFEATURES/OPERATIONS
SAFETY AND EMERGENCY FEATURES
23
Step 8 When charging schedule is only set for some days of the week:
If “Keep My Schedule” is touched, setting the charging schedule is done and the
EV screen returns. Touch “Return to Schedule Setup” to set the charging schedule
for additional days.
Step 9 When charging schedule is set for each day of the week:
A screen advising that settings have been completed appears. The EV screen
returns after a few seconds.
Page 26 of 52
24
ELECTRIC VEHICLE SYSTEM
Add a one-time departure
Step 1 Turn the EV System off. If a charge schedule has been previously set,
the following charge settings screen will be displayed. If no actions are
performed, screen will turn off after 30 seconds.
Step 2 Touch “Edit.”
Step 3 Touch “Yes.”
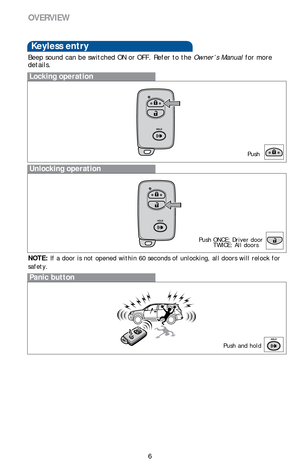
Step 4 Flick the schedule to the desired day and time for charging and/or
Pre-climate completion. Select Charge Only, Pre-climate Only or Charge &
Pre-climate. Touch Save.
Charge Only schedule setting
Pre-climate Only schedule setting
Charging and Pre-climate
schedule setting
Step 5 The set schedule will be displayed. To change the set action or schedule,
return to Step 2.
Step 6 Plug in the charging cable.
Page 27 of 52

OVERVIEW ELECTRIC VEHICLE SYSTEMFEATURES/OPERATIONS
SAFETY AND EMERGENCY FEATURES
25
Extended charge mode
Step 1 Turn the EV System off. The screen will change to the charging schedule
screen. The screen will turn off after about 30 seconds if no operations
are performed. Depending on “Charging & Pre-climate Setup” settings, the
displayed screen will differ.
Step 2 Touch “Extended Charge.”
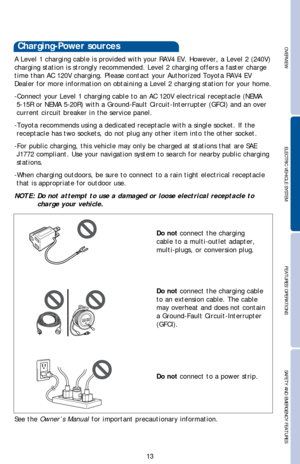
Charge modes
The RAV4 EV has two charge modes which can be selected depending on your
intended usage.
* An approximation based on a traction battery without any capacity deterioration.
This value will fluctuate depending on conditions such as air conditioning system
usage, road conditions, years of usage, etc.
Changing to extended charge mode
Charge
modeCharge
amount*Details
Normal
charge
modeApprox.
80%Maximizes traction battery life.
Recommended whenever long distance driving
is not necessary.
Extended
charge
modeApprox.
100%Maximizes driving range on a single charge.
However, frequent use of this mode may
shorten traction battery life.
Page 28 of 52
26
ELECTRIC VEHICLE SYSTEM
Step 3 Read screen and touch “YES” to continue to Extended Charge mode.
Touching “NO” will cause previous screen to return.
Step 4 When settings are completed, the “Extended Charge” screen button
indicator illuminates. Touching “NO” will cause previous screen to return.
If “Extended Charge” is touched
again, the indicator goes off and
the system returns to normal
charge mode.
NOTE: The charge mode will remain on the last mode selected (either extended or
normal) and default to that mode the next time the vehicle is charged.
Page 29 of 52

OVERVIEW ELECTRIC VEHICLE SYSTEMFEATURES/OPERATIONS
SAFETY AND EMERGENCY FEATURES
27
Charging and Pre-climate results While charging/Pre-climate operations are being
performed or after they are finished, the following information is displayed for 30
seconds when the driver’s door is opened.
Plug connection status
Current charging status
Estimated charging time (both 120V and 240V)
When the plug is connected, only the voltage of the connected receptacle
is displayed.
Pre-climate status
Departure time*
* If Pre-climate operations are performed using a smartphone, this will not be
displayed even if the driver’s door is opened.
In the following conditions, only the plug connection information will be displayed:
- When the POWER switch is turned to ON mode after charging/Pre-climate
operations.
- When the charging/Pre-climate schedule is not set.
Note: If Pre-climate operations are performed using a smartphone, Pre-climate
results will be displayed.
Multi-Information Display-Charging
information
Page 30 of 52
28
ELECTRIC VEHICLE SYSTEM
Confirming charge settings
The amount of charge remaining in the traction battery and charging/Pre-climate
schedule settings can be confirmed, and the schedule can be adjusted according
to your next departure time.
Step 1 Touch EV.
Step 2 Touch “Charge Summary.”
The next scheduled charge (if previously set) will also be shown on this screen. If
an earlier charge time is desired, a one-time departure may be scheduled here.
Step 3 Touch “Edit.”
Step 4 Touch “Yes.”
The previously scheduled charge
will be ignored until the one-time
departure is completed.
Charging information and warning messages The first time the POWER switch is
turned to ON mode after charging is completed, a message detailing the results
of the charge is shown. Also, if an operation that cannot be carried out during
charging was attempted, a warning message will be shown.
For details on setting one-time departure, see Charging section.
Page 31 of 52

OVERVIEW ELECTRIC VEHICLE SYSTEMFEATURES/OPERATIONS
SAFETY AND EMERGENCY FEATURES
29
In the unlikely event that the electrical leakage detection function is not
operating properly, contact your Toyota dealer as soon as possible.
Check that it is operating properly by following the procedure below.
Step 1 Insert the charging cable into the electrical receptacle of the external
power source.
Step 2 Press the test button on the CCID (Charging Circuit Interrupting Device).
If the error warning indicator
illuminates when the test button
is pressed, the function is
operating correctly.
Step 3 Press the reset button on the CCID (Charging Circuit Interrupting Device).
Turn off the error warning indicator. Charging cannot be carried out while the
error warning indicator is illuminated.
Charging can be continued by following the normal procedure. Store the charging
cable when not in use.
See the Owner’s Manual for important precautionary information.
Inspecting electrical leakage
detection function
Page 32 of 52
30
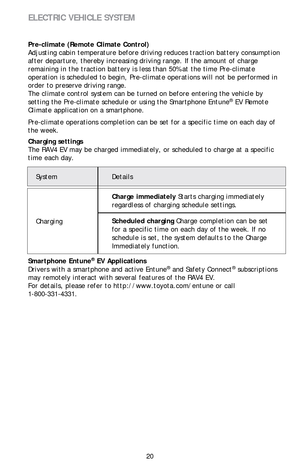
Parking brake
FEATURES/OPERATIONS
Transmission
*
The regenerative brake is the equivalent of downshifting. Shift to “B” when
regenerative braking is desired (i.e. downhill driving, coasting to a stop, etc.).
Park button
Reverse
Neutral
Drive
Regenerative brake*
SPORT Mode
By increasing the motor’s output when compared to normal mode, the vehicle’s
acceleration power and maximum speed is increased. This mode provides a more
dynamic driving experience.
Refer to the Owner’s Manual for more details.
Push
Pull
(2) Push(1) Pull slightly
(3) Lower
Set Release