Page 358 of 724
358 3-2. Using the audio system
LC200_OM_OM60L09U_(U)
Setting station presets (excluding XM® Satellite Radio)
Search for desired stations by turning or pressing “ ” or
“ ” on .
Press and hold the button (from to ) the sta-
tion is to be set to, and you hear a beep.
Scanning radio stations (excluding XM® Satellite Radio)
■ Scanning the preset radio stations
Press and hold until you hear a beep.
Preset stations will be played for a few seconds each.
When the desired station is reached, press once
again.
■ Scanning all radio stations within range
Press .
“SCAN” appears on the display and all stations with reception
will be played for a few seconds each.
When the desired station is reached, press once
again.
STEP1
STEP2
STEP1
STEP2
STEP1
STEP2
Page 359 of 724
359
3-2. Using the audio system
3
Interior features
LC200_OM_OM60L09U_(U)
XM® Satellite Radio (type A)
■ Receiving XM
® Satellite Radio
Press .
The display changes as follows each time the button is pressed.
“SAT1” “SAT2” “SAT3”
Turn to select a desired channel from all the categories
or press “ ” or “ ” on to select a desired
channel in the current category.
■ Presetting XM
® Satellite Radio channels
Select the desired channel. Press and hold the button (from to ) until you hear a beep.
■ Changing the channel category
Press “ ” or “ ” on .
■ Scanning XM
® Satellite Radio channels
● Scanning channels in the current category
Press .
When the desired channel is reached, press the buttonagain.
● Scanning preset channels
Press and hold until you hear a beep.
When the desired channel is reached, press the buttonagain.
STEP1
STEP2
STEP1
STEP2
STEP1
STEP2
Page 361 of 724

361
3-2. Using the audio system
3
Interior features
LC200_OM_OM60L09U_(U)
■
Displaying radio text messages
Press .
If MSG is shown on the display, a text message will be displayed.
If the text continues past the end of the display, is displayed. Press
and hold until you hear a beep.
■Traffic announcement
Press .
“TRAF SEEK” appears on the display, and the radio will start seeking
any station broadcasting traffic program information.
If no traffic program station is found, “NO TRAF INFO” appears on the
display.
■ When the battery is disconnected
All preset stations are erased.
■ Reception sensitivity
●Maintaining perfect radio reception at all times is difficult due to the con-
tinually changing position of the antenna, differences in signal strength
and surrounding objects, such as trains, transmitters, etc.
● The radio antenna is mounted inside the rear quarter window. To main-
tain clear radio reception, do not attach metallic window tinting or other
metallic objects to the antenna wire mounted inside the rear quarter win-
dow.
Page 385 of 724

385
3-2. Using the audio system
3
Interior features
LC200_OM_OM60L09U_(U)
■
iPod problems
To resolve most problems encountered when using your iPod, disconnect
your iPod from the vehicle iPod connection and reset it.
For instructions on how to reset your iPod, refer to your iPod Owner’s Man-
ual.
■ Display
P. 369
■ Error messages
“ERROR”:This indicates a problem in the iPod or its connection.
“NO MUSIC”:This indicates that there is no music data in the iPod.
“EMPTY”: This indicates that an empty playlist is selected.
“UPDATE”: This indicates that the version of the iPod is not compatible.
Upgrade your iPod software to the latest version.
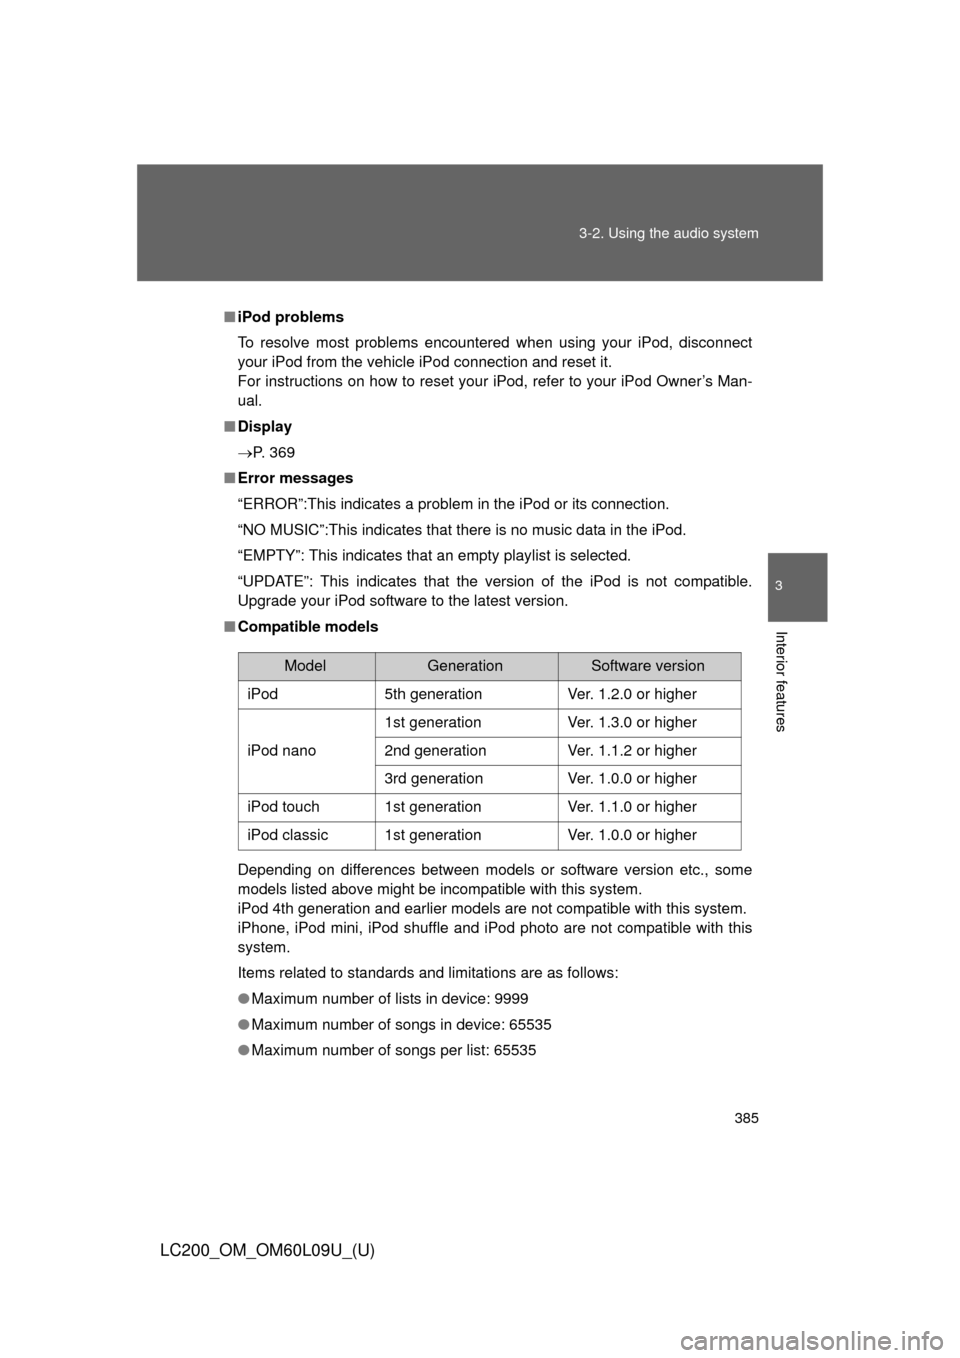
■ Compatible models
Depending on differences between models or software version etc., some
models listed above might be incompatible with this system.
iPod 4th generation and earlier models are not compatible with this system.
iPhone, iPod mini, iPod shuffle and iPod photo are not compatible with this
system.
Items related to standards and limitations are as follows:
●Maximum number of lists in device: 9999
● Maximum number of songs in device: 65535
● Maximum number of songs per list: 65535
ModelGenerationSoftware version
iPod5th generationVer. 1.2.0 or higher
iPod nano
1st generationVer. 1.3.0 or higher
2nd generationVer. 1.1.2 or higher
3rd generationVer. 1.0.0 or higher
iPod touch1st generationVer. 1.1.0 or higher
iPod classic1st generationVer. 1.0.0 or higher
Page 438 of 724
438 3-4. Using the hands-free system (for cellular phone)
LC200_OM_OM60L09U_(U)
Speed dialingPress the off-hook switch.
Press the preset button in wh ich the desired number is regis-
tered.
Press the off-hook switch.
When receiving a phone call
■ Answering the phone
Press the off-hook switch.
■ Refusing the call
Press the on-hook switch.
Transferring a call
A call can be transferred between the cellular phone and system
while dialing, receiving a call, or during a call. Use one of the follow-
ing methods:
a. Operate the cellular phone.
Refer to the manual that comes with the cellular phone for the oper-
ation of the phone.
b. Press the off-hook switch*1.
c. Press the talk switch and say “Call Transfer”
*2.
*1:This operation can be performed only when transferring a call from the cellular phone to the system during a call.
*2:While the vehicle is in motion, a call cannot be transferred from
the system to the cellular phone.
STEP1
STEP2
STEP3
Page 459 of 724
459
3-4. Using the hands-free
system (for cellular phone)
3
Interior features
LC200_OM_OM60L09U_(U)Pattern A
Select the data to be registered as a speed dial by either of
the following methods, and select “Confirm” using a voice
command or .
a. Press the talk sw itch, say desired name.
b. Press the talk switch, and say “List names”. When the
desired name is read aloud, press the talk switch.
Pattern B
Select the desired data using .
Select the desired preset butt on, and register the data into
speed dial by either of the following methods:
a. Press the desired preset butto n, and select “Confirm” using
a voice command or .
b. Press and hold the desired preset button.
STEP2
STEP2
STEP3
Page 461 of 724
461
3-4. Using the hands-free
system (for cellular phone)
3
Interior features
LC200_OM_OM60L09U_(U)
Deleting speed dials
Select “Delete Speed Dial (Del Spd Dial)” using a voice com-
mand or .
Press the preset button in which the desired speed dial is reg-
istered, and select “Confirm” using a voice command or
.
■Limitation of number of digits
A phone number that exceeds 24 digits cannot be registered.
STEP1
STEP2
Page 519 of 724

519
4-2. Maintenance
4
Maintenance and care
LC200_OM_OM60L09U_(U)
■
Reset the maintenance data
After the required maintenance is performed according to the maintenance
schedule, please reset the maintenance data.
To reset the data, follow the procedures described below:
Switch the display to the trip meter A when the engine is running.
(P. 180)
Turn the “ENGINE START STOP” switch OFF.
While pressing the trip meter reset button, set the “ENGINE START
STOP” switch to IGNITION ON mode (but do not start the engine
because otherwise the reset mode will be canceled). Continue to
press and hold the button until the multi-information display indi-
cates that the reset is complete.
■ Allow inspection and repairs to be performed by a Toyota dealer
● Toyota technicians are well-trained specialists and are kept up to date
with the latest service information. They are well informed about the
operations of all systems on your vehicle.
● Keep a copy of the repair order. It proves that the maintenance that has
been performed is under warranty coverage. If any problem should arise
while your vehicle is under warranty, your Toyota dealer will promptly
take care of it.
STEP1
STEP2
STEP3