Page 89 of 356
89
2. RADIO OPERATION
3
AUDIO/VISUAL SYSTEM
INFORMATION
●The tag information can not be pre-
served while scanning or caching the
radio station.
●If tagging the music information fails,
“Saving the HD Radio tag was unsuc-
cessful.” will be displayed on the screen.
If this occurs, tag the information again.
●HD Radio™ stations can be preset.
●An orange “HD)” logo indicator will be
displayed on the screen when in digital.
The “HD)” logo will first appear in a gray
color indicating the station is indeed (an
analog and) a digital station. Once the
digital signal is acquired, the logo will
change to a bright orange color.
●The song title and artist name will
appear on the screen when available by
the radio station. The radio station can
send album pictures when available.
●As a user works through the analog
radio stations, (where applicable) the
radio receiver will automatically tune
from an analog signal to a digital signal
within 5 seconds.
Page 90 of 356

90
2. RADIO OPERATION
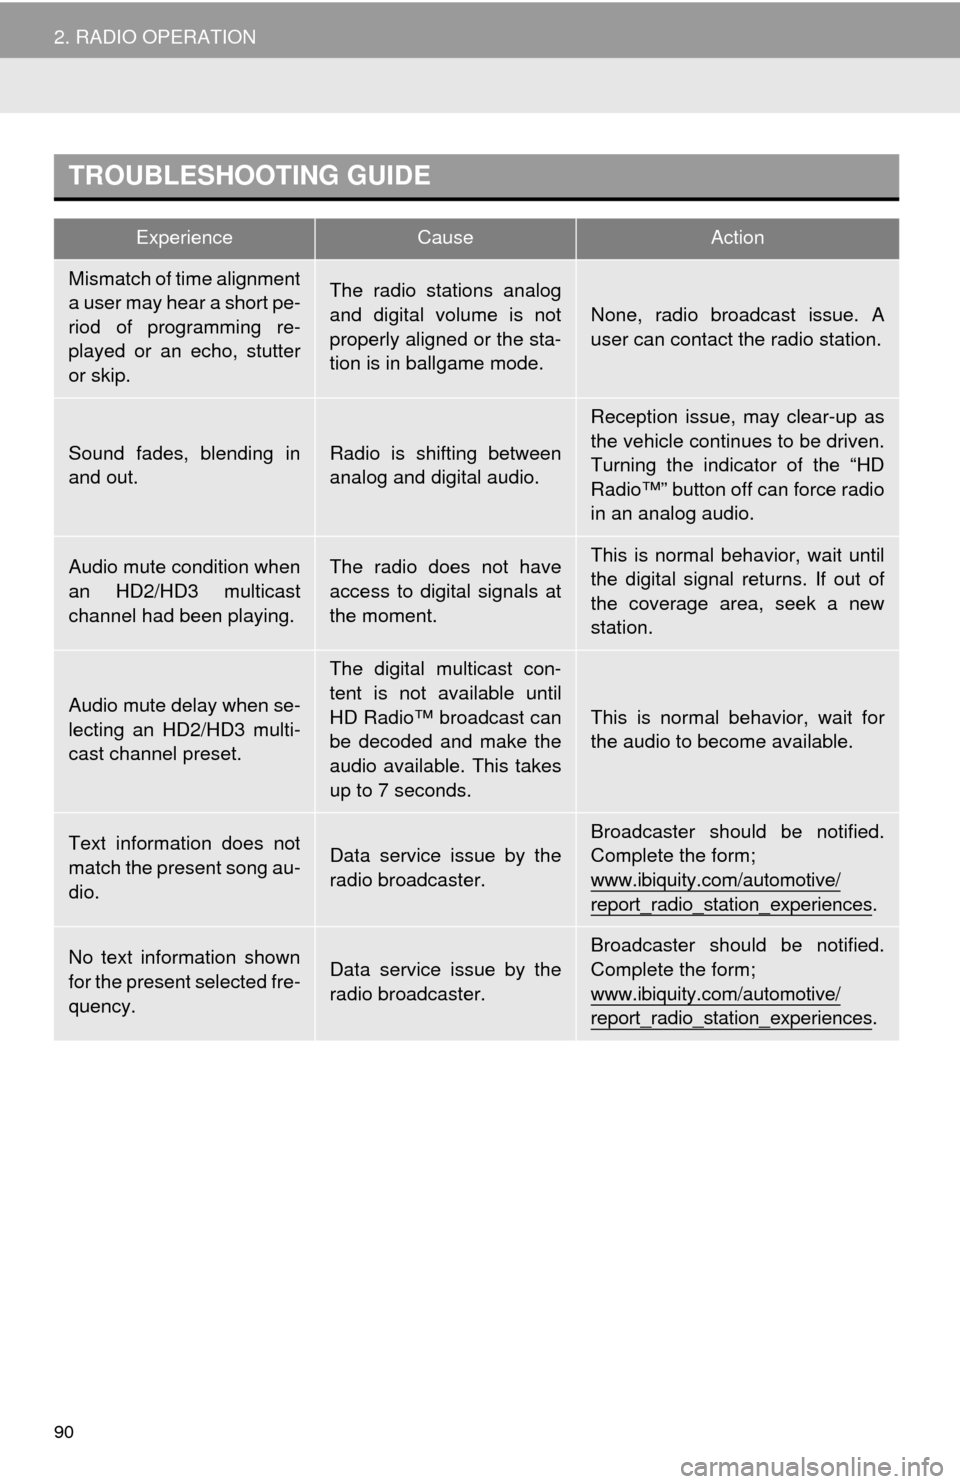
TROUBLESHOOTING GUIDE
ExperienceCauseAction
Mismatch of time alignment
a user may hear a short pe-
riod of programming re-
played or an echo, stutter
or skip.The radio stations analog
and digital volume is not
properly aligned or the sta-
tion is in ballgame mode.
None, radio broadcast issue. A
user can contact the radio station.
Sound fades, blending in
and out.Radio is shifting between
analog and digital audio.
Reception issue, may clear-up as
the vehicle continues to be driven.
Turning the indicator of the “HD
Radio™” button off can force radio
in an analog audio.
Audio mute condition when
an HD2/HD3 multicast
channel had been playing.The radio does not have
access to digital signals at
the moment.This is normal behavior, wait until
the digital signal returns. If out of
the coverage area, seek a new
station.
Audio mute delay when se-
lecting an HD2/HD3 multi-
cast channel preset.
The digital multicast con-
tent is not available until
HD Radio™ broadcast can
be decoded and make the
audio available. This takes
up to 7 seconds.
This is normal behavior, wait for
the audio to become available.
Text information does not
match the present song au-
dio.Data service issue by the
radio broadcaster.
Broadcaster should be notified.
Complete the form;
www.ibiquity.com/automotive/
report_radio_station_experiences.
No text information shown
for the present selected fre-
quency.Data service issue by the
radio broadcaster.
Broadcaster should be notified.
Complete the form;
www.ibiquity.com/automotive/
report_radio_station_experiences.
Page 92 of 356

92
2. RADIO OPERATION
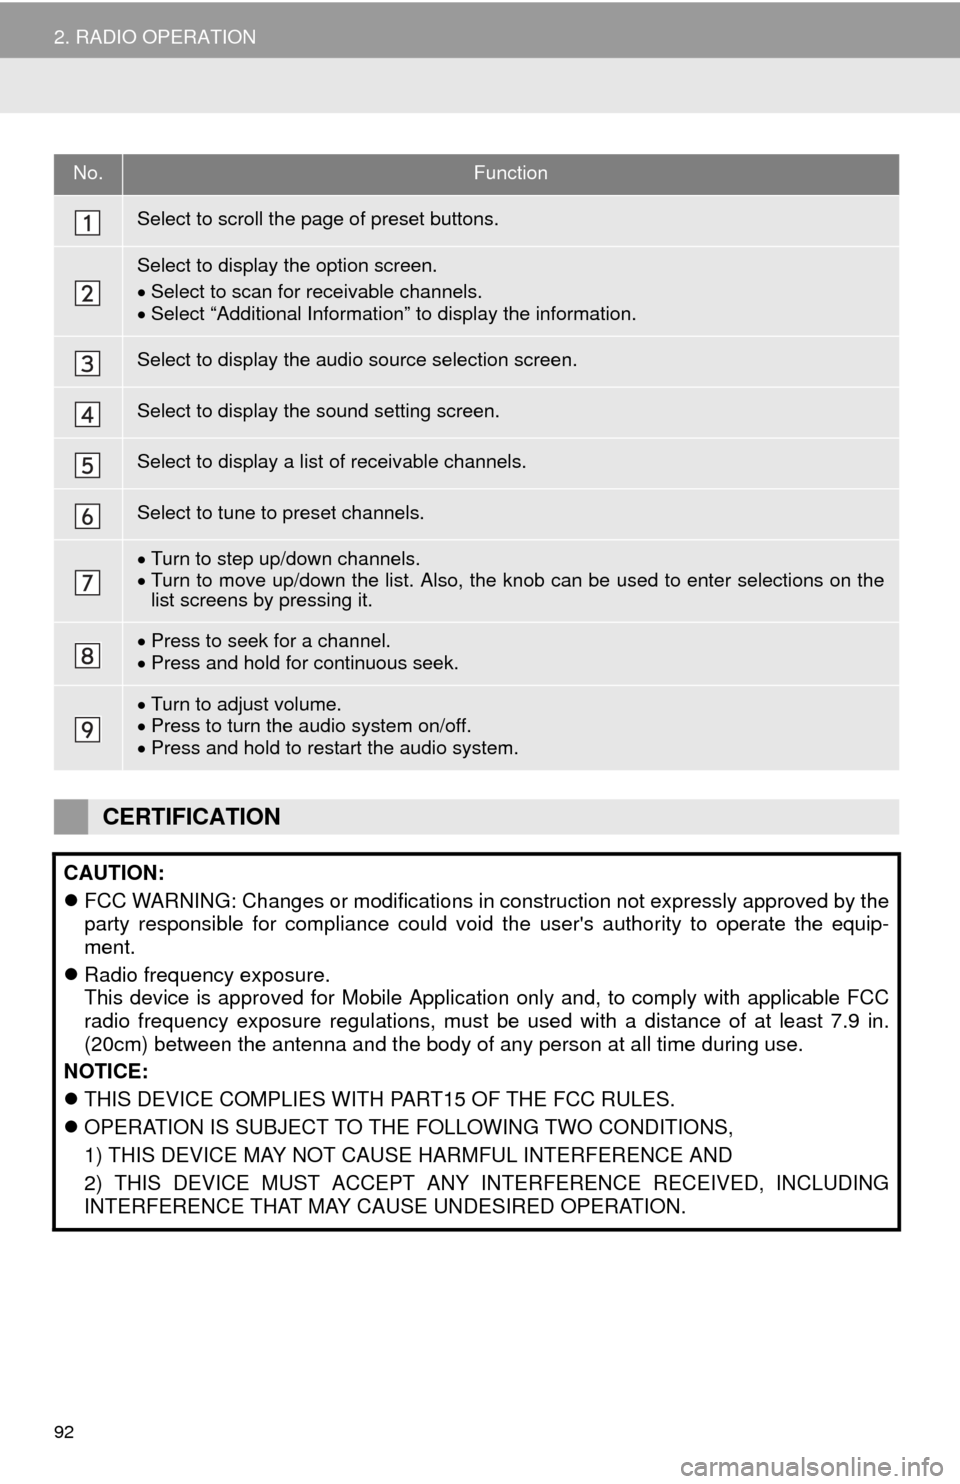
No.Function
Select to scroll the page of preset buttons.
Select to display the option screen.
Select to scan for receivable channels.
Select “Additional Information” to display the information.
Select to display the audio source selection screen.
Select to display the sound setting screen.
Select to display a list of receivable channels.
Select to tune to preset channels.
Turn to step up/down channels.
Turn to move up/down the list. Also, the knob can be used to enter selections on the
list screens by pressing it.
Press to seek for a channel.
Press and hold for continuous seek.
Turn to adjust volume.
Press to turn the audio system on/off.
Press and hold to restart the audio system.
CERTIFICATION
CAUTION:
FCC WARNING: Changes or modifications in construction not expressly approved by the
party responsible for compliance could void the user's authority to operate the equip-
ment.
Radio frequency exposure.
This device is approved for Mobile Application only and, to comply with applicable FCC
radio frequency exposure regulations, must be used with a distance of at least 7.9 in.
(20cm) between the antenna and the body of any person at all time during use.
NOTICE:
THIS DEVICE COMPLIES WITH PART15 OF THE FCC RULES.
OPERATION IS SUBJECT TO THE FOLLOWING TWO CONDITIONS,
1) THIS DEVICE MAY NOT CAUSE HARMFUL INTERFERENCE AND
2) THIS DEVICE MUST ACCEPT ANY INTERFERENCE RECEIVED, INCLUDING
INTERFERENCE THAT MAY CAUSE UNDESIRED OPERATION.
Page 95 of 356
95
2. RADIO OPERATION
3
AUDIO/VISUAL SYSTEM
If “Ch 000” is selected using the “TUNE/
SCROLL” knob, the ID code, which is 8
alphanumeric characters, will be dis-
played. If another channel is selected, the
ID code will no longer be displayed. The
channel (000) alternates between display-
ing the radio ID and the specific radio
code.
1Tune in the desired channel.
2Select “(add new)”.
To change the preset channel to a differ-
ent one, select and hold the preset station/
channel.
3Select “Yes” on the confirmation
screen.
4Select “OK” after setting the new pre-
set channel.
1Select “Channel List”.
2Select the desired program genre.
3Select the desired channel and select
“OK”.
DISPLAYING THE RADIO ID
Each XM tuner is identified with a
unique radio ID. The radio ID is re-
quired when activating an XM service
or when reporting a problem.
PRESETTING A CHANNEL
SELECTING A CHANNEL
FROM THE LIST
Page 119 of 356
119
4. AUDIO/VISUAL REMOTE CONTROLS
3
AUDIO/VISUAL SYSTEM
“ ” switch
“ ” switch*
1
Enter switch*1 (except audio control screen)
ModeOperationFunction
AM/FM Radio
PressPreset station/channel up/down
Station/channel list up/down
Press and hold*1Fast preset station/channel up/down
Fast station/channel list up/down
XM
PressPreset channel up/down
Channel list up/down
Press and holdFast preset channel up/down
Fast channel list up/down
Audio CD, MP3/
WMA/AAC disc,
USB, iPod, BT
audioPressTrack/file up/down
Track/file list up/down
Press and hold*1Fast track/file up/down
Fast track/file list up/down
Press and hold*2Fast forward/rewind
ModeOperationFunction
AM/FM Radio
PressSeek up/down
Press and holdSeek up/down continuously while the switch is being
pressed
XMPressType seek up/down
Press and holdFast channel up/down
Audio CD, MP3/
WMA/AAC disc,
USB, iPod, BT
audio
Press and holdFast forward/rewind
ModeOperationFunction
Home
screenPressReturn to the top screen of current mode.
Page 122 of 356
122
5. SETUP
1Display the “Audio Settings” screen.
(P.121)
2Select “Number of Radio Presets”.
3Select the button with the desired num-
ber to be displayed.
1Display the “Audio Settings” screen.
(P.121)
2Select “iPod Video Sound Input”
(“iPod Sound Input”).
3Select a screen button for the desired
setting.
1Display the “Audio Settings” screen.
(P.121)
2Select “Video Input Mode”.
3Select a screen button for the desired
setting.
No.FunctionPage
Select to change the num-
ber of preset radio sta-
tions/channels displayed
on the screen.
122
Select to set the iPod au-
dio signal input settings.122
Select to set the video sig-
nal format settings.122
Select to set cover art set-
tings on/off.
Select to set automatic
sound levelizer.77
*1Select to create a feeling
of presence.77
*2Select to enable cache ra-
dio.
Select to reset all setup
items.
*
1: If equipped
*2: With navigation function
SETTING THE NUMBER OF
RADIO PRESETS
iPod SETTINGS
EXTERNAL VIDEO SETTINGS
Page 153 of 356
153
7. REAR SEAT ENTERTAINMENT SYSTEM OPERATION
3
AUDIO/VISUAL SYSTEM
■CHANGING THE INITIAL LAN-
GUAGE OF THE DISC MENU
1Select “Disc Menu Language”.
2Select the desired language.
If you cannot find the desired language,
select “Other” and input the desired lan-
guage code. (P.157)
■SETTING THE ANGLE MARK
1Each time “Angle Mark” is selected,
“ON” or “OFF” can be selected.
■SETTING THE DVD PARENTAL
LOCK
DVD video
1Select “DVD Parental Lock”.
2Input the 4-digit personal code and
then select “OK”.
Select 10 times to reset the per-
sonal code in case the code was forgot-
ten.
3Select a restriction level (1-8) and then
select “OK”.
If the BD/DVD disc has angle options,
you can turn the angle mark on/off.
The level of viewer restrictions can be
set.
Page 154 of 356
154
7. REAR SEAT ENTERTAINMENT SYSTEM OPERATION
■SETTING THE BD PARENTAL
LOCK
BD video
1Select “BD Parental Lock”.
2Input the 4-digit personal code and
then select “OK”.
Select 10 times to reset the personal
code in case the code was forgotten.
3Input a restriction age (0-255) and then
select “OK”.
■SETTING A QUICK PLAYBACK
BD video
Each time “Quick Playback” is selected,
“ON” or “OFF” can be selected.
■SETTING A SOUND DYNAMIC
RANGE
Each time “Sound Dynamic Range” is
selected, the setting changes in the follow-
ing order:
“MAX”: Maximum dynamic range
“STD”: Standard dynamic range
“MIN”: Minimum dynamic range
The age of viewer restrictions can be
set.
After inserting a BD disc you can skip
over to the first playback point and can
immediately playback the main story.
The difference between the lowest and
highest sound volumes can be adjust-
ed.