2014 TOYOTA DYNA 100/150 flat tire
[x] Cancel search: flat tirePage 142 of 232
136STARTING AND DRIVING
TIRES
DEnsure that your vehicle’s tires are
properly inflated. See page 193 in Sec-
tion 7−2 and page 218 in Section 8 for
instructions.
DThe trailer tires should be inflated to
the pressure recommended by the trail-
er manufacturer in respect to the total
trailer weight.
TRAILER LIGHTS
DCheck for correct operation of the turn
signals and stop lights each time you
hitch up. Direct splicing may damage
your vehicle’s electrical system and
cause a malfunction of your lights.
BREAK−IN SCHEDULE
DToyota recommends that you do not
tow a trailer with a new vehicle or a
vehicle with any new power train com-
ponent (engine, transmission, differen-
tial, wheel bearing, etc.) for the first
800 km (500 miles) of driving.
MAINTENANCE
DIf you tow a trailer, your vehicle will
require more frequent maintenance due
to the additional load.
DRetighten all fixing bolts of the towing
ball and bracket after approximately
1000 km (600 miles) of trailer driving.
PRE−TOWING SAFETY CHECK
DBe sure not to exceed designated max-
imum load for the ball coupling of the
towing bracket. Please remember that
the ball coupling load will increase the
load on the vehicle. Maximum permissi-
ble rear axle capacity must not be ex-
ceeded.
DMake sure the trailer cargo is securely
loaded so that it cannot shift.
DIf the traffic behind the trailer cannot
be seen properly with the standard rear
view mirrors, additional outside mirrors
will be necessary. Both outside mirrors
must be fitted on folding arms and ad-
justed to give a good rear view at all
times.
TRAILER TOWING TIPS
Your vehicle will handle differently
when towing a trailer. In order to avoid
accident, death or serious injury, keep
the following in mind when towing:
DBefore starting out, check operation of
the lights and all vehicle−trailer connec-
tions. After driving a short distance,
stop and recheck the lights and con-
nections. Before actually towing a trail-
er, practice turning, stopping and back-
ing with a trailer in an area away from
traffic until you learn the feel.
DBecause stopping distance may be in-
creased, vehicle−to−vehicle distance
should be increased when towing a
trailer. For each 10 km/h (6 mph) of
speed, allow at least one vehicle and
trailer length between you and the ve-
hicle ahead. Avoid sudden braking as
you may skid, resulting in jackknifing
and loss of control. This is especially
true on wet or slippery surfaces.
DAvoid jerky starts or sudden accelera-
tion. Prevent excessive clutch slippage
by keeping engine rpm low and not
racing the engine. Always start out in
first gear.
DAvoid jerky steering and sharp turns.
The trailer could hit your vehicle in a
tight turn. Slow down before making a
turn to avoid the necessity of sudden
braking.
Dyna100/150_EE
Page 144 of 232
138STARTING AND DRIVING
CAUTION
DObserve the legal maximum speeds
for trailer towing.
DSlow down and downshift before
descending steep or long downhill
grades. Do not make sudden down-
shifts while descending steep or
long downhill grades.
DAvoid holding the brake pedal down
too long or too frequently. This
could cause the brakes to overheat
and result in reduced braking effi-
ciency.
Improving fuel economy is easy—just take
it easy. It will help make your vehicle last
longer, too. Here are some specific tips
on how to save money on both fuel and
repairs:
DKeep your tires inflated at the cor-
rect pressure.Underinflation causes
tire wear and wastes fuel. See page
193 in Section 7−2 for instructions.
DDo not carry unneeded weight in
your vehicle.Excess weight puts a
heavier load on the engine, causing
greater fuel consumption.
DAvoid lengthy warm−up idling.Once
the engine is running smoothly, begin
driving—but gently. Remember, howev-
er, that on cold winter days this may
take a little longer.
DAccelerate slowly and smoothly.
Avoid jackrabbit starts. Get into high
gear as quickly as possible.
DAvoid long engine idling.If you have
a long wait and you are not in traffic,
it is better to turn off the engine and
start again later.
DAvoid engine lugging or over−rev-
ving.Use a gear position suitable for
the road on which you are travelling.
DAvoid continuous speeding up and
slowing down.Stop−and−go driving
wastes fuel.
DAvoid unnecessary stopping and
braking.Maintain a steady pace. Try
to time the traffic signals so you only
need to stop as little as possible or
take advantage of through streets to
avoid traffic lights. Keep a proper dis-
tance from other vehicles to avoid sud-
den braking. This will also reduce wear
on your brakes.
DAvoid heavy traffic or traffic jams
whenever possible.
DDo not rest your foot on the clutch
or brake pedal.This causes premature
wear, overheating and poor fuel econo-
my.
Dyna100/150_EE
How to save fuel and make
your vehicle last longer
Page 147 of 232

IN CASE OF AN EMERGENCY141
Section 4
IN CASE OF AN EMERGENCY
DIf your vehicle will not start 142..........................
DIf your engine stalls while driving 147....................
DIf you cannot increase engine speed 147.................
DIf your vehicle overheats 148...........................
DIf you have a flat tire 149...............................
DIf your vehicle becomes stuck 162.......................
DIf your vehicle needs to be towed 163....................
DIf you lose your keys 166...............................
DIf your vehicle has to be stopped in an emergency 167....
Dyna100/150_EE
Page 155 of 232

IN CASE OF AN EMERGENCY149
1. Reduce your speed gradually, keeping
a straight line. Move cautiously off the
road to a safe place well away from
the traffic. Avoid stopping on the center
divider of a highway. Park on a level
spot with firm ground.
2. Stop the engine and turn on your
emergency flashers.
3. Firmly set the parking brake and put
the transmission in reverse.
4. Have everyone get out of the vehicle
onthesideawayfromtraffic.
5. Read the following instructions thor-
oughly.
CAUTION
When jacking, be sure to observe the
following to reduce the possibility of
death or serious injury:
DFollow jacking instructions.
DDo not put any part of your body
under the vehicle supported by the
jack. Otherwise, death or serious
injury may occur.
DDo not start or run the engine while
your vehicle is supported by the
jack.
DStop the vehicle on a level firm
ground, firmly set the parking brake
and put the transmission in reverse.
Block the wheel diagonally opposite
to the one being changed if neces-
sary.
DMake sure to set the jack properly
in the jack point. Raising the ve-
hicle with jack improperly posi-
tioned will damage the vehicle or
may allow the vehicle to fall off the
jack and cause death or serious in-
jury.
DNever get under the vehicle when
the vehicle is supported by the jack
alone.
DUse the jack only for lifting your
vehicle during wheel changing.
DDo not raise the vehicle with some-
one in the vehicle.
DWhen raising the vehicle, do not
place any objects on top of or un-
derneath the jack.
DRaise the vehicle only high enough
to remove and change the tire.
NOTICE
Do not continue driving with a de-
flated tire. Driving even a short dis-
tance can damage a tire and wheel
beyond repair.
Dyna100/150_EE
If you have a flat tire—
Page 160 of 232

154IN CASE OF AN EMERGENCY
CAUTION
After fixing the tire in place, make
sure that the tire is fixed securely by
pushing it. If the handle is not fas-
tened tightly enough, or if the chain
is twisted, the vibration caused by
driving can cause the tire to become
loose and fall off.
2. Block the wheel diagonally opposite
the flat tire to keep the vehicle from
rolling when it is jacked up.
When blocking the wheel, place a wheel
block from the front for the front wheels
or from the rear for the rear wheels.
Dyna100/150_EE
—Blocking the wheel
Page 163 of 232
IN CASE OF AN EMERGENCY157
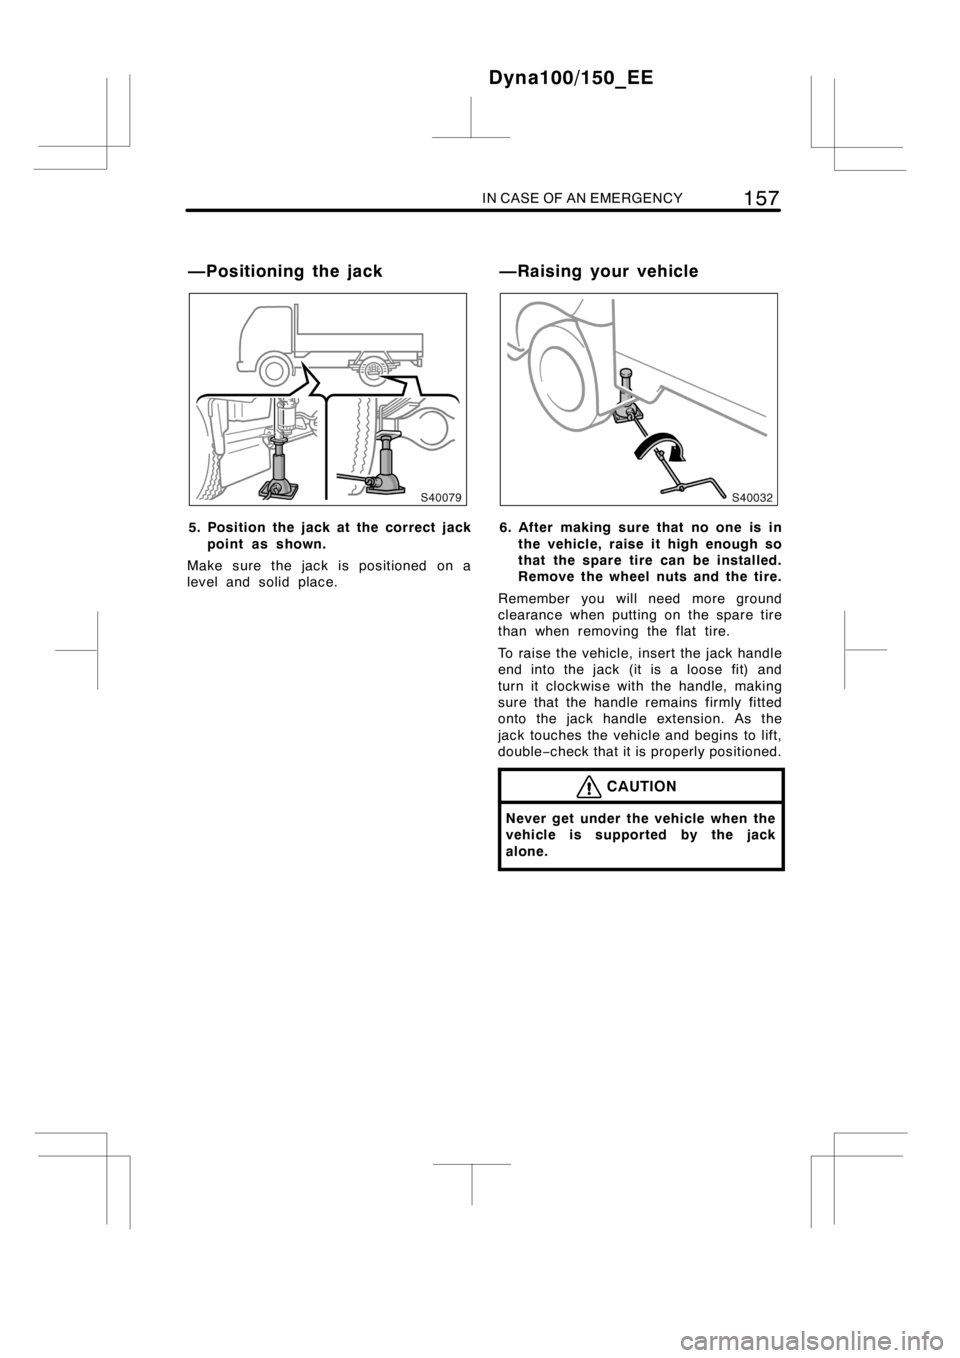
5. Position the jack at the correct jack
point as shown.
Make sure the jack is positioned on a
level and solid place.6. After making sure that no one is in
the vehicle, raise it high enough so
that the spare tire can be installed.
Remove the wheel nuts and the tire.
Remember you will need more ground
clearance when putting on the spare tire
than when removing the flat tire.
To raise the vehicle, insert the jack handle
end into the jack (it is a loose fit) and
turn it clockwise with the handle, making
sure that the handle remains firmly fitted
onto the jack handle extension. As the
jack touches the vehicle and begins to lift,
double−check that it is properly positioned.
CAUTION
Never get under the vehicle when the
vehicle is supported by the jack
alone.
Dyna100/150_EE
—Positioning the jack —Raising your vehicle
Page 164 of 232
158IN CASE OF AN EMERGENCY
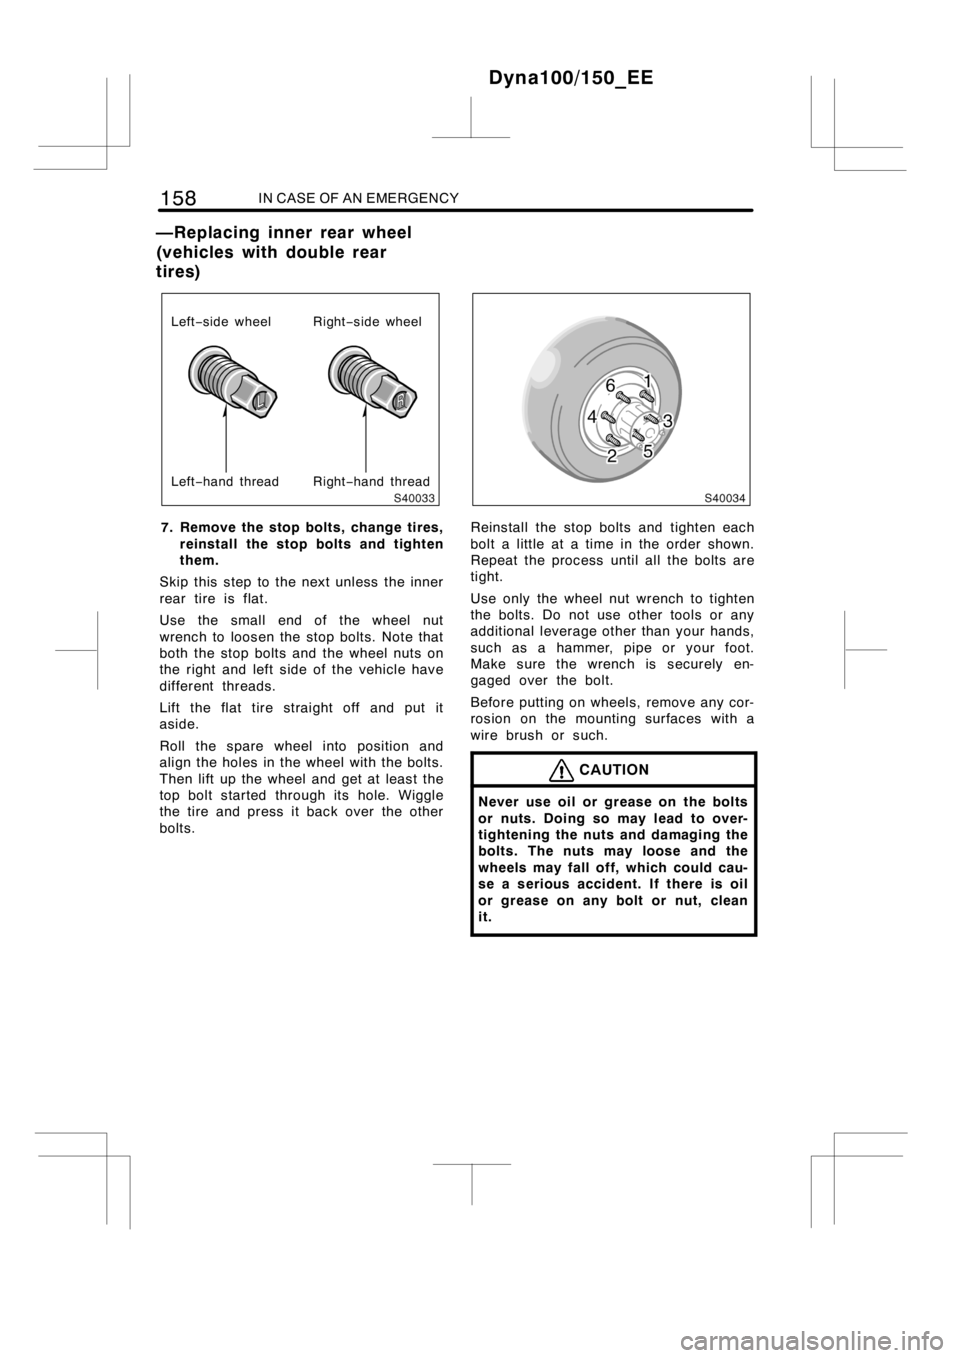
Left−side wheel
Right−hand thread Left−hand threadRight−side wheel
7. Remove the stop bolts, change tires,
reinstall the stop bolts and tighten
them.
Skip this step to the next unless the inner
rear tire is flat.
Use the small end of the wheel nut
wrench to loosen the stop bolts. Note that
both the stop bolts and the wheel nuts on
the right and left side of the vehicle have
different threads.
Lift the flat tire straight off and put it
aside.
Roll the spare wheel into position and
align the holes in the wheel with the bolts.
Then lift up the wheel and get at least the
top bolt started through its hole. Wiggle
the tire and press it back over the other
bolts.Reinstall the stop bolts and tighten each
bolt a little at a time in the order shown.
Repeat the process until all the bolts are
tight.
Use only the wheel nut wrench to tighten
the bolts. Do not use other tools or any
additional leverage other than your hands,
such as a hammer, pipe or your foot.
Make sure the wrench is securely en-
gaged over the bolt.
Before putting on wheels, remove any cor-
rosion on the mounting surfaces with a
wire brush or such.
CAUTION
Never use oil or grease on the bolts
or nuts. Doing so may lead to over-
tightening the nuts and damaging the
bolts. The nuts may loose and the
wheels may fall off, which could cau-
se a serious accident. If there is oil
or grease on any bolt or nut, clean
it.
Dyna100/150_EE
—Replacing inner rear wheel
(vehicles with double rear
tires)
Page 168 of 232
162IN CASE OF AN EMERGENCY
11. Check the air pressure of the re-
placed tire.
Adjust the air pressure to the specification
designated on page 218 in Section 8. If
the pressure is lower, drive slowly to the
nearest service station and fill to the cor-
rect pressure.
Do not forget to reinstall the tire inflation
valve cap as dirt and moisture could get
into the valve core and possibly cause air
leakage. If the cap is missing, have a new
one put on as soon as possible.
12. Restow all the tools, jack and flat
tire securely.
Front and single rear tires—
As soon after changing wheels as pos-
sible, tighten the wheel nuts to the torque
specified on page 218 in Section 8 with
a torque wrench. Have a technician repair
the flat tire.
Double rear tires—
As soon after changing wheels as pos-
sible, tighten the stop bolts and wheel
nuts to the torque specified on page 218
in Section 8 with a torque wrench. Have
a technician repair the flat tire.
This is the same procedure for changing
or rotating your tires.
CAUTION
Before driving, make sure all the
tools, jack and flat tire are securely
in place in their storage location to
reduce the possibility of death or se-
rious injury during sudden braking,
sudden swerving or an accident.
If your vehicle becomes stuck in snow,
mud, sand, etc., then you may attempt
to rock the vehicle free by moving it
forward and backward.
CAUTION
Do not attempt to rock the vehicle
free by moving it forward and back-
ward if people or objects are any-
where near the vehicle. During the
rocking operation the vehicle may
suddenly move forward or backward
as it becomes unstuck, causing injury
or damage to nearby people or ob-
jects.
NOTICE
If you rock your vehicle, observe the
following precautions to prevent dam-
age to the transmission and other
parts.
zDo not race the engine and avoid
spinning the wheels.
zIf your vehicle remains stuck after
rocking the vehicle several times,
consider other ways such as tow-
ing.
Dyna100/150_EE
—After changing wheelsIf your vehicle becomes
stuck