Page 678 of 776
678 5-2. Steps to take in an emergency
AVENSIS_OM_OM20B88E_(EE)Check the specified inflation pressure.
The label is placed as shown in the illustration.
Left-hand drive vehicles
Right-hand drive vehicles
Turn the compressor switch “ON”
and fill the tire with air until the
specified inflation pressure is
reached.
STEP14
STEP15
Switch
Page 679 of 776
5
679 5-2. Steps to take in an emergency
When trouble arises
AVENSIS_OM_OM20B88E_(EE)Turn the switch “OFF” when the pressure gauge connected to
the hose reads the specified pressure.
If the inflation pressure is not attained within 5 minutes, emergency
repair is not possible due to severe damage. Contact any authorized
Toyota dealer or repairer, or another duly qualified and equipped pro-
fessional.
After completely filling the tire with air, disconnect the hose
from the valve on the tire.
Pull the power plug of the compressor out of the power outlet
on the vehicle.
To spread the liquid sealant evenly in the tire, immediately
drive for about 5 km (3 miles) or 10 minutes.
After driving about 5 km (3 miles)
or 10 minutes, pull your vehicle
over in a safe place and recon-
nect the compressor.
Read the inflation pressure on
the pressure gauge.
STEP16
STEP17
STEP18
STEP19
STEP20
STEP21
Page 680 of 776

680 5-2. Steps to take in an emergency
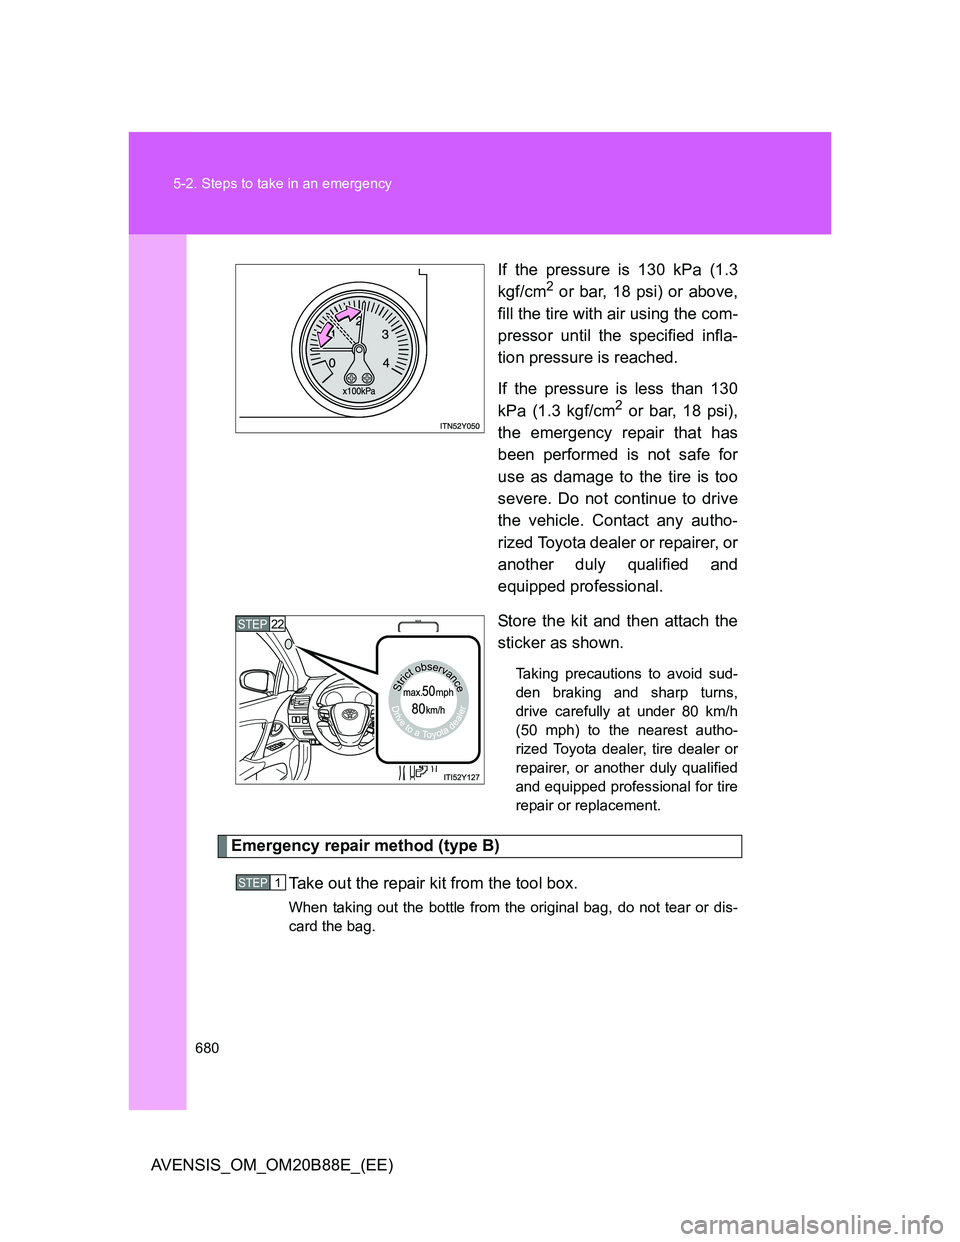
AVENSIS_OM_OM20B88E_(EE)If the pressure is 130 kPa (1.3
kgf/cm
2 or bar, 18 psi) or above,
fill the tire with air using the com-
pressor until the specified infla-
tion pressure is reached.
If the pressure is less than 130
kPa (1.3 kgf/cm
2 or bar, 18 psi),
the emergency repair that has
been performed is not safe for
use as damage to the tire is too
severe. Do not continue to drive
the vehicle. Contact any autho-
rized Toyota dealer or repairer, or
another duly qualified and
equipped professional.
Store the kit and then attach the
sticker as shown.
Taking precautions to avoid sud-
den braking and sharp turns,
drive carefully at under 80 km/h
(50 mph) to the nearest autho-
rized Toyota dealer, tire dealer or
repairer, or another duly qualified
and equipped professional for tire
repair or replacement.
Emergency repair method (type B)
Take out the repair kit from the tool box.
When taking out the bottle from the original bag, do not tear or dis-
card the bag.
STEP22
STEP1
Page 683 of 776
5
683 5-2. Steps to take in an emergency
When trouble arises
AVENSIS_OM_OM20B88E_(EE)Remove the power plug from the
compressor.
Connect the power plug to the
power outlet socket. (P. 485)
Check the specified tire inflation pressure.
Tire inflation pressure is specified on the label as shown.
Left-hand drive vehicles
STEP9
STEP10
STEP11
Page 685 of 776
5
685 5-2. Steps to take in an emergency
When trouble arises
AVENSIS_OM_OM20B88E_(EE)Inflate the tire until the specified
air pressure is reached.
The sealant will be injected
and the pressure will surge
and then gradually decrease.
The air pressure gauge will
display the actual tire inflation
pressure about 1 minute (5
minutes at low temperature)
after the switch is turned on.
Inflate the tire until the speci-
fied air pressure.
• If the tire inflation pressure
is still lower than the speci-
fied point after inflation for
35 minutes with the switch
on, the tire is too damaged
to be repaired. Turn the
compressor switch off and
contact any authorized
Toyota dealer or repairer, or
another duly qualified and
equipped professional.
• If the tire inflation pressure
exceeds the specified air
pressure, let out some air to
adjust the tire inflation pres-
sure. (P. 688)
STEP14
Page 687 of 776
5
687 5-2. Steps to take in an emergency
When trouble arises
AVENSIS_OM_OM20B88E_(EE)After driving for about 5 km (3
miles), stop your vehicle in a
safe place on a hard, flat surface
and connect the compressor.
Check the tire inflation pressure.
If the tire inflation pressure is
under 130 kPa (1.3 kgf/cm
2 or
bar, 19 psi): The puncture can-
not be repaired. Contact any
authorized Toyota dealer or
repairer, or another duly quali-
fied and equipped profes-
sional.
If the tire inflation pressure is
130 kPa (1.3 kgf/cm
2 or bar,
19 psi) or higher, but less than
the specified air pressure:
Proceed to .
If the tire inflation pressure is
the specified air pressure:
Proceed to .
STEP21
STEP22
STEP23
STEP24
Page 688 of 776

688 5-2. Steps to take in an emergency
AVENSIS_OM_OM20B88E_(EE)Turn the compressor switch on to inflate the tire until the spec-
ified air pressure is reached. Drive for about 5 km (3 miles)
and then perform .
Store the compressor in the luggage compartment.
Taking precautions to avoid sudden braking, sudden accelera-
tion and sharp turns, drive carefully at under 80 km/h (50
mph) to the nearest authorized Toyota dealer or repairer, or
another duly qualified and equipped professional for tire repair
or replacement.
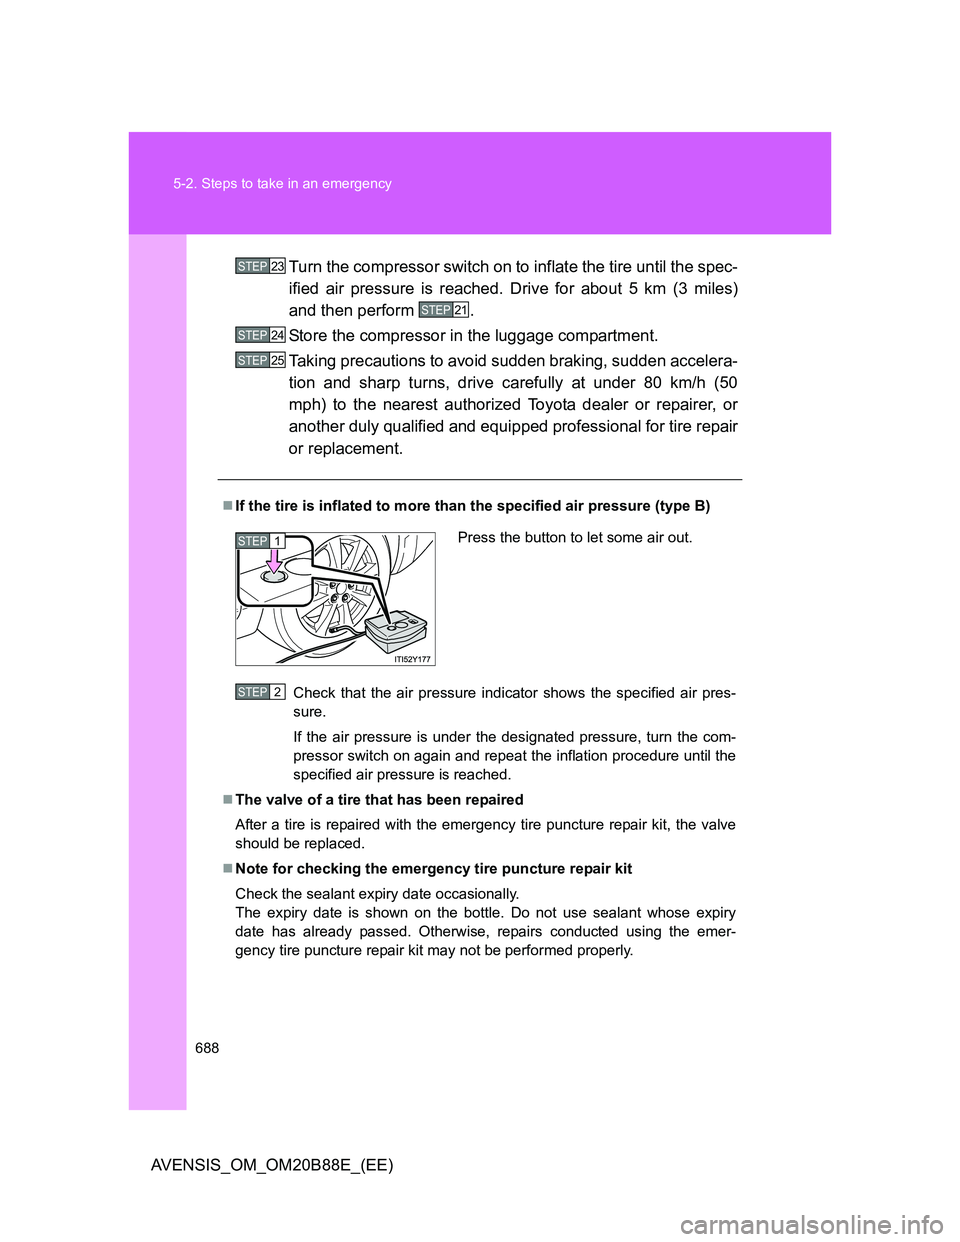
If the tire is inflated to more than the specified air pressure (type B)
Check that the air pressure indicator shows the specified air pres-
sure.
If the air pressure is under the designated pressure, turn the com-
pressor switch on again and repeat the inflation procedure until the
specified air pressure is reached.
The valve of a tire that has been repaired
After a tire is repaired with the emergency tire puncture repair kit, the valve
should be replaced.
Note for checking the emergency tire puncture repair kit
Check the sealant expiry date occasionally.
The expiry date is shown on the bottle. Do not use sealant whose expiry
date has already passed. Otherwise, repairs conducted using the emer-
gency tire puncture repair kit may not be performed properly.
STEP23
STEP21
STEP24
STEP25
Press the button to let some air out.STEP1
STEP2
Page 689 of 776

5
689 5-2. Steps to take in an emergency
When trouble arises
AVENSIS_OM_OM20B88E_(EE)
Emergency tire puncture repair kit
The sealant stored in the emergency tire puncture repair kit can be used
only once to temporarily repair a single tire. If the sealant has been used
and needs to be replaced, purchase a new bottle at any authorized
Toyota dealer or repairer, or another duly qualified and equipped profes-
sional. The compressor is reusable.
The sealant can be used when the outside temperature is from -30°C
(-22°F) to 60°C (140°F).
The repair kit is exclusively designed for size and type of tires originally
installed on your vehicle. Do not use it for tires that a different size than
the original ones, or for any other purposes.
The sealant has a limited lifespan. The expiry date is marked on the bot-
tle. The bottle of sealant should be replaced with a new bottle before the
expiry date. Contact any authorized Toyota dealer or repairer, or another
duly qualified and equipped professional for replacement.
If the sealant gets on your clothes, it may stain.
If the sealant adheres to a wheel or the surface of the vehicle body, the
stain may not be removable if it is not cleaned at once. Immediately wipe
away the sealant with a wet cloth.
During operation of the repair kit, a loud operation noise is produced.
This does not indicate a malfunction.
Do not use to check or to adjust the tire pressure.
CAUTION
Do not drive the vehicle with a flat tire
Do not continue driving with a flat tire.
Driving even a short distance with a flat tire can damage the tire and the
wheel beyond repair.
Driving with a flat tire may cause a circumferential groove on the side wall. In
such a case, the tire may explode when using a repair kit.