2014 TOYOTA AVALON USB
[x] Cancel search: USBPage 193 of 346

193
1. AUDIO/VIDEO SYSTEM OPERATION
5
AUDIO/VIDEO SYSTEM
6. RADIO OPERATION (INTERNET RADIO BROADCAST)
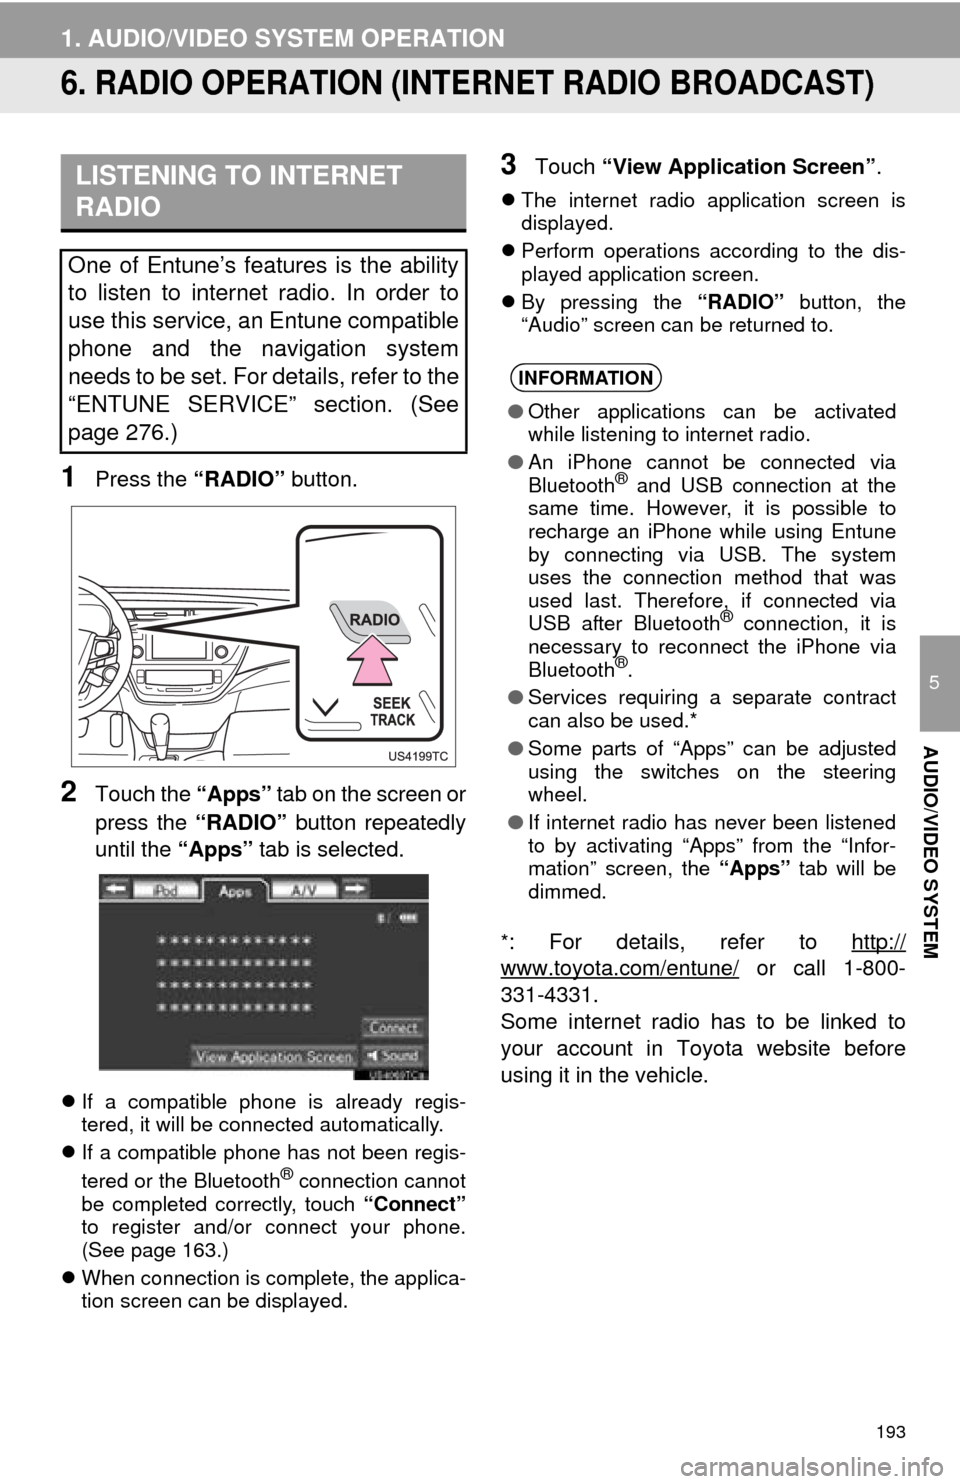
1Press the “RADIO” button.
2Touch the “Apps” tab on the screen or
press the “RADIO” button repeatedly
until the “Apps” tab is selected.
If a compatible phone is already regis-
tered, it will be connected automatically.
If a compatible phone has not been regis-
tered or the Bluetooth
® connection cannot
be completed correctly, touch “Connect”
to register and/or connect your phone.
(See page 163.)
When connection is complete, the applica-
tion screen can be displayed.
3Touch “View Application Screen” .
The internet radio application screen is
displayed.
Perform operations according to the dis-
played application screen.
By pressing the “RADIO” button, the
“Audio” screen can be returned to.
*
: For details, refer to http://
www.toyota.com/entune/ or call 1-800-
331-4331.
Some internet radio has to be linked to
your account in Toyota website before
using it in the vehicle.
LISTENING TO INTERNET
RADIO
One of Entune’s features is the ability
to listen to internet radio. In order to
use this service, an Entune compatible
phone and the navigation system
needs to be set. For details, refer to the
“ENTUNE SERVICE” section. (See
page 276.)
INFORMATION
● Other applications can be activated
while listening to internet radio.
● An iPhone cannot be connected via
Bluetooth
® and USB connection at the
same time. However, it is possible to
recharge an iPhone while using Entune
by connecting via USB. The system
uses the connection method that was
used last. Therefore, if connected via
USB after Bluetooth
® connection, it is
necessary to reconnect the iPhone via
Bluetooth
®.
● Services requiring a separate contract
can also be used.*
● Some parts of “Apps” can be adjusted
using the switches on the steering
wheel.
● If internet radio has never been listened
to by activating “Apps” from the “Infor-
mation” screen, the “Apps” tab will be
dimmed.
Page 212 of 346

212
1. AUDIO/VIDEO SYSTEM OPERATION
8. USB MEMORY OPERATION
1Open the lid.
2Open the cover and connect a USB
memory.
Turn on the power of the USB memory if it
is not turned on.
3Press the “MEDIA” button.
Connecting a USB memory enables
users to enjoy music from the vehicle
speakers.
CAUTION
●Do not operate the player’s controls or
connect the USB memory while driving.
NOTICE
●Depending on the size and shape of the
USB memory that is connected to the
system, the lid may not close fully. In this
case, do not forcibly close the lid as this
may damage the USB memory or the
terminal, etc.
● Do not leave your portable player in the
car. In particular, high temperatures
inside the vehicle may damage the por-
table player.
● Do not push down on or apply unneces-
sary pressure to the portable player
while it is connected as this may dam-
age the portable player or its terminal.
● Do not insert foreign objects into the port
as this may damage the portable player
or its terminal.
CONNECTING A USB
MEMORY
Page 213 of 346

213
1. AUDIO/VIDEO SYSTEM OPERATION
5
AUDIO/VIDEO SYSTEM
Tag mode
Folder mode
1If a USB memory has already been
connected, touch the “USB” tab to se-
lect USB mode. Pressing the “MEDIA”
button repeatedly can also select the
tab.
: Touch to start playing the music.
: Touch to pause the music.
: Touch to start playing the music again.
■ON THE USB TOP SCREEN
, : Touch to skip to the next or previ-
ous folder/album.
1Touch the folder/album name screen
button.
PLAYING A USB MEMORY
PLAYING AND PAUSING A USB
MEMORY
INFORMATION
● If tag information exists, the file/folder
names will be changed to track/album
names.
INFORMATION
●When the USB memory is connected
and the audio source is changed to USB
memory mode, the USB memory will
start playing the first file in the first
folder. If the same device is removed
and reinserted (and the contents have
not been changed), the USB memory
will resume playing from the same point
it was last used.
● Depending on the USB memory that is
connected to the system, certain func-
tions may not be available.
SELECTING A DESIRED
FOLDER/ALBUM
SELECTING A DESIRED
FOLDER, ARTIST OR ALBUM
Page 214 of 346

214
1. AUDIO/VIDEO SYSTEM OPERATION
2Touch the desired tab and select the
desired folder, artist or album.
Character screen buttons, “ABC”, “DEF”
etc., allow a direct jump to list entries that
begin with the same letter as the character
button.
Each time the same character screen but-
ton is touched, the list starting with the
subsequent character is displayed.
, : Touch to move the list up or down
by 5 folder/artist/album groups. If either of
these screen buttons is touched when the
top/bottom page of the lis t is displayed, the
last/first page is displayed.
, : If appears to the right of an item
name, the complete name is too long for
the screen. Touch to scroll to the end of
the name. Touch to scroll to the begin-
ning of the name.
■ON THE USB TOP SCREEN
“SEEK/TRACK” button: Press the “” or
“” button of “SEEK/TRACK” repeatedly
until the desired file/track number appears
on the screen. The player will start playing
the selected file/track from the beginning. “TUNE SCROLL” knob: Turn the knob
clockwise or counterclockwise to skip to
the desired file/track.
■ON THE FILE/TRACK LIST SCREEN
1Touch the file/track name screen but-
ton to display the following file/track list
screen.
2Touch the desired file/track number.
The player will start playing the select-
ed file/track from the beginning.
, : Touch to move the list up or down
by 5 file/track groups. If either of these
screen buttons is t ouched when the top/
bottom page of the list is displayed, the
last/first page is displayed.
“SEEK/TRACK” button: Press the “” or
“” button of “SEEK/TRACK” to scroll
through the file/track list one by one.
“TUNE SCROLL” knob: Turn the knob
clockwise or counterclockwise to quickly
scroll up or down the file/track list. To se-
lect the desired file/track, press the knob.
, : If appears to the right of an item
name, the complete name is too long for
the screen. Touch to scroll to the end of
the name. Touch to scroll to the begin-
ning of the name.
SELECTING A DESIRED FILE/
TRACK
Page 231 of 346

231
1. AUDIO/VIDEO SYSTEM OPERATION
5
AUDIO/VIDEO SYSTEM
“Made for iPod” and “Made for iPhone”
mean that an electronic accessory has
been designed to connect specifically to
iPod, or iPhone, respectively, and has
been certified by the developer to meet
Apple performance standards.
Apple is not responsible for the operation
of this device or its compliance with safety
and regulatory standards. Please note
that the use of this accessory with iPod or
iPhone may affect wireless performance.
iPhone, iPod, iPod classic, iPod nano and
iPod touch are trademarks of Apple Inc.,
registered in the U.S. and other countries.
The following iPod, iPod nano, iPod
classic, iPod touch and iPhone devic-
es can be used with this system.
Made for
• iPod touch (4th generation)
• iPod touch (3rd generation)
• iPod touch (2nd generation)
• iPod touch (1st generation)
• iPod classic
• iPod with video
• iPod nano (6th generation)
• iPod nano (5th generation)
• iPod nano (4th generation)
• iPod nano (3rd generation)
• iPod nano (2nd generation)
• iPod nano (1st generation)
• iPhone 4
• iPhone 3GS
• iPhone 3G
• iPhone
Depending on differences between mod-
els or software versions etc., some models
might be incompatible with this system.
USB memory that can be used for MP3
and WMA playback:
• USB communication formats: USB 2.0
HS (480 Mbps) and FS (12 Mbps)
• File formats: FAT 16/32
• Correspondence class: Mass storage
class
This DVD player is intended for use with
4.7 in. (12 cm) discs only.
Extremely high temperatures can keep the
DVD player from working. On hot days,
use the air conditioning system to cool the
inside of the vehicle before using the
player.
Bumpy roads or other vibrations may
make the DVD player skip.
If moisture gets into the DVD player, the
discs may not be able to be played.
Remove the discs from the player and
wait until it dries.
iPod
COMPATIBLE MODELS
USB MEMORY
CARING FOR YOUR DVD
PLAYER AND DISC
Page 234 of 346

234
1. AUDIO/VIDEO SYSTEM OPERATION
MP3 (MPEG Audio Layer 3) and WMA
(Windows Media Audio) are audio com-
pression standards.
The MP3/WMA player can play MP3 and
WMA files on CD-ROM, CD-R and CD-
RW discs.
The unit can play disc recordings compati-
ble with ISO 9660 level 1 and level 2 and
with the Romeo and Joliet file system.
When naming an MP3 or WMA file, add
the appropriate file extension (.mp3 or
.wma).
The MP3/WMA player plays back files
with .mp3 or .wma file extensions as MP3
or WMA files. To prevent noise and play-
back errors, use the appropriate file exten-
sions.
The MP3/WMA player can play only the
first session when using multi-session
compatible CDs.
MP3 player: MP3 files are compatible with
the ID3 Tag Ver. 1.0, Ver. 1.1, Ver. 2.2 and
Ver. 2.3 formats. The unit cannot display
disc title, track title and artist name in
other formats.
USB memory: MP3 files are compatible
with the ID3 Tag Ver. 1.0, Ver. 1.1, Ver.
2.2, Ver. 2.3 and Ver. 2.4 formats. The unit
cannot display track title and artist name
in other formats.
WMA files can contain a WMA tag that is
used in the same way as an ID3 tag. WMA
tags carry information such as track title
and artist name.
The emphasis function is available only
when playing MP3/WMA files recorded at
32, 44.1 and 48 kHz.
MP3 files for MP3 player:
MPEG 1 LAYER 3 — 32, 44.1, 48 kHz
MPEG 2 LSF LAYER 3 — 16, 22.05, 24
kHz
MP3 files for USB memory:
MPEG 1 AUDIO LAYER 2, 3 — 32, 44.1,
48 kHz
MPEG 2 AUDIO LAYER 2, 3 — 16, 22.05,
24 kHz
WMA files for WMA player:
Ver. 7, 8, 9 CBR — 32, 44.1, 48 kHz
WMA files for USB memory:
Ver. 9 — HIGH PROFILE 32, 44.1, 48 kHz
The sound quality of MP3/WMA files gen-
erally improves with higher bit rates. In
order to achieve a reasonable level of
sound quality, discs recorded with a bit
rate of at least 128 kbps are recom-
mended.
MP3 files for MP3 player:
MPEG1 LAYER3 — 32 to 320 kbps
MPEG2 LSF LAYER3 — 8 to 160 kbps
MP3 files for USB memory:
MPEG 1 AUDIO LAYER 2, 3 — 32 to 320
kbps
MPEG 2 AUDIO LAYER 2, 3 — 8 to 160
kbps
WMA files for WMA player:
Ver. 7, 8 CBR — 48 to 192 kbps
Ver. 9 CBR — 48 to 320 kbps
WMA files for USB memory:
Ver. 9 HIGH PROFILE 32 to 320 kbps,
VBR (Variable Bit Rate)
The MP3/WMA player does not play back
MP3/WMA files from discs recorded using
packet write data transfer (UDF format).
Discs should be record ed using “pre-mas-
tering” software rather than packet-write
software.
M3u playlists are not compatible with the
audio player.
MP3i (MP3 interactive) and MP3PRO for-
mats are not compatible with the audio
player.
The player is compatible with VBR (Vari-
able Bit Rate).
MP3/WMA FILESSAMPLING FREQUENCY
PLAYABLE BIT RATES
Page 235 of 346

235
1. AUDIO/VIDEO SYSTEM OPERATION
5
AUDIO/VIDEO SYSTEM
When playing back files recorded as VBR
(Variable Bit Rate) files, the play time will
not be correctly displayed if the fast for-
ward or reverse operations are used.
It is not possible to check folders that do
not include MP3/WMA files.
MP3/WMA files in folders up to 8 levels
deep can be played. However, the start of
playback may be delayed when using
discs containing numerous levels of fold-
ers. For this reason, we recommend creat-
ing discs with no more than two levels of
folders.
The play order of the compact disc with
the structure shown above is as follows:
MP3/WMA player: It is possible to play up
to 192 folders or 255 files on one disc.
USB memory: It is possible to play up to
3000 folders, 255 files per folder or 9999
files in the device.
The order changes depending on the per-
sonal computer and MP3/WMA encoding
software you use.
CD-R/CD-RW discs that have not been
subject to the “finalizing process” (a pro-
cess that allows discs to be played on a
conventional CD player) cannot be
played.
It may not be possible to play CD-R/CD-
RW discs recorded on a music CD
recorder or a personal computer because
of disc characteristics, scratches or dirt on
the disc, or dirt, condensation, etc. on the
lens of the unit.
It may not be possible to play discs
recorded on a personal computer depend-
ing on the application settings and the
environment. Record with the correct for-
mat. (For details, contact the appropriate
application manufacturers of the applica-
tions.)
CD-R/CD-RW discs may be damaged by
direct exposure to sunlight, high tempera-
tures or other storage conditions. The unit
may be unable to play some damaged
discs.
If you insert a CD-RW disc into the MP3/
WMA player, playback will begin more
slowly than with a conventional CD or CD-
R disc.
Recordings on CD-R/CD-RW cannot be
played using the DDCD (Double Density
CD) system.
001.mp3
002.wma
Folder 1003.mp3
Folder 2
004.mp3
005.wma
Folder 3006.mp3
001.mp3 002.wma . . . 006.mp3
CD-R AND CD-RW DISCS
Page 247 of 346

247
1. VOICE COMMAND SYSTEM OPERATION
6
VOICE COMMAND SYSTEM
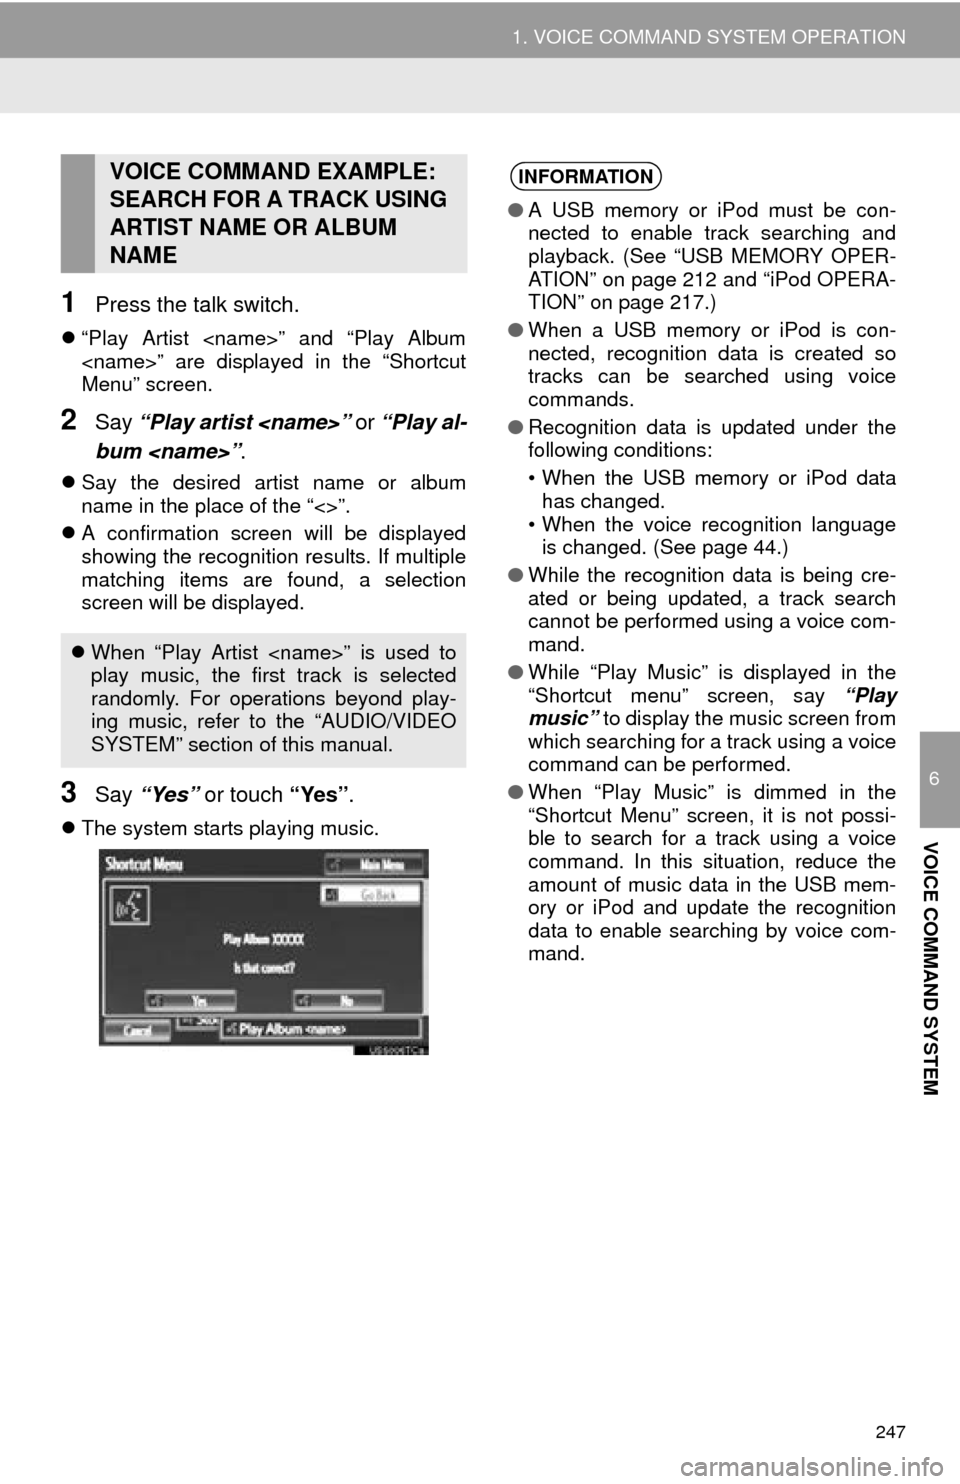
1Press the talk switch.
“Play Artist
Menu” screen.
2Say “Play artist
bum
Say the desired artist name or album
name in the place of the “<>”.
A confirmation screen will be displayed
showing the recognition results. If multiple
matching items are found, a selection
screen will be displayed.
3Say “Yes” or touch “Yes” .
The system starts playing music.
VOICE COMMAND EXAMPLE:
SEARCH FOR A TRACK USING
ARTIST NAME OR ALBUM
NAME
When “Play Artist
play music, the first track is selected
randomly. For operations beyond play-
ing music, refer to the “AUDIO/VIDEO
SYSTEM” section of this manual.
INFORMATION
● A USB memory or iPod must be con-
nected to enable track searching and
playback. (See “USB MEMORY OPER-
ATION” on page 212 and “iPod OPERA-
TION” on page 217.)
● When a USB memory or iPod is con-
nected, recognition data is created so
tracks can be searched using voice
commands.
● Recognition data is updated under the
following conditions:
• When the USB memory or iPod data
has changed.
• When the voice recognition language is changed. (See page 44.)
● While the recognition data is being cre-
ated or being updated, a track search
cannot be performed using a voice com-
mand.
● While “Play Music” is displayed in the
“Shortcut menu” screen, say “Play
music” to display the music screen from
which searching for a track using a voice
command can be performed.
● When “Play Music” is dimmed in the
“Shortcut Menu” screen, it is not possi-
ble to search for a track using a voice
command. In this situation, reduce the
amount of music data in the USB mem-
ory or iPod and update the recognition
data to enable searching by voice com-
mand.