Page 166 of 788

1663-2. Opening, closing and locking the doors
UK_AURIS/AURIS_HV_EE (OM12G88E)Note for locking the doors
Touching the door lock sensor while wearing gloves may delay or prevent
lock operation. Remove the gloves and touch the lock sensor again.
When the lock operation is performed using the lock sensor, recognition sig-
nals will be shown up to two consecutive times. After this, no recognition
signals will be given.
If the door handle becomes wet while the electronic key is within the effec-
tive range, the door may lock and unlock repeatedly. In that case, follow the
following correction procedures to wash the vehicle:
• Place the electronic key in a location 2 m (6 ft.) or more away from the
vehicle. (Take care to ensure that the key is not stolen.)
• Set the electronic key to battery-saving mode to disable the smart entry &
start system. (P. 163)
Vehicles without a multi-information display: If the electronic key is inside
the vehicle and a door handle becomes wet during a car wash, a buzzer will
sound outside the vehicle. To turn off the alarm, lock all the doors.
Vehicles with a multi-information display: If the electronic key is inside the
vehicle and a door handle becomes wet during a car wash, a message may
be shown on the multi-information display and a buzzer will sound outside
the vehicle. To turn off the alarm, lock all the doors.
The lock sensor may not work properly if it comes into contact with ice,
snow, mud, etc. Clean the lock sensor and attempt to operate it again.
Fingernails may scrape against the door during operation of the door han-
dle. Be careful not to injure fingernails or damage the surface of the door.
Note for the unlocking function
A sudden approach to the effective range or door handle may prevent the
doors from being unlocked. In this case, return the door handle to the origi-
nal position and check that the doors unlock before pulling the door handle
again.
Gripping the door handle when wearing a glove may not unlock the door.
If the door handle becomes wet while the electronic key is within the effec-
tive range, the door may lock and unlock repeatedly. In that case, follow the
following correction procedures to wash the vehicle:
• Place the electronic key in a location 2 m (6 ft.) or more away from the
vehicle. (Take care to ensure that the key is not stolen.)
• Set the electronic key to battery-saving mode to disable the smart entry &
start system. (P. 163)
If there is another electronic key in the detection area, it may take slightly
longer to unlock the doors after the door handle is gripped.
Page 208 of 788

2083-2. Opening, closing and locking the doors
UK_AURIS/AURIS_HV_EE (OM12G88E)Luggage compartment light
The luggage compartment light turns on when the back door is opened.
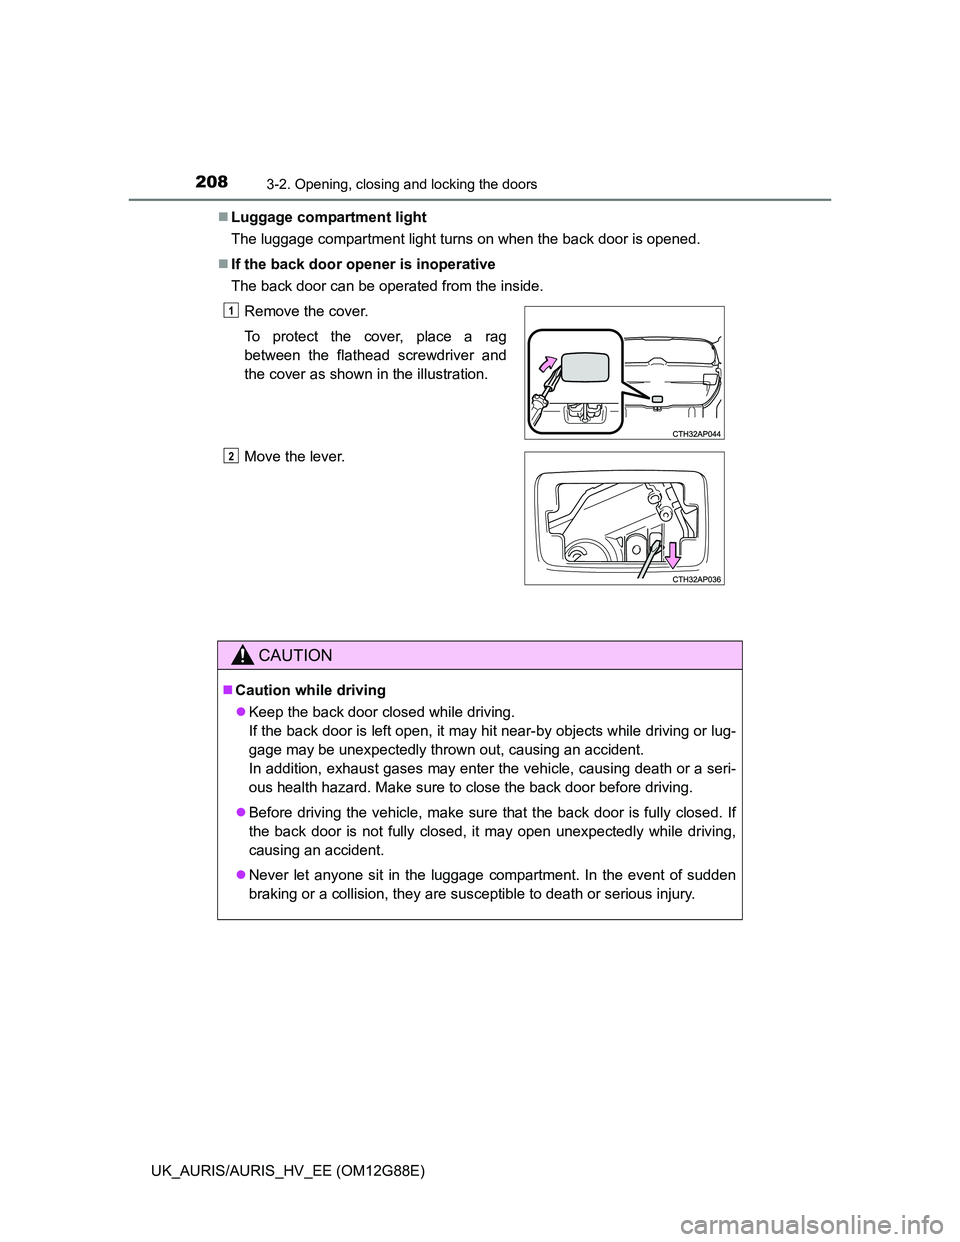
If the back door opener is inoperative
The back door can be operated from the inside.
Remove the cover.
To protect the cover, place a rag
between the flathead screwdriver and
the cover as shown in the illustration.
Move the lever.
CAUTION
Caution while driving
Keep the back door closed while driving.
If the back door is left open, it may hit near-by objects while driving or lug-
gage may be unexpectedly thrown out, causing an accident.
In addition, exhaust gases may enter the vehicle, causing death or a seri-
ous health hazard. Make sure to close the back door before driving.
Before driving the vehicle, make sure that the back door is fully closed. If
the back door is not fully closed, it may open unexpectedly while driving,
causing an accident.
Never let anyone sit in the luggage compartment. In the event of sudden
braking or a collision, they are susceptible to death or serious injury.
1
2
Page 210 of 788

2103-2. Opening, closing and locking the doors
UK_AURIS/AURIS_HV_EE (OM12G88E)
CAUTION
Do not pull on the back door damper stay to close the back door, and do
not hang on the back door damper stay.
Doing so may cause hands to be caught or the back door damper stay to
break, causing an accident.
If a bicycle carrier or similar heavy object is attached to the back door, it
may suddenly shut again after being opened, causing someone’s hands,
head or neck to be caught and injured. When installing an accessory part
to the back door, using a genuine Toyota part is recommended.
NOTICE
Back door damper stays
The back door is equipped with damper stays that hold the back door in
place.
Observe the following precautions.
Failure to do so may cause damage to the back door damper stay, resulting
in malfunction.
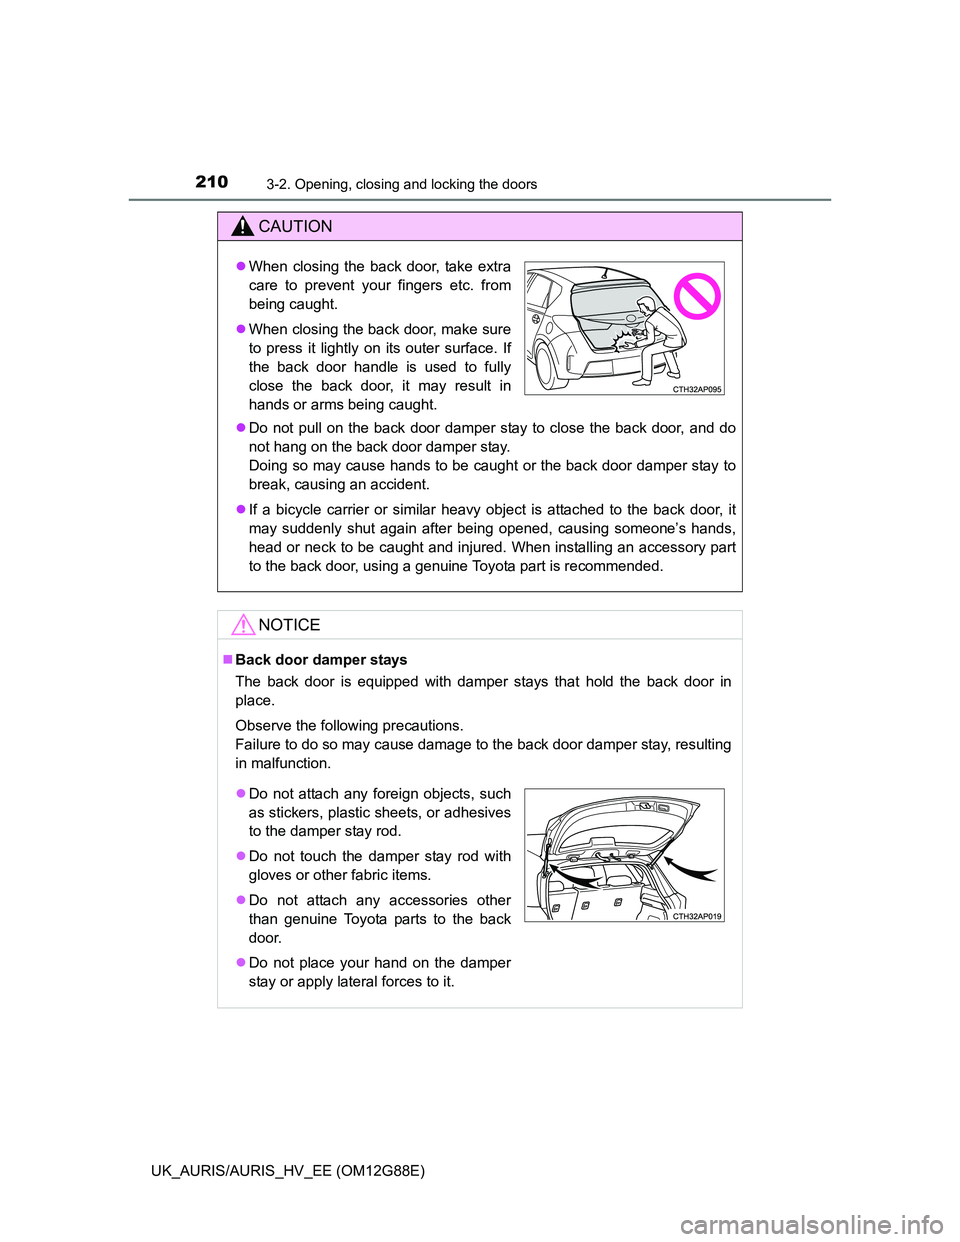
When closing the back door, take extra
care to prevent your fingers etc. from
being caught.
When closing the back door, make sure
to press it lightly on its outer surface. If
the back door handle is used to fully
close the back door, it may result in
hands or arms being caught.
Do not attach any foreign objects, such
as stickers, plastic sheets, or adhesives
to the damper stay rod.
Do not touch the damper stay rod with
gloves or other fabric items.
Do not attach any accessories other
than genuine Toyota parts to the back
door.
Do not place your hand on the damper
stay or apply lateral forces to it.
Page 215 of 788
2153-3. Adjusting the seats
UK_AURIS/AURIS_HV_EE (OM12G88E)
3
Operation of each component
CAUTION
After returning the rear seatback to the upright position
Observe the following precautions. Failure to do so may result in death or
serious injury.
Make sure that the seatback is securely
locked in position by lightly pushing it
back and forth.
If the seatback is not securely locked,
the red marking will be visible on the
seatback lock release lever. Make sure
that the red marking is not visible.
Check that the seat belts are not twisted
or caught in the seatback.
If the seat belt gets caught between the
seatback's securing hook and latch, it
may damage the seat belt.
Page 219 of 788
2193-4. Adjusting the steering wheel and mirrors
UK_AURIS/AURIS_HV_EE (OM12G88E)
3
Operation of each component
The height of the rear view mirror can be adjusted to suit your driving
posture.
Adjust the height of the rear view
mirror by moving it up and down.
Manual anti-glare inside rear view mirror
Reflected light from the headlights of vehicles behind can be reduced
by operating the lever.
Normal position
Anti-glare position
Inside rear view mirror
The rear view mirror’s position can be adjusted to enable suffi-
cient confirmation of the rear view.
Adjusting the height of rear view mirror (auto anti-glare inside
rear view mirror only)
Anti-glare function
1
2
Page 220 of 788

2203-4. Adjusting the steering wheel and mirrors
UK_AURIS/AURIS_HV_EE (OM12G88E)
Auto anti-glare inside rear view mirror
Responding to the level of brightness of the headlights of vehicles
behind, the reflected light is automatically reduced.
Changing automatic anti-glare
function mode
ON/OFF
When the automatic anti-glare
function is in ON mode, the indica-
tor illuminates.
Except hybrid model: The function
will set to ON mode each time the
engine switch is turned to IGNI-
TION ON mode.
Hybrid model: The function will set
to ON mode each time the power
switch is turned to ON mode.
Pressing the button turns the func-
tion to OFF mode. (The indicator
also turns off.)
To prevent sensor error (vehicles with an auto anti-glare inside rear view
mirror)
Indicator
To ensure that the sensors operate prop-
erly, do not touch or cover them.
CAUTION
Do not adjust the position of the mirror while driving.
Doing so may lead to mishandling of the vehicle and cause an accident,
resulting in death or serious injury.
Page 225 of 788

2253-5. Opening and closing the windows
UK_AURIS/AURIS_HV_EE (OM12G88E)
3
Operation of each component
The power windows can be operated when
Except hybrid model (vehicles without a smart entry & start system):
The engine switch is in the “ON” position.
Except hybrid model (vehicles with a smart entry & start system):
The engine switch is in IGNITION ON mode.
Hybrid model: The power switch is in ON mode.
Operating the power windows after turning the engine off (except hybrid
model)
Vehicles without a smart entry & start system:
The power windows can be operated for approximately 45 seconds even
after the engine switch is turned to the “ACC” or “LOCK” position. They can-
not, however, be operated once either front door is opened.
Vehicles with a smart entry & start system:
The power windows can be operated for approximately 45 seconds even
after the engine switch is turned to ACCESSORY mode or turned off. They
cannot, however, be operated once either front door is opened.
Operating the power windows after turning the hybrid system off (hybrid
model)
The power windows can be operated for approximately 45 seconds even
after the power switch is turned to ACCESSORY mode or turned off. They
cannot, however, be operated once either front door is opened.
Jam protection function (windows with one-touch closing function only)
If an object becomes caught between the window and the window frame, win-
dow travel is stopped and the window is opened slightly.
Page 226 of 788

2263-5. Opening and closing the windows
UK_AURIS/AURIS_HV_EE (OM12G88E)When the power window does not close normally (windows with one-
touch closing function only)
If the jam protection function is operating abnormally and a window cannot be
closed, perform the following operations using the power window switch on
the relevant door.
Except hybrid model (vehicles without a smart entry & start system): After
stopping the vehicle, the window can be closed by holding the power win-
dow switch in the one-touch closing position while the engine switch is
turned to the “ON” position.
Except hybrid model (vehicles with a smart entry & start system): After
stopping the vehicle, the window can be closed by holding the power win-
dow switch in the one-touch closing position while the engine switch is
turned to IGNITION ON mode.
Hybrid model: After stopping the vehicle, the window can be closed by
holding the power window switch in the one-touch closing position while the
power switch is turned to ON mode.
If the window still cannot be closed even by carrying out the operation as
explained above, initialize the function by performing the following proce-
dure.
Hold the power window switch in the one-touch closing position. Continue
holding the switch for a further 6 seconds after the window has closed.
Hold the power window switch in the one-touch opening position. Con-
tinue holding the switch for a further 2 seconds after the window has
opened completely.
Hold the power window switch in the one-touch closing position once
again. Continue holding the switch for a further 2 seconds after the win-
dow has closed.
If you release the switch while the window is moving, start again from the
beginning.
If the window continues to close but then re-open slightly even after perform-
ing the above procedure correctly, have the vehicle inspected by any autho-
rized Toyota dealer or repairer, or another duly qualified and equipped
professional.
1
2
3