Page 411 of 530
4097-1. Essential information
7
When trouble arises
4RUNNER (U)_(OM35A83U)
Steadily step on the brake pedal with both feet and firmly depress it.
Do not pump the brake pedal repeatedly as this will increase the effort
required to slow the vehicle.
Shift the shift lever to N.
If the shift lever is shifted to N
After slowing down, stop the vehicle in a safe place by the road.
Stop the engine.
If the shift lever cannot be shifted to N
Keep depressing the brake pedal with both feet to reduce vehicle
speed as much as possible.
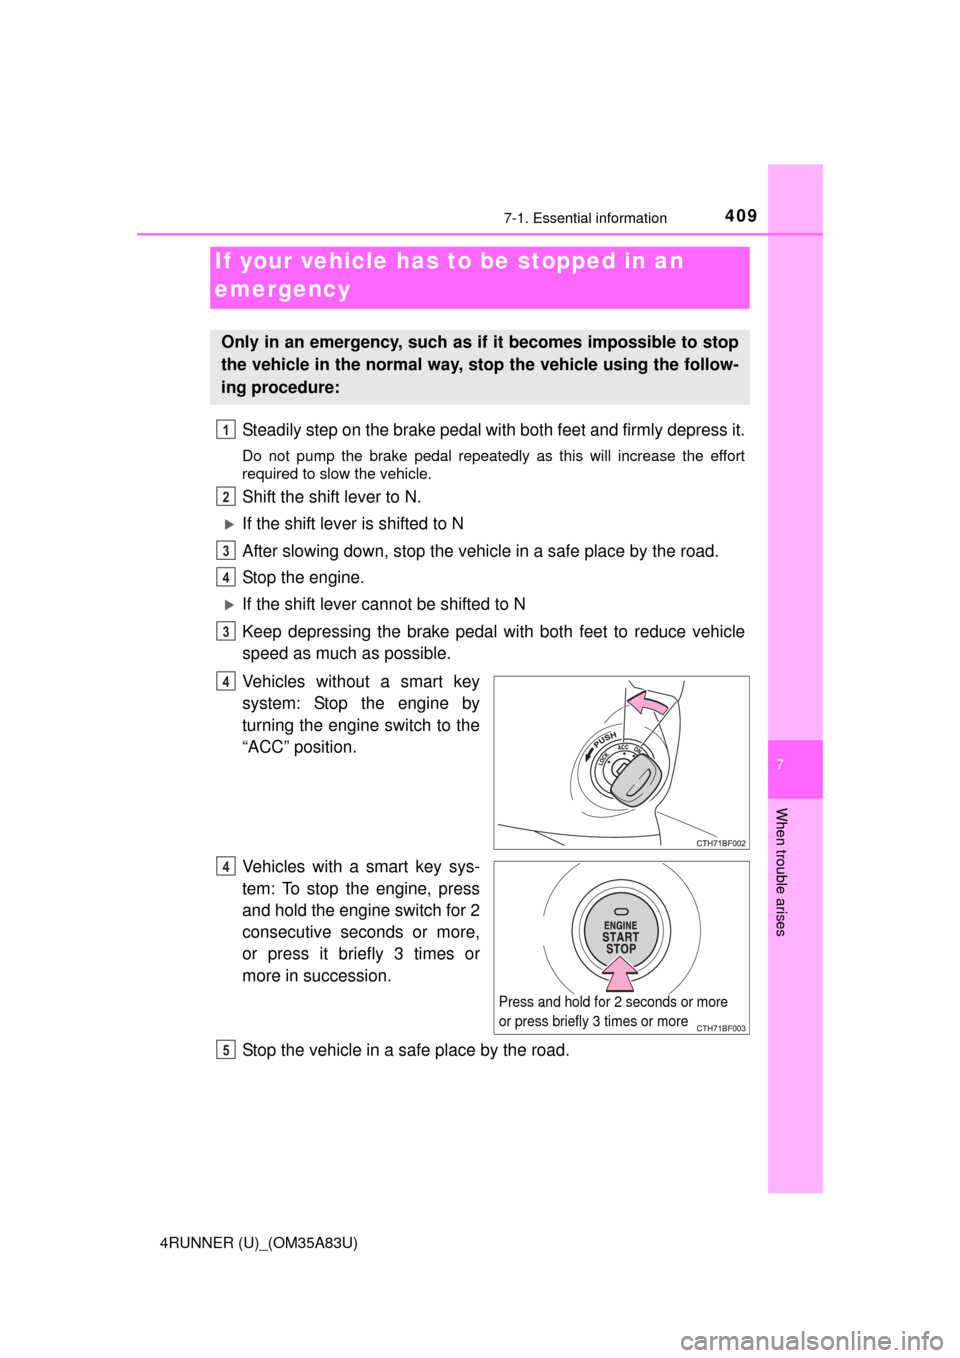
Vehicles without a smart key
system: Stop the engine by
turning the engine switch to the
“ACC” position.
Vehicles with a smart key sys-
tem: To stop the engine, press
and hold the engine switch for 2
consecutive seconds or more,
or press it briefly 3 times or
more in succession.
Stop the vehicle in a safe place by the road.
If your vehicle has to be stopped in an
emergency
Only in an emergency, such as if it becomes impossible to stop
the vehicle in the normal way, st op the vehicle using the follow-
ing procedure:
1
2
3
4
3
4
Press and hold for 2 seconds or more
or press briefly 3 times or more
4
5
Page 413 of 530
411
7
When trouble arises
4RUNNER (U)_(OM35A83U)
7-2. Steps to take in an emergency
The following may indicate a problem with your transmission. Contact
your Toyota dealer before towing.
●The engine is running but the vehicle will not move.
● The vehicle makes an abnormal sound.
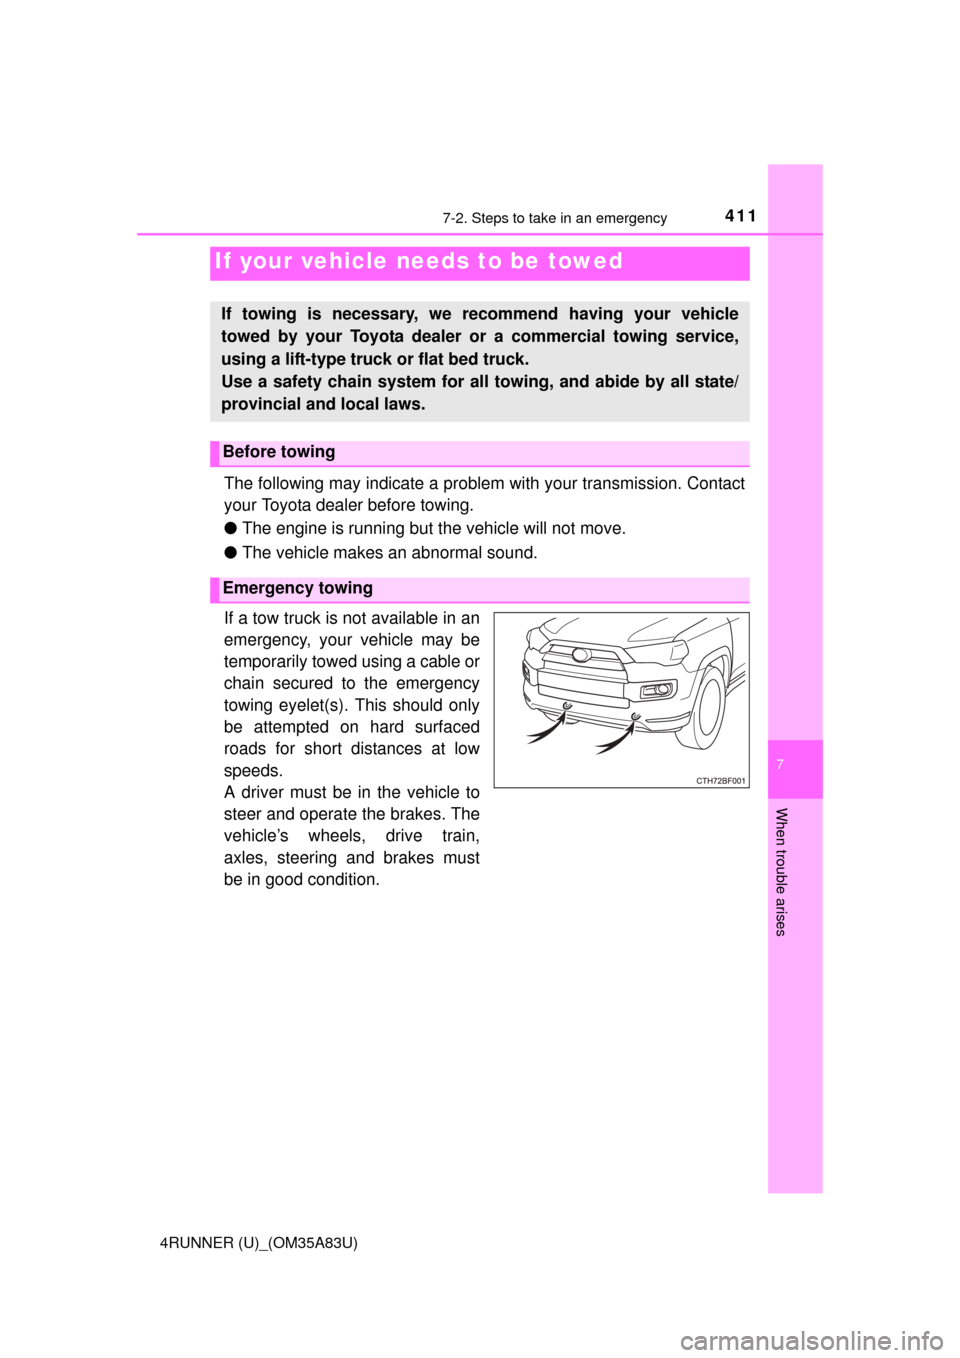
If a tow truck is not available in an
emergency, your vehicle may be
temporarily towed using a cable or
chain secured to the emergency
towing eyelet(s). This should only
be attempted on hard surfaced
roads for short distances at low
speeds.
A driver must be in the vehicle to
steer and operate the brakes. The
vehicle’s wheels, drive train,
axles, steering and brakes must
be in good condition.
If your vehicle needs to be towed
If towing is necessary, we re commend having your vehicle
towed by your Toyota dealer or a commercial towing service,
using a lift-type truc k or flat bed truck.
Use a safety chain system for all towing, and abide by all state/
provincial and local laws.
Before towing
Emergency towing
Page 424 of 530

4227-2. Steps to take in an emergency
4RUNNER (U)_(OM35A83U)
*1: Parking brake engaged warning buzzer:A buzzer will sound if the vehicle is driven at a speed of approximately 3
mph (5 km/h) or more.
*2: Open door warning buzzer:The open door warning buzzer sounds to alert one or more of the doors is
not fully closed (with the vehicle having reached a speed of 3 mph [5 km/h]).
*3: Driver’s and front passenger’s seat belt buzzer: The driver’s and front passenger’s seat belt buzzer sounds to alert the
driver and front passenger that
his or her seat belt is not fastened. The
buzzer sounds intermittently for 10 seconds after the vehicle reaches a
speed of 12 mph (20 km/h). Then, if the seat belt is still unfastened, the
buzzer will sound in a different tone for 20 more seconds.
■ SRS warning light
This warning light system monitors the airbag sensor assembly, front impact
sensors, side impact sensors (front door), side impact sensors (rear), safing
sensor (rear), driver's seat belt buckle switch, front passenger occupant clas-
sification system (ECU and sensors) , “AIR BAG ON” and “AIR BAG OFF”
indicator lights, front passenger's seat belt buckle switch, seat belt preten-
sioners, airbags, interconnecting wiring and power sources. (P. 3 5 )
■ Key reminder buzzer (vehicles without a smart key system)
The buzzer indicates that the key has not been removed with the engine off
and the driver’s door opened.
■ Open moon roof reminder buzzer (if equipped)
The buzzer indicates that the moon roof is not fully closed with the engine off
and the driver’s door opened.
■ Front passenger detection sensor, passenger seat belt reminder and
warning buzzer
● If luggage is placed on the front passenger seat, the front passenger detec-
tion sensor may cause the warning light to flash and the warning buzzer to
sound even if a passenger is not sitting in the seat.
● If a cushion is placed on the seat, the sensor may not detect a passenger,
and the warning light may not operate properly.
■ If the malfunction indicator la mp comes on while driving
First check the following:
● Is the fuel tank empty?
If it is, fill the fuel tank immediately.
● Is the fuel tank cap loose?
If it is, tighten it securely.
The light will go off after several driving trips.
If the light does not go off even after several trips, contact your Toyota dealer
as soon as possible.
Page 432 of 530
4307-2. Steps to take in an emergency
4RUNNER (U)_(OM35A83U)
Con-
tinu-
ousCon-
tinu-
ous
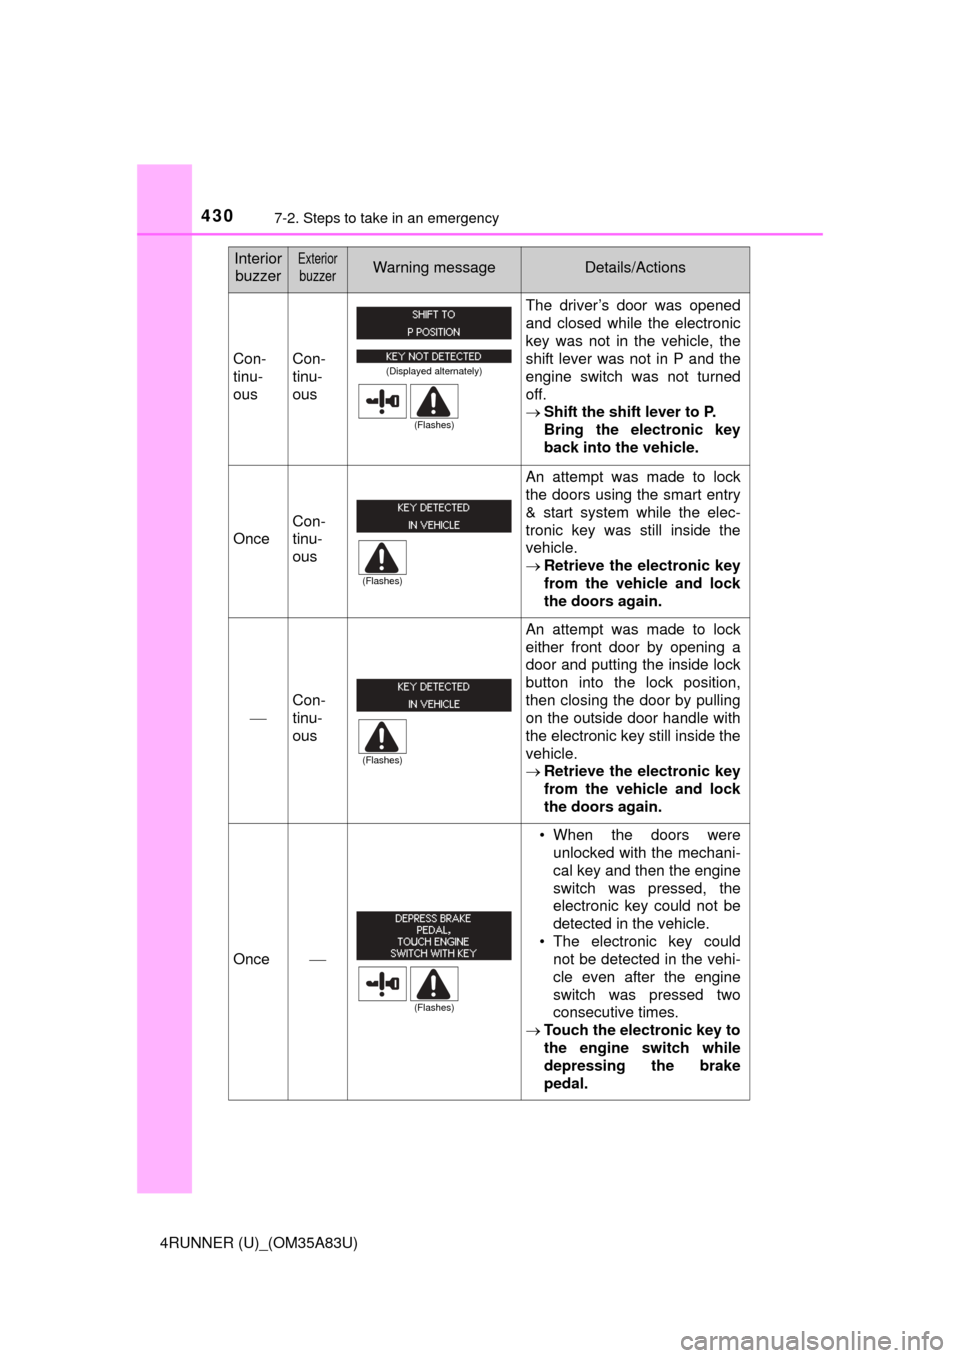
The driver’s door was opened
and closed while the electronic
key was not in the vehicle, the
shift lever was not in P and the
engine switch was not turned
off.
Shift the shift lever to P.
Bring the electronic key
back into the vehicle.
Once
Con-
tinu-
ous
An attempt was made to lock
the doors using the smart entry
& start system while the elec-
tronic key was still inside the
vehicle.
Retrieve the electronic key
from the vehicle and lock
the doors again.
Con-
tinu-
ous
An attempt was made to lock
either front door by opening a
door and putting the inside lock
button into the lock position,
then closing the door by pulling
on the outside door handle with
the electronic key still inside the
vehicle.
Retrieve the electronic key
from the vehicle and lock
the doors again.
Once
• When the doors were
unlocked with the mechani-
cal key and then the engine
switch was pressed, the
electronic key could not be
detected in the vehicle.
• The electronic key could not be detected in the vehi-
cle even after the engine
switch was pressed two
consecutive times.
Touch the electronic key to
the engine switch while
depressing the brake
pedal.
Interior
buzzerExterior
buzzerWarning messageDetails/Actions
(Displayed alternately)
(Flashes)
(Flashes)
(Flashes)
(Flashes)
Page 437 of 530
4357-2. Steps to take in an emergency
7
When trouble arises
4RUNNER (U)_(OM35A83U)
CAUTION
■Using the tire jack
Improper use of the tire jack may cause the vehicle to suddenly fall off
the jack, leading to death or serious injury.
●Do not use the tire jack for any purpose other than replacing tires or
installing and removing tire chains.
●Only use the tire jack that comes with this vehicle for replacing a flat
tire.
Do not use it on other vehicles, and do not use other tire jacks for
replacing tires on this vehicle.
●Always check that the tire jack is securely set to the jack point.
●Do not put any part of your body und er the vehicle while it is supported
by the jack.
●Do not start or run the engine while your vehicle is supported by the
jack.
●Do not raise the vehicle while someone is inside.
●When raising the vehicle, do not put an object on or under the jack.
●Do not raise the vehicle to a height greater than that required to
replace the tire.
●Use a jack stand if it is necessary to get under the vehicle.
Vehicles with Automatic running boards
●Observe the following precautions. Failu re to do so may result in seri-
ous injury:
• When jacking up the vehicle, always turn the Automatic running boards switch off.
• When jacking up the vehicle, do not use an Automatic running board
as a jack point. The Automatic running board may break, causing
injuries.
Take particular care when lowering the vehicle to ensure that no one
working on or near the vehicle may be injured.
■Using the jack handle
Tighten all the jack handle bolts securely using a Phillips-head screw-
driver, to prevent the extension parts from coming apart unexpectedly.
Page 446 of 530
4447-2. Steps to take in an emergency
4RUNNER (U)_(OM35A83U)
Lower the vehicle.
Firmly tighten each wheel nut
two or three times in the order
shown in the illustration.
Tightening torque:
81 ft•lbf (110 N•m, 11.2 kgf•m)
Lay down the tire with the outer
side facing up, and install the
holding bracket.
Insert the holding bracket tab into
one of the holes in the wheel.
Raise the tire.
Vehicles with kinetic dynamic susp ension: Pull the tire toward the
rear of the vehicle when raising. After raising, visually check that
tire is not interfering with components.
Stow the tools and jack securely, and replace the cover.
3
4
Stowing the flat/spare tire, jack and tools
1
2
3
Page 485 of 530
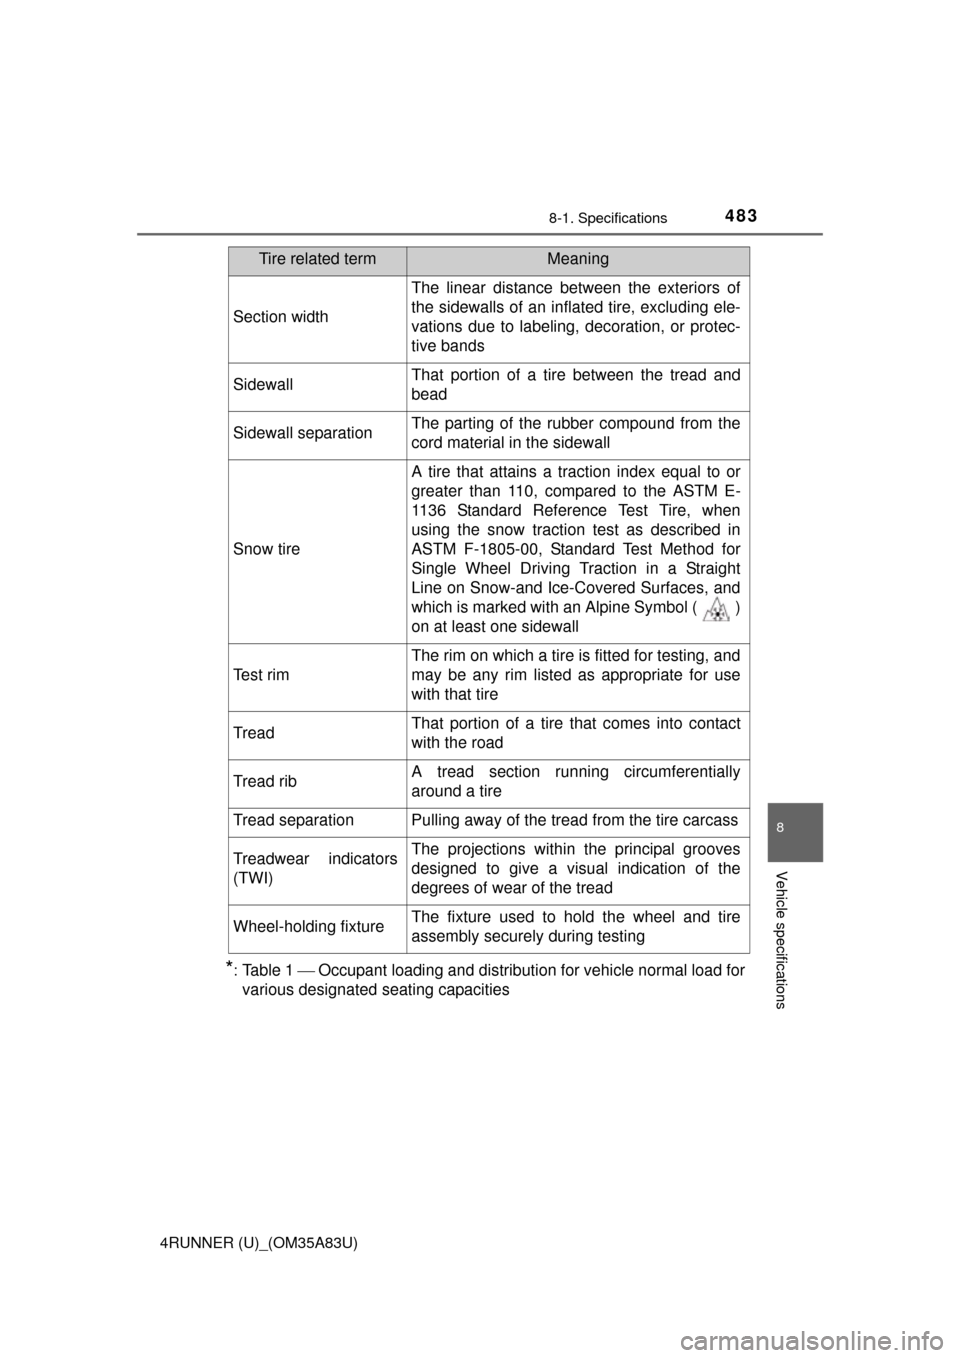
4838-1. Specifications
8
Vehicle specifications
4RUNNER (U)_(OM35A83U)
*:Table 1 Occupant loading and distribution for vehicle normal load for
various designated seating capacities
Section width
The linear distance between the exteriors of
the sidewalls of an inflated tire, excluding ele-
vations due to labeling, decoration, or protec-
tive bands
SidewallThat portion of a tire between the tread and
bead
Sidewall separationThe parting of the rubber compound from the
cord material in the sidewall
Snow tire
A tire that attains a traction index equal to or
greater than 110, compared to the ASTM E-
1136 Standard Reference Test Tire, when
using the snow traction test as described in
ASTM F-1805-00, Standard Test Method for
Single Wheel Driving Traction in a Straight
Line on Snow-and Ice-Covered Surfaces, and
which is marked with an Alpine Symbol ( )
on at least one sidewall
Test rim
The rim on which a tire is fitted for testing, and
may be any rim listed as appropriate for use
with that tire
TreadThat portion of a tire that comes into contact
with the road
Tread ribA tread section running circumferentially
around a tire
Tread separationPulling away of the tread from the tire carcass
Treadwear indicators
(TWI)The projections within the principal grooves
designed to give a visual indication of the
degrees of wear of the tread
Wheel-holding fixtureThe fixture used to hold the wheel and tire
assembly securely during testing
Tire related termMeaning
Page 497 of 530
495
9
For owners
4RUNNER (U)_(OM35A83U)
●Déroulez la sangle diagonale
de telle sorte qu’elle passe bien
sur l’épaule, sans pour autant
être en contact avec le cou ou
glisser de l’épaule.
● Placez la sangle abdominale le
plus bas possible sur les han-
ches.
● Réglez la position du dossier de
siège. Asseyez-vous le dos le
plus droit possible et calez-
vous bien dans le siège.
● Ne vrillez pas la ceinture de
sécurité.
■Ceintures de sécurité
Nettoyez avec un chiffon ou une éponge humectée d’eau savon-
neuse tiède. Vérifiez régulièrem ent que les ceintures ne sont pas
effilochées, entaillées ou exagérément usées.
Seat belt instructions for Canadian owners
(in French)
The following is a French explan ation of seat belt instructions
extracted from the seat be lt section in this manual.
See the seat belt section for more detailed seat belt instructions in
English.
Utilisation correcte des ceintures de sécurité
Entretien et soin