2014 TESLA MODEL S warning
[x] Cancel search: warningPage 41 of 152

4.1
DRIVING
Driver Profiles
Creating a Driver Profile ............................... 4.2
Restoring a Driver’s Profile .......................... 4.2
Saved Driver Settings .................................... 4.2
Steering Wheel
Adjusting Position ........................................... 4.3
Adjusting Sensitivity ...................................... 4.3
Using Left Steering Wheel Buttons.......... 4.3
Using Right Steering Wheel Buttons ....... 4.4
Horn ...................................................................... 4.4
MirrorsAdjusting Exterior Side Mirrors.................. 4.5
Rear View Mirror .............................................. 4.5
Starting and Powering Off
Starting Model S .............................................. 4.6
Powering Off ..................................................... 4.6
Gears
Shifting Gears ................................................... 4.7
Leaving Model S in Neutral (Tow Mode) 4.7
Instrument Panel
Instrument Panel Overview ......................... 4.8
Indicator Lights ................................................ 4.9
LightsControlling Lights ............................................ 4.11
Headlight High Beams .................................. 4.12
Headlights After Exit..................................... 4.13
Cornering Lights ............................................. 4.13
Turn Signals ...................................................... 4.14
Hazard Warning Flashers ............................ 4.14
Wipers and WashersWipers................................................................. 4.15
Washers ............................................................. 4.15
Park Assist
How Park Assist Works ................................ 4.16
Visual and Audio Feedback ....................... 4.16
Controlling Audible Feedback .................. 4.17
Limitations and False Warnings ............... 4.17
Other Parking Aids ........................................ 4.17
Trip Information
Displaying Trip Information ....................... 4.18
Energy Usage
Displaying Energy Usage ............................ 4.19
Driving Tips to Maximize Range .............. 4.19
Brakes
Braking Systems............................................ 4.20
Brake Wear ..................................................... 4.20
Regenerative Braking.................................... 4.21
Parking Brake ................................................... 4.21
Traction Control
How It Works................................................... 4.22
Cruise ControlOperating Cruise Control ........................... 4.23
Changing the Cruising Speed ................... 4.23
Canceling and Resuming ............................ 4.23
Rear View CameraCamera Location ........................................... 4.24
book.book Page 1 Friday, July 19, 2013 12:53 PM
Page 43 of 152

Steering Wheel
DRIVING4.3
Steering WheelAdjusting Position
Adjust the steering wheel to the desired driving
position by moving the control on the left side
of the steering column.
WARNING: Do not make adjustments
while driving. Doing so increases the
likelihood of a collision.
Adjusting Sensitivity
You can adjust the feel and sensitivity of the
steering system to suit your personal
preference:
1.On the touchscreen, touch Controls.
2.Choose a steering option:
•Comfort - reduces the effort required to
turn the wheel. In town, Model S feels
easier to drive and park.
•Standard - Tesla believes that this setting
offers the best handling and response in
all conditions.
•Sport - Increases the effort required to
turn the wheel. When driving at higher
speeds, Model S feels more responsive.
The only way to really know which option you
like best is to try them.
Using Left Steering Wheel Buttons
Use the buttons on the left side of the steering
wheel to change radio stations, control the
media player’s volume, and control what
displays on the left side of the instrument panel
whenever the Navigation app is not displaying
instructions.
NOTE: The volume control on the steering
wheel does not adjust spoken navigation
instructions. To control the volume of
navigation instructions, use the navigation
window on the touchscreen (see page 5.19).
1. Next
If you are listening to local radio and you
have defined more than one radio preset,
(see page 5.12) press to play the next preset
in the radio band that is currently playing. If
you have not defined more than one preset,
press to go to the next available frequency.
If you are listening to Internet radio, or to an
audio file on a connected Bluetooth or USB
device, press to skip to the next song or
station.
2. Scroll Wheel
•To adjust the media volume, roll up or
down.
•To mute the media volume, or to
pause/play an audio file, tap the wheel.
•To choose what displays on the left side
of the instrument panel, press the scroll
wheel to display the available options.
Then roll the scroll wheel to browse
through the options. Tap the scroll wheel
when the option you want is selected.
3. Previous
Same as described above for Next, except it
skips to the previous song or station.
NOTE: Regardless of how you customize the
left side of the instrument panel, it
automatically changes to display navigation
instructions (if applicable), or to let you know if
a door or trunk is open when Model S is in a
driving gear.
book.book Page 3 Friday, July 19, 2013 12:53 PM
Page 50 of 152

Instrument PanelInstrument Panel
4.10MODEL S OWNERS MANUAL An ABS (Anti-lock Braking System) fault is detected. See page 4.20. Contact Tesla
immediately.
A brake system fault is detected or the brake fluid level is low. See page 4.20. Contact
Tesla immediately.
Tire pressure warning. The pressure of a tire is out of range. If a fault with the Tire
Pressure Monitoring System (TPMS) is detected, the indicator flashes. For a TPMS
fault, contact Tesla. See page 7.3.
A door or trunk is open. See page 2.4.
Flashes green when the left turn signal is operating. Both turn signal indicators flash
green when the hazard warning flashers are operating.
Flashes green when the right turn signal is operating. Both turn signal indicators flash
green when the hazard warning flashers are operating.
Model S is in Tow mode and can roll freely. It does not automatically shift into Park
when you exit. See page 9.3.
Indicator Description
book.book Page 10 Friday, July 19, 2013 12:53 PM
Page 54 of 152

LightsLights
4.14MODEL S OWNERS MANUAL
Turn Signals
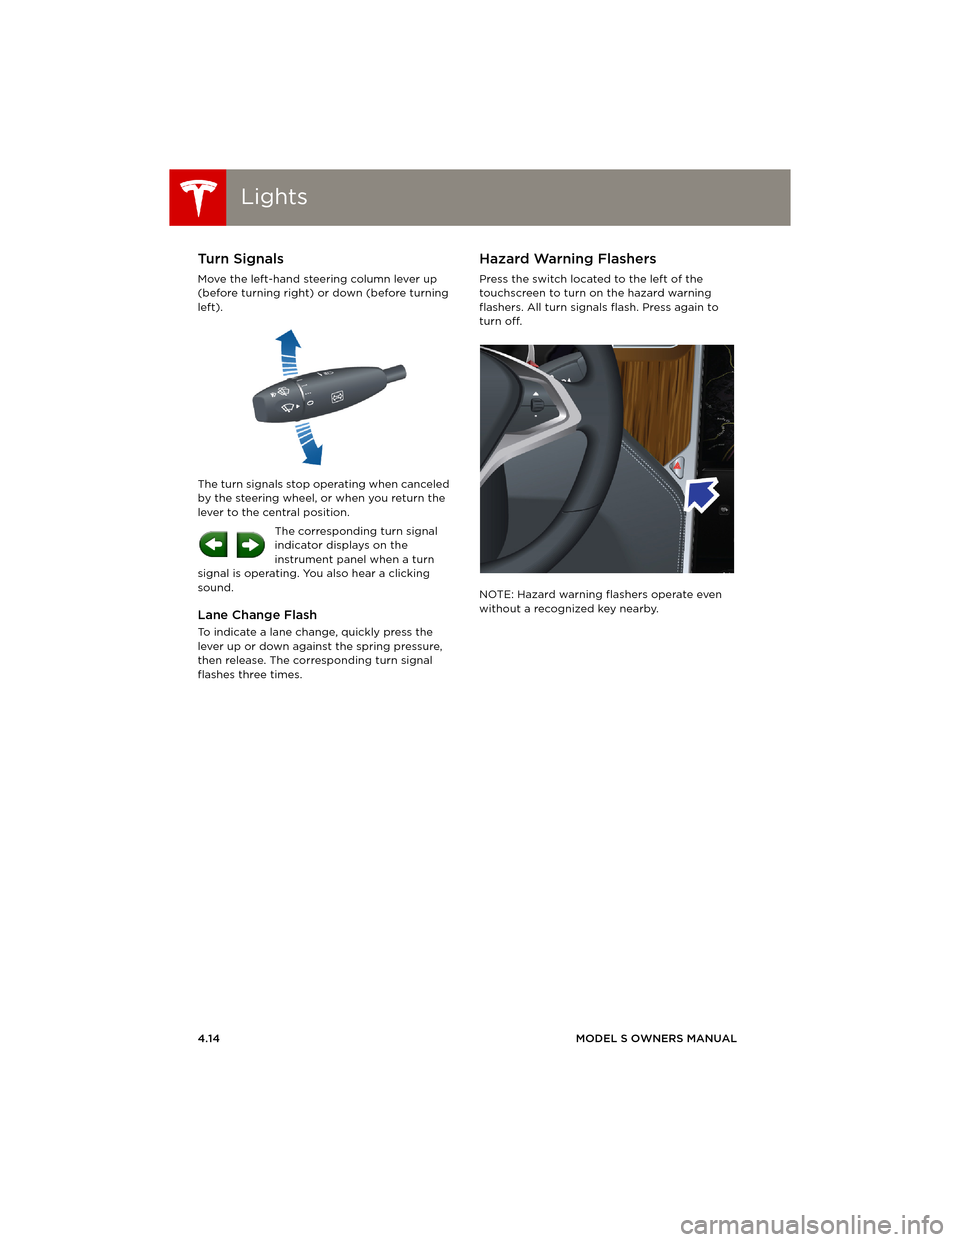
Move the left-hand steering column lever up
(before turning right) or down (before turning
left).
The turn signals stop operating when canceled
by the steering wheel, or when you return the
lever to the central position.
The corresponding turn signal
indicator displays on the
instrument panel when a turn
signal is operating. You also hear a clicking
sound.
Lane Change Flash
To indicate a lane change, quickly press the
lever up or down against the spring pressure,
then release. The corresponding turn signal
flashes three times.
Hazard Warning Flashers
Press the switch located to the left of the
touchscreen to turn on the hazard warning
flashers. All turn signals flash. Press again to
turn off.
NOTE: Hazard warning flashers operate even
without a recognized key nearby.
book.book Page 14 Friday, July 19, 2013 12:53 PM
Page 56 of 152

Park AssistPark Assist
4.16MODEL S OWNERS MANUAL
Park AssistHow Park Assist Works
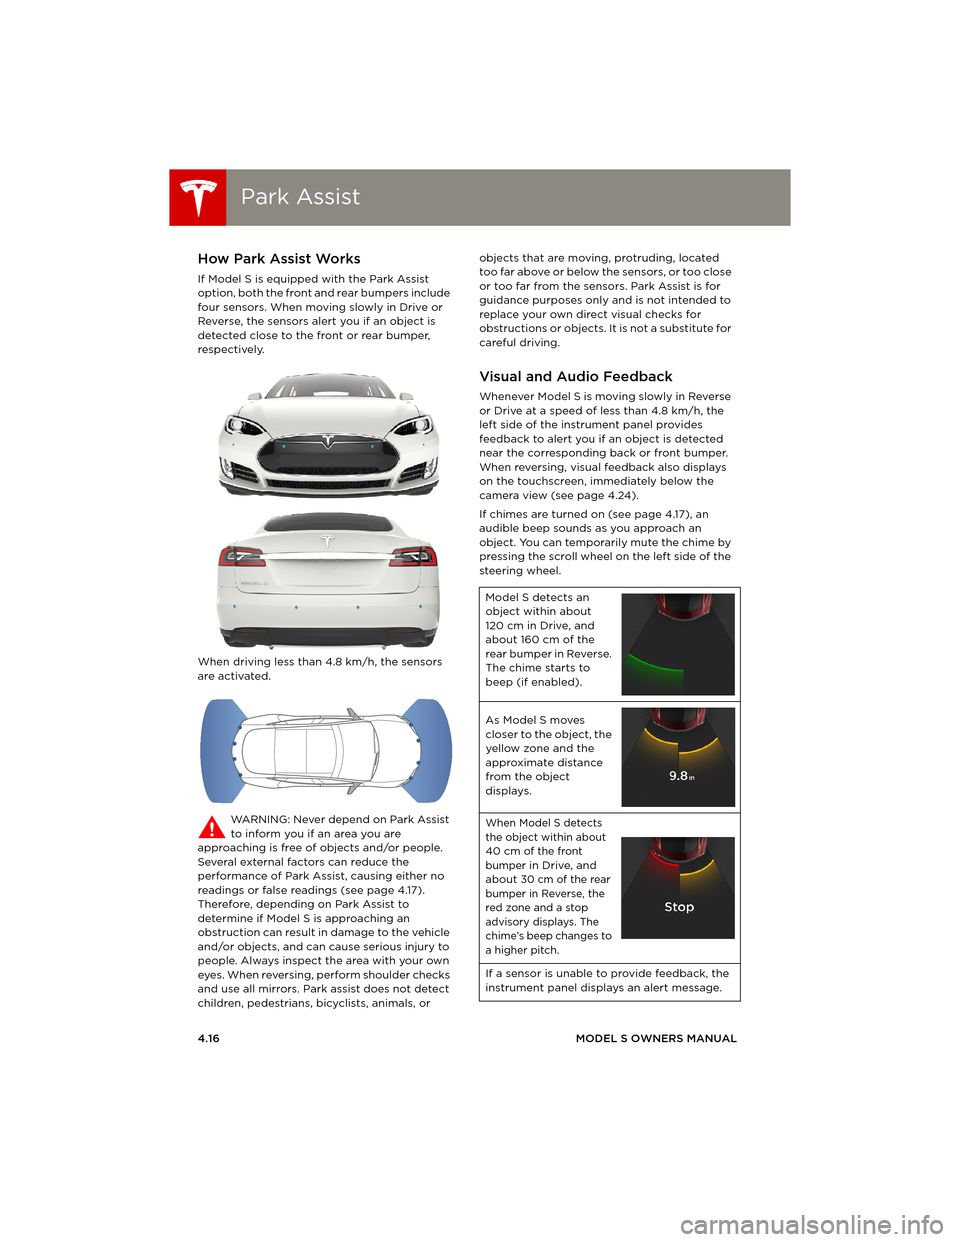
If Model S is equipped with the Park Assist
option, both the front and rear bumpers include
four sensors. When moving slowly in Drive or
Reverse, the sensors alert you if an object is
detected close to the front or rear bumper,
respectively.
When driving less than 4.8 km/h, the sensors
are activated.
WARNING: Never depend on Park Assist
to inform you if an area you are
approaching is free of objects and/or people.
Several external factors can reduce the
performance of Park Assist, causing either no
readings or false readings (see page 4.17).
Therefore, depending on Park Assist to
determine if Model S is approaching an
obstruction can result in damage to the vehicle
and/or objects, and can cause serious injury to
people. Always inspect the area with your own
eyes. When reversing, perform shoulder checks
and use all mirrors. Park assist does not detect
children, pedestrians, bicyclists, animals, or objects that are moving, protruding, located
too far above or below the sensors, or too close
or too far from the sensors. Park Assist is for
guidance purposes only and is not intended to
replace your own direct visual checks for
obstructions or objects. It is not a substitute for
careful driving.
Visual and Audio Feedback
Whenever Model S is moving slowly in Reverse
or Drive at a speed of less than 4.8 km/h, the
left side of the instrument panel provides
feedback to alert you if an object is detected
near the corresponding back or front bumper.
When reversing, visual feedback also displays
on the touchscreen, immediately below the
camera view (see page 4.24).
If chimes are turned on (see page 4.17), an
audible beep sounds as you approach an
object. You can temporarily mute the chime by
pressing the scroll wheel on the left side of the
steering wheel.
Model S detects an
object within about
120 cm in Drive, and
about 160 cm of the
rear bumper in Reverse.
The chime starts to
beep (if enabled).
As Model S moves
closer to the object, the
yellow zone and the
approximate distance
from the object
displays.
When Model S detects
the object within about
40 cm of the front
bumper in Drive, and
about 30 cm of the rear
bumper in Reverse, the
red zone and a stop
advisory displays. The
chime’s beep changes to
a higher pitch.
If a sensor is unable to provide feedback, the
instrument panel displays an alert message.
book.book Page 16 Friday, July 19, 2013 12:53 PM
Page 57 of 152

Park Assist
DRIVING4.17 CAUTION: Keep sensors clean from dirt,
debris, snow, and ice. Avoid using a high
pressure power washer on the sensors
and do not clean a sensor with a sharp or
abrasive object that can scratch or
damage its surface.
CAUTION: Do not install accessories or
stickers on or near the parking sensors.
Controlling Audible Feedback
You can use Park Assist with or without audible
feedback. To turn chimes on or off, touch
Controls > Settings > Safety & Security > Park
Assist Chimes.
You can also mute the chimes temporarily by
pressing the scroll wheel on the left side of the
steering wheel. The chimes are muted until you
shift into a different gear or drive over
4.8 km/h.
Limitations and False Warnings
The parking sensors may not function correctly
in these situations:
•One or more of the parking sensors is
damaged, dirty, or covered (such as mud,
ice, or snow).
•Object is located below approximately
20 cm (such as a curb or low barrier).
•Weather conditions (heavy rain, snow, or
fog) are interfering with sensor operation.
•Object is thin (such as a sign post).
•A sensor’s operating range has been
exceeded.
•Object is sound-absorbing or soft (such as
powder snow).
•Object is sloped (such as a sloped
embankment).
•Model S has been parked in, or is being
driven in, extremely hot or cold
temperatures.
•The sensors are affected by other electrical
equipment or devices that generate
ultrasonic waves.
•Object is located too close to the bumper.
•A bumper is misaligned or damaged.
•An object that is mounted to Model S is
interfering with and/or obstructing the
sensor (such as a bike rack or a bumper
sticker).
Other Parking Aids
In addition to Park Assist, when shifted into
Reverse gear, the backup camera displays a
view of the area behind Model S. See
page 4.24.
book.book Page 17 Friday, July 19, 2013 12:53 PM
Page 60 of 152

BrakesBrakes
4.20MODEL S OWNERS MANUAL
BrakesBraking Systems
Model S has an anti-lock braking system (ABS)
that prevents the wheels from locking when
you apply maximum brake pressure. This
improves steering control during heavy braking
in most road conditions.
During emergency braking conditions, the ABS
constantly monitors the speed of each wheel
and varies the brake pressure according to the
grip available.
The alteration of brake pressure can be felt as a
pulsing sensation through the brake pedal. This
demonstrates that ABS is operating and is not
a cause for concern. Keep firm and steady
pressure on the brake pedal while experiencing
the pulsing.
The ABS indicator flashes briefly on the
instrument panel when you first start
Model S. If this indicator displays at any
other time, an ABS fault has occurred
and ABS is not operating. Contact Tesla.
The braking system remains fully
operational and is not affected by an
ABS failure. However, braking distances
may increase.
If the instrument panel displays this
indicator at any time other than
displaying briefly when you first start
Model S, a brake system fault is
detected or the brake fluid level is low.
Contact Tesla immediately.
Emergency Braking
In an emergency, fully press the brake pedal
and maintain firm pressure, even on low
traction surfaces. ABS varies the braking
pressure to each wheel according to the
amount of traction available. This prevents
wheels from locking and ensures that you stop
as safely as possible.
WARNING: Do not pump the brake pedal.
Doing so interrupts operation of the ABS
and can increase braking distance.
WARNING: Always maintain a safe
distance from the vehicle in front of you
and be aware of hazardous driving conditions.
While ABS can improve stopping distance, it
cannot overcome the laws of physics. It also
does not prevent the danger of hydroplaning
(where a layer of water prevents direct contact
between the tires and the road).
Brake Wear
Model S brake pads are equipped with wear
indicators. A wear indicator is a thin metal strip
attached to the brake pad that squeals as it
rubs against the rotor when the pad wears
down. This squealing sound indicates that the
brake pads have reached the end of their
service life and require replacement. To stop
the squealing, contact Tesla Service.
Brakes must be periodically inspected visually
by removing the tire and wheel. For detailed
specifications and service limits for rotors and
brake pads, see page 8.6.
WARNING: Neglecting to replace worn
brake pads will result in damage to the
braking system and can create a braking
hazard.
book.book Page 20 Friday, July 19, 2013 12:53 PM
Page 62 of 152

Traction ControlTraction Control
4.22MODEL S OWNERS MANUAL
Tr a c t i o n C o n t r o lHow It Works
The traction control system constantly
monitors the difference in speed between the
front and rear wheels. If Model S experiences a
loss of traction, the traction control system
minimizes wheel spin by controlling brake
pressure and motor power.
The electronic stability control indicator
displays on the instrument panel
whenever the traction control system is
actively controlling brake pressure and
motor power.
WARNING: Traction control does not
prevent accidents caused by driving
dangerously or turning too sharply at high
speeds.
Turning Off
Under normal conditions, you should leave
traction control on. Turn it off only in
circumstances where you deliberately want the
wheels to spin, such as:
•Starting on a loose surface, such as gravel
or snow.
•Driving in deep snow, sand or mud.
•Rocking out of a hole or deep rut.
To turn traction control off, touch
Controls > Driving > Traction Control > Off.
The Traction Control Off indicator
displays at the top center of the
touchscreen whenever the traction
control system is turned off.
Although traction control turns on again
automatically the next time you start Model S,
turn it on using the touchscreen as soon as the
circumstances that required you to turn it off
have passed.
TC
book.book Page 22 Friday, July 19, 2013 12:53 PM