Page 323 of 414

11-4Maintenance and service/Maintenance precautions
guard against getting oil or fluids
in your eyes. If something does
get in your eyes, thoroughly
wash them out with clean water.
. Do not tamper with the wiring of
the SRS airbag system or seat-
belt pretensioner system, or at-
tempt to take its connectors
apart, as that may activate the
system or it can render it inop-
erative. NEVER use a circuit
tester for this wiring.
If your SRS airbag or seatbelt
pretensioner needs service, con-
sult your nearest SUBARU deal-
er. &
Before checking or servicing
in the engine compartment
WARNING
. Always stop the engine and set
the parking brake firmly to pre-
vent the vehicle from moving.
. Always let the engine cool down.
Engine parts become very hot
when the engine is running and
remain hot for some time after
the engine is stopped.
. Do not spill engine oil, engine
coolant, brake fluid or any other
fluid on hot engine components.
This may cause a fire.
. Always remove the key from the
ignition switch. When the ignition
switch is in the “ON ”position,
thecoolingfanmayoperate
suddenly even when the engine
is stopped.
. Before performing any servicing
on a vehicle equipped with a
remote engine start system (a
dealer option) temporarily place
that system in the service mode
to prevent it from unexpectedly
starting the engine. &
When checking or servicing
in the engine compartment
CAUTION
Do not contact the belt cover while
checking the components in the
engine compartment. Doing so may
cause your hand to slip off the belt
cover and result in an unexpected
injury.
Page 325 of 414
11-6Maintenance and service/Engine compartment overview
Engine compartment overview &Turbo models except STI1) Power steering fluid reservoir
(page 11-17)
2) Manual transmission oil level gauge (MT) (page 11-16)
3) Clutch fluid reservoir (page 11-19)
4) Brake fluid reservoir (page 11-18)
5) Fuse box (page 11-38)
6) Battery (page 11-37)
7) Windshield washer tank (page 11-31)
8) Engine oil filler cap (page 11-8)
9) Engine coolant reservoir (page 11-12)
10) Engine oil level gauge (page 11-8)
11) Radiator cap (page 11-12)
12) Air cleaner case (page 11-13)
Page 335 of 414

11-16Maintenance and service/Manual transmission oil
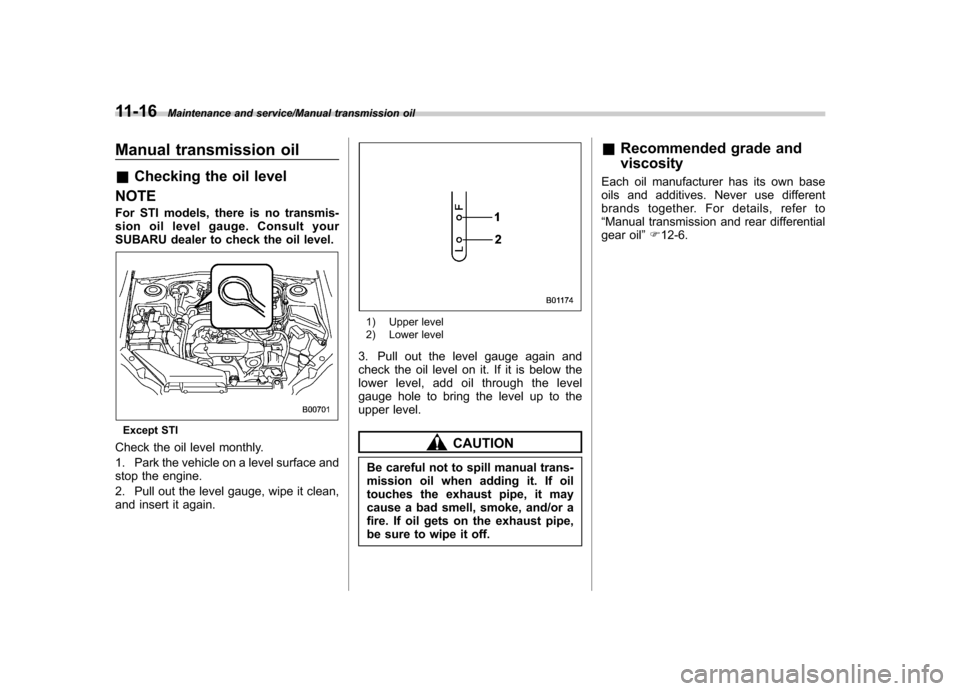
Manual transmission oil &Checking the oil level
NOTE
For STI models, there is no transmis-
sion oil level gauge. Consult your
SUBARU dealer to check the oil level.
Except STI
Check the oil level monthly.
1. Park the vehicle on a level surface and
stop the engine.
2. Pull out the level gauge, wipe it clean,
and insert it again.
1) Upper level
2) Lower level
3. Pull out the level gauge again and
check the oil level on it. If it is below the
lower level, add oil through the level
gauge hole to bring the level up to the
upper level.
CAUTION
Be careful not to spill manual trans-
mission oil when adding it. If oil
touches the exhaust pipe, it may
cause a bad smell, smoke, and/or a
fire. If oil gets on the exhaust pipe,
be sure to wipe it off. &
Recommended grade and viscosity
Each oil manufacturer has its own base
oils and additives. Never use different
brands together. For details, refer to“ Manual transmission and rear differential
gear oil ”F 12-6.
Page 354 of 414
&Rear window wiper blade
assembly (5-door models)
1. Raise the wiper arm off the rear
window.
2. Turn the wiper blade assembly coun- terclockwise.
3. Pull the wiper blade assembly toward
you to remove it from the wiper arm.
4. Install the wiper blade assembly to the
wiper arm. Make sure that it locks in place.
5. Hold the wiper arm by hand and slowly
lower it in position. &
Rear window wiper blade
rubber (5-door models)
1. Pull out the end of the blade rubber
assembly to unlock it from the plasticsupport.
Maintenance and service/Replacement of wiper blades11-35
– CONTINUED –
Page 358 of 414

corresponding fuse. If a fuse has blown,
replace it.
1. Turn the ignition switch to the“LOCK ”
position and turn off all electrical acces- sories.
2. Remove the cover.
3. Determine which fuse may be blown.
Look at the back side of each fuse box
cover and refer to “Fuses and circuits ”
F 12-10.
4. Pull out the fuse with the fuse puller.
5. Inspect the fuse. If it has blown,
replace it with a spare fuse of the samerating.
6. If the same fuse blows again, this
indicates that its system has a problem.
Contact your SUBARU dealer for repairs. Installation of accessories
Always consult your SUBARU dealer
before installing fog lights or any other
electrical equipment in your vehicle. Such
accessories may cause the electronic
system to malfunction if they are incor-
rectly installed or if they are not suited for
the vehicle.
Replacing bulbs
WARNING
Bulbs may become very hot while
illuminated. Before replacing bulbs,
turn off the lights and wait until the
bulbs cool down. Otherwise, there is
a risk of sustaining a burn injury.
CAUTION
Replace any bulb only with a new
bulb of the specified wattage. Using
a bulb of different wattage could
result in a fire. For the specified
wattage of each bulb, refer to “Bulb
chart ”F 12-14.
& Headlights (models with HID headlights)
WARNING
High-intensity-discharge (HID) bulbs
are used for the low beams of the
headlights. These HID bulbs use an
extremely high voltage. To avoid the
risk of an electric shock that could
result in serious injury, observe the
Maintenance and service/Installation of accessories11-39
– CONTINUED –
Page 359 of 414

11-40Maintenance and service/Replacing bulbs
following precautions. .Do not replace any headlight
bulbs (both low beam and high
beam) by yourself.
. Do not remove/restore the head-
light assemblies by yourself.
. Do not remove any headlight-
assembly components by your-self.
For replacement, contact your
SUBARU dealer.
& Headlights (models without
HID headlights)
CAUTION
Halogen headlight bulbs become
very hot while in use. If you touch
the bulb surface with bare hands or
greasy gloves, fingerprints or
grease on the bulb surface will
develop into hot spots, causing the
bulb to break. If there are finger
prints or grease on the bulb surface,
wipe them away with a soft cloth
moistened with alcohol. NOTE .
If headlight aiming is required, con-
sult your SUBARU dealer for proper
adjustment of the headlight aim.. It may be difficult to replace the
bulbs. Have the bulbs replaced by your
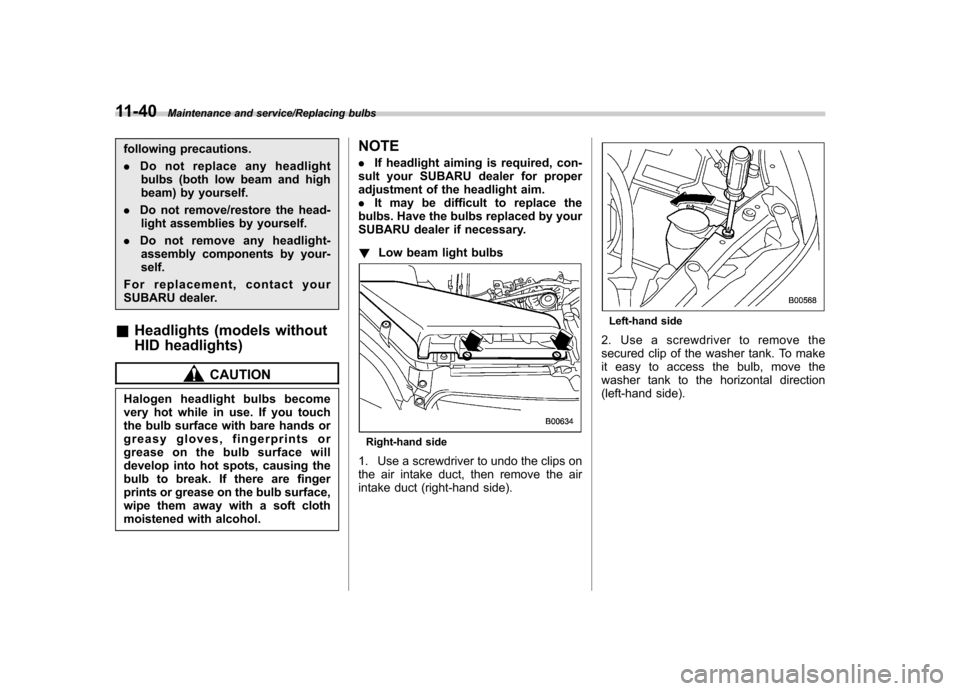
SUBARU dealer if necessary. ! Low beam light bulbs
Right-hand side
1. Use a screwdriver to undo the clips on
the air intake duct, then remove the air
intake duct (right-hand side).
Left-hand side
2. Use a screwdriver to remove the
secured clip of the washer tank. To make
it easy to access the bulb, move the
washer tank to the horizontal direction
(left-hand side).
Page 362 of 414
Type B
1. Remove the clips.
2. Turn over the mud guard.
3. Disconnect the electrical connector.
1) View from driver ’s left-hand side
2) View from driver ’s right-hand side
4. Remove the bulb.
5. Replace the bulb with a new one.
6. After replacing the bulb, reattach the
mud guard. &
Rear combination lights
! 4-door models
1. Remove the clip from the rear trunk
trim with a screwdriver.
2. Open the rear portion of the side trunk
trim panel.
Maintenance and service/Replacing bulbs11-43
– CONTINUED –
Page 363 of 414

11-44Maintenance and service/Replacing bulbs
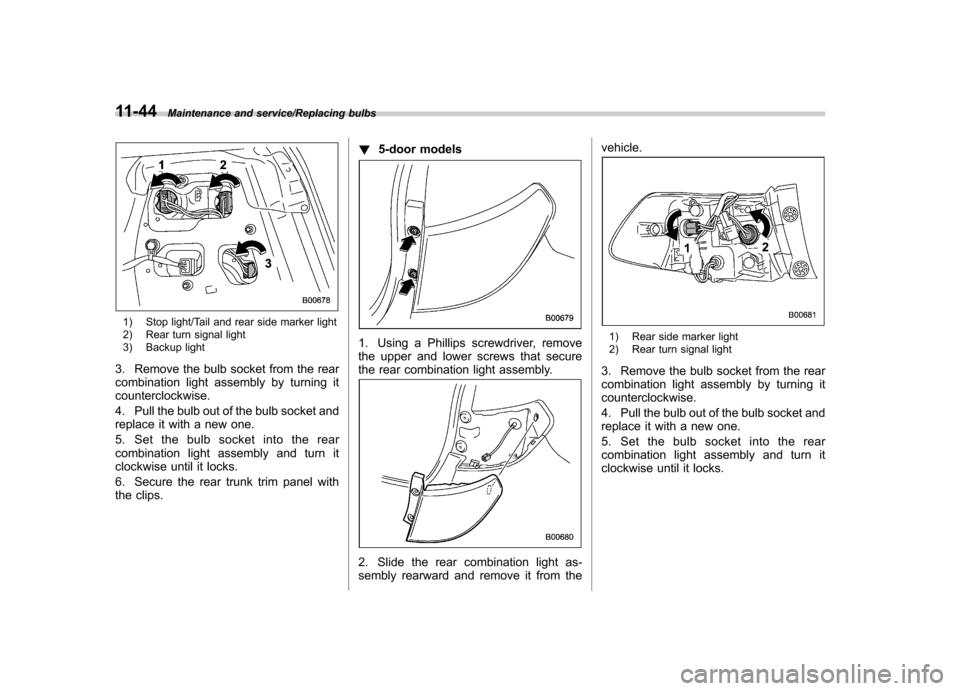
1) Stop light/Tail and rear side marker light
2) Rear turn signal light
3) Backup light
3. Remove the bulb socket from the rear
combination light assembly by turning itcounterclockwise.
4. Pull the bulb out of the bulb socket and
replace it with a new one.
5. Set the bulb socket into the rear
combination light assembly and turn it
clockwise until it locks.
6. Secure the rear trunk trim panel with
the clips. !
5-door models
1. Using a Phillips screwdriver, remove
the upper and lower screws that secure
the rear combination light assembly.
2. Slide the rear combination light as-
sembly rearward and remove it from the vehicle.
1) Rear side marker light
2) Rear turn signal light
3. Remove the bulb socket from the rear
combination light assembly by turning itcounterclockwise.
4. Pull the bulb out of the bulb socket and
replace it with a new one.
5. Set the bulb socket into the rear
combination light assembly and turn it
clockwise until it locks.