2014 SUBARU IMPREZA WRX page 1
[x] Cancel search: page 1Page 193 of 414
5-12Audio/FM/AM radio operation
Type B audio:Seek up
Seek down
In the PTY selection mode, when the
desired PTY group has been selected,
pressing the “SEEK ”button “
”or “”
seeks within that PTY group.
The control function returns to the normal
mode after approximately 10 seconds.
& Displaying radio PS (Pro-
gram Service Name) and RT
(Radio Text)
Type A audio
Type B audio
If the PS (Program Service Name) and/or
RT (Radio Text) are available, pressing the “TEXT ”button changes the display
among PS, RT and frequency. The initial setting is
“PS ”.
NOTE . The maximum number of characters
that can be displayed for PS is 8. . The maximum number of characters
that can be displayed for RT is 64.. If RT is 13 characters or longer,
press and hold the “TEXT ”button in
order to change the page. & Station preset
! How to preset stations
1. Select the preferred reception mode.
2. Select the preferred station.
3. Press and hold one of the preset
buttons (from
to) to store the
frequency. If the button is pressed briefly,
the preceding selection will remain in the
memory.
NOTE . Up to six stations for each reception
mode may be preset. . If the connection between the radio
and battery is broken for any reason
such as vehicle maintenance or radio
removal, all stations stored in the
preset buttons are cleared. If this
occurs, it is necessary to reset the preset buttons..
If a cell phone is placed near the
radio, it may cause the radio to emit
noise when a phone call is received.
This noise does not indicate a radiomalfunction. ! Selecting preset stations
1. Select the preferred reception mode.
2. Press the preferred preset button (from
to) briefly.
Page 202 of 414
resumed. To cancel the scan mode, press the“SCAN ”button again.
NOTE
The scan mode will be cancelled if you
perform any of the following steps. . Press the “RPT/RDM ”button
. Turn the “TUNE/TRACK/CH ”dial
. Press the “
”or “”side of the
“ FOLDER/PTY/CAT ”button
. Press the “
”button
. Press the disc select button (type A
audio) . Select the radio or AUX mode
. Press the “LOAD ”button when
there is free space in the CD magazine
(type A audio). Press the “PTY/CAT ”button
. Turn off the power of the audio
equipment. Turn the ignition switch to the
“ LOCK ”position
& Display selection
Type A audio
Type B audio
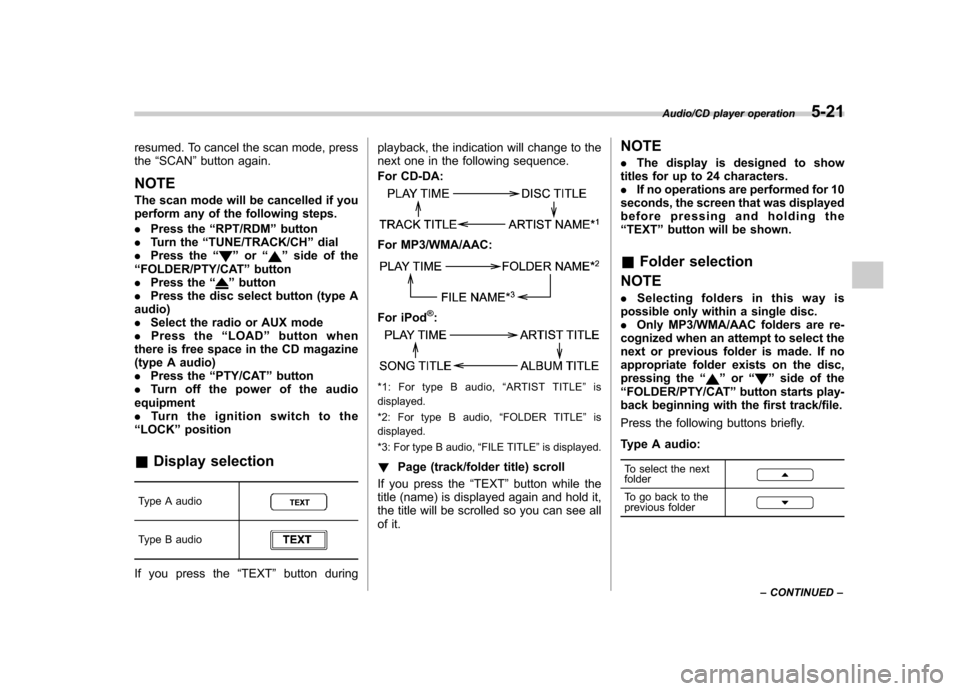
If you press the “TEXT ”button during playback, the indication will change to the
next one in the following sequence.
For CD-DA:
For MP3/WMA/AAC:
For iPod®:
*1: For type B audio,
“ARTIST TITLE ”is
displayed.
*2: For type B audio, “FOLDER TITLE ”is
displayed.
*3: For type B audio, “FILE TITLE ”is displayed.
! Page (track/folder title) scroll
If you press the “TEXT ”button while the
title (name) is displayed again and hold it,
the title will be scrolled so you can see all
of it. NOTE .
The display is designed to show
titles for up to 24 characters. . If no operations are performed for 10
seconds, the screen that was displayed
before pressing and holding the“ TEXT ”button will be shown.
& Folder selection
NOTE . Selecting folders in this way is
possible only within a single disc. . Only MP3/WMA/AAC folders are re-
cognized when an attempt to select the
next or previous folder is made. If no
appropriate folder exists on the disc,
pressing the “”or “”side of the
“ FOLDER/PTY/CAT ”button starts play-
back beginning with the first track/file.
Press the following buttons briefly.
Type A audio:
To select the next folder
To go back to the
previous folder
Audio/CD player operation5-21
– CONTINUED –
Page 211 of 414
5-30Audio/USB storage device / iPod®operations (type B audio)
iPod®. It randomly repeats all of the
tracks on the iPod®.
. When an iPod®is connected, the
files are played back at random by the
shuffle function of the iPod
®. There-
fore, iPod®operation may be different
depending on the model of the con-
nected iPod
®.
. When an audiobook or a podcast is
playing, the mode does not change
even if you press and hold the
button.
To cancel the random playback mode,
press and hold the
button and select
CANCEL. The “RDM ”indication will turn
off, and the normal playback mode will resume. & SCAN (only when connecting
USB storage device)
Scan is operated in the same way as for a
CD. For details, refer to “Scan ”F 5-20.
NOTE
When an iPod
®is connected, you
cannot select the SCAN mode.
& Selecting category (only
when connecting iPod
®)
When the
button is pressed briefly,
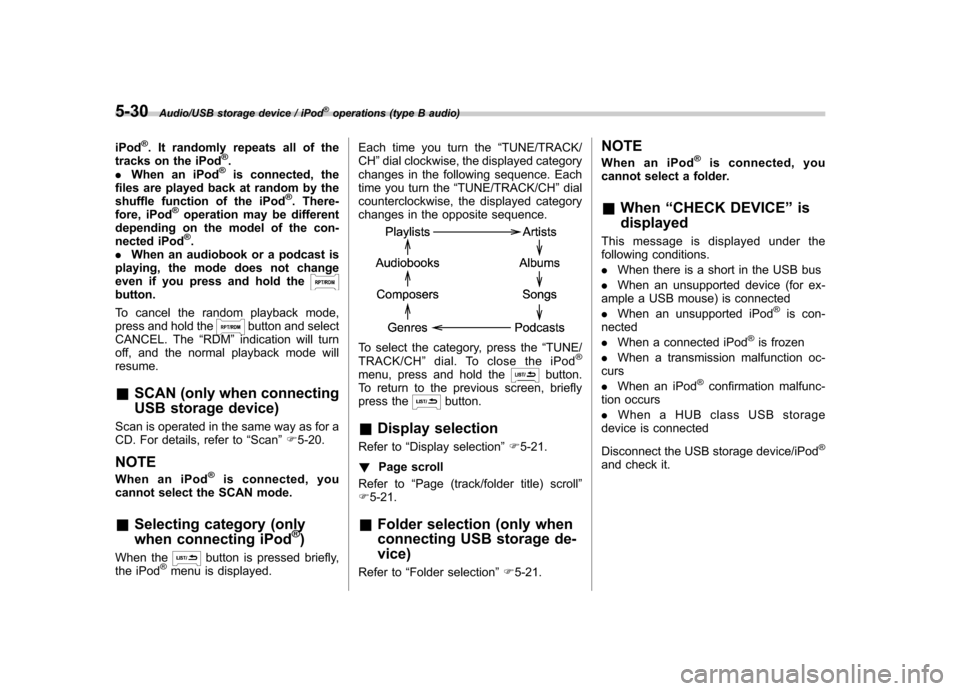
the iPod®menu is displayed. Each time you turn the
“TUNE/TRACK/
CH ”dial clockwise, the displayed category
changes in the following sequence. Each
time you turn the “TUNE/TRACK/CH ”dial
counterclockwise, the displayed category
changes in the opposite sequence.
To select the category, press the “TUNE/
TRACK/CH ”dial. To close the iPod®
menu, press and hold thebutton.
To return to the previous screen, briefly
press the
button.
& Display selection
Refer to “Display selection ”F 5-21.
! Page scroll
Refer to “Page (track/folder title) scroll ”
F 5-21.
& Folder selection (only when
connecting USB storage de- vice)
Refer to “Folder selection ”F 5-21. NOTE
When an iPod
®is connected, you
cannot select a folder. & When “CHECK DEVICE ”is
displayed
This message is displayed under the
following conditions. . When there is a short in the USB bus
. When an unsupported device (for ex-
ample a USB mouse) is connected. When an unsupported iPod
®is con-
nected . When a connected iPod
®is frozen
. When a transmission malfunction oc-
curs . When an iPod
®confirmation malfunc-
tion occurs. When a HUB class USB storage
device is connected
Disconnect the USB storage device/iPod
®
and check it.
Page 220 of 414
First menu Second menu Third menu Details Page
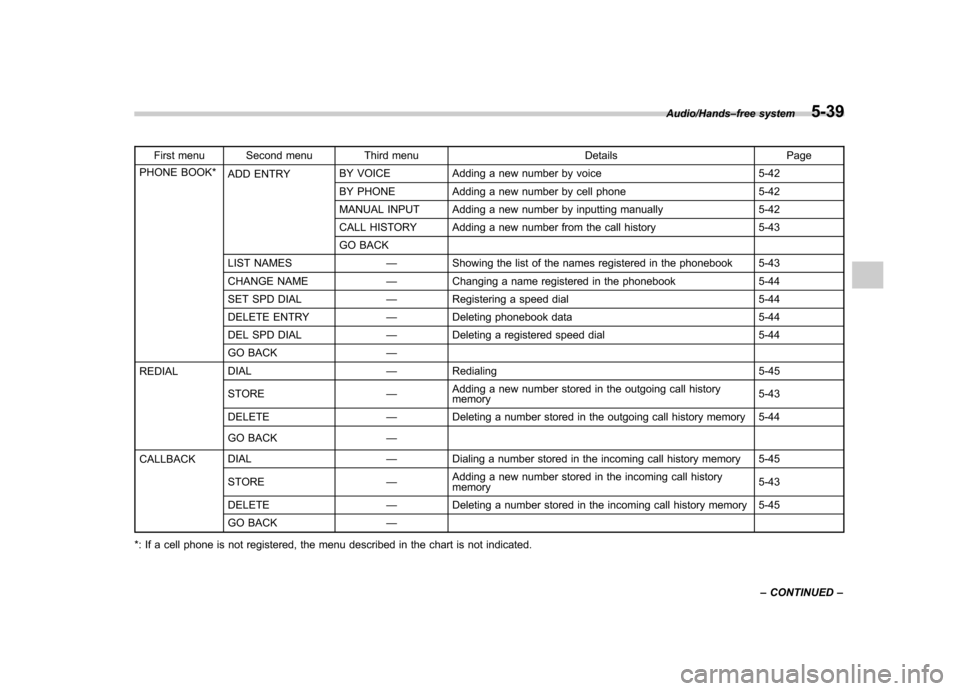
PHONE BOOK* ADD ENTRY BY VOICE Adding a new number by voice 5-42
BY PHONE Adding a new number by cell phone 5-42
MANUAL INPUT Adding a new number by inputting manually 5-42
CALL HISTORY Adding a new number from the call history 5-43
GO BACK
LIST NAMES —Showing the list of the names registered in the phonebook 5-43
CHANGE NAME —Changing a name registered in the phonebook 5-44
SET SPD DIAL —Registering a speed dial 5-44
DELETE ENTRY —Deleting phonebook data 5-44
DEL SPD DIAL —Deleting a registered speed dial 5-44
GO BACK —
REDIAL DIAL
—Redialing 5-45
STORE —Adding a new number stored in the outgoing call history memory 5-43
DELETE —Deleting a number stored in the outgoing call history memory 5-44
GO BACK —
CALLBACK DIAL
—Dialing a number stored in the incoming call history memory 5-45
STORE —Adding a new number stored in the incoming call historymemory 5-43
DELETE —Deleting a number stored in the incoming call history memory 5-45
GO BACK —
*: If a cell phone is not registered, the menu described in the chart is not indicated.
Audio/Hands –free system5-39
– CONTINUED –
Page 221 of 414
5-40Audio/Hands–free system
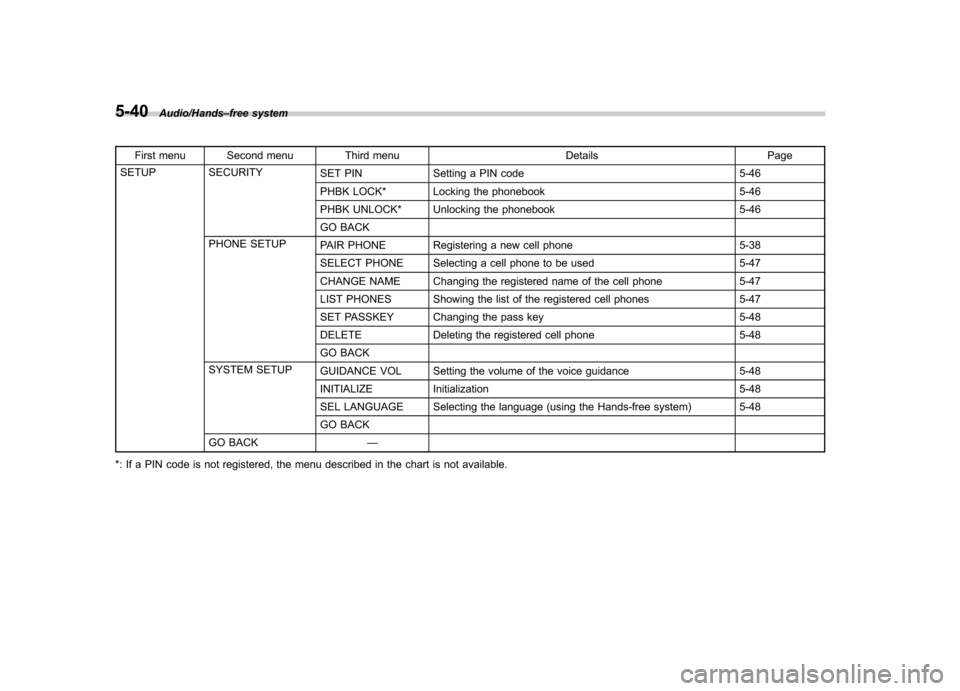
First menu Second menu Third menu Details Page
SETUP SECURITY SET PIN Setting a PIN code 5-46
PHBK LOCK* Locking the phonebook 5-46
PHBK UNLOCK* Unlocking the phonebook 5-46
GO BACK
PHONE SETUP PAIR PHONE Registering a new cell phone 5-38
SELECT PHONE Selecting a cell phone to be used 5-47
CHANGE NAME Changing the registered name of the cell phone 5-47
LIST PHONES Showing the list of the registered cell phones 5-47
SET PASSKEY Changing the pass key 5-48
DELETE Deleting the registered cell phone 5-48
GO BACK
SYSTEM SETUP GUIDANCE VOL Setting the volume of the voice guidance 5-48
INITIALIZE Initialization 5-48
SEL LANGUAGE Selecting the language (using the Hands-free system) 5-48
GO BACK
GO BACK —
*: If a PIN code is not registered, the menu described in the chart is not available.
Page 264 of 414
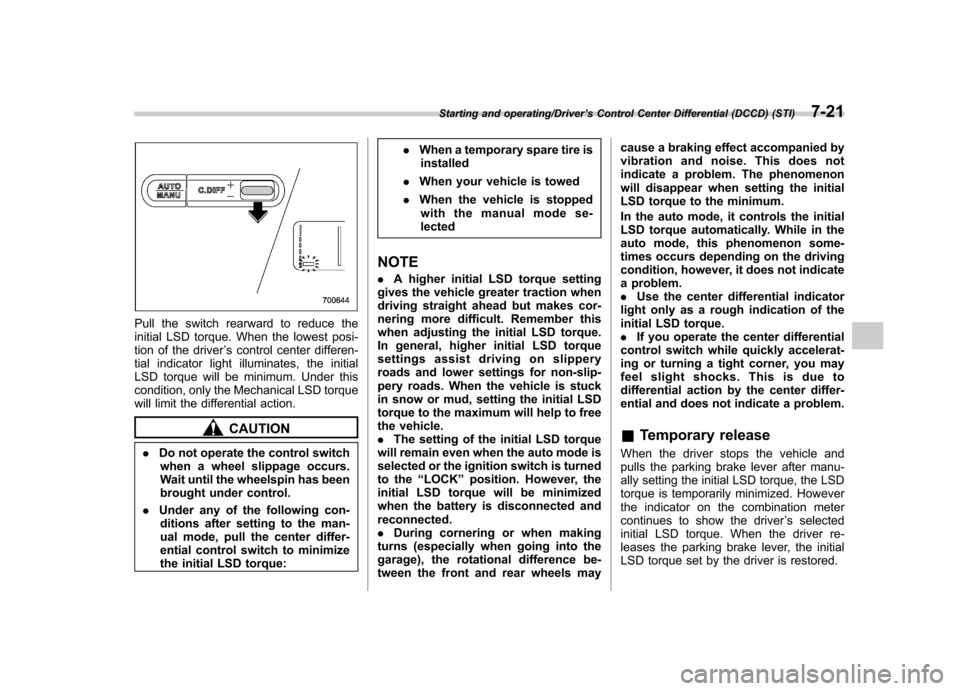
Pull the switch rearward to reduce the
initial LSD torque. When the lowest posi-
tion of the driver’s control center differen-
tial indicator light illuminates, the initial
LSD torque will be minimum. Under this
condition, only the Mechanical LSD torque
will limit the differential action.
CAUTION
. Do not operate the control switch
when a wheel slippage occurs.
Wait until the wheelspin has been
brought under control.
. Under any of the following con-
ditions after setting to the man-
ual mode, pull the center differ-
ential control switch to minimize
the initial LSD torque: .
When a temporary spare tire is
installed
. When your vehicle is towed
. When the vehicle is stopped
with the manual mode se-lected
NOTE . A higher initial LSD torque setting
gives the vehicle greater traction when
driving straight ahead but makes cor-
nering more difficult. Remember this
when adjusting the initial LSD torque.
In general, higher initial LSD torque
settings assist driving on slippery
roads and lower settings for non-slip-
pery roads. When the vehicle is stuck
in snow or mud, setting the initial LSD
torque to the maximum will help to free
the vehicle.. The setting of the initial LSD torque
will remain even when the auto mode is
selected or the ignition switch is turned
to the “LOCK ”position. However, the
initial LSD torque will be minimized
when the battery is disconnected andreconnected.. During cornering or when making
turns (especially when going into the
garage), the rotational difference be-
tween the front and rear wheels may cause a braking effect accompanied by
vibration and noise. This does not
indicate a problem. The phenomenon
will disappear when setting the initial
LSD torque to the minimum.
In the auto mode, it controls the initial
LSD torque automatically. While in the
auto mode, this phenomenon some-
times occurs depending on the driving
condition, however, it does not indicate
a problem..
Use the center differential indicator
light only as a rough indication of the
initial LSD torque.. If you operate the center differential
control switch while quickly accelerat-
ing or turning a tight corner, you may
feel slight shocks. This is due to
differential action by the center differ-
ential and does not indicate a problem. & Temporary release
When the driver stops the vehicle and
pulls the parking brake lever after manu-
ally setting the initial LSD torque, the LSD
torque is temporarily minimized. However
the indicator on the combination meter
continues to show the driver ’s selected
initial LSD torque. When the driver re-
leases the parking brake lever, the initial
LSD torque set by the driver is restored.
Starting and operating/Driver ’s Control Center Differential (DCCD) (STI)7-21
Page 325 of 414

11-6Maintenance and service/Engine compartment overview
Engine compartment overview &Turbo models except STI1) Power steering fluid reservoir
(page 11-17)
2) Manual transmission oil level gauge (MT) (page 11-16)
3) Clutch fluid reservoir (page 11-19)
4) Brake fluid reservoir (page 11-18)
5) Fuse box (page 11-38)
6) Battery (page 11-37)
7) Windshield washer tank (page 11-31)
8) Engine oil filler cap (page 11-8)
9) Engine coolant reservoir (page 11-12)
10) Engine oil level gauge (page 11-8)
11) Radiator cap (page 11-12)
12) Air cleaner case (page 11-13)
Page 326 of 414

&STI1) Power steering fluid reservoir
(page 11-17)
2) Clutch fluid reservoir (page 11-19)
3) Brake fluid reservoir (page 11-18)
4) Fuse box (page 11-38)
5) Battery (page 11-37)
6) Windshield washer tank (page 11-31)
7) Engine oil filler cap (page 11-8)
8) Engine coolant reservoir (page 11-12)
9) Engine oil level gauge (page 11-8)
10) Radiator cap (page 11-12)
11) Air cleaner case (page 11-13)
Maintenance and service/Engine compartment overview11-7