2014 SUBARU IMPREZA WRX odometer
[x] Cancel search: odometerPage 122 of 414

NOTE .Even during the illumination after
the driver ’s door is opened, if the
ignition switch is turned to the “ON ”
position, the combination meter will
illuminate as usual.. If the doors are locked by the remote
keyless entry system during the illumi-
nation after the driver ’s door is opened,
the illumination will be turned off.. Even while the illumination gradu-
ally turns off after the ignition switch is
turned to the “LOCK ”position, if the
ignition switch is turned to the “ON ”
position, the combination meter illumi-
nate as usual.
To change the setting:
1. Turn the ignition switch to the “LOCK ”
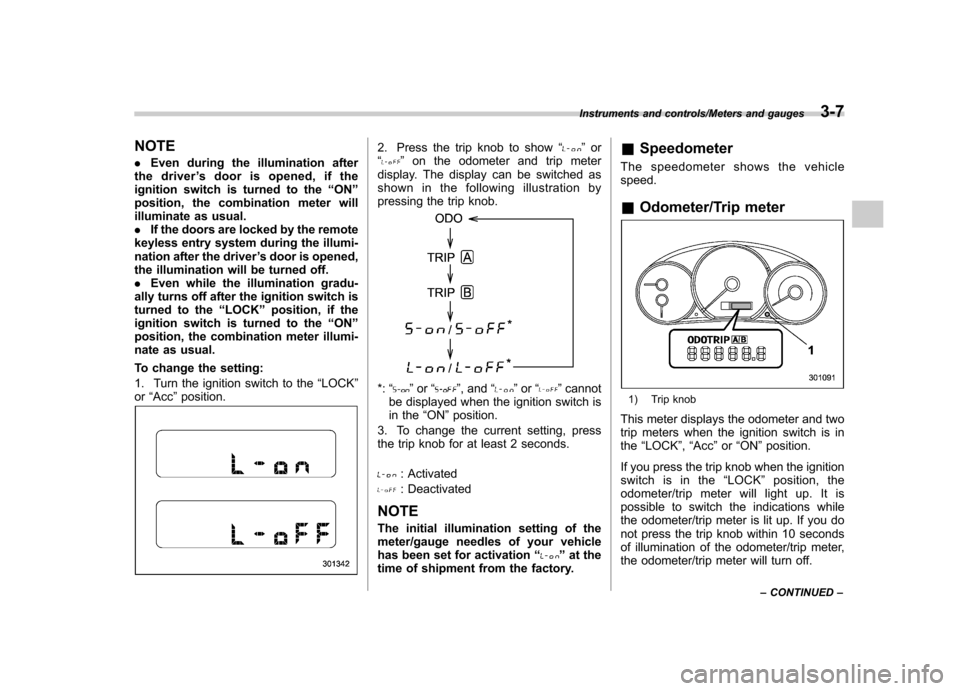
or “Acc ”position.2. Press the trip knob to show “”or
“” on the odometer and trip meter
display. The display can be switched as
shown in the following illustration by
pressing the trip knob.
*: “”or “”, and “”or “”cannot
be displayed when the ignition switch is
in the “ON ”position.
3. To change the current setting, press
the trip knob for at least 2 seconds.
: Activated
: Deactivated
NOTE
The initial illumination setting of the
meter/gauge needles of your vehicle
has been set for activation “
”at the
time of shipment from the factory. &
Speedometer
The speedometer shows the vehicle speed. & Odometer/Trip meter
1) Trip knob
This meter displays the odometer and two
trip meters when the ignition switch is inthe “LOCK ”, “Acc ”or “ON ”position.
If you press the trip knob when the ignition
switch is in the “LOCK ”position, the
odometer/trip meter will light up. It is
possible to switch the indications while
the odometer/trip meter is lit up. If you do
not press the trip knob within 10 seconds
of illumination of the odometer/trip meter,
the odometer/trip meter will turn off.
Instruments and controls/Meters and gauges3-7
– CONTINUED –
Page 123 of 414

3-8Instruments and controls/Meters and gauges
The display can be switched as shown in
the following illustration by pressing the
trip knob.
*1: STI only
*2: “” or “”,and “”or “”
cannot be displayed when the ignition
switch is in the “ON ”position.
*
3: Except STI !
Odometer
The odometer shows the total distance
that the vehicle has been driven. !
Double trip meterThe trip meter shows the distance that the
vehicle has been driven since you last set
it to zero.
To set the trip meter to zero, select the A
trip or B trip meter by pushing the knob
and keep the knob pushed for more than 2seconds.
CAUTION
To ensure safety, do not attempt to
change the function of the indicator
during driving, as an accident couldresult.
Page 125 of 414

3-10Instruments and controls/REV indicator light and buzzer (STI)
&Temperature gauge
1) Normal operating range
The temperature gauge shows engine
coolant temperature when the ignition
switch is in the “ON ”position.
The coolant temperature will vary in
accordance with the outside temperature
and driving conditions.
We recommend that you drive moderately
until the pointer of the temperature gauge
reaches near the middle of the range.
Engine operation is optimum with the
engine coolant at this temperature range
and high revving operation when the
engine is not warmed up enough should
be avoided.
CAUTION
If the pointer exceeds the normal
operating range, safely stop the
vehicle as soon as possible.
Refer to “Engine overheating ”F9-
12. REV indicator light and buz-
zer (STI)
The REV alarm system has the following functions. .
When the engine speed reaches the
level that was previously set, the REV
indicator light illuminates to inform you. At
this time, a buzzer also sounds if the
buzzer setting is activated. . Whenever the engine speed enters the
red zone of the tachometer, the REV
indicator light flashes.
If you press the trip knob, the odometer/
trip meter will show the engine speed that
has already been set.
Page 142 of 414

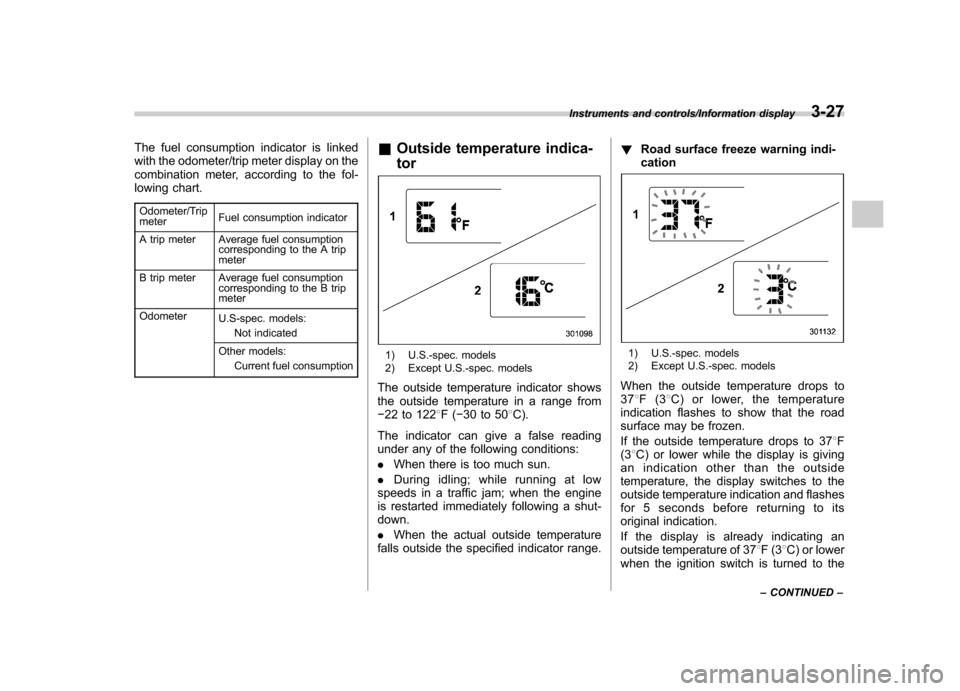
The fuel consumption indicator is linked
with the odometer/trip meter display on the
combination meter, according to the fol-
lowing chart.Odometer/Trip meter Fuel consumption indicator
A trip meter Average fuel consumption corresponding to the A trip meter
B trip meter Average fuel consumption corresponding to the B trip meter
Odometer U.S-spec. models:
Not indicated
Other models: Current fuel consumption &
Outside temperature indica- tor
1) U.S.-spec. models
2) Except U.S.-spec. models
The outside temperature indicator shows
the outside temperature in a range from� 22 to 122 8F( �30 to 50 8C).
The indicator can give a false reading
under any of the following conditions: . When there is too much sun.
. During idling; while running at low
speeds in a traffic jam; when the engine
is restarted immediately following a shut- down. . When the actual outside temperature
falls outside the specified indicator range. !
Road surface freeze warning indi- cation1) U.S.-spec. models
2) Except U.S.-spec. models
When the outside temperature drops to 37 8F(3 8C) or lower, the temperature
indication flashes to show that the road
surface may be frozen.
If the outside temperature drops to 37 8F
(3 8C) or lower while the display is giving
an indication other than the outside
temperature, the display switches to the
outside temperature indication and flashes
for 5 seconds before returning to its
original indication.
If the display is already indicating an
outside temperature of 37 8F(3 8C) or lower
when the ignition switch is turned to the
Instruments and controls/Information display3-27
– CONTINUED –
Page 288 of 414

printed on the tire placard. The
tire placard is located on the
bottom of driver’s door pillar.
If all of four tires are not the same
for items (a) to (h), there is a
possibility that serious mechan-
ical damage could occur to the
drive train of your car, and affect
the following. — Ride
— Handling
— Braking
— Speedometer/Odometer
calibration— Clearance between the body
and tires
It also may be dangerous and
lead to loss of vehicle control,
and it can lead to an accident.
CAUTION
If you use a temporary spare tire to
replace a flat tire, be sure to use the
original temporary spare tire stored
in the vehicle. Using other sizes may
result in severe mechanical damage
to the drive train of your vehicle.
All-Wheel Drive distributes the engine
power to all four wheels. AWD models
provide better traction when driving on
slippery, wet or snow-covered roads and
when moving out of mud, dirt and sand.
By shifting power between the front and
rear wheels, SUBARU AWD can also
provide added traction during acceleration
and added engine braking force duringdeceleration.
Therefore, your SUBARU AWD vehicle
may handle differently than an ordinary
two wheel drive vehicle and it contains
some features unique to AWD. For safety
purposes as well as to avoid damaging
the AWD system, you should keep the
following tips in mind. . An AWD model is better able to climb
steeper roads under snowy or slippery conditions than a two wheel drive vehicle.
There is little difference in handling,
however, during extremely sharp turns or
sudden braking. Therefore, when driving
down a slope or turning corners, be sure
to reduce your speed and maintain an
ample distance from other vehicles. .
Always check the cold tire pressure
before starting to drive. The recom-
mended tire pressure is provided on the
tire placard, which is located under the
door latch on the driver ’s side.
. Frequent driving of an AWD model
under hard-driving conditions such as
steep hills or dusty roads will necessitate
more frequent replacement of the follow-
ing items than that specified in “Mainte-
nance schedule ”F 11-3.
– Engine oil
– Brake fluid
– Rear differential gear oil
– Manual transmission oil
. There are some precautions that you
must observe when towing your vehicle.
For detailed information, refer to “Towing ”
F 9-12.
Driving tips/Driving tips for AWD models8-5
Page 292 of 414

obey the specification that is
printed on the tire placard. The
tire placard is located on the
bottom of driver’s door pillar.
If all of four winter tires are not
the same for items (a) to (h), there
is a possibility that serious me-
chanical damage could occur to
the drive train of your car, and
affect the following. — Ride
— Handling
— Braking
— Speedometer/Odometer
calibration— Clearance between the body
and tires
It also may be dangerous and
lead to loss of vehicle control,
and it can lead to an accident.
. Do not use a combination of
radial, belted bias or bias tires
since it may cause dangerous
handling characteristics and lead
to an accident.
Your vehicle is equipped with “summer
tires ”as original equipment, which are
inadequate for driving on slippery roads
such as on snow-covered or icy roads. Compared with winter and all-season
tires, summer tires give significantly less
grip on snowy and icy road surfaces.
Therefore, use of winter tires is strongly
recommended when driving with such
road conditions.
When you choose to install winter tires on
your vehicle, be sure to use the correct tire
size and type. You must install four winter
tires that are of the same size, construc-
tion, brand and load range and you should
never mix radial, belted bias or bias tires
since this may result in dangerous hand-
ling characteristics. When you choose a
tire, make sure that there is enough
clearance between the tire and vehicle
body.
Remember to drive with care at all times
regardless of the type of tires on yourvehicle.
& Tire chains
CAUTION
Tire chains cannot be used on your
Impreza, WRX and STI because of
the lack of clearance between the
tires and vehicle body. &
Rocking the vehicle
If you must rock the vehicle to free it from
snow, sand, or mud, depress the accel-
erator pedal slightly and move the shift
lever back and forth between “1 ” and “R ”
repeatedly. Do not race the engine. For
the best possible traction, avoid spinning
the wheels when trying to free the vehicle.
When the road surface is extremely
slippery, you can obtain better traction by
starting the vehicle with the transmission
in 2nd than 1st.
Driving tips/Winter driving8-9
Page 349 of 414

11-30Maintenance and service/Tires and wheels
Using tires of a non-specified size detracts
from controllability, ride comfort, braking
performance, speedometer accuracy and
odometer accuracy. It also creates incor-
rect body-to-tire clearances and inappro-
priately changes the vehicle’sground
clearance.
All four tires must be the same in terms of
size, circumference, speed symbol, load
index, construction, manufacturer, brand
(tread pattern), and degrees of wear. You
are advised to replace the tires with new
ones that are identical to those fitted as
standard equipment.
For safe vehicle operation, SUBARU
recommends replacing all four tires at
the same time.
WARNING
. When you replacing or installing
tire(s), all four tires must be the
same for following items.
(a) Size
(b) Circumference
(c) Speed symbol
(d) Load index
(e) Construction
(f) Manufacturer
(g) Brand (tread pattern) (h) Degrees of wear
For the items (a) to (d), you must
obey the specification that is
printed on the tire placard. The
tire placard is located on the
bottom of driver
’s door pillar.
If all of four tires are not the same
for items (a) to (h), there is a
possibility that serious mechan-
ical damage could occur to the
drive train of your car, and affect
the following. — Ride
— Handling
— Braking
— Speedometer/Odometer
calibration— Clearance between the body
and tires
It also may be dangerous and
lead to loss of vehicle control,
and it can lead to an accident.
. Use only radial tires. Do not use
radial tires together with belted
bias tires and/or bias-ply tires.
Doing so can dangerously re-
duce controllability, resulting in
an accident. &
Wheel replacement
When replacing wheels due, for example,
to damage, make sure the replacement
wheels match the specifications of the
wheels that are fitted as standard equip-
ment. Replacement wheels are available
from SUBARU dealers.
WARNING
Use only those wheels that are
specified for your vehicle. Wheels
not meeting specifications could
interfere with brake caliper opera-
tion and may cause the tires to rub
against the wheel well housing dur-
ing turns. The resulting loss of
vehicle control could lead to anaccident.
NOTE
When any of the wheels are removed
and replaced for tire rotation or to
change a flat tire, always check the
tightness of the wheel nuts after driv-
ing approximately 600 miles (1,000 km).
If any nut is loose, tighten it to the
specified torque.
Page 408 of 414

Limited slip differential (LSD)....................................... 7-24
Loading your vehicle .................................................. 8-10
Low fuel warning light ................................................. 3-20
Low tire pressure warning light .................................... 3-16
Lower and tether anchorage ........................................ 1-29
LSD (Limited slip differential) ....................................... 7-24
Lubricants ................................................................. 12-5
M Maintenance Precautions ........................................................... 11-3
Schedule .............................................................. 11-3
Seatbelt ................................................................ 1-19
Tools ...................................................................... 9-3
Malfunction indicator light (check engine warning light) ... 3-15Manual Climate control system ............................................. 4-3
Transmission oil ............................................ 11-16, 12-6
Transmission-5 speeds ........................................... 7-16
Transmission-6 speeds ........................................... 7-14
Map light ........................................................... 6-3, 11-46
Meters and gauges ...................................................... 3-5
Mirror defogger .......................................................... 3-47
Mirrors ...................................................................... 3-38
Moonroof .................................................................. 2-27
N
New vehicle break-in driving .......................................... 8-2
O
Odometer/Trip meter .................................................... 3-7 Oil filter
..................................................................... 11-9
Oil level Engine .................................................................. 11-8
Manual transmission ............................................. 11-16
Rear differential gear ............................................ 11-17
Oil pressure warning light ............................................ 3-16
Outside
Mirror defogger ...................................................... 3-47
Mirrors .................................................................. 3-45
Temperature indicator .............................................. 3-27
Overheating engine .................................................... 9-12
PParking Brake .................................................................... 7-33
Brake stroke ........................................................ 11-23
Tips ...................................................................... 7-34
Periodic inspections ..................................................... 8-4
Petrol fuel ................................................................... 7-3
Power
Door locking switch .................................................. 2-6
Outlets ................................................................... 6-8
Outside mirrors .............................................. 3-45, 3-47
Steering ................................................................ 7-24
Steering fluid ................................................ 11-17, 12-7
Windows ............................................................... 2-20
Precautions against vehicle modification ................ 1-21, 1-57
Preparing to drive ........................................................ 7-8 Index
14-7