2014 SUBARU IMPREZA WRX height
[x] Cancel search: heightPage 50 of 414
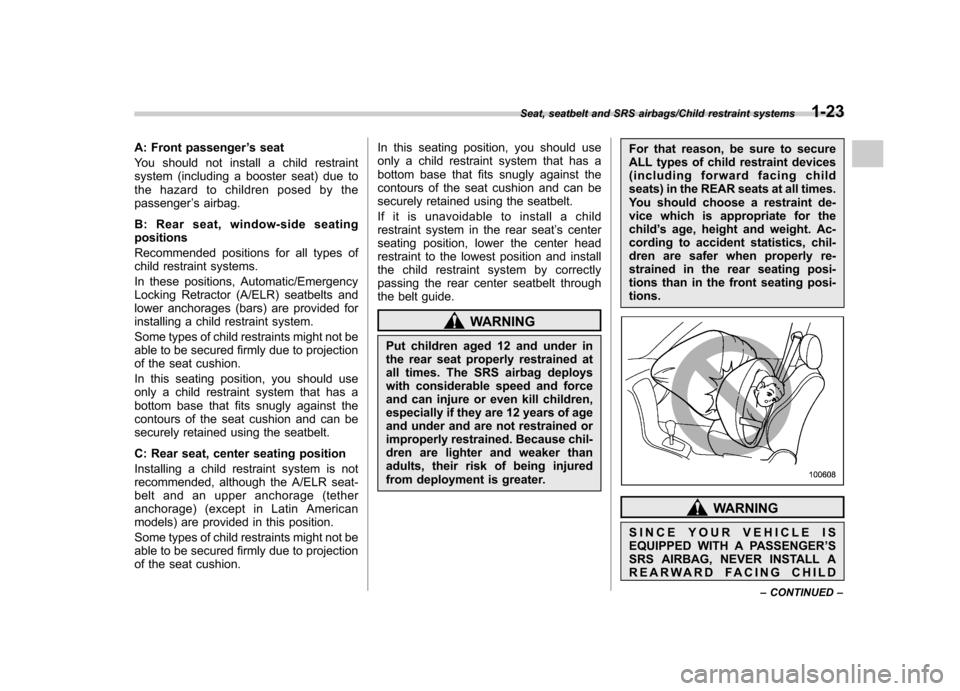
A: Front passenger’s seat
You should not install a child restraint
system (including a booster seat) due to
the hazard to children posed by thepassenger ’s airbag.
B: Rear seat, window-side seatingpositions
Recommended positions for all types of
child restraint systems.
In these positions, Automatic/Emergency
Locking Retractor (A/ELR) seatbelts and
lower anchorages (bars) are provided for
installing a child restraint system.
Some types of child restraints might not be
able to be secured firmly due to projection
of the seat cushion.
In this seating position, you should use
only a child restraint system that has a
bottom base that fits snugly against the
contours of the seat cushion and can be
securely retained using the seatbelt.
C: Rear seat, center seating position
Installing a child restraint system is not
recommended, although the A/ELR seat-
belt and an upper anchorage (tether
anchorage) (except in Latin American
models) are provided in this position.
Some types of child restraints might not be
able to be secured firmly due to projection
of the seat cushion. In this seating position, you should use
only a child restraint system that has a
bottom base that fits snugly against the
contours of the seat cushion and can be
securely retained using the seatbelt.
If it is unavoidable to install a child
restraint system in the rear seat
’s center
seating position, lower the center head
restraint to the lowest position and install
the child restraint system by correctly
passing the rear center seatbelt through
the belt guide.
WARNING
Put children aged 12 and under in
the rear seat properly restrained at
all times. The SRS airbag deploys
with considerable speed and force
and can injure or even kill children,
especially if they are 12 years of age
and under and are not restrained or
improperly restrained. Because chil-
dren are lighter and weaker than
adults, their risk of being injured
from deployment is greater. For that reason, be sure to secure
ALL types of child restraint devices
(including forward facing child
seats) in the REAR seats at all times.
You should choose a restraint de-
vice which is appropriate for thechild
’s age, height and weight. Ac-
cording to accident statistics, chil-
dren are safer when properly re-
strained in the rear seating posi-
tions than in the front seating posi-tions.
WARNING
SINCE YOUR VEHICLE IS
EQUIPPED WITH A PASSENGER ’S
SRS AIRBAG, NEVER INSTALL A
REARWARD FACING CHILD
Seat, seatbelt and SRS airbags/Child restraint systems1-23
– CONTINUED –
Page 51 of 414
1-24Seat, seatbelt and SRS airbags/Child restraint systems
SAFETY SEAT IN THE FRONT PAS- SENGER’S SEAT. DOING SO RISKS
SERIOUS INJURY OR DEATH TO
THE CHILD BY PLACING THECHILD ’SHEADTOOCLOSETO
THE SRS AIRBAG.
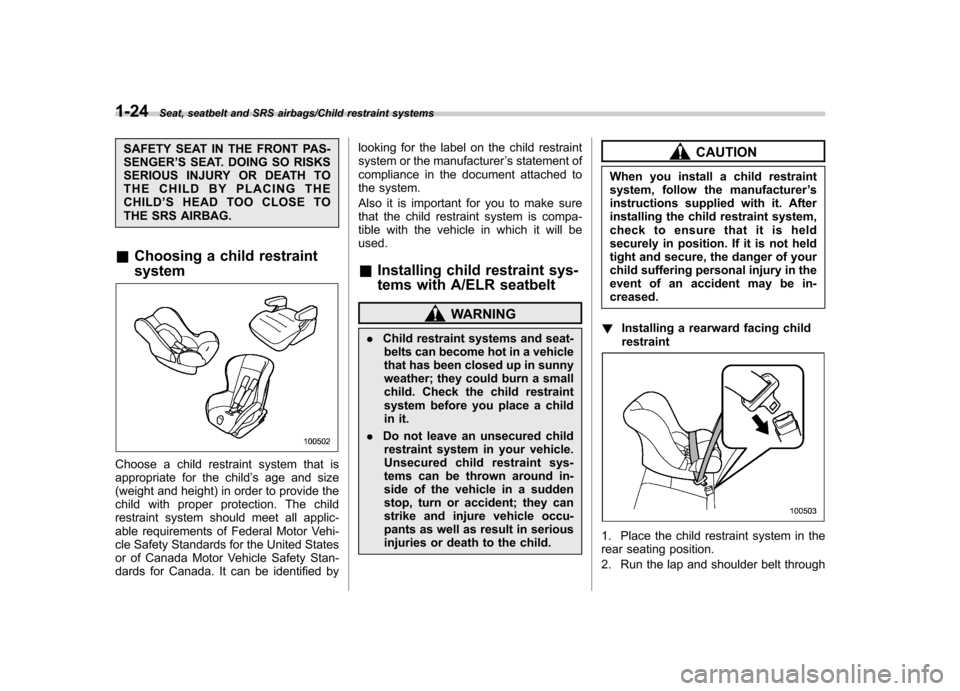
& Choosing a child restraint system
Choose a child restraint system that is
appropriate for the child ’s age and size
(weight and height) in order to provide the
child with proper protection. The child
restraint system should meet all applic-
able requirements of Federal Motor Vehi-
cle Safety Standards for the United States
or of Canada Motor Vehicle Safety Stan-
dards for Canada. It can be identified by looking for the label on the child restraint
system or the manufacturer
’s statement of
compliance in the document attached to
the system.
Also it is important for you to make sure
that the child restraint system is compa-
tible with the vehicle in which it will beused.
& Installing child restraint sys-
tems with A/ELR seatbelt
WARNING
. Child restraint systems and seat-
belts can become hot in a vehicle
that has been closed up in sunny
weather; they could burn a small
child. Check the child restraint
system before you place a child
in it.
. Do not leave an unsecured child
restraint system in your vehicle.
Unsecured child restraint sys-
tems can be thrown around in-
side of the vehicle in a sudden
stop, turn or accident; they can
strike and injure vehicle occu-
pants as well as result in serious
injuries or death to the child.
CAUTION
When you install a child restraint
system, follow the manufacturer ’s
instructions supplied with it. After
installing the child restraint system,
check to ensure that it is held
securely in position. If it is not held
tight and secure, the danger of your
child suffering personal injury in the
event of an accident may be in-creased.
! Installing a rearward facing childrestraint
1. Place the child restraint system in the
rear seating position.
2. Run the lap and shoulder belt through
Page 65 of 414
1-38Seat, seatbelt and SRS airbags/*SRS airbag (Supplemental Restraint System airbag)
WARNING
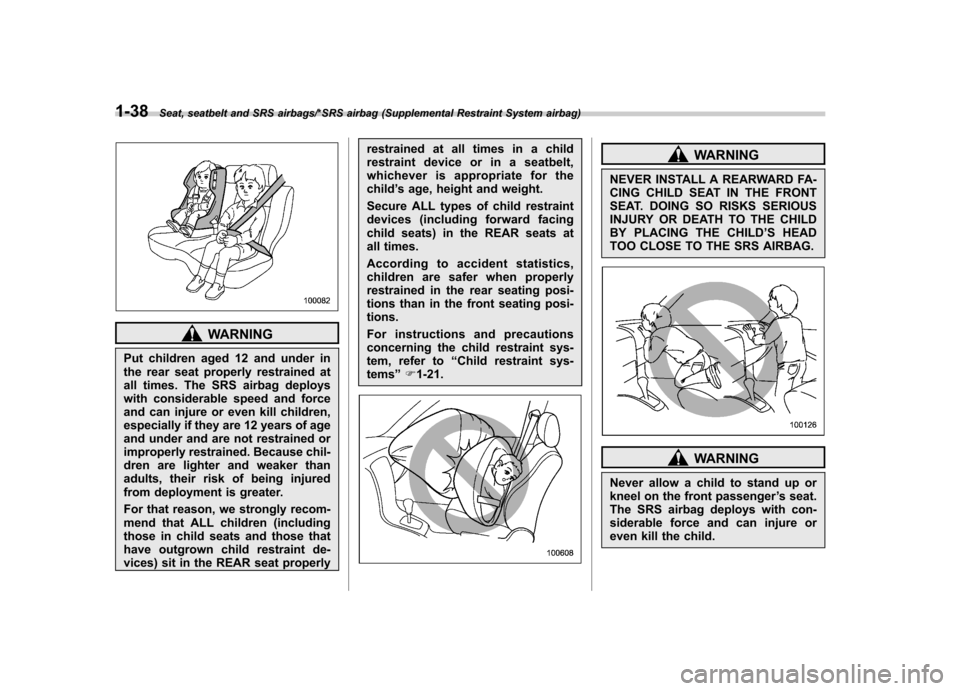
Put children aged 12 and under in
the rear seat properly restrained at
all times. The SRS airbag deploys
with considerable speed and force
and can injure or even kill children,
especially if they are 12 years of age
and under and are not restrained or
improperly restrained. Because chil-
dren are lighter and weaker than
adults, their risk of being injured
from deployment is greater.
For that reason, we strongly recom-
mend that ALL children (including
those in child seats and those that
have outgrown child restraint de-
vices) sit in the REAR seat properly restrained at all times in a child
restraint device or in a seatbelt,
whichever is appropriate for thechild
’s age, height and weight.
Secure ALL types of child restraint
devices (including forward facing
child seats) in the REAR seats at
all times.
According to accident statistics,
children are safer when properly
restrained in the rear seating posi-
tions than in the front seating posi-tions.
For instructions and precautions
concerning the child restraint sys-
tem, refer to “Child restraint sys-
tems ”F 1-21.
WARNING
NEVER INSTALL A REARWARD FA-
CING CHILD SEAT IN THE FRONT
SEAT. DOING SO RISKS SERIOUS
INJURY OR DEATH TO THE CHILD
BY PLACING THE CHILD ’S HEAD
TOO CLOSE TO THE SRS AIRBAG.
WARNING
Never allow a child to stand up or
kneel on the front passenger ’s seat.
The SRS airbag deploys with con-
siderable force and can injure or
even kill the child.
Page 147 of 414
3-32Instruments and controls/Headlight beam leveler
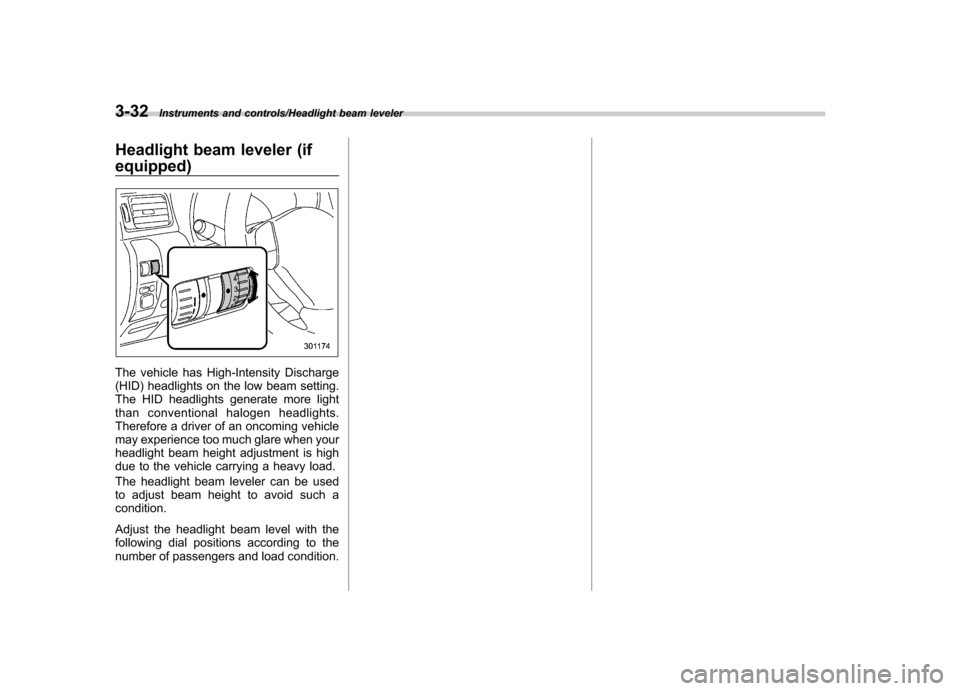
Headlight beam leveler (if equipped)
The vehicle has High-Intensity Discharge
(HID) headlights on the low beam setting.
The HID headlights generate more light
than conventional halogen headlights.
Therefore a driver of an oncoming vehicle
may experience too much glare when your
headlight beam height adjustment is high
due to the vehicle carrying a heavy load.
The headlight beam leveler can be used
to adjust beam height to avoid such acondition.
Adjust the headlight beam level with the
following dial positions according to the
number of passengers and load condition.
Page 324 of 414
&When checking or servicing
in the engine compartment
while the engine is running
WARNING
A running engine can be dangerous.
Keep your fingers, hands, clothing,
hair and tools away from the cooling
fan, belts and any other moving
engine parts. Removing rings,
watches and ties is advisable. Engine hood
WARNING
Always check that the hood is
properly locked before you start
driving. If it is not, it might fly open
while the vehicle is moving and
block your view, which may cause
an accident and serious bodily in-
jury.
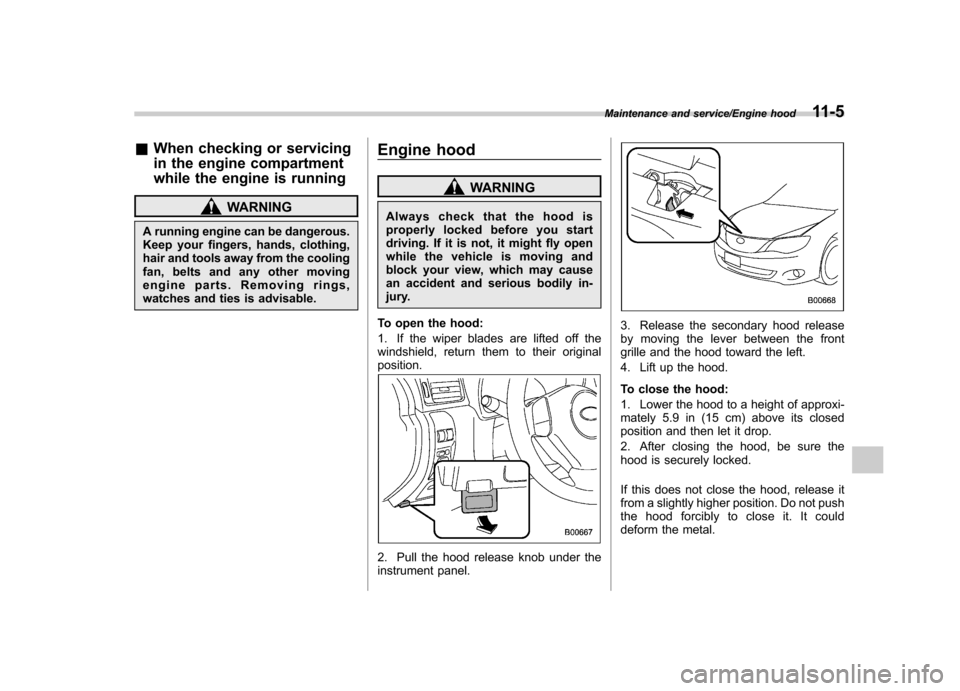
To open the hood:
1. If the wiper blades are lifted off the
windshield, return them to their originalposition.
2. Pull the hood release knob under the
instrument panel.
3. Release the secondary hood release
by moving the lever between the front
grille and the hood toward the left.
4. Lift up the hood.
To close the hood:
1. Lower the hood to a height of approxi-
mately 5.9 in (15 cm) above its closed
position and then let it drop.
2. After closing the hood, be sure the
hood is securely locked.
If this does not close the hood, release it
from a slightly higher position. Do not push
thehoodforciblytocloseit.Itcould
deform the metal.
Maintenance and service/Engine hood11-5
Page 339 of 414
11-20Maintenance and service/Brake booster
&Recommended clutch fluid
Refer to “Fluids ”F 12-7.
CAUTION
Never use different brands of clutch
fluid together. Also, avoid mixing
DOT 3 and DOT 4 brake fluids even if
they are the same brand. Brake booster
If the brake booster does not operate as
described in the following, have it checked
by your SUBARU dealer.
1. With the engine off, depress the brake
pedal several times, applying the same
pedal force each time. The distance the
pedal travels should not vary.
2. With the brake pedal depressed, start
the engine. The pedal should move
slightly down to the floor.
3. With the brake pedal depressed, stop
the engine and keep the pedal depressed
for 30 seconds. The pedal height should
not change.
4. Start the engine again and run for
approximately one minute then turn it off.
Depress the brake pedal several times to
check the brake booster. The brake
booster operates properly if the pedal
stroke decreases with each depression. NOTE
For vehicles equipped with the brake
assist system, when you depress the
brake pedal strongly or suddenly, you
might feel that lighter depression of the
brake pedal generates a greater brak-
ing force. However, even though these
occur, they do not indicate any mal- functions, and the brake assist system
is operating properly.
Brake assist is not a system that brings
more braking ability to the vehicle
beyond its breaking capability.
Page 369 of 414
12-2Specifications/Specifications
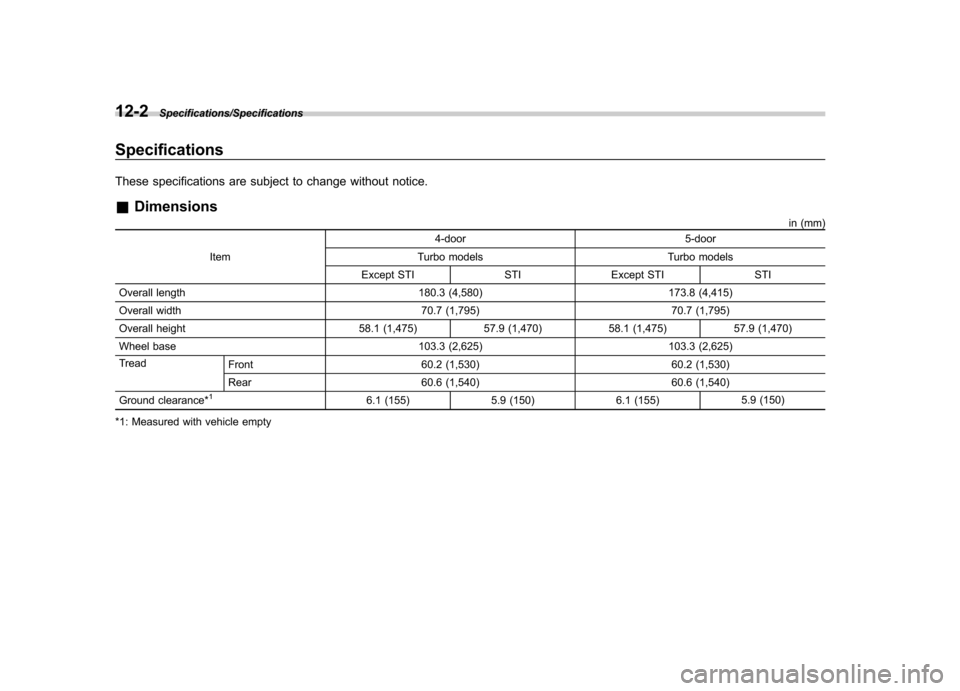
Specifications
These specifications are subject to change without notice. &Dimensions
in (mm)
Item 4-door
5-door
Turbo models Turbo models
Except STI STI Except STI STI
Overall length 180.3 (4,580)173.8 (4,415)
Overall width 70.7 (1,795)70.7 (1,795)
Overall height 58.1 (1,475) 57.9 (1,470) 58.1 (1,475) 57.9 (1,470)
Wheel base 103.3 (2,625)103.3 (2,625)
Tread Front 60.2 (1,530) 60.2 (1,530)
Rear 60.6 (1,540) 60.6 (1,540)
Ground clearance*
16.1 (155) 5.9 (150) 6.1 (155) 5.9 (150)
*1: Measured with vehicle empty
Page 387 of 414

13-2Consumer information and Reporting safety defects/For U.S.A.
For U.S.A.
The following information has been
compiled according to Code of
Federal Regulations“Title 49, Part
575 ”. Tire information &
Tire labeling
Many markings (e.g. Tire size, Tire
Identification Number or TIN) are
placed on the sidewall of a tire by
tire manufacturers. These markings
can provide you with useful infor-
mation on the tire. ! Tire size
Your vehicle comes equipped with
P-Metric tire size. It is important to
understand the sizing system in
selecting the proper tire for your
vehicles. Here is a brief review of
the tire sizing system with a break-
down of its individual elements.
!P Metric
With the P-Metric system, Section
Width is measured in millimeters.
To convert millimeters into inches,
divide by 25.4. The Aspect Ratio
(Section Height divided by Section
Width) helps provide more dimen-
sional information about the tiresize. Example:
(1) P = Certain tire type used on
light duty vehicles such as passen-
ger cars
(2) Section Width in millimeters
(3) Aspect Ratio (= section height 7
section width).
(4) R = Radial Construction
(5) Rim diameter in inches
! Load and Speed Rating De-
scriptions
The load and speed rating descrip-
tions will appear following the size designation.
They provide two important facts
about the tire. First, the number
designation is its load index. Sec-
ond, the letter designation indicates
the tire ’s speed rating.