2014 SKODA YETI radio
[x] Cancel search: radioPage 18 of 88
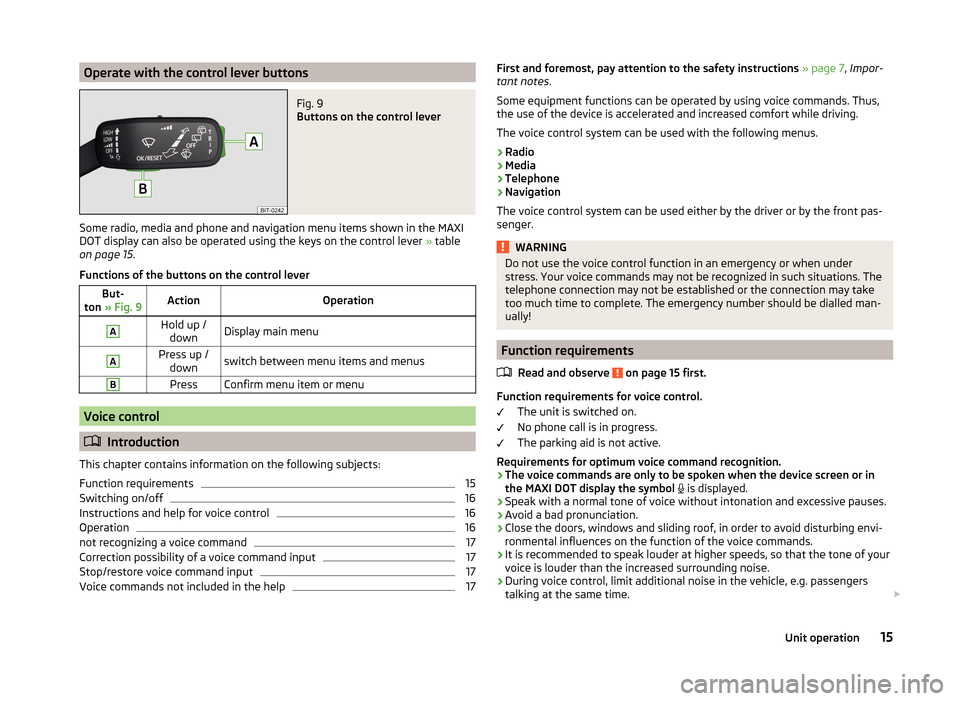
Operate with the control lever buttonsFig. 9
Buttons on the control lever
Some radio, media and phone and navigation menu items shown in the MAXI
DOT display can also be operated using the keys on the control lever » table
on page 15 .
Functions of the buttons on the control lever
But-
ton » Fig. 9ActionOperationAHold up /
downDisplay main menuAPress up / downswitch between menu items and menusBPressConfirm menu item or menu
Voice control
Introduction
This chapter contains information on the following subjects:
Function requirements
15
Switching on/off
16
Instructions and help for voice control
16
Operation
16
not recognizing a voice command
17
Correction possibility of a voice command input
17
Stop/restore voice command input
17
Voice commands not included in the help
17First and foremost, pay attention to the safety instructions » page 7 , Impor-
tant notes .
Some equipment functions can be operated by using voice commands. Thus,
the use of the device is accelerated and increased comfort while driving.
The voice control system can be used with the following menus.
› Radio
› Media
› Telephone
› Navigation
The voice control system can be used either by the driver or by the front pas-
senger.WARNINGDo not use the voice control function in an emergency or when under
stress. Your voice commands may not be recognized in such situations. The
telephone connection may not be established or the connection may take
too much time to complete. The emergency number should be dialled man-
ually!
Function requirements
Read and observe
on page 15 first.
Function requirements for voice control. The unit is switched on.
No phone call is in progress.
The parking aid is not active.
Requirements for optimum voice command recognition.
› The voice commands are only to be spoken when the device screen or in
the MAXI DOT display the symbol
is displayed.
› Speak with a normal tone of voice without intonation and excessive pauses.
› Avoid a bad pronunciation.
› Close the doors, windows and sliding roof, in order to avoid disturbing envi-
ronmental influences on the function of the voice commands.
› It is recommended to speak louder at higher speeds, so that the tone of your
voice is louder than the increased surrounding noise.
› During voice control, limit additional noise in the vehicle, e.g. passengers
talking at the same time.
15Unit operation
Page 20 of 88
Voice command entry was stopped » page 17, Stop/restore voice com-
mand input
A voice command is recognized
It is not necessary to wait for the end of message playback when the device is
playing a message. The message ends by pressing the button
or by press-
ing the symbol key
on the multifunction steering wheel. This cancels the
message and causes the system to wait for a new voice command.
The voice control system is affected by the setting » page 21, Voice control
settings .
not recognizing a voice command
Read and observe
on page 15 first.
If a voice command is not recognised, the device answers with Pardon? and
you can give a new command.
If the device does not recognise the second voice command, the help message
is provided again and you can give a new command.
If the device does not recognise the third voice command, the system plays
the Cancel message and the dialogue is ended.
Correction possibility of a voice command input
Read and observe
on page 15 first.
A voice command can be corrected, modified or re-entered by briefly pressing
the button on the device or the symbol key
is operated on the multi-
function steering wheel. However, this is only possible if the symbol is dis-
played.
You do not have to wait until the voice command is recognized by the device.
Stop/restore voice command input
Read and observe
on page 15 first.
Stop
In some menus, the procedure for entering voice commands can be stopped with the right control
2
» Fig. 1 on page 7 .
This allows more time to be gained for the voice command input.
The function can be used for the contact search in the phone book.
When stopped the symbol shown in the device screen or in the MAXI DOT dis-
play changes from
to
.
Restore
The procedure for voice command input can be restarted in one of the follow-
ing ways.
› by pressing the function key
.
› By pressing the
button on the device.
› By pressing the symbol key
on the multifunction steering wheel.
Voice commands not included in the help
Read and observe
on page 15 first.
This chapter discusses some voice commands, which are not included in thehelp topics.
The voice commands allow working with lists or describe the function keys
with symbols that have no screen texts.
All menus
Voice commandOperationBackReturn to the previous menu Next page
Scroll through the menu / list / direc-
tory
Previous pageFirst pageLast page
Menu Radio
Voice commandOperationNext stationNearest station in the selected fre-
quency rangePrevious stationPrevious station in the selected fre-
quency range
Start scanning
Switch on the search for available sta- tions » page 25
(The search is ended by pressing the
key
on the unit or the button
on the multifunction steering wheel)
17Unit operation
Page 22 of 88
Device Settings
Menu Sound
Introduction
This chapter contains information on the following subjects:
Sound settings
19
First and foremost, pay attention to the safety instructions » page 7 , Impor-
tant notes .
This chapter covers the sound setting of the device and the volume setting of
the connected equipment.
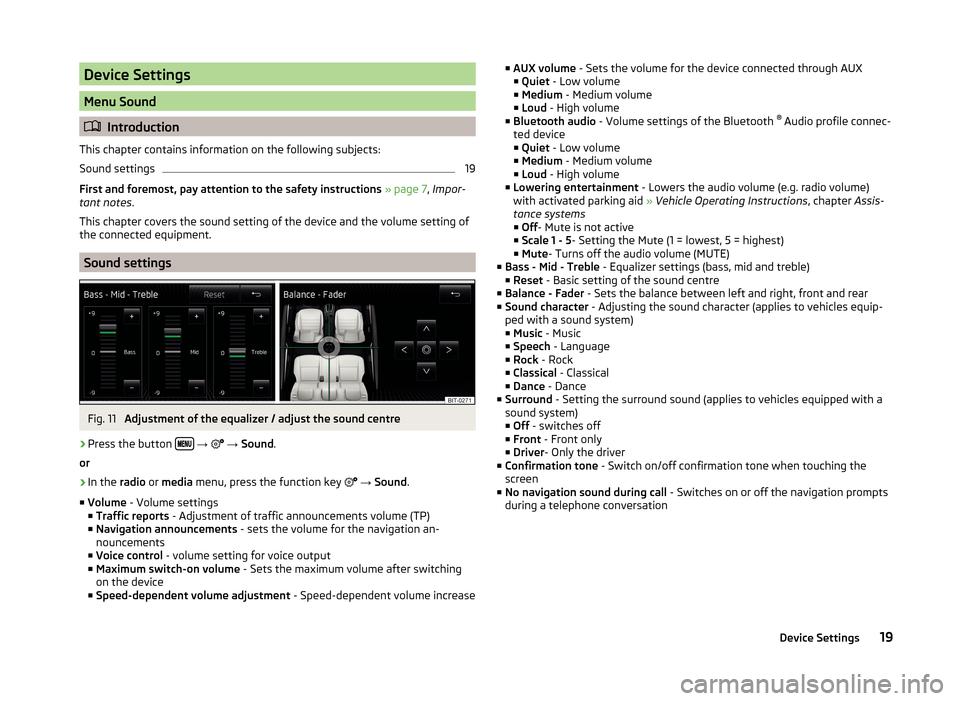
Sound settings
Fig. 11
Adjustment of the equalizer / adjust the sound centre
›
Press the button
→
→ Sound .
or
›
In the radio or media menu, press the function key
→ Sound .
■ Volume - Volume settings
■ Traffic reports - Adjustment of traffic announcements volume (TP)
■ Navigation announcements - sets the volume for the navigation an-
nouncements
■ Voice control - volume setting for voice output
■ Maximum switch-on volume - Sets the maximum volume after switching
on the device
■ Speed-dependent volume adjustment - Speed-dependent volume increase
■
AUX volume - Sets the volume for the device connected through AUX
■ Quiet - Low volume
■ Medium - Medium volume
■ Loud - High volume
■ Bluetooth audio - Volume settings of the Bluetooth ®
Audio profile connec-
ted device ■ Quiet - Low volume
■ Medium - Medium volume
■ Loud - High volume
■ Lowering entertainment - Lowers the audio volume (e.g. radio volume)
with activated parking aid » Vehicle Operating Instructions , chapter Assis-
tance systems ■ Off - Mute is not active
■ Scale 1 - 5 - Setting the Mute (1 = lowest, 5 = highest)
■ Mute - Turns off the audio volume (MUTE)
■ Bass - Mid - Treble - Equalizer settings (bass, mid and treble)
■ Reset - Basic setting of the sound centre
■ Balance - Fader - Sets the balance between left and right, front and rear
■ Sound character - Adjusting the sound character (applies to vehicles equip-
ped with a sound system)
■ Music - Music
■ Speech - Language
■ Rock - Rock
■ Classical - Classical
■ Dance - Dance
■ Surround - Setting the surround sound (applies to vehicles equipped with a
sound system)
■ Off - switches off
■ Front - Front only
■ Driver - Only the driver
■ Confirmation tone - Switch on/off confirmation tone when touching the
screen
■ No navigation sound during call - Switches on or off the navigation prompts
during a telephone conversation19Device Settings
Page 24 of 88
Keyboard settings›
Press the button
→
→ Keypad: .
You can choose between two types of keyboard character arrange-
ment » page 11 , Alphanumeric with keyboard .
■ ABC - Keyboard characters in alphabetical order
■ QWERTZ - Keyboard characters in QWERTZ or QWERTY system
Additional keypad language settings
›
Press the button
→
→ More keypad languages .
In this menu, the keyboard character arrangement for the chosen language
can be selected, and with this the option for fast entry of the characters used
in the selected language.
It is then possible to swap between the languages in the input screen showing
a keyboard by pressing the function keys
» page 11 .
Voice control settings
›
Press the button
→
→ Voice control .
■ Dialogue style: - Setting the message style
■ Long - The device plays unabridged audible messages
■ Short - The device shortens some audible messages or substitutes them
with an acoustic signal
■ Display available commands - Switch on/off the menus containing basic
voice commands when voice control is activated
■ Voice control session start tone - Switch on/off the audible signal that is
output when voice control is activated
■ Voice control session end tone - Switch on/off the audible signal that is out-
put when voice control ends
■ Input tone in voice dialogue - Switch on/off the audible signal for voice con-
trol input
Note
For some languages, there is no voice control available. In this regard, an ap-
propriate warning message appears on the device screen.Data transmission of mobile devices›
Press the button
→
→ Mobile device data transfer .
The activated function enables transmission of vehicle data for applications in
connected devices (e.g. MirrorLink ™
Applications).
■ Activate data transfer for apps - Turning the data transfer on and off
■ Use apps to operate - Select the mode for operation using applications con-
nected to the device
■ Deactivate - The operation is prohibited
■ Confirm - An acknowledgment from the device is required
■ Allow - The operation is always allowed
Safe removal of the audio source
›
Press the button
→
→ Remove safely .
■ SD card 1 - Safe removal of the SD storage card 1
■ SD card 2 - Safe removal of the SD storage card 2
■ USB - Safe removal of the USB source
Restore factory settings
›
Press the button
→
→ Factory settings .
■ Reset all settings and data - menu to restore all settings
■ Restore factory settings - Reset all factory settings
■ Reset individual settings/data - menu for the recovery of individual settings
■ Sound - Reset default settings for sound
■ Radio - Reset default settings for radio
■ Telephone - Reset default settings for phone
■ Media - Reset default settings for media
■ Voice control - Restore the voice control
■ Navigation - Restore default settings for navigation
■ System - Reset the system default settings
■ MirrorLink ™
- Reset settings on the MirrorLink ™
- function
Bluetooth ®
settings
›
Press the button
→
→ Bluetooth .
21Device Settings
Page 26 of 88
Radio
Operation
Introduction
This chapter contains information on the following subjects:
Main menu
23
Radio DAB text and images presentation
24
Select the frequency range
24
List of available stations
24
Search and select available stations
25
Save radio station
25
Station logos
26
TP Traffic programme
26
First and foremost, pay attention to the safety instructions » page 7 , Impor-
tant notes .
The device allows analogue radio reception of FM and AM frequency ranges as
well as DAB digital radio reception.
CAUTION
■ For vehicles with window antennas do not stick foil or metal coated stickers
to the window as this can lead to interference.■
Car parks, tunnels, tall buildings or mountains can interfere with the radio
signal even causing it to fail completely.
Note
In countries where the RDS function is not supported, we recommend turning
off the AF and RDS function.Main menuFig. 12
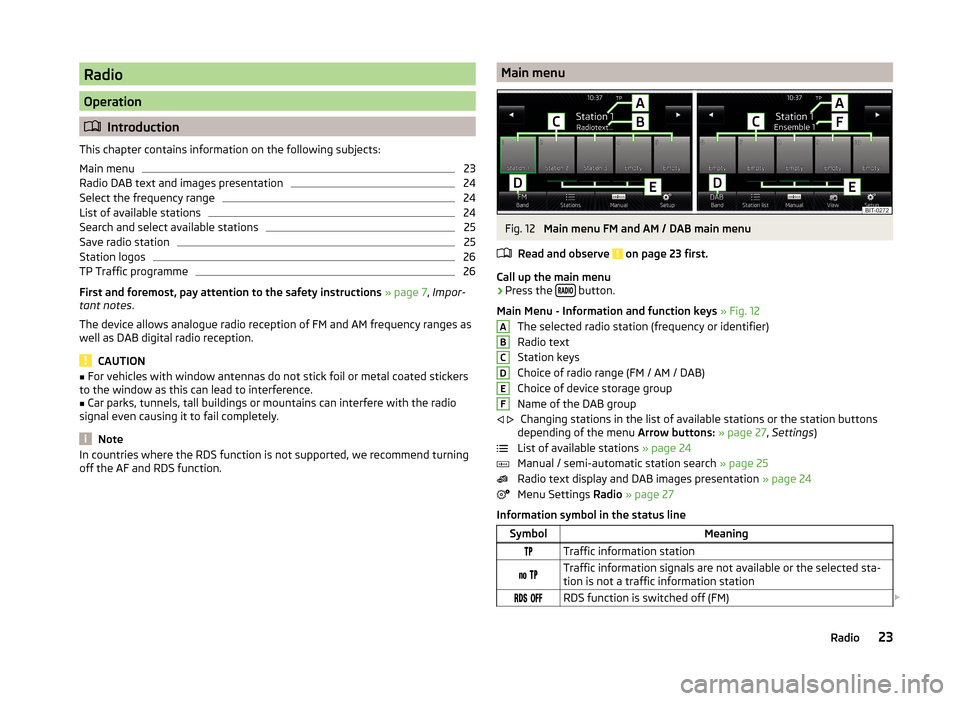
Main menu FM and AM / DAB main menu
Read and observe
on page 23 first.
Call up the main menu
›
Press the button.
Main Menu - Information and function keys » Fig. 12
The selected radio station (frequency or identifier)
Radio text
Station keys
Choice of radio range (FM / AM / DAB)
Choice of device storage group
Name of the DAB group Changing stations in the list of available stations or the station buttons
depending of the menu Arrow buttons: » page 27 , Settings )
List of available stations » page 24
Manual / semi-automatic station search » page 25
Radio text display and DAB images presentation » page 24
Menu Settings Radio » page 27
Information symbol in the status line
SymbolMeaningTraffic information station Traffic information signals are not available or the selected sta-
tion is not a traffic information station RDS function is switched off (FM) ABCDEF
23Radio
Page 27 of 88
SymbolMeaning AF Alternative frequency is switched off (FM)Signal is not available (DAB)
If a continuous change of a displayed station name (dynamic text) occurs, then
it is possible to fix the current text by holding a finger on the device screen in
the station range
A
» Fig. 12 . The station name is displayed again completely
by holding again in the area of the station name.
Radio DAB text and images presentation
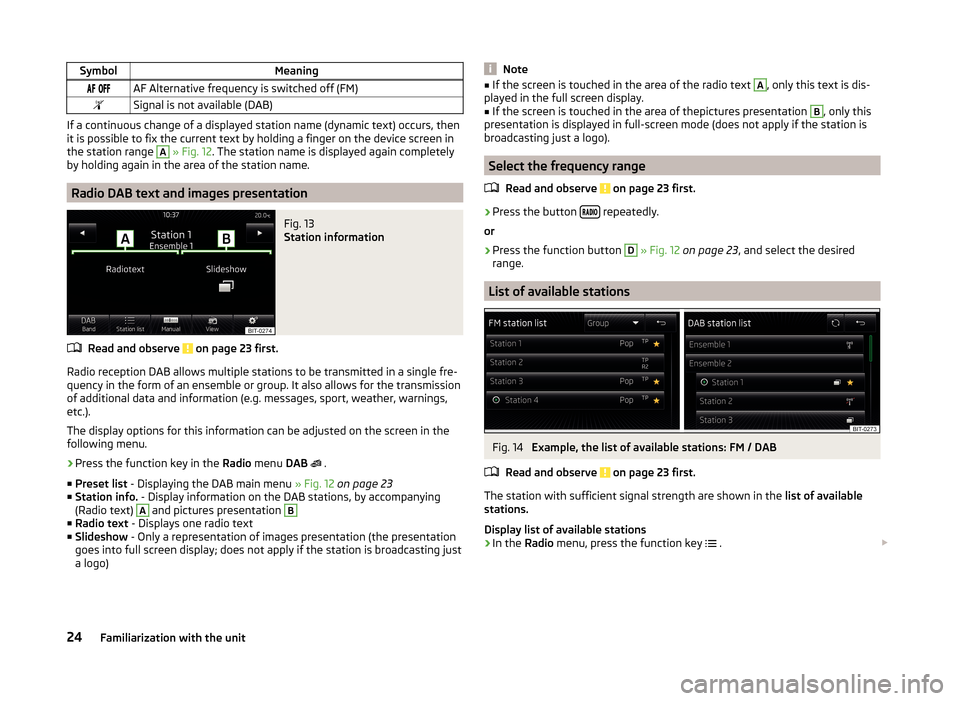
Fig. 13
Station information
Read and observe on page 23 first.
Radio reception DAB allows multiple stations to be transmitted in a single fre- quency in the form of an ensemble or group. It also allows for the transmission
of additional data and information (e.g. messages, sport, weather, warnings,
etc.).
The display options for this information can be adjusted on the screen in the
following menu.
›
Press the function key in the Radio menu DAB
.
■ Preset list - Displaying the DAB main menu » Fig. 12 on page 23
■ Station info. - Display information on the DAB stations, by accompanying
(Radio text)
A
and pictures presentation
B
■ Radio text - Displays one radio text
■ Slideshow - Only a representation of images presentation (the presentation
goes into full screen display; does not apply if the station is broadcasting just
a logo)
Note■ If the screen is touched in the area of the radio text A, only this text is dis-
played in the full screen display.■
If the screen is touched in the area of thepictures presentation
B
, only this
presentation is displayed in full-screen mode (does not apply if the station is
broadcasting just a logo).
Select the frequency range
Read and observe
on page 23 first.
›
Press the button repeatedly.
or
›
Press the function button
D
» Fig. 12 on page 23 , and select the desired
range.
List of available stations
Fig. 14
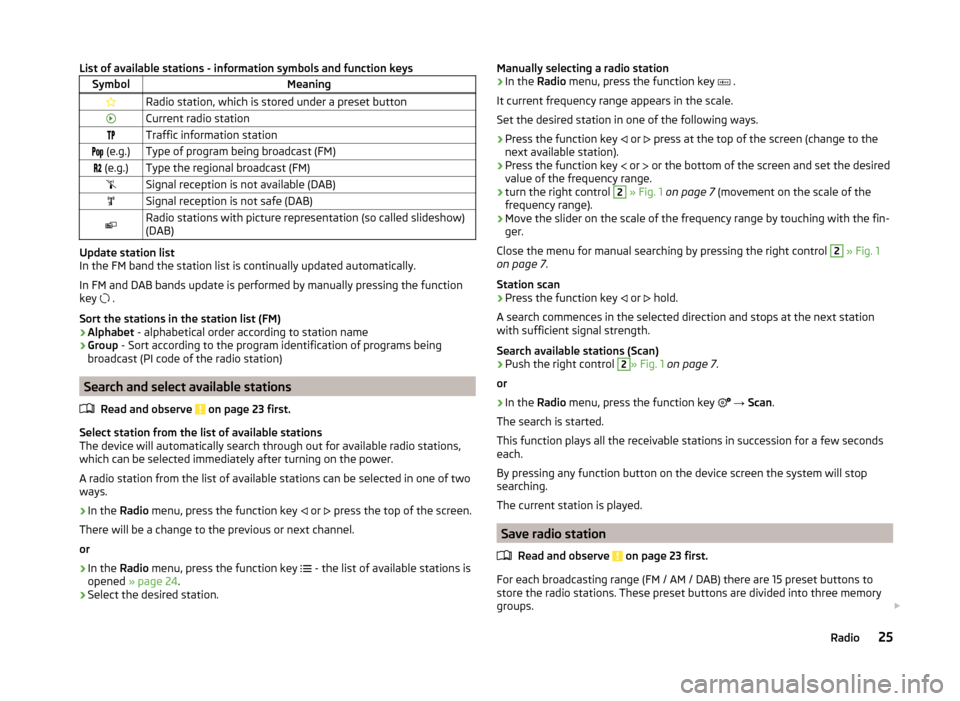
Example, the list of available stations: FM / DAB
Read and observe
on page 23 first.
The station with sufficient signal strength are shown in the list of available
stations.
Display list of available stations
›
In the Radio menu, press the function key
.
24Familiarization with the unit
Page 28 of 88
List of available stations - information symbols and function keysSymbolMeaningRadio station, which is stored under a preset buttonCurrent radio stationTraffic information station (e.g.)Type of program being broadcast (FM) (e.g.)Type the regional broadcast (FM)Signal reception is not available (DAB)Signal reception is not safe (DAB)Radio stations with picture representation (so called slideshow)
(DAB)
Update station list
In the FM band the station list is continually updated automatically.
In FM and DAB bands update is performed by manually pressing the function
key .
Sort the stations in the station list (FM) › Alphabet
- alphabetical order according to station name
› Group
- Sort according to the program identification of programs being
broadcast (PI code of the radio station)
Search and select available stations
Read and observe
on page 23 first.
Select station from the list of available stations
The device will automatically search through out for available radio stations,
which can be selected immediately after turning on the power.
A radio station from the list of available stations can be selected in one of two
ways.
›
In the Radio menu, press the function key
or
press the top of the screen.
There will be a change to the previous or next channel.
or
›
In the Radio menu, press the function key
- the list of available stations is
opened » page 24 .
›
Select the desired station.
Manually selecting a radio station›In the Radio menu, press the function key .
It current frequency range appears in the scale.
Set the desired station in one of the following ways.›
Press the function key
or
press at the top of the screen (change to the
next available station).
›
Press the function key
or
or the bottom of the screen and set the desired
value of the frequency range.
›
turn the right control
2
» Fig. 1 on page 7 (movement on the scale of the
frequency range).
›
Move the slider on the scale of the frequency range by touching with the fin-
ger.
Close the menu for manual searching by pressing the right control
2
» Fig. 1
on page 7 .
Station scan
›
Press the function key or
hold.
A search commences in the selected direction and stops at the next station with sufficient signal strength.
Search available stations (Scan)
›
Push the right control
2
» Fig. 1 on page 7 .
or
›
In the Radio menu, press the function key
→ Scan .
The search is started.
This function plays all the receivable stations in succession for a few seconds
each.
By pressing any function button on the device screen the system will stop
searching.
The current station is played.
Save radio station
Read and observe
on page 23 first.
For each broadcasting range (FM / AM / DAB) there are 15 preset buttons to
store the radio stations. These preset buttons are divided into three memory
groups.
25Radio
Page 29 of 88
A radio station can be stored in the device memory in one of the following
ways.
Save station from the menu Radio›
In the menu Radio hold the desired station button
C
» Fig. 12 on page 23
until you hear an acoustic signal.
If a station was already stored in the desired position it is replaced with the
currently selected station.
Save station from the station list
›
In the list of available stations » page 24 press the function key of the de-
sired station longer.
A list of the station keys
C
is shown as well as a list of the functions keys for
the storage groups
E
» Fig. 12 on page 23 .
›
Select a storage group.
›
Press the station button.
The station is stored under the selected station button.
Station logos
Read and observe
on page 23 first.
With the present buttons
C
» Fig. 12 on page 23 logos (images) can be linked
or removed to/from the radio stations.
Store station logos automatically (FM / DAB)
›
Before you store the radio station to a station button function key press in
the Radio menu the function key
→ Advanced setup .
›
Activate the menu item Auto-save station logos » page 27 , Advanced Set-
tings (FM) and » page 27 , Advanced setup (DAB) .
When you save the station to a station button, the station is assigned a logo
from the device memory if the logo is available in the memory.
Assign channel logo manually
A logo can be assigned or removed manually from the previously stored sta-
tions.
›
Press the function key
→ Station logos .
A menu with preset buttons for radio stations is displayed.
›
Press the preset button for the station, which a logo is to be assigned to.
A menu of media (CD, SD card, USB) is displayed.
› In the relevant media select the image you want to have.
By selection of the image it is assigned to the relevant station button.
Remove channel logo manually›
Press the function key
→ Station logos .
A menu with preset buttons for radio stations is displayed.
›
Press the preset button for the station, which a logo is to be removed from.
The logo is removed from the station button.
Note
■ The following image formats are supported: jpg, gif, png, bmp.■We recommend a resolution of up to 500 x 500 pixels.■
The information about radio station updates can be found on the ŠKODA In-
ternet pages www.infotainment.skoda-auto.com .
TP Traffic programme
Read and observe
on page 23 first.
The function allows the reception of traffic information.
Switching the traffic information station on and off manually
›
Press the button.
or
›
In the Radio menu, press the function key
.
›
Enable or disable the menu item
Traffic programme (TP).
Current traffic reports
During a traffic announcement, the following menu is displayed.
›
Cancel - interruption of the current traffic report. The TP function remains
activated.
›
Deactivate - Interrupt the current traffic report and turn off TP function.
Note
■
Should this radio station not transmit traffic reports or the signal is not avail-
able, then the device automatically searches in the background for another TP
station.■
During playback in menu Media or a radio station in the AM range, traffic
news is received from the previously selected FM radio station.
26Familiarization with the unit