2014 SKODA YETI change time
[x] Cancel search: change timePage 43 of 88

Symbols on the screenSymbolMeaningCharge status of the telephone batterya)Signal strength of the mobile wireless connection a)Active roaming (before the name of the mobile network
provider) a)Missed callCurrent callIncoming SMS
a)a)
This function is only supported by some telephones.
Main / additional phone
Read and observe
and on page 38 first.
Up to 2 telephones can be connected via Bluetooth ®
profile HFP and at the
same time one of them can be connected with the audio profile A2DP or
AVRCP. Therefore the functions of the telephones can be operated via the de-
vice.
One of the telephones can be set as main telephone, the other telephone as
an additional telephone.
Main telephone
The main telephone offers the ability to perform the following functions de-
pending on the type of the connected telephone.
› Acceptance of the incoming call
› Direct entry of a telephone number
› Dial a number from the contact list 1)
› List of telephone contacts / import telephone contacts 1)
› Call list 1)
› Dial the breakdown number 2)
› Dial the info number 2)
› Conference call
› Management of text messages (SMS) 1)
The name of the device connected to the telephone as a main telephone is
displayed in the function key B» Fig. 22 on page 39 .
Additional telephone
The additional telephone provides you with the opportunity to accept or reject
the incoming call (when a telephone call is performed by the main telephone).
The name of the device connected to the telephone as an additional tele-
phone is displayed in the function key C
» Fig. 22 on page 39 .
Change the main telephone to an additional phone › Press the function key
C
» Fig. 22 on page 39 with the name of the addi-
tional telephone.
The functions of the main and additional telephones are switched with each
other.
Note
The contact list is valid for the main telephone. If the incoming call is accepted
by the additional telephone and you find the telephone number in the contact
list of the main telephone, then the caller details (e.g. name, image, etc.) is dis-
played instead of the number.
Bluetooth ®
- connection profile
Fig. 23
List of paired devices - Bluetooth
® profiles
Read and observe and on page 38 first.
Profile types
With the device several telephones can be paired, but only two telephones can
actively be using the Bluetooth ®
profile HFP and at the same time only one
telephone can be connected via the Bluetooth ®
profile A2DP or AVRCP .
1)
This function is only supported by some telephones.
2)
The function is only available for some countries.
40Familiarization with the unit
Page 51 of 88

›Press the function key
, connection starts.
› Press the function key
- connection starts with the area code.
Search for a contact in the list The input screen » Fig. 24 also functions as an alphanumeric keypad that you
can use to search for contacts in the phonebook.
For example, if you enter 32, the unit will display contacts with the letter se-
quence DA, FA, EB, etc.
On the right side next to the numerical keyboard a list of contacts found from
the directory appears according to the lettered specified. By pressing the cor-
responding function key for the respective contact, dialling is started or the
contact details are displayed if the telephone contact has several telephone
numbers.
Enter prefix
Entering the prefix into the input line can be done in one of two ways.
› Enter the characters or numbers of the prefix (e.g.
or enter 00 or similar).
› Enter the telephone number and press the function key
(the connection
with the prefix starts).
The prefix may, for example be used for international calls, telephone calls via
a virtual telephone service provider or distinguishing between business and
private calls and similar.
If the contact number contains a prefix, pressing the function key causes a
further prefix to be added before the number and the connection starts. The
telephone number contains at this time two prefixes and a telephone call is
not initiated.
Dialling breakdown and info numbers
› Press the function key
Breakdn. call , breakdown number is dialled.
A breakdown service will then be called when your vehicle breaks down.
› Press the function key
Info. call the Info number is dialled.
An information service can be called when information regarding the products and services of the ŠKODA brand are required.
The breakdown and info numbers are free of charge. Charges are only made for a telephone call in accordance with the fare conditions of your telephone
service provider.
If no Breakdown or Info. call can be made, then a ŠKODA service partner
should be consulted.The breakdown and info numbers are set country-specific at the factory. If you
want to change the preset numbers, then consult a ŠKODA service partner.
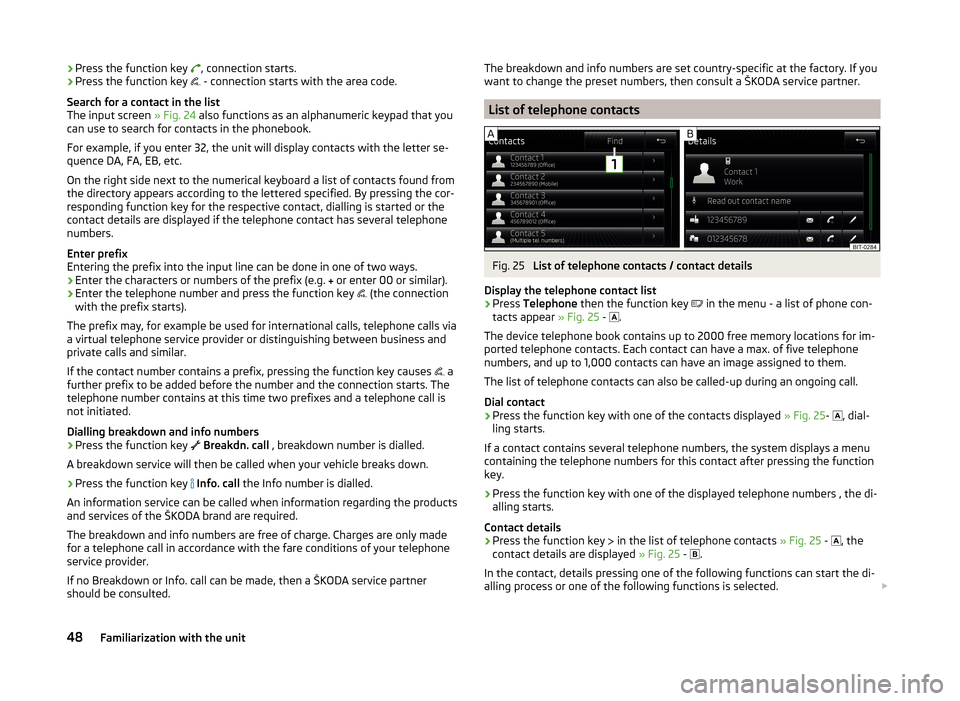
List of telephone contacts
Fig. 25
List of telephone contacts / contact details
Display the telephone contact list
›
Press Telephone then the function key
in the menu - a list of phone con-
tacts appear » Fig. 25 -
.
The device telephone book contains up to 2000 free memory locations for im-
ported telephone contacts. Each contact can have a max. of five telephone
numbers, and up to 1,000 contacts can have an image assigned to them.
The list of telephone contacts can also be called-up during an ongoing call.
Dial contact
›
Press the function key with one of the contacts displayed » Fig. 25-
, dial-
ling starts.
If a contact contains several telephone numbers, the system displays a menu
containing the telephone numbers for this contact after pressing the function
key.
›
Press the function key with one of the displayed telephone numbers , the di-
alling starts.
Contact details
›
Press the function key in the list of telephone contacts
» Fig. 25 -
, the
contact details are displayed » Fig. 25 -
.
In the contact, details pressing one of the following functions can start the di- alling process or one of the following functions is selected.
48Familiarization with the unit
Page 60 of 88

Navigation
Description of the navigation system
Preface to navigation
Introduction
This chapter contains information on the following subjects:
Navigation data
57
Main menu
58
Map display
58
Map Orientation
59
Map scale
59
Options for map display
60
Split screen
60
First and foremost, pay attention to the safety instructions » page 7 , Impor-
tant notes .
The unit uses the GPS (Global Positioning System) satellite system for route
guidance. The satellite signal allows you to determine your current vehicle po-
sition.
Outside the range of the GPS satellite signal (e.g. in dense vegetation, in tun-
nels, parking garages, etc.), the unit navigates only with restrictions using on-
vehicle sensors.
The route guidance is as follows.
› With graphical driving recommendations in the device screen and MAXI DOT
display.
› With navigation announcements.
WARNING■
Information about traffic lights, stop and right of way signs, parking and
stopping restrictions as well as lane constrictions and speed restrictions is
not taken into account for route guidance by the unit.■
The navigation announcements provided may vary from the actual situa-
tions, e.g. due out-of-date navigation data.
■
The volume should be adjusted to ensure that acoustic signals from out-
side, e.g. sirens from vehicles which have the right of way, such as police,
ambulance and fire brigade vehicles, can be heard at all time.
CAUTIONIn some countries, some unit features can no longer be selected when the ve-
hicle is running faster than a certain speed. This is not a malfunction, but com-
plies with the national legal regulations.
Navigation data
Read and observe
and on page 57 first.
Navigation data source
You received the SD memory card with navigation data together with the unit.
For correct functioning of the device, the card must be inserted into slots
12
or
13
» Fig. 1 on page 7 during the entire route guidance.
Insert the memory card » page 33, SD memory card .
Data update
The navigation data is subject to constant changes (such as new streets,
changes of street names and house numbers) and are no longer valid after
some time. Therefore the route guidance may be inaccurate of incorrect. We
recommend that you update the navigation data on a regular basis.
For more information on updating the data, please visit the ŠKODA website
www.infotainment.skoda-auto.com or contact a ŠKODA Partner.
The version of the navigation data for maps can be found in the navigation
settings
→
→ Version information .
Card has been damaged or lost
If the SD memory card with the navigation data has been damaged or lost, a
new card can be obtained from ŠKODA original accessories. The navigation da-
ta can be loaded only on the original card.
57Description of the navigation system
Page 61 of 88

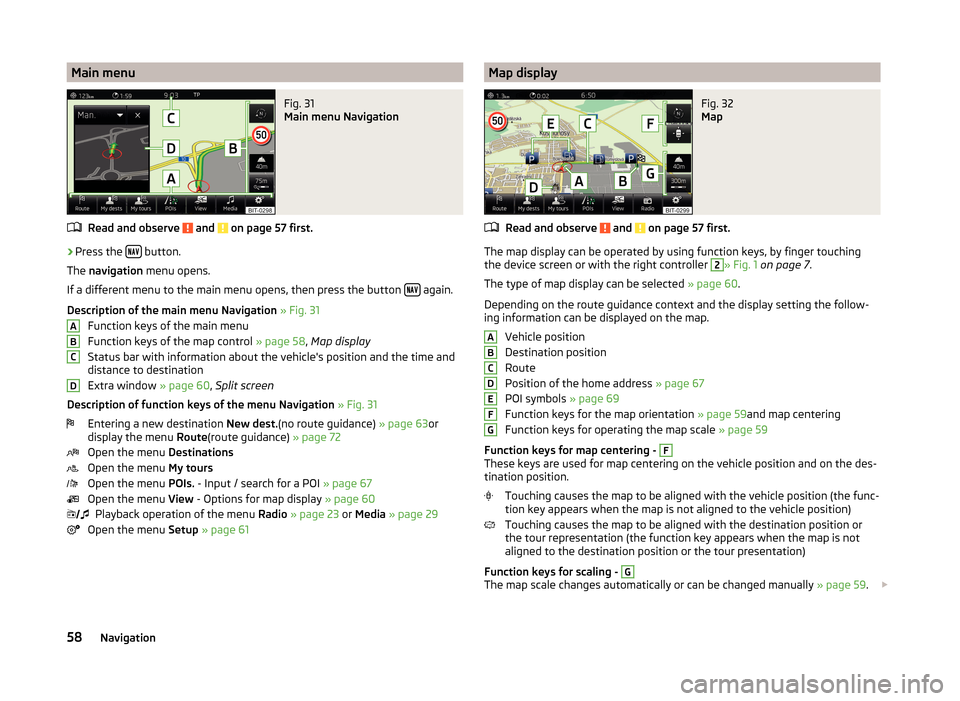
Main menuFig. 31
Main menu Navigation
Read and observe and on page 57 first.
›
Press the button.
The navigation menu opens.
If a different menu to the main menu opens, then press the button
again.
Description of the main menu Navigation » Fig. 31
Function keys of the main menu
Function keys of the map control » page 58, Map display
Status bar with information about the vehicle's position and the time and distance to destination
Extra window » page 60, Split screen
Description of function keys of the menu Navigation » Fig. 31
Entering a new destination New dest.(no route guidance) » page 63or
display the menu Route(route guidance) » page 72
Open the menu Destinations
Open the menu My tours
Open the menu POIs. - Input / search for a POI » page 67
Open the menu View - Options for map display » page 60
Playback operation of the menu Radio » page 23 or Media » page 29
Open the menu Setup » page 61
ABCD Map displayFig. 32
Map
Read and observe and on page 57 first.
The map display can be operated by using function keys, by finger touching
the device screen or with the right controller
2
» Fig. 1 on page 7 .
The type of map display can be selected » page 60.
Depending on the route guidance context and the display setting the follow-
ing information can be displayed on the map.
Vehicle position
Destination position
Route
Position of the home address » page 67
POI symbols » page 69
Function keys for the map orientation » page 59and map centering
Function keys for operating the map scale » page 59
Function keys for map centering -
F
These keys are used for map centering on the vehicle position and on the des-
tination position.
Touching causes the map to be aligned with the vehicle position (the func-
tion key appears when the map is not aligned to the vehicle position)
Touching causes the map to be aligned with the destination position or
the tour representation (the function key appears when the map is not
aligned to the destination position or the tour presentation)
Function keys for scaling -
G
The map scale changes automatically or can be changed manually » page 59.
ABCDEFG58Navigation
Page 74 of 88

The route is recalculated each time if you ignore driving recommendations or
change the route. This process takes only a few seconds. Nav. announcements
can only then be re-transmitted.
If Demo mode is switched on » page 62, a prompt appears asking whether you
want the guidance to start in demo mode or normal mode.
Demo mode provides a travel simulation to the entered destination. The func-
tion offers the chance to travel the calculated route “virtually” on the device
screen.
If an alternative route option is set » page 61, then after the route calculation
the following function keys for the choice of route type will be displayed.
- economic route
- fast route
- short route
In the function keys information about the route length and the estimated
travel time are displayed.
It is possible to select a pre-calculated route before the calculation of the re-
maining routes is completed.
Selecting the route type will start route guidance.
If the option for alternative routes is disabled, the route is calculated and route
guidance is started according to the preferred route » page 61.
The unit tries to allow for continued guidance even if the navigation data is in-
complete or there is no data at all for the given area (e.g., one-way streets,
road types, etc.).
Abort route guidance
If the ignition is switched off and on again, then the route guidance is contin-
ued depending on the stop time in one of the following ways.
› Within 15 min - route guidance is continued taking into account the calcula-
ted route.
› From 15 min to 120 min - the device screen displays
Continue route guid-
ance? (after confirming the guidance is continued, taking into account the
calculated route).
› After 120 min - the route guidance is cancelled.
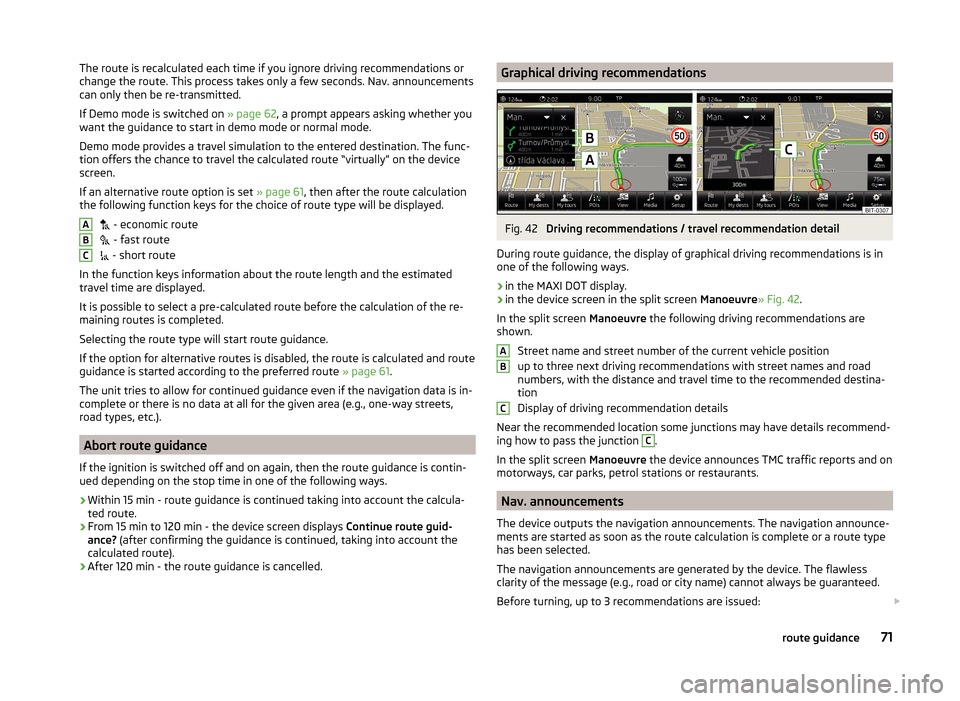
ABCGraphical driving recommendationsFig. 42
Driving recommendations / travel recommendation detail
During route guidance, the display of graphical driving recommendations is in one of the following ways.
› in the MAXI DOT display.
› in the device screen in the split screen
Manoeuvre» Fig. 42.
In the split screen Manoeuvre the following driving recommendations are
shown.
Street name and street number of the current vehicle position
up to three next driving recommendations with street names and road
numbers, with the distance and travel time to the recommended destina-
tion
Display of driving recommendation details
Near the recommended location some junctions may have details recommend- ing how to pass the junction
C
.
In the split screen Manoeuvre the device announces TMC traffic reports and on
motorways, car parks, petrol stations or restaurants.
Nav. announcements
The device outputs the navigation announcements. The navigation announce-
ments are started as soon as the route calculation is complete or a route type
has been selected.
The navigation announcements are generated by the device. The flawless
clarity of the message (e.g., road or city name) cannot always be guaranteed.
Before turning, up to 3 recommendations are issued:
ABC71route guidance