2014 SKODA OCTAVIA reset
[x] Cancel search: resetPage 19 of 83
Unit settings
Setup menu
Introduction
This chapter contains information on the following subjects:
Main menu
17
Sound settings
18
Screen settings
18
Time and date settings
19
Keyboard settings
19
Additional keypad language settings
19
Unit settings
19
Voice control settings
20
Restore factory settings
20
Bluetooth ®
settings
20
First and foremost, pay attention to the safety instructions » page 4 , Impor-
tant notes .
This chapter covers the basic settings of the device.
Additional settings are described in the individual menus ■ Radio » page 24
■ Media » page 28
■ DVD video » page 35
■ Images » page 36
■ Phone » page 39
■ Navigation » page 48
■ Vehicle system settings » page 68
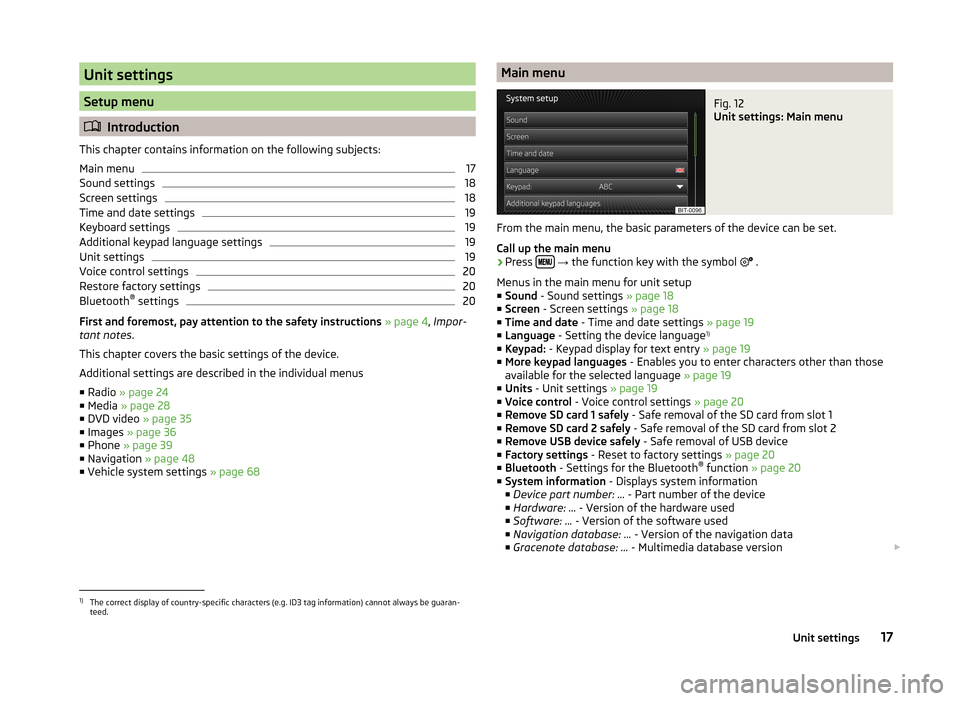
Main menuFig. 12
Unit settings: Main menu
From the main menu, the basic parameters of the device can be set.
Call up the main menu
›
Press
→ the function key with the symbol
.
Menus in the main menu for unit setup
■ Sound - Sound settings » page 18
■ Screen - Screen settings » page 18
■ Time and date - Time and date settings » page 19
■ Language - Setting the device language 1)
■ Keypad: - Keypad display for text entry » page 19
■ More keypad languages - Enables you to enter characters other than those
available for the selected language » page 19
■ Units - Unit settings » page 19
■ Voice control - Voice control settings » page 20
■ Remove SD card 1 safely - Safe removal of the SD card from slot 1
■ Remove SD card 2 safely - Safe removal of the SD card from slot 2
■ Remove USB device safely - Safe removal of USB device
■ Factory settings - Reset to factory settings » page 20
■ Bluetooth - Settings for the Bluetooth ®
function » page 20
■ System information - Displays system information
■ Device part number: ... - Part number of the device
■ Hardware: ... - Version of the hardware used
■ Software: ... - Version of the software used
■ Navigation database: ... - Version of the navigation data
■ Gracenote database: ... - Multimedia database version
1)
The correct display of country-specific characters (e.g. ID3 tag information) cannot always be guaran-
teed.
17Unit settings
Page 22 of 83
■Gas consumption: - Gas consumption units
■ kg/100km - Kilograms per 100 km
■ km/kg - Kilometres per kilogram
■ m³/100km - Cubic metres per 100 kilometres
■ km/m³ - Kilometres per cubic metre
■ Pressure: - Pressure units for tyre pressure
■ kPa - Kilopascal
■ bar - bar
■ psi - Pounds per square inch
Voice control settings
›
Press the button
→
→ Voice control .
■ Dialogue style: - Setting the dialogue style
■ Long - Long dialogue (the system plays complete acoustic messages)
■ Short - Short dialogue (the system shortens some acoustic messages or
substitutes them with an acoustic signal)
■ Display available commands - Switch on/off the menus containing basic
voice commands when voice control is activated
■ Voice control session start tone - Switch on/off the audible signal that is
output when voice control is activated
■ Voice control session end tone - Switch on/off the audible signal that is out-
put when voice control is ended
■ Input tone in voice dialogue - Switch on/off the audible signal that is output
to signal that voice control is waiting for a command
Restore factory settings
›
Press the button
→
→ Factory settings .
■ Reset all settings and data
■ Restore factory settings - Reset all factory settings
■ Reset individual settings/data
■ Sound - Restore default settings for sound
■ Radio - Restore default settings for radio
■ Vehicle - Restore default settings for the vehicle systems
■ Telephone - Restore default settings for phone
■ Media - Restore default settings for media
■ Voice control - Restore default settings for voice control
■
Navigation - Restore default settings for navigation
■ System - Restore the system default settings
Bluetooth ®
settings
›
Press the button
→
→ Bluetooth .
■ Bluetooth - Switch on/off Bluetooth ®
function
■ Visibility: - Switch on/off the visibility of the Bluetooth ®
device for other de-
vices
■ Visible - Visibility is always on
■ Hidden - Visibility is off
■ At start-up - Turns on visibility for 5 minutes after switching on the ignition
or until the driving speed has exceeded 5 km/h
■ Name: - Open the input screen with keyboard - Change the device name
■ Paired devices - Display the list of paired Bluetooth ®
devices; connect or de-
lete a paired device; delete the list of paired devices ■ Delete all - Delete all paired Bluetooth ®
devices
■ - Delete the paired Bluetooth ®
device
■ Find devices - Searches for available external devices with enabled Blue-
tooth ®
functions and activated visibility » page 41
■ Bluetooth audio (A2DP/AVRCP) - Switch on/off the connection option for
Bluetooth ®
profiles A2DP and AVRCP 1)
1)
A2DP and AVRCP are Bluetooth
®
profiles that support multimedia functions.
20Familiarization with the unit
Page 23 of 83
Audio/Video/Images
Radio
Operation
Introduction
This chapter contains information on the following subjects:
Mainmenu
21
List of available stations
22
Search for radio stations and store
22
Search available stations (Scan)
23
Station logos
23
Traffic programme
23
Station information DAB)
24
First and foremost, pay attention to the safety instructions » page 4 , Impor-
tant notes .
The device allows analogue radio reception of FM and AM frequency ranges as
well as DAB digital radio reception.
Radio reception DAB allows multiple stations to be transmitted in a single fre-
quency in the form of a so-called ensemble. It also allows for the transmission
of additional data and information (e.g. messages, sport, weather, warnings,
etc.).
CAUTION
■ Car parks, tunnels, tall buildings or mountains can interfere with the radio
signal even causing it to fail completely.■
In countries where the RDS function is not supported sufficiently, we recom-
mend turning off the AF and RDS settings. Otherwise, these settings can af-
fect the functionality of the radio.
■
For vehicles with window antennas, if the windows have foil stuck to them
or metal-coated stickers this may cause you to experience some interference.
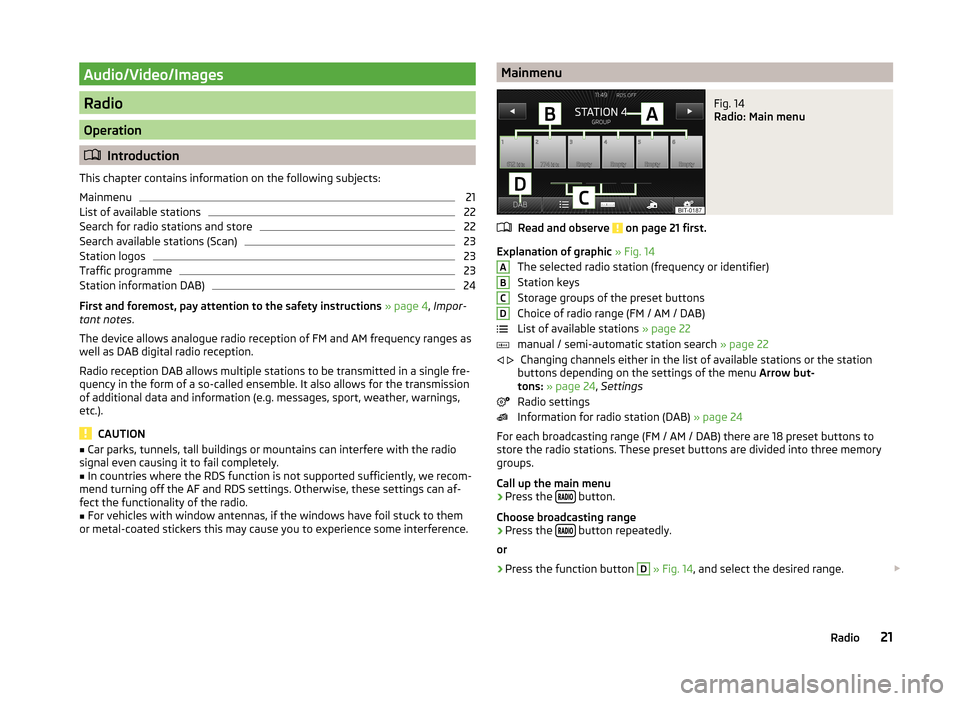
MainmenuFig. 14
Radio: Main menu
Read and observe on page 21 first.
Explanation of graphic » Fig. 14
The selected radio station (frequency or identifier)
Station keys
Storage groups of the preset buttons
Choice of radio range (FM / AM / DAB)
List of available stations » page 22
manual / semi-automatic station search » page 22
Changing channels either in the list of available stations or the station
buttons depending on the settings of the menu Arrow but-
tons: » page 24 , Settings
Radio settings
Information for radio station (DAB) » page 24
For each broadcasting range (FM / AM / DAB) there are 18 preset buttons to
store the radio stations. These preset buttons are divided into three memory
groups.
Call up the main menu
›
Press the button.
Choose broadcasting range
›
Press the button repeatedly.
or
›
Press the function button
D
» Fig. 14 , and select the desired range.
ABCD
21Radio
Page 24 of 83
Information symbols in the displaySymbolMeaningTraffic information station Traffic information signals are not available or the selected sta-
tion is not a traffic information station RDS function is switched off (FM) AF Alternative frequency is switched off (FM)
List of available stations
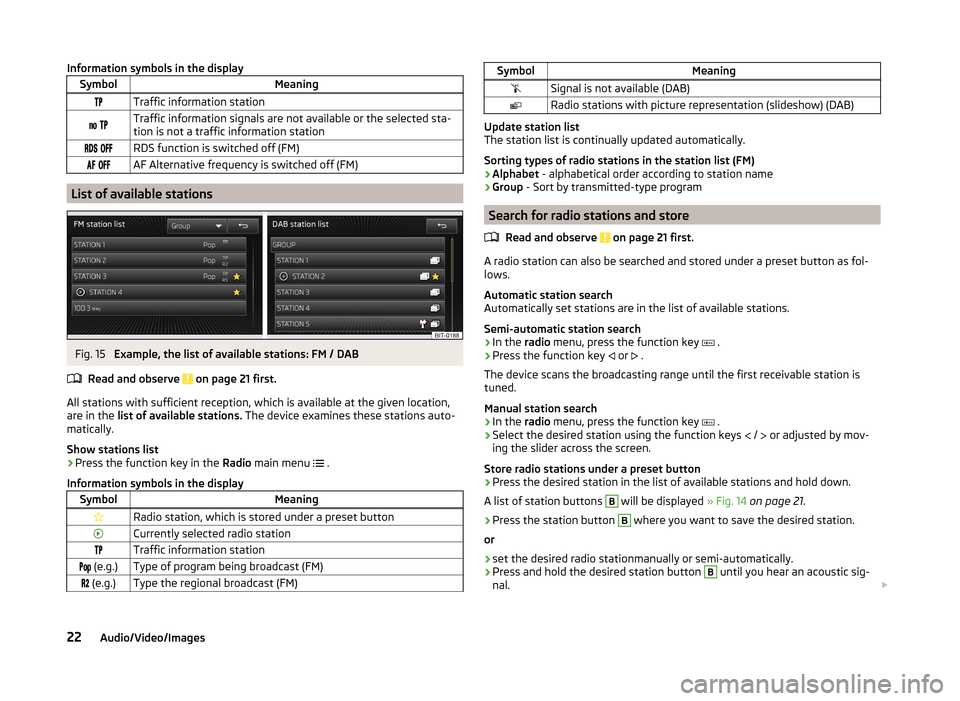
Fig. 15
Example, the list of available stations: FM / DAB
Read and observe
on page 21 first.
All stations with sufficient reception, which is available at the given location,
are in the list of available stations. The device examines these stations auto-
matically.
Show stations list
›
Press the function key in the Radio main menu
.
Information symbols in the display
SymbolMeaningRadio station, which is stored under a preset buttonCurrently selected radio stationTraffic information station (e.g.)Type of program being broadcast (FM) (e.g.)Type the regional broadcast (FM)SymbolMeaningSignal is not available (DAB)Radio stations with picture representation (slideshow) (DAB)
Update station list
The station list is continually updated automatically.
Sorting types of radio stations in the station list (FM) › Alphabet
- alphabetical order according to station name
› Group
- Sort by transmitted-type program
Search for radio stations and store
Read and observe
on page 21 first.
A radio station can also be searched and stored under a preset button as fol-
lows.
Automatic station search
Automatically set stations are in the list of available stations.
Semi-automatic station search
›
In the radio menu, press the function key
.
›
Press the function key
or
.
The device scans the broadcasting range until the first receivable station is
tuned.
Manual station search
›
In the radio menu, press the function key
.
›
Select the desired station using the function keys
/
or adjusted by mov-
ing the slider across the screen.
Store radio stations under a preset button
›
Press the desired station in the list of available stations and hold down.
A list of station buttons
B
will be displayed » Fig. 14 on page 21 .
›
Press the station button
B
where you want to save the desired station.
or
›
set the desired radio stationmanually or semi-automatically.
›
Press and hold the desired station button
B
until you hear an acoustic sig-
nal.
22Audio/Video/Images
Page 25 of 83
You can switch between memory groups of individual preset buttons using the
function keys C.
Search available stations (Scan)
Read and observe
on page 21 first.
This function plays all the receivable stations in succession for a few seconds
each.
Switching on
›
Press the menu knob
2
» Fig. 1 on page 5 .
or
›
In the radio menu, press the function key
→ Scan .
Switching off
›
Press the menu knob
2
.
or
›
press any function key in the device screen.
After switching off the function, the device plays the station at which the
function was cancelled.
Station logos
Read and observe
on page 21 first.
The present buttons
B
» Fig. 14 on page 21 can be linked to logos (images) of
the radio stations.
Store station logos automatically (FM / DAB)
›
Before you store the radio station to a station button function key press in
the Radio menu the function key
→ Activate Advanced settings .
›
Activate the menu item Auto-save station logos » page 24 , Advanced Set-
tings (FM) and » page 25 , Advanced Settings (DAB) .
When you save the station to a station button, the station is assigned a logo
from the device memory if the logo is available in the memory.
Storing station logos manually
A logo can be assigned manually for the previously stored stations.
›
The function key
Press
→ Station logos .
A menu with preset buttons for radio stations is displayed.›
Press the preset button for the station, which a logo is to be assigned to.
A menu of media (CD, SD card, USB) is displayed.
›
In the the relevant madia select the image you want to have.
By selection of the image it is assiagned to the relevant station button.
Note
■ The following image formats are supported: jpg, gif, png, bmp.■We recommend a resolution of up to 500 x 500 pixels.
Traffic programme
Read and observe
on page 21 first.
Switching on/off
›
In the radio menu, press the function key
.
›
Enable or disable the menu item
Traffic programme (TP)
Traffic news
During a traffic announcement, the following menu is displayed.
›
Cancel - interruption of the current traffic report. The TP function remains
activated.
›
Deactivate - Exit the current traffic report and turn off TP function.
Note
Some radio stations misleadingly identify themselves as traffic programs. It is
therefore not an error with the unit that there is no traffic news with these
stations.■
During playback in the media menu the traffic information from the last se-
lected radio station is received.
■
Should this radio station not transmit traffic reports or the signal is not avail-
able, then the device automatically searches for a TP station.
23Radio
Page 26 of 83
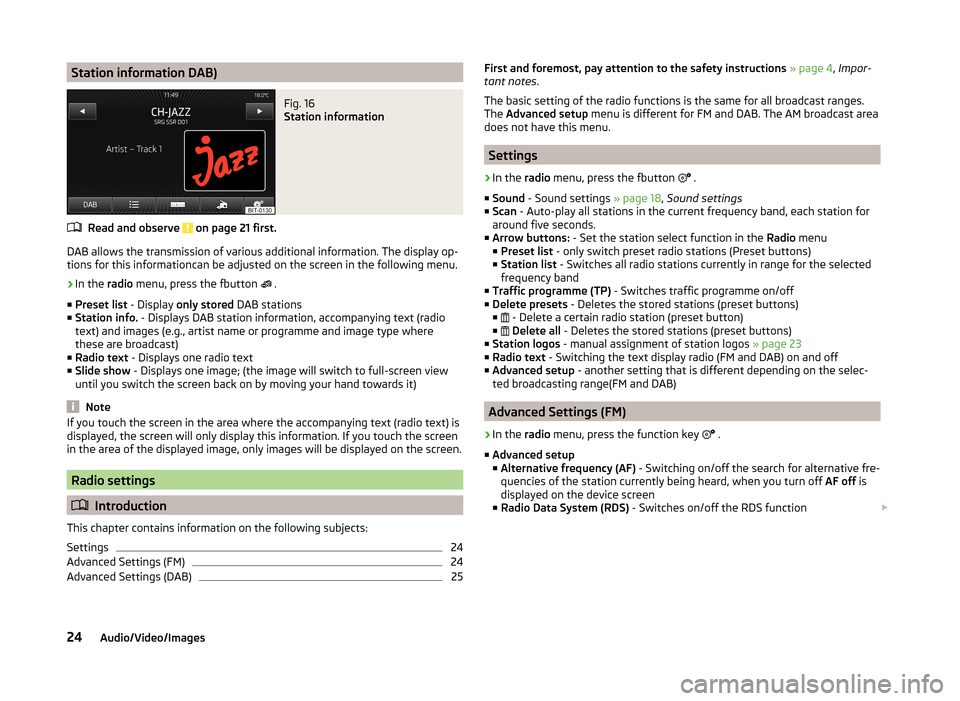
Station information DAB)Fig. 16
Station information
Read and observe on page 21 first.
DAB allows the transmission of various additional information. The display op-
tions for this informationcan be adjusted on the screen in the following menu.
›
In the radio menu, press the fbutton
.
■ Preset list - Display only stored DAB stations
■ Station info. - Displays DAB station information, accompanying text (radio
text) and images (e.g., artist name or programme and image type where
these are broadcast)
■ Radio text - Displays one radio text
■ Slide show - Displays one image; (the image will switch to full-screen view
until you switch the screen back on by moving your hand towards it)
Note
If you touch the screen in the area where the accompanying text (radio text) is
displayed, the screen will only display this information. If you touch the screen
in the area of the displayed image, only images will be displayed on the screen.
Radio settings
Introduction
This chapter contains information on the following subjects:
Settings
24
Advanced Settings (FM)
24
Advanced Settings (DAB)
25First and foremost, pay attention to the safety instructions » page 4 , Impor-
tant notes .
The basic setting of the radio functions is the same for all broadcast ranges.
The Advanced setup menu is different for FM and DAB. The AM broadcast area
does not have this menu.
Settings
›
In the radio menu, press the fbutton
.
■ Sound - Sound settings » page 18, Sound settings
■ Scan - Auto-play all stations in the current frequency band, each station for
around five seconds.
■ Arrow buttons: - Set the station select function in the Radio menu
■ Preset list - only switch preset radio stations (Preset buttons)
■ Station list - Switches all radio stations currently in range for the selected
frequency band
■ Traffic programme (TP) - Switches traffic programme on/off
■ Delete presets - Deletes the stored stations (preset buttons)
■ - Delete a certain radio station (preset button)
■
Delete all - Deletes the stored stations (preset buttons)
■ Station logos - manual assignment of station logos » page 23
■ Radio text - Switching the text display radio (FM and DAB) on and off
■ Advanced setup - another setting that is different depending on the selec-
ted broadcasting range(FM and DAB)
Advanced Settings (FM)
›
In the radio menu, press the function key
.
■ Advanced setup
■ Alternative frequency (AF) - Switching on/off the search for alternative fre-
quencies of the station currently being heard, when you turn off AF off is
displayed on the device screen
■ Radio Data System (RDS) - Switches on/off the RDS function
24Audio/Video/Images
Page 30 of 83
Track - Sorted by the track title
Video - Files containing a video recording
Note
■
In the title / folder database a maximum of 1000 files / folders can be dis-
played alphabetically.■
If the file format is not supported by the unit or the file is damaged and can-
not be played the title / folder database displays a struck-through icon.
Playback
The device plays the files in alphabetical order.
Description of the playback keys
ButtonActionFunction /PressPlay / PausePress briefly a)Play the previous titlePress briefly b)Plays the current track from the startPress and hold but-
tonc)Fast-reverse of the trackPress brieflyPlay the next titlePress and hold but-
tonc)Fast-forward of the track
First pressTurn on the track repeat
Second pressTurn on the repetition of the entire folder /
source of signal Third pressSwitch off the repetitionPressTurn on / off the random playback of the
folder / source (mix mode)First pressAutomatic play from the folder / sourceSecond pressTurn off the function a)
Within about 3 seconds after the start of the track playback.
b)
After about 5 seconds after the start of playback of the track.
c)
The longer the button is pressed, the faster the fast forward/reverse.
Scan function
The Scan function can also be started/stopped in the main Media menu by
pressing button
2
» Fig. 1 on page 5 .
The
scanning feature can also be cancelled by switching to another file / signal
source or a function key is pressed for playback.
Note
The function keys listed in the table are different depending on the currently
selected menu screen.
Media settings
›
Press the button in the menu Media
.
■ Sound - Sound settings » page 18, Sound settings
■ Manage jukebox - Save/delete supported audio/video files in the internal
unit memory » page 30
■ Mix/repeat/scan including subfolders - switching the song playback in the
following modes (Shuffle / Repeat / Automatic play) including subfolders in
the current folder
■ Bluetooth - Settings for the Bluetooth ®
function » page 20
■ Video setup (files) - Set the parameters of the video being played back from
a file
■ Format: - Set the screen width/height ratio
■ Automatic - adjust the picture to the screen size
■ 16:9
■ 4:3
■ 14:9
■ 47:20
■ Video (DVD) settings - Set the parameters of the video being played back
from a DVD source » page 31
■ Traffic programme (TP) - Switches traffic programme on/off
■ External AUX device - Activate/deactivate the input of the external AUX au-
dio source
■ Reset codec to system settings - Codec default settings
■ Remove safely - safe removal of the source connected
■ Select device
■ SD card 1
■ SD card 2
■ USB 1
28Audio/Video/Images
Page 53 of 83
Map display with light or dark backgroundSwitches the split screen on/off in the map » page 52
Map operation
Moving the map
The map can be moved in any direction by touching it with your finger and
dragging it on the screen in the desired direction.
Changing the scale
› with the menu button
2
›by touching the screen with two fingers and pulling the fingers together or
apart.
Function keys and map display symbols
■ - Context-dependent change in the map orientation
■ 2D map display - the map rotates and the direction of travel arrow
C
» Fig. 32 on page 50 points to the top of screen, or the north is aligned
with the top edge of the screen, and the arrow
C
shows the direction of
travel
■ 3D map view -the direction of travel arrow
C
points to the top of the
screen (if the map scale is larger than 100 km, the map is aligned to the north).
■ - Touch to align the map to the position of the vehicle (the function key is
available when you move the map in the vehicle position display)
■ - Touch to align the map to the destination position and/or route display
(the function key is available when you move the map within the destina-
tion- or route display )
■ - The number located below the symbol indicates the elevation 1)
■ - Touch to increase the map scale for a few seconds before it resets to the
original scale (quick view)
■ - Displays the manually set map scale
■ - Displays the automatic map scale
■ - Switches the autozoom on/off during route guidance. Active autozoom is
indicated by a green symbol. If Autozoom is active, the map scale will change
automatically depending on the route travelled (motorway trip: large map
scale - city: small map scale)
Day/night
Split screenThe autozoom can be switched off by touching
→ or off by changing
the map scale. Touching again the (function key highlighted in green) turns
the autozoom on again. Autozoom can also be switched on/off in the naviga-
tion settings » page 49
Autozoom is only functional when the map is aligned with the vehicle position
(the function key
with the symbol).
Traffic signs
The system provides the option to display traffic signs
B
» Fig. 32 on page 50
in the information display and on the unit screen that are:
› stored in the navigation data of the maps;
› recognised by the camera.
The information given by traffic signs that are recognized by the front camera
always takes precedence over stored navigation data.
If the Traffic signs split screen is not switched on, only one traffic sign is dis-
played on the unit screen.
Switching on the traffic sign display function » page 49.
Home address entry
›
In the Navigation main menu, press
→ Manage memory → Define home
address .
If the home address has not been entered, an input window is displayed with
the following message:
Please select as your home address: your current position or a new address.
The following function keys are displayed:
› Current position
- Entry of the home address via the acquisition of the cur-
rent location;
› Address
- Enter the home address in writing » page 55
Description of the adjustment or deletion process of the home ad-
dress » page 49 .
1)
Display of elevation requires the reception of signals from at least five satellites. Route guidance must
not be running in demo mode.
51Description of the navigation system