2014 SKODA OCTAVIA manual radio set
[x] Cancel search: manual radio setPage 23 of 83
Audio/Video/Images
Radio
Operation
Introduction
This chapter contains information on the following subjects:
Mainmenu
21
List of available stations
22
Search for radio stations and store
22
Search available stations (Scan)
23
Station logos
23
Traffic programme
23
Station information DAB)
24
First and foremost, pay attention to the safety instructions » page 4 , Impor-
tant notes .
The device allows analogue radio reception of FM and AM frequency ranges as
well as DAB digital radio reception.
Radio reception DAB allows multiple stations to be transmitted in a single fre-
quency in the form of a so-called ensemble. It also allows for the transmission
of additional data and information (e.g. messages, sport, weather, warnings,
etc.).
CAUTION
■ Car parks, tunnels, tall buildings or mountains can interfere with the radio
signal even causing it to fail completely.■
In countries where the RDS function is not supported sufficiently, we recom-
mend turning off the AF and RDS settings. Otherwise, these settings can af-
fect the functionality of the radio.
■
For vehicles with window antennas, if the windows have foil stuck to them
or metal-coated stickers this may cause you to experience some interference.
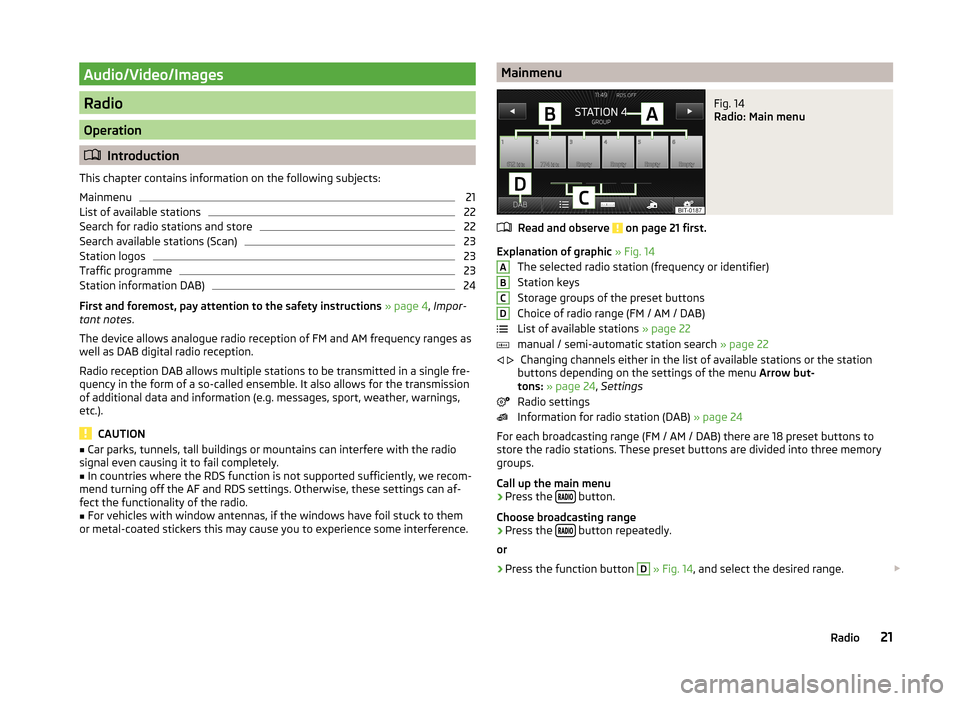
MainmenuFig. 14
Radio: Main menu
Read and observe on page 21 first.
Explanation of graphic » Fig. 14
The selected radio station (frequency or identifier)
Station keys
Storage groups of the preset buttons
Choice of radio range (FM / AM / DAB)
List of available stations » page 22
manual / semi-automatic station search » page 22
Changing channels either in the list of available stations or the station
buttons depending on the settings of the menu Arrow but-
tons: » page 24 , Settings
Radio settings
Information for radio station (DAB) » page 24
For each broadcasting range (FM / AM / DAB) there are 18 preset buttons to
store the radio stations. These preset buttons are divided into three memory
groups.
Call up the main menu
›
Press the button.
Choose broadcasting range
›
Press the button repeatedly.
or
›
Press the function button
D
» Fig. 14 , and select the desired range.
ABCD
21Radio
Page 24 of 83
Information symbols in the displaySymbolMeaningTraffic information station Traffic information signals are not available or the selected sta-
tion is not a traffic information station RDS function is switched off (FM) AF Alternative frequency is switched off (FM)
List of available stations
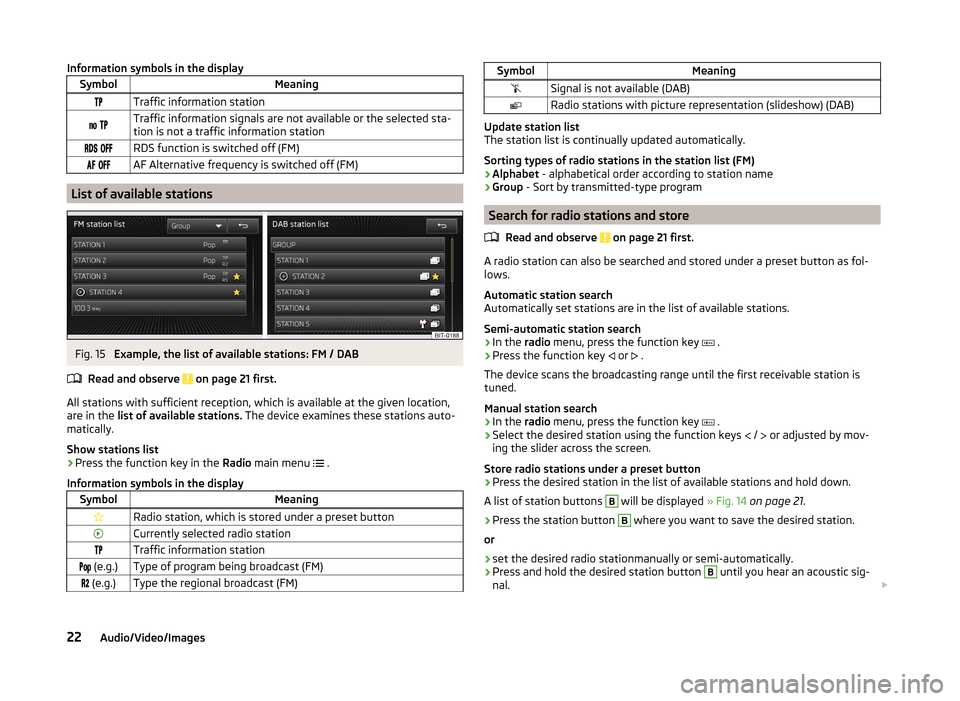
Fig. 15
Example, the list of available stations: FM / DAB
Read and observe
on page 21 first.
All stations with sufficient reception, which is available at the given location,
are in the list of available stations. The device examines these stations auto-
matically.
Show stations list
›
Press the function key in the Radio main menu
.
Information symbols in the display
SymbolMeaningRadio station, which is stored under a preset buttonCurrently selected radio stationTraffic information station (e.g.)Type of program being broadcast (FM) (e.g.)Type the regional broadcast (FM)SymbolMeaningSignal is not available (DAB)Radio stations with picture representation (slideshow) (DAB)
Update station list
The station list is continually updated automatically.
Sorting types of radio stations in the station list (FM) › Alphabet
- alphabetical order according to station name
› Group
- Sort by transmitted-type program
Search for radio stations and store
Read and observe
on page 21 first.
A radio station can also be searched and stored under a preset button as fol-
lows.
Automatic station search
Automatically set stations are in the list of available stations.
Semi-automatic station search
›
In the radio menu, press the function key
.
›
Press the function key
or
.
The device scans the broadcasting range until the first receivable station is
tuned.
Manual station search
›
In the radio menu, press the function key
.
›
Select the desired station using the function keys
/
or adjusted by mov-
ing the slider across the screen.
Store radio stations under a preset button
›
Press the desired station in the list of available stations and hold down.
A list of station buttons
B
will be displayed » Fig. 14 on page 21 .
›
Press the station button
B
where you want to save the desired station.
or
›
set the desired radio stationmanually or semi-automatically.
›
Press and hold the desired station button
B
until you hear an acoustic sig-
nal.
22Audio/Video/Images
Page 25 of 83
You can switch between memory groups of individual preset buttons using the
function keys C.
Search available stations (Scan)
Read and observe
on page 21 first.
This function plays all the receivable stations in succession for a few seconds
each.
Switching on
›
Press the menu knob
2
» Fig. 1 on page 5 .
or
›
In the radio menu, press the function key
→ Scan .
Switching off
›
Press the menu knob
2
.
or
›
press any function key in the device screen.
After switching off the function, the device plays the station at which the
function was cancelled.
Station logos
Read and observe
on page 21 first.
The present buttons
B
» Fig. 14 on page 21 can be linked to logos (images) of
the radio stations.
Store station logos automatically (FM / DAB)
›
Before you store the radio station to a station button function key press in
the Radio menu the function key
→ Activate Advanced settings .
›
Activate the menu item Auto-save station logos » page 24 , Advanced Set-
tings (FM) and » page 25 , Advanced Settings (DAB) .
When you save the station to a station button, the station is assigned a logo
from the device memory if the logo is available in the memory.
Storing station logos manually
A logo can be assigned manually for the previously stored stations.
›
The function key
Press
→ Station logos .
A menu with preset buttons for radio stations is displayed.›
Press the preset button for the station, which a logo is to be assigned to.
A menu of media (CD, SD card, USB) is displayed.
›
In the the relevant madia select the image you want to have.
By selection of the image it is assiagned to the relevant station button.
Note
■ The following image formats are supported: jpg, gif, png, bmp.■We recommend a resolution of up to 500 x 500 pixels.
Traffic programme
Read and observe
on page 21 first.
Switching on/off
›
In the radio menu, press the function key
.
›
Enable or disable the menu item
Traffic programme (TP)
Traffic news
During a traffic announcement, the following menu is displayed.
›
Cancel - interruption of the current traffic report. The TP function remains
activated.
›
Deactivate - Exit the current traffic report and turn off TP function.
Note
Some radio stations misleadingly identify themselves as traffic programs. It is
therefore not an error with the unit that there is no traffic news with these
stations.■
During playback in the media menu the traffic information from the last se-
lected radio station is received.
■
Should this radio station not transmit traffic reports or the signal is not avail-
able, then the device automatically searches for a TP station.
23Radio
Page 26 of 83
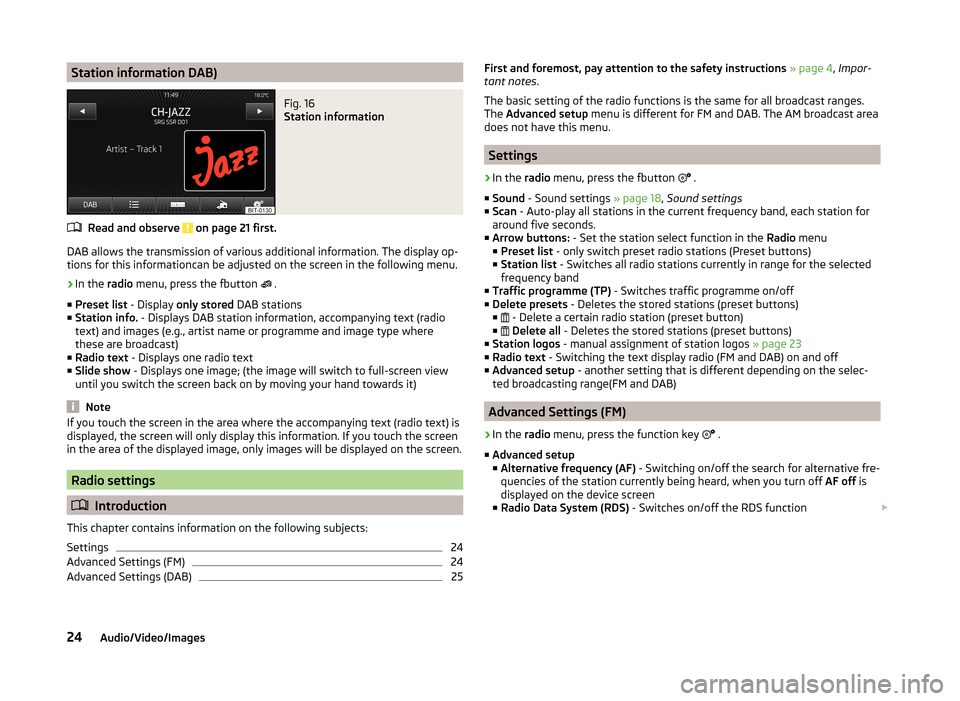
Station information DAB)Fig. 16
Station information
Read and observe on page 21 first.
DAB allows the transmission of various additional information. The display op-
tions for this informationcan be adjusted on the screen in the following menu.
›
In the radio menu, press the fbutton
.
■ Preset list - Display only stored DAB stations
■ Station info. - Displays DAB station information, accompanying text (radio
text) and images (e.g., artist name or programme and image type where
these are broadcast)
■ Radio text - Displays one radio text
■ Slide show - Displays one image; (the image will switch to full-screen view
until you switch the screen back on by moving your hand towards it)
Note
If you touch the screen in the area where the accompanying text (radio text) is
displayed, the screen will only display this information. If you touch the screen
in the area of the displayed image, only images will be displayed on the screen.
Radio settings
Introduction
This chapter contains information on the following subjects:
Settings
24
Advanced Settings (FM)
24
Advanced Settings (DAB)
25First and foremost, pay attention to the safety instructions » page 4 , Impor-
tant notes .
The basic setting of the radio functions is the same for all broadcast ranges.
The Advanced setup menu is different for FM and DAB. The AM broadcast area
does not have this menu.
Settings
›
In the radio menu, press the fbutton
.
■ Sound - Sound settings » page 18, Sound settings
■ Scan - Auto-play all stations in the current frequency band, each station for
around five seconds.
■ Arrow buttons: - Set the station select function in the Radio menu
■ Preset list - only switch preset radio stations (Preset buttons)
■ Station list - Switches all radio stations currently in range for the selected
frequency band
■ Traffic programme (TP) - Switches traffic programme on/off
■ Delete presets - Deletes the stored stations (preset buttons)
■ - Delete a certain radio station (preset button)
■
Delete all - Deletes the stored stations (preset buttons)
■ Station logos - manual assignment of station logos » page 23
■ Radio text - Switching the text display radio (FM and DAB) on and off
■ Advanced setup - another setting that is different depending on the selec-
ted broadcasting range(FM and DAB)
Advanced Settings (FM)
›
In the radio menu, press the function key
.
■ Advanced setup
■ Alternative frequency (AF) - Switching on/off the search for alternative fre-
quencies of the station currently being heard, when you turn off AF off is
displayed on the device screen
■ Radio Data System (RDS) - Switches on/off the RDS function
24Audio/Video/Images
Page 27 of 83
■RDS Regional: - Switch on/off the automatic tracking of related regional
stations
■ Fixed - Maintains the selected regional station continuously. When the
signal is lost, another regional station must be set manually.
■ Automatic - Auto-selects the station with the best reception at the mo-
ment. If you lose reception the region, the unit will automatically set an-
other available region.
■ Auto-save station logos - Auto save the station logo according to the PI
code of the radio station » page 23
Advanced Settings (DAB)
›
Select the DAB band in the Radio menu, and press the function key
→
Activate Advanced settings .
■ Advanced setup
■ DAB traffic announcements - Switch on/off DAB announcements
■ Other DAB announcements - Switch on/off other announcements (e.g.,
warnings, regional weather, sports reports, financial news)
■ DAB - DAB station tracking - Switch on/off automatic DAB station tracking
in other station groups
■ Automatic DAB - FM switching - Switch on/off auto-switching from DAB to
the FM frequency band if the DAB signal is lost
■ L-Band - Switch on/off the automatic DAB station search in L-band
■ Auto-save station logos - Automatic association of the logo with station
detected » page 23
DAB programme tracking
If a DAB station is a member of several sender groups, when the signal is poor,
the same station is searched in a different sender group.
Auto-change DAB -FM
If the DAB signal is poor, the unit will try to find a corresponding FM station for
the DAB station you are currently listening to.
For auto-change to work, the DAB and FM stations must send a sender ID.
› While the station is being received on the FM band, (
) is displayed after the
station name. The () marker disappears when the relevant DAB station can
be received again
).
› If a DAB station is also not available in the FM band due to poor reception,
the device will be switched to mute.
› If you do not want automatic station change (e.g. when driving through tun-
nels, when reception may be lost temporarily), you can deactivate this func-
tion.
L-band
For the DAB radio reception in different countries, different frequency ranges
are used. In some countries the DAB radio reception only in the so-called L-
band.
› If you have any problems with the DAB wireless reception it is necessary to
ensure that the DAB Automatic tuning in L-band is on.
› If no L-band DAB radio reception is possible in the country then it is better to
leave this menu item turned off. The channel scan is therefore faster.25Radio
Page 39 of 83
Phone
Communication
Telephones and two-way radio systems
Introduction
This chapter contains information on the following subjects:
Introductory information
38
Main menu
38
Problems with the Telephone function
38
Phonebox
39
Settings
39
The Telephone menu is available when the following conditions are met.
The ignition is switched on.
The Bluetooth ®
function on the device is switched on.
The visibility of the mobile phone is switched on » page 20.
The visibility of the telephone is switched on.
The phone is within range of the Bluetooth ®
signal.
The phone is supported by the device.
After the device is switched on, the system attempts to connect to the most
recently connected telephone 1)
.
If a telephone is connected to the device and the device is turned off, the con-
nection to the telephone is not lost. The connection is only lost after switching
off the ignition (for vehicles with the system KESSY after switching off the ig-
nition and opening the driver's door).
WARNING■ The national regulations for using a mobile phone in a vehicle must be
observed.■
If a mobile phone or a two-way radio system is operated in a vehicle with-
out an external aerial or an external aerial which has been installed incor-
rectly, this can increase the strength of the electromagnetic field inside the
vehicle.
■
Two-way radio systems, mobile phones or mounts must not be installed
on airbag covers or within the immediate deployment range of the airbags.
■
Never leave a telephone in the deployment area of an airbag, on a seat,
on the dash panel or in another area, from which it can be thrown during a
sudden braking manoeuvre, an accident or a collision - risk of injury. There
are storage compartments with lids and if necessary there is the multime-
dia storage compartments to hold this » Vehicle owner's manual , chap-
ter Practical equipment.
■
Before transport of the vehicle by air, the Bluetooth ®
function must be
switched off by a specialist company.
CAUTION
■ In areas with no signal and possibly in tunnels, garages and subways a tele-
phone conversation can be interrupted and no telephone connection can be
established - not even in an emergency!■
The range of the Bluetooth ®
connection to the hands-free system is limited
to the vehicle interior. The range is dependent on local factors, e.g. obstacles
between the devices and mutual interferences with other devices. If your tele-
phone is in a jacket pocket, for example, this can lead to difficulties when es-
tablishing a connection with the device or transferring data.
Note
Available updates for Bluetooth ®
devices as well as information about the
phone support can be obtained from the ŠKODA website www.infotain-
ment.skoda-auto.com .1)
With some phones, it is necessary to set the connection to the device as "authorised" in order for the
automatic connection to be successful. If this is not set, the system will prompt you for a confirmation
each time you attempt to connect to the telephone.
37Communication
Page 40 of 83
Introductory informationRead and observe
and on page 37 first.
The device allows for a wireless connection to the telephone. Your telephonecan be operated from the device.
ŠKODA permits the operation of telephones and two-way radio systems with a
professionally installed external aerial and a maximum transmission power of
up to 10 watts.
Please ask at a specialist workshop about installing and operating telephones
and two-way radio systems that have a transmission power of more than 10 W.
Operating telephones or two-way radio systems may interfere with the func-
tionality of the electronic systems in your vehicle.
The reasons for this are as follows:
› no external aerial;
› external aerial incorrectly installed;
› transmission power greater than 10 watts.
Note
■
We recommend that the installation of telephones and two-way radio sys-
tems in a vehicle be carried out by a specialist garage.■
The telephone functions are dependent on the mobile network operators, as
well as the telephone being used. Further information is available from the
mobile network operator or to refer to the manual of the telephone.
■
In signal-free areas reception can be disturbed or a call may be disconnected.
■
Most modern electronic equipment is shielded from RF signals. In exceptional
cases, electronic equipment may not be shielded against the RF signals and
telephone service may be disrupted.
Main menu
Fig. 27
Phone: Main menu
Read and observe and on page 37 first.
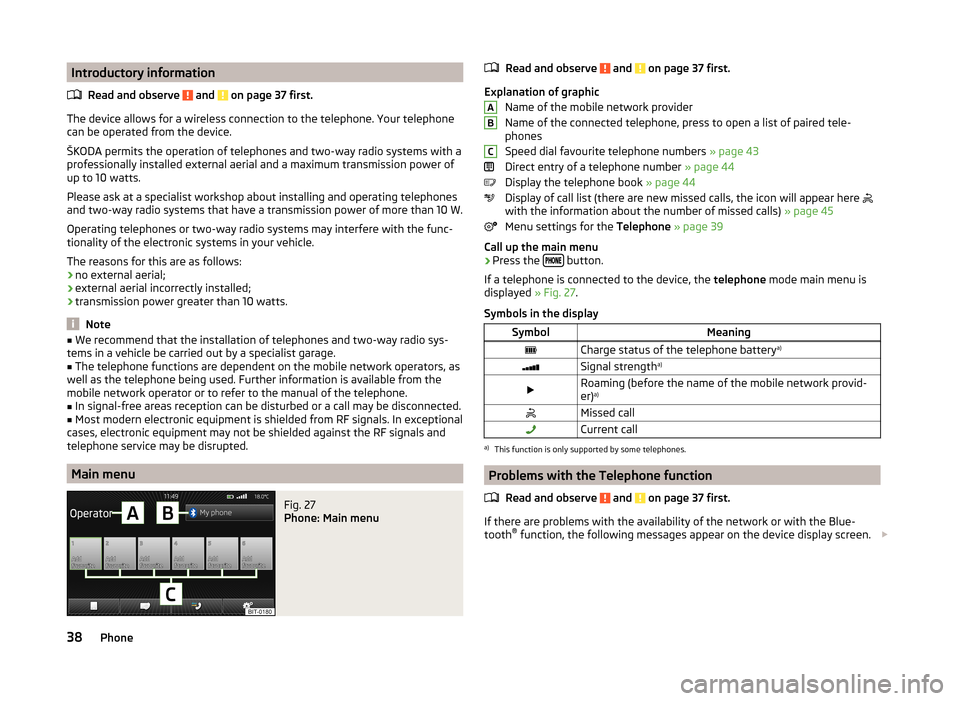
Explanation of graphic
Name of the mobile network provider
Name of the connected telephone, press to open a list of paired tele-
phones
Speed dial favourite telephone numbers » page 43
Direct entry of a telephone number » page 44
Display the telephone book » page 44
Display of call list (there are new missed calls, the icon will appear here
with the information about the number of missed calls) » page 45
Menu settings for the Telephone » page 39
Call up the main menu
›
Press the button.
If a telephone is connected to the device, the telephone mode main menu is
displayed » Fig. 27.
Symbols in the display
SymbolMeaningCharge status of the telephone battery a)Signal strengtha)Roaming (before the name of the mobile network provid-
er) a)Missed callCurrent calla)
This function is only supported by some telephones.
Problems with the Telephone function
Read and observe
and on page 37 first.
If there are problems with the availability of the network or with the Blue-
tooth ®
function, the following messages appear on the device display screen.
ABC38Phone
Page 50 of 83
ButtonMeaning/Media/radio playback » page 21Setting the navigation menu » page 48
Navigation data
Read and observe
and on page 47 first.
Navigation data source
The navigation data is part of the device and is stored in the internal device
memory.
Data update
The navigation data should be updated at regular intervals.
Navigation data is subject to constant changes (such as new streets, changes of street names and house numbers), and this can become out of date over
time. For this reason, the guidance may be inaccurate or incorrect.
For more information on updating the data, please visit the ŠKODA website or contact a ŠKODA Partner.
The version of the navigation data for maps can be found in the navigation
settings
→
→ Version information .
Settings
Introduction
This chapter contains information on the following subjects:
Main menu
48
Route options
48
Map
49
Fuel options
49
Navigation announcements
49
Advanced settings
49
Manage memory
49
First and foremost, pay attention to the safety instructions » page 4 , Impor-
tant notes .
Main menu
Call up the main menu›
In the Navigation main menu, press
.
Setting:
■ Route options - Set the parameters for route calculation » page 48
■ Fuel options - Select preferred fuel station, switch on/off reminder of low
fuel level warning with the possibility to find the nearest fuel sta-
tion » page 49
■ Advanced setup - Display additional information » page 49
■ Import destinations - Import custom destinations previously pre-
pared » page 58
■ Map - Map display » page 49
■ Nav. announcements - Set the volume and the type of the navigation an-
nouncements » page 49
■ Manage memory - Sort contacts, enter your home address, and delete desti-
nations » page 49
■ Version information View the current version of the navigation data
Route options
›
In the Navigation main menu, press
→ Route options .
■ Suggest 3 alternative routes - Switch on/off manual selection of the route
type (economical, fast, short) » page 62
■ Route: - Automatic selection of the preferred route type (manual route selec-
tion is switched off)
■ Economical - Calculate the most economical route with shortest travelling
time and distance travelled – displayed in green
■ Fast - Calculate the fastest route to the destination, even if a detour is nec-
essary - displayed in red
■ Short - Calculate the shortest route to the destination, even if a longer
travelling time is required - displayed in orange
■ Dynamic route - Switch on/off dynamic route calculation using TMC traffic
reports » page 63
■
Avoid motorways - switches on/off the use of motorways
■
Avoid ferries and motorail trains - Switch use of ferries and motorail
trains on/off
■
Avoid toll roads switches on/off the use of toll roads
■
Avoid tunnels - Switch use of tunnels on/off
48Navigation