2014 SKODA OCTAVIA lock
[x] Cancel search: lockPage 5 of 83

AbbreviationsAbbreviationDefinitionA2DPa software profile for the one-way audio data transfer via
Bluetooth ®ACCAdaptive cruise controlAFAlternative frequencies for the current radio stationAMAmplitude modulation - denomination of the radio frequency
rangeTCSTraction Control of the drive wheelsAVRCPa software profile for the transfer of audiovisual data using
Bluetooth ®AVan audio-visual signal, typical for a DVD player or TV tunerBTBluetooth ®
- wireless communication for reception and
transmission of voice and data informationDABDigital radio receptionDRMa system for monitoring or restricting the use of digital me-
dia contentESCElectronic Stability Controlexifadditional information data for an image fileFMIdentification of the radio-frequency rangeHFP- a software profile for data transfer via Bluetooth ®,
which
allows for communication between a mobile phone and the
in-vehicle hands-free equipmentGPSSatellite system for position determinationGSMGlobal System for Mobile communication, the most popular
standard for mobile phonesID3 tagan additional feature of a music file, which allows for the dis-
play of artist, title, album name, etc.KESSYkeyless unlocking, starting and lockingmp3compressed audio formatNTSCCoding standard of the audiovisual signal in North and Cen-
tral America and some countries in South East AsiaPALCoding standard of the audiovisual signal in most European
countriesAbbreviationDefinitionPIStation identification of the RDS system, for example when
setting a different radio stationRDSSystem for the transmission of additional information for FM
radio receptionTMCService for transmitting traffic information to the driverTPIdentification of a traffic information stationvCardFile format (vcf) - for the personnel data exchange (especial-
ly electronic business cards)VINVehicle identification numberwmacompressed audio format3Abbreviations
Page 8 of 83

Switching the unit on/off›
Press the knob to switch the device on or off.
When the device is switched on, the audio source and operating mode that
were active before switching off the device will be restored.
If Telephone mode was active before you switched off the unit and the igni-
tion and Bluetooth ®
function is not switched on, the screen displays the mes-
sage » page 38 . Switch on the ignition or the Bluetooth ®
func-
tion » page 20 .
If the vehicle key is pulled out of the ignition lock while the unit is switched on,
the unit will switch off automatically. After switching on the ignition, the unit
is turned on automatically.
If the device was switched off using the
knob, then the device will not
switch on automatically after switching on the ignition.
The unit will switch off automatically after the engine is switched off and the
door is opened if your vehicle is fitted with the KESSY system. If you open the
driver's door before switching off the engine, the device will also switch off.
When the ignition is switched off, the device switches off automatically after
approx. half an hour (discharge protection of the vehicle battery).
Unit menus
Fig. 2
Unit menus
Call up the main menu
›
Press the button.
Function keys in the MENU main menu Radio - Menu Radio » page 21
Media - Menu Media » page 26
Pictures - Menu Pictures » page 35
Sound - Sound settings » page 18
Setup - Unit settings » page 17
Vehicle - Vehicle system settings » page 68
Navigation - Menu Navigation » page 47
Telephone - Menu Telephone » page 37
Adjusting volume
Increase the volume
›
Turn the knob to the right.
Reduce the volume
›
Turn the knob to the left.
Muting
›
Set the volume to 0 using the knob.
Note
■
The change in volume is displayed on the screen of the unit.■The following symbol appears in the display when the sound is muted : .■
High volumes can cause sound resonance in the vehicle.
■
The car speakers may be damaged if the volume is set too loud or is distor-
ted.
■
The loudspeakers in the vehicle are designed for a power output of the de-
vice of 4x20 W.
■
When equipped with a sound system the speakers are matched for a total
power amplifier output of 570 W.
6Familiarization with the unit
Page 21 of 83

■Switch off screen (in 10 seconds) - Activate/deactivate energy-saving mode
for the display 1)
■ Brightness: - Adjusts the brightness of the screen
■ Brightest - brightest level
■ Brighter - brighter level
■ Medium - medium level
■ Darker - darker level
■ Darkest - darkest level
■ Confirmation tone - Switch on/off confirmation tone when a function key is
pressed
■ Animation when finger near screen - Switches on or off hiding of the bottom
menu bar
■ Show clock in standby mode - Time and date displayed on the screen when
the ignition is switched on and the unit is switched off
Time and date settings
›
Press the button
→
→ Time and date .
■ Clock time source: - Type of time settings
■ Manual - Manual setting
■ GPS - Take the values from the GPS signal received
■ Time: - Time settings
■ Summer (DST) - Switches the summer time setting on/off
■ Time zone: - Select the time zone
■ Time format: - Set the time format
■ 12h
■ 24h
■ Date: - Date settings
■ Date format: - Set the date format
■ DD.MM.YYYY - Day - Month - Year
■ YYYY-MM-DD - Year - Month - Day
■ MM-DD-YYYY - Month - Day - Year
Keyboard settings
›
Press the button
→
→ Keyboard: .
■
ABC - keys arranged alphabetically
■ QWERTY - Arrangement of the keys as per the QWERTY system (in accord-
ance with computer keyboard arrangement)
Additional keypad language settings
›
Press the button
→
→ More keypad languages .
In this menu, the keyboard character arrangement for the chosen language
can be selected, and with this the option for fast entry of the characters used
in the selected language.
It is then possible to swap between the languages in the input screen showing
a keyboard by pressing.
» page 8 .
Unit settings
›
Press the button
→
→ Units .
■ Distance: - Distance units
■ km - Kilometres
■ mi - Miles
■ Speed: - Speed units
■ km/h - Kilometres per hour
■ mph - Miles per hour
■ Temperature: - Temperature units
■ ° - Degrees Celsius
■ ° - Degrees Fahrenheit
■ Volume: - Volume units
■ l - Litres
■ gal (US) - Gallons (US)
■ gal (UK) - Gallons (UK)
■ Consumption: - Consumption units
■ l/100km - Litres per 100 kilometres
■ km/l - Kilometres per litre
■ mpg (US) - Miles per gallon (US)
■ mpg (UK) - Miles per gallon (UK)
1)
If after 10 seconds, the screen is not activated by approaching, touching the screen or operating the
menu button
2
» Fig. 1 on page 5 , the screen turns black. You can switch the display back on again by
approaching it with your hand, touching it, or operating the menu knob
2
.
19Unit settings
Page 34 of 83

›Press the symbol button
- the CD/DVD is ejected.
If the ejected medium is not taken out within 10 seconds, it will be retracted again for safety reasons. However, the unit will not change to the CD/DVD
source.WARNING■ The CD/DVD player is a laser product.■On the manufacturing date, this unit was classified as a class 1 laser prod-
uct in accordance with the national/international standards
DIN EN 60825-1: 2008-05 and DHHS Rules 21 CFR, Subchapter J classed as a class 1 laser product. The laser used in this class 1 laser product is so weak
that there is no risk of danger when operated correctly.■
This product is designed such that the laser is restricted to the inside of
the unit. However, the installed laser could be classified in a higher class
were the housing to be removed. For this reason, never remove the hous-
ing of the unit.
CAUTION
■ Be sure to wait until the CD/DVD has been fully ejected before you try to in-
sert a new CD/DVD. Otherwise you can damage the drive inside the unit.■
Only insert in the CD/DVD drive original audio CDs/video DVDs or standard
CD-R/RWs or DVD±R/RWs.
■
Do not affix anything to the CD/DVDs!
■
Outside temperatures that are either too high or too low might cause the
playback unit to turn off temporarily. The unit switches to the last active
menu.
Note
■ After pressing the symbol key it takes a few seconds for the CD / DVD to
be ejected.■
Poor or unsealed road surfaces and severe vibrations may cause the CD to
jump.
■
Damp (condensation) may affect the device in cold weather or after showers.
This can lead to playback jumps or impair the play function. Wait until the
moisture has evaporated if this happens.
■
If the CD/DVD is physically damaged, is not readable or is inserted incorrectly,
the following message is displayed: Error: CD/DVD. Check the CD/DVD and in-
sert properly into the drive.
■
It is possible under certain circumstances that copyright-protected CD/DVDs
and home-burnt CD/DVDs will not be played back at all or only in a limited way.
■
The national copyright laws that apply in your country must be observed.
SD memory cardFig. 22
SD memory card slots
Read and observe
and on page 29 first.
The device makes it possible to play audio files from the SD memory card.
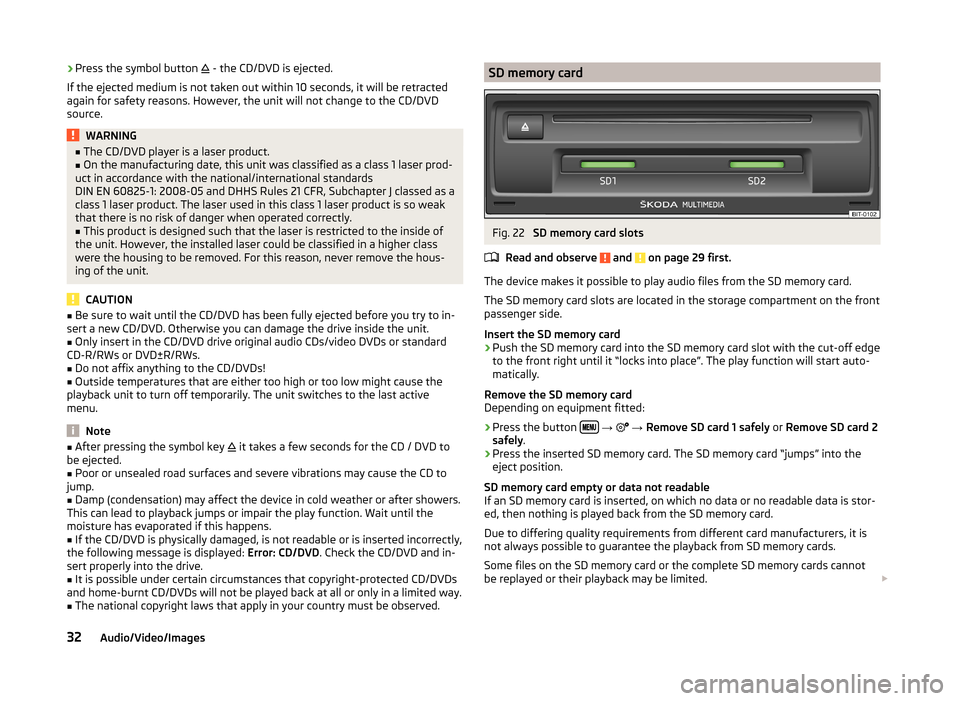
The SD memory card slots are located in the storage compartment on the front
passenger side.
Insert the SD memory card
›
Push the SD memory card into the SD memory card slot with the cut-off edge
to the front right until it “locks into place”. The play function will start auto-
matically.
Remove the SD memory card
Depending on equipment fitted:
›
Press the button
→
→ Remove SD card 1 safely or Remove SD card 2
safely .
›
Press the inserted SD memory card. The SD memory card “jumps” into the
eject position.
SD memory card empty or data not readable
If an SD memory card is inserted, on which no data or no readable data is stor-
ed, then nothing is played back from the SD memory card.
Due to differing quality requirements from different card manufacturers, it is
not always possible to guarantee the playback from SD memory cards.
Some files on the SD memory card or the complete SD memory cards cannot
be replayed or their playback may be limited.
32Audio/Video/Images
Page 38 of 83

Supported file typesFile typeSupported formatsImagesjpg, jpeg, png, bmp, gif
Operation
Displaying images
But- ton
» Fig. 26
on page 35
ActionFunction
PressDisplay the previous image /PressSwitch on/off slideshow a)PressDisplay the next imagePressRotate the image 90° anticlock-
wisePressRotate the image 90° clockwisePressDisplay the maximum image size
while retaining the aspect ratioPressguidance to GPS coordinates that
are stored in the image EXIF met-
adata » page 662 » Fig. 1
on page 5Rotate the image clockwise or anticlockwiseEnlarge/reduce the size of an im-
agea)
Presentation of selected photographs shown in succession at defined intervals.
You can adjust the size of the image by touching the screen with two fingers
and pulling the fingers together or apart. You can move the image in the de-
sired direction by touching and dragging it with your finger. By finger tapping
on the screen image magnification or size reductions takes place.
Select source
›
Press the button
→
→
A
» Fig. 26 on page 35 .
■
CD/DVD - Changes to a CD/DVD in the player
■
USB - Changes to a data medium connected to the USB input
■
SD card 1 - Changes to a memory card inserted in SD 1
■
SD card 2 - Changes to a memory card inserted in SD 2
Settings›
Press the button
→
→
.
■ Image view: - Image view settings
■ Full - Display the maximum image size while retaining the aspect ratio
■ Automatic - Full screen display
■ Display time: - Set the display time for the slideshow
■ 5 sec.
■ 10 sec.
■ 15 sec.
■ 30 sec.
■ Repeat slide show - Switch on/off the slideshow repeat function. (After the
last image is displayed, the slideshow restarts from the beginning.)
36Audio/Video/Images
Page 41 of 83

MessageImportanceNetwork search...The telephone searches for available
GSM networks.No networkThe telephone is not connected to
the GSM network.
Rejected by network.
The mobile phone network operator
has rejected the connection (e.g. not
enough mobile phone credit, SIM card
blocked, roaming not available).To use the Bluetooth function,
please switch the ignition on.Switch on the ignition.Please switch on Bluetooth.Switch on the Bluetooth ®
function.No Bluetooth devices paired.Connect the telephone with the de-
vice.
Phonebox
Fig. 28
Front centre console: Phonebox
Read and observe
and on page 37 first.
At the bottom of the storage compartment in the front center console is an in- duction plate connected to a GSM roof antenna roof - the Phonebox.
Function
When the telephone is inserted into the Phonebox, the telephone signal in-
creases in strength by about 20%. This reduces the level of phone battery dis-
charge and the electromagnetic radiation inside the vehicle.
Inserting the telephone into the Phonebox›Press on the edge of the lid A in the direction of the arrow, and open the
storage compartment.›
Place the telephone in the storage compartment
B
with its back on the in-
duction panel.
›
Press on the edge of the lid
A
in the direction of the arrow, and close the
storage compartment » .
The Phonebox cannot be used as an alternative to connecting the telephone
with the device.
WARNINGFor safety reasons, the storage compartment must always be closed when
driving.
CAUTION
■ Protective cases or cases around the telephone placed in the storage com-
partment may interfere with the telephone signal strength.■
Metallic objects such as coins or keys under the telephone can affect the tel-
ephone signal strength.
Settings
Read and observe
and on page 37 first.
›
Press the button
→
.
■ Select telephone - Search for available telephones/list of paired telephones/
select telephone ■ Find telephone - Search for a telephone
■ Bluetooth - Bluetooth ®
settings » page 20
■ User profile - User profile settings
■ Manage favourites - Assign function keys to allow speed dialling of con-
tacts; you can also add and delete contacts here
■ Mailbox number: Enter here - Enter the phone number of the mailbox
■ Prefix: - Switch on/off the option to assign a prefix to a telephone number.
Once this function is activated, the button for adding a prefix will be dis-
played with the symbol in some menus.
■ Enter here - Enter the prefix of a phone number
■ Sort by: - Sort the order of the telephone book
■ Surname - Sort by contact name
■ Name - Sort by contact first name
39Communication
Page 66 of 83

›Traffic programme TP in the FM frequency range
» page 23.
› Traffic programme in the DAB frequency range
› TMC traffic information with a dynamic adjustment for the current route
The following conditions are required for the correct TMC function: The vehicle is within reception range of the FM RDS-TMC.
Adequate and uninterrupted signal reception of a traffic information sta-
tion 1)
.
Current navigation data in the device.
Operation
TMC (Traffic Message Channel) is a digital data service emitted by the radio
station for continuous transmission of traffic information.
›
Press to display a list of traffic reports
Traffic report …/….
Touch one of the traffic report entries to display traffic report de-
tails » page 64 .
If a TMC traffic radio station is available for current location, the TMC traffic re-
ports are updated continuously in the background. The station you are listen-
ing to does not have to be a TMC station.
The reception of TMC traffic reports is always switched on and cannot be
turned off.
The accuracy of the dynamic route guidance depends on the transmitted traf-
fic reports. The radio stations broadcasting this information are responsible for
the content.
TMC traffic reports can only be evaluated and saved by the radio navigation
system when navigation data are available for the driven area.
Switching dynamic route on/off
›
In the Navigation main menu, press
→ Route Options → Dynamic route .
When the Dynamic route » page 48 function is switched on, the traffic reports
influence the dynamic route guidance by means of TMC messages.
Dynamic route switched on
Information on traffic problems received via TMC which affect the route are displayed in the map by means of a coloured symbol (e.g.,
,
,
, etc.). Traffic
problems, which do not affect the route, are displayed in the map by means of
a grey symbol. The direction in which a traffic problem is found, is displayed by
means of an arrow in the symbol.
Dynamic route switched off
You are not alerted to received traffic disruptions along your route and are gui-
ded through the traffic disruption by the radio navigation system. The traffic
reports are updated automatically in the unit and displayed by pressing the
button
.
If one of the announced traffic disruptions lies on your route, you can switch on dynamic route guidance during your current route guidance or block the
route manually » page 63.
Note
Making a diversion from a traffic jam based on TMC traffic reports may not al-
ways offer a time advantage, e.g. if the diversion route is also congested.
Detailed traffic reports
After pressing the
button, a screen appears with the following informa-
tion:
■ Function key All - Show all traffic information
■ Function key Route - only display the traffic information on the current route
■ A map showing the traffic obstruction
■ A window with a description of the traffic information
■ Location of event, the accuracy depends on the timeliness of the naviga-
tion data
■ Description of up to three events related to the respective information
■ Description of the direction with respect to the event
■ probable duration of the event
■ Additional information, such as probable delay time
■ An information line, on how current the information is and on the provider
of the message
■ Symbol that specifies the type of information
■ - zoom in window with described traffic obstruction
1)
For vehicles with window antennas, if the windows have foil stuck to them or metal-coated stickers this
may cause you to experience some interference.
64Navigation
Page 74 of 83

■Rear tone setting - Setting the pitch of the beeps for the rear obstacle de-
tection
■ Audio lowering: - lowering the volume of the speakers (audio)
■ Off - No volume reduction of the sound from speakers
■ Weak - weak volume attenuation of sound from speakers
■ Medium - medium volume attenuation of sound from speakers
■ Strong - Strong volume attenuation of sound from speakers
Note
The compact display of the parking aid can be switched to a full screen view by
touching the screen within the display.
Light
›
Press the button
→
→ Light .
■ Light assistance - Setting of outdoor lighting
■ Light Assist - Switch on/off the head light assist
■ Switch-on time: - Set the sensibility of the light sensor against the change
in intensity of the ambient light ■ Early - High sensibility
■ Medium - Medium sensibility
■ Late - Low sensibility
■ Automatic headlight control (rain) - Activate/deactivate automatic head-
light control in rain
■ Daytime running lights - Activate/deactivate daytime running lights
■ Lane change flash - Activate/deactivate lane change flashing
■ Travel mode: - Travel mode on/off
■ Right-hand traffic - For right-hand traffic
■ Left-hand traffic - For left-hand traffic
■ Interior lighting - Sets the interior lighting
■ Instrument/switch lighting - Sets the brightness of the instrument/switch
lighting
■ Footwell lighting - Sets the brightness of the footwell light
■ Coming/Leaving Home function - Setting the COMING HOME / LEAVING
HOME-function
■ Coming Home function - Sets the period that the lights remain on after you
leave the vehicle (0 - 30 seconds; 0 = function deactivated)
■ Leaving Home function - Sets the period that the lights remain on after
you unlock the vehicle (0 - 30 seconds; 0 = function deactivated)
mirrors and wiper›
Press the button
→
→ Mirrors and wipers .
■ Mirrors - Adjusts the mirrors
■ Synchronous adjustment - Activate/deactivate synchronous mirror adjust-
ment
■ Lower while reversing - Activate/deactivate the lowering of the front pas-
senger mirror
■ Fold in when parked - Activate/deactivate folding the mirror via the remote
control key or by using the sensor in the handle (KESSY)
■ Wipers - Adjusts the windscreen wipers
■ Automatic wiping in rain - Activate/deactivate automatic windscreen wip-
ing in rain
■ Automatic rear wiper - Activate/deactivate automatic rear window wiping
Opening and closing
›
Press the button
→
→ Opening and closing .
■ Window operation - Window operation settings
■ Convenience opening: - Set the convenience opening feature
■ All windows - All windows
■ Driver window - Driver's window only
■ Off - Deactivates the convenience opening
■ Central locking - Settings for opening and closing of doors
■ Door unlocking: - Set the door unlocking feature
■ All doors - All doors
■ Single door - Driver's door or driver's or passenger door with KESSY sys-
tem
■ Vehicle side - Doors on the driver's side or on the driver's or passenger's
side with KESSY system
■ Automatic locking - Activate/deactivate automatic locking when starting
off
■ Acoustic confirmation - Activate/deactivate acoustic signals when locking/
unlocking the vehicle with an anti-theft alarm system
Seats
›
Press the button
→
→ Seats .
72Vehicle