2014 SKODA FABIA lock
[x] Cancel search: lockPage 7 of 60

Description of the deviceFig. 1
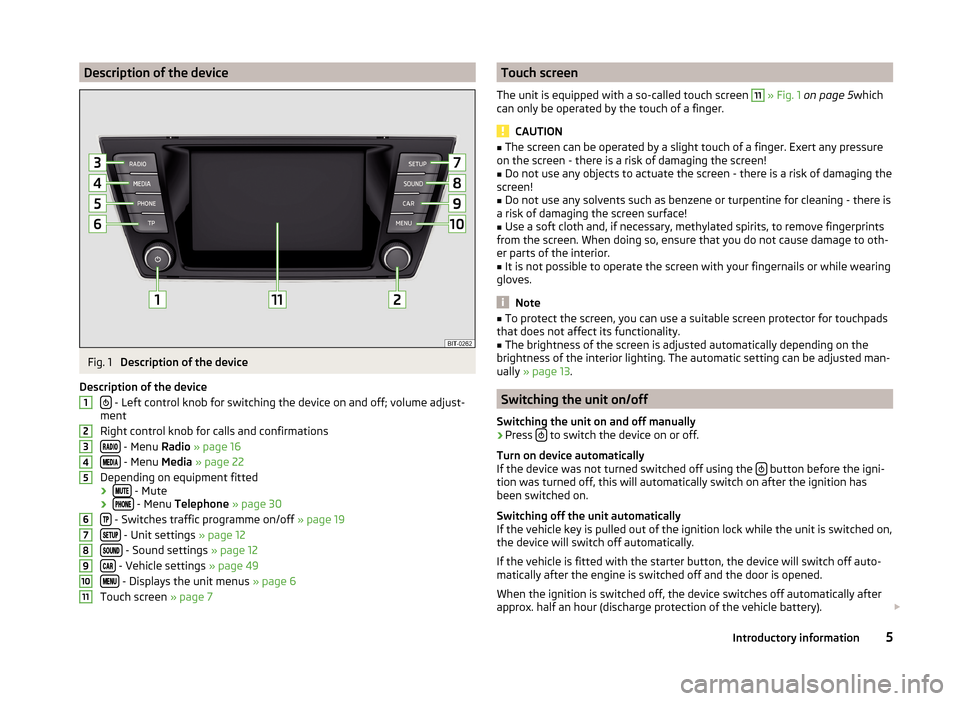
Description of the device
Description of the device
- Left control knob for switching the device on and off; volume adjust-
ment
Right control knob for calls and confirmations
- Menu Radio » page 16
- Menu Media » page 22
Depending on equipment fitted ›
- Mute
› - Menu
Telephone » page 30
- Switches traffic programme on/off » page 19
- Unit settings » page 12
- Sound settings » page 12
- Vehicle settings » page 49
- Displays the unit menus » page 6
Touch screen » page 7
1234567891011Touch screen
The unit is equipped with a so-called touch screen 11
» Fig. 1 on page 5 which
can only be operated by the touch of a finger.
CAUTION
■ The screen can be operated by a slight touch of a finger. Exert any pressure
on the screen - there is a risk of damaging the screen!■
Do not use any objects to actuate the screen - there is a risk of damaging the
screen!
■
Do not use any solvents such as benzene or turpentine for cleaning - there is
a risk of damaging the screen surface!
■
Use a soft cloth and, if necessary, methylated spirits, to remove fingerprints
from the screen. When doing so, ensure that you do not cause damage to oth-
er parts of the interior.
■
It is not possible to operate the screen with your fingernails or while wearing
gloves.
Note
■ To protect the screen, you can use a suitable screen protector for touchpads
that does not affect its functionality.■
The brightness of the screen is adjusted automatically depending on the
brightness of the interior lighting. The automatic setting can be adjusted man-
ually » page 13 .
Switching the unit on/off
Switching the unit on and off manually
›
Press to switch the device on or off.
Turn on device automatically
If the device was not turned switched off using the
button before the igni-
tion was turned off, this will automatically switch on after the ignition has
been switched on.
Switching off the unit automatically
If the vehicle key is pulled out of the ignition lock while the unit is switched on,
the device will switch off automatically.
If the vehicle is fitted with the starter button, the device will switch off auto-
matically after the engine is switched off and the door is opened.
When the ignition is switched off, the device switches off automatically after
approx. half an hour (discharge protection of the vehicle battery).
5Introductory information
Page 16 of 60

■Switch off screen (in 10 seconds) - Activate/deactivate the display
■ Brightness: - Adjusts the brightness of the screen
■ Brightest - brightest level
■ Brighter - brighter level
■ Medium - medium level
■ Darker - darker level
■ Darkest - darkest level
■ Confirmation tone - Switch on/off confirmation tone when touching the
screen
■ Show clock in standby mode - Time and date displayed on the screen when
the ignition is switched on and the unit is switched off
Time and date settings
›
Press
→ Time and date .
■ Time: - Time settings
■ Summer time - Switches the summer time setting on/off
■ Time zone: - Select the time zone
■ Time format: - Set the time format
■ 12h
■ 24h
■ Date: - Date settings
■ Date format: - Set the date format
■ DD.MM.YYYY - Day - Month - Year
■ YYYY-MM-DD - Year - Month - Day
■ MM-DD-YYYY - Month - Day - Year
Keyboard settings
›
Press the button
→ Keyboard: .
You can choose between two types of keyboard character arrange-
ment » page 8 , Alphanumeric with keyboard .
■ ABC - Keyboard characters in alphabetical order
■ QWERTZ - Keyboard characters in QWERTZ or QWERTY system
Additional keypad language settings
›
Press the
→ More keypad languages button.
In this menu, the keyboard character arrangement for the chosen language
can be selected, and with this the option for fast entry of the characters used
in the selected language.
It is then possible to swap between the languages in the input screen showing
a keyboard by pressing the function keys
» page 8 .
Unit settings
›
Press the button
→ Units .
■ Distance: - Distance units
■ km - Kilometres
■ mi - Miles
■ Speed: - Speed units
■ km/h - Kilometres per hour
■ mph - Miles per hour
■ Temperature: - Temperature units
■ ° - Degrees Celsius
■ ° - Degrees Fahrenheit
■ Volume: - Volume units
■ l - Litres
■ gal (US) - Gallons (US)
■ gal (UK) - Gallons (UK)
■ Consumption: - Consumption units
■ l/100km - Litres per 100 kilometres
■ km/l - Kilometres per litre
■ mpg (US) - Miles per gallon (US)
■ mpg (UK) - Miles per gallon (UK)
■ Pressure: - Pressure units for tyre pressure
■ kPa - Kilopascal
■ bar - bar
■ psi - Pounds per square inch
Data transmission of mobile devices
›
Press the key →
Data transfer mobile devices .
The activated function enables transmission of vehicle data for applications in
connected devices (e.g. MirrorLink ™
Applications).
■ Activate data transfer for apps - Turning the data transfer on and off
14Device Settings
Page 28 of 60

Inserting an SD memory card›Push the SD memory card into the available slot with the cut edge down-
wards until it “locks into place”.
The play function will start automatically. The playlists are not played auto-
matically and must be manually started from the folders and title lists.
Removing an SD memory card›
Press the button
→ Remove safely SD card .
›
Press the inserted SD memory card. The SD memory card “jumps” into the
eject position.
After popping out the SD memory card, playback will start from the last played
audio source. If this source is not available, the device switches to the Radio
menu.
Unreadable SD memory card
If there are no readable files on the SD memory card nothing will play.
Due to differing quality requirements from different card manufacturers, it is
not always possible to guarantee the playback from SD memory cards.
It may not be possible to play some or all files on the SD memory card, or pos-
sibly their playback may be limited.
CAUTION
Use only SD memory cards with a standard size. When using smaller SD cards
with the adapter the SD memory card can fall out of the adapter while driving
due to vehicle vibrations.
USB input
Fig. 17
USB and AUX inputs
Read and observe and on page 24 first.
The USB input is above the storage compartment in the front center console and is identified with the symbol
» Fig. 17 .
The USB input audio source can be connected directly or via a connecting ca-
ble.
Some audio sources connected to the USB input can be operated from this de-
vice 1)
.
Connect the USB audio source
›
Plug the USB audio source into the corresponding well.
The play function will start automatically. The playlists are not played auto-
matically and must be manually started from the folders and title lists.
If an Apple device is connected as a Bluetooth ®
player, and this is connected
to the USB input, then the Bluetooth ®
connection is dropped.
The following warning message appears in the device screen Bluetooth-Audio
(A2DP) ... Connection cancelled.
Separate USB audio source
›
Press the button
→ Remove safely → USB .
›
Disconnect the USB audio source.
After disconnecting the USB audio source, playback will start from the last
played audio source. If this source is not available, the device switches to the
Radio menu.
Charge USB audio source
With the ignition on after connecting the USB audio source, the charging proc-
ess is automatically started (applies for audio sources where charging via the
USB connector is possible).
The charging efficiency can be different compared to the charging from the
usual mains power supply. Connected audio sources can be supplied / loaded
with a current of max. 1.5 A.
Some connected audio sources may not be recognised and cannot be charged.
The charging of the connected audio source is automatically stopped after
switching off the ignition.
1)
Some operating options from an audio source may not be supported.
26Media
Page 31 of 60

Pictures
Image viewer
Introduction
This chapter contains information on the following subjects:
Operation
29
Select source
29
Supported Formats
29
Settings
30
First and foremost, pay attention to the safety instructions » page 4 , Impor-
tant notes .
Operation
Fig. 18
Image viewer
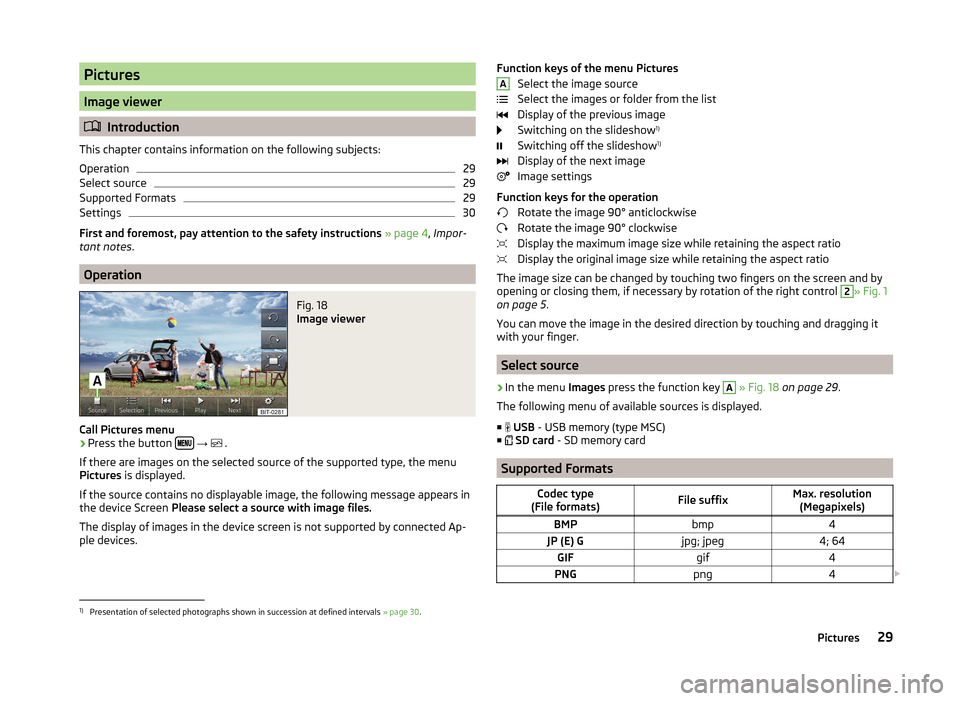
Call Pictures menu
›
Press the button
→
.
If there are images on the selected source of the supported type, the menu
Pictures is displayed.
If the source contains no displayable image, the following message appears in
the device Screen Please select a source with image files.
The display of images in the device screen is not supported by connected Ap-
ple devices.
Function keys of the menu Pictures
Select the image source
Select the images or folder from the list
Display of the previous image
Switching on the slideshow 1)
Switching off the slideshow 1)
Display of the next image
Image settings
Function keys for the operation Rotate the image 90° anticlockwise
Rotate the image 90° clockwise
Display the maximum image size while retaining the aspect ratio
Display the original image size while retaining the aspect ratio
The image size can be changed by touching two fingers on the screen and by
opening or closing them, if necessary by rotation of the right control 2
» Fig. 1
on page 5 .
You can move the image in the desired direction by touching and dragging it
with your finger.
Select source
›
In the menu Images press the function key
A
» Fig. 18 on page 29 .
The following menu of available sources is displayed. ■
USB - USB memory (type MSC)
■
SD card - SD memory card
Supported Formats
Codec type
(File formats)File suffixMax. resolution (Megapixels)BMPbmp4JP (E) Gjpg; jpeg4; 64GIFgif4PNGpng4 A1)
Presentation of selected photographs shown in succession at defined intervals
» page 30.
29Pictures
Page 36 of 60

If there are problems with the availability of the mobile network or with the
Bluetooth ®
function, one of the following messages may appear on the device
display screen.MessageMeaningNetw. search…The telephone scans for available
wireless networks.
No network
The telephone has no connection to a
wireless network, if necessary, it does
not support sending information to
the network state.
Rejected by network.
The telephone service provider has
rejected the connection (e.g. not
enough mobile telephone credit, SIM
card blocked, roaming not available).To use the Bluetooth function,
please switch the ignition on.Switch on the ignition » page 35,
conditions for coupling .Please switch on Bluetooth.Switch on the Bluetooth ®
function on
the device.Please connect a mobile telephone.Connect the telephone with the de-
vice » page 34 , Pair .Telephone not available.There is a problem with the Tele-
phone , contact a specialist workshop.Telephone is currently not available.
Unknown
The telephone did not provide any in-
formation regarding the telephone
service provider. Connect the mobile
telephone again, if necessary, remove
the key for a few minutes a)
.a)
On vehicles with a start button, switch off the ignition and open the driver's door.
Pair
Introduction
This chapter contains information on the following subjects:
conditions for coupling
35
Coupling - no telephone connected
35
Coupling - connected telephone
35
Coupling - two telephones connected
36
Coupling - more options of the telephone search
36
Connect telephone to the device
36
Pairing confirmation
37
Delete the telephone from the list of paired devices
37
First and foremost, pay attention to the safety instructions » page 4 , Impor-
tant notes .
During the coupling and connecting process the device can demand the confir-
mation by the Bluetooth ®
profile (e.g., release contact import, release the MAP
profile or the Bluetooth connection ®
player and similar.) The telephone display
should be monitored to acknowledge any possible request.
If the telephone to be paired has several SIM cards, then the primary SIM card
of the telephone is paired with your device.
The coupling procedure is different depending on the number of telephones
associated with the device.
WARNINGThe device may require confirmation of certain features in the telephone
when pairing. Therefore do not carry out the pairing process while driving -
there is danger of accidents! 34Communication
Page 53 of 60

■Front volume - Adjust the volume of the beeps for obstacle detection in
front
■ Front tone setting - Setting the pitch of the beeps for obstacle detection in
front
■ Rear volume - Set the volume level of the beeps for the rear obstacle de-
tection
■ Rear tone setting - Setting the pitch of the beeps for the rear obstacle de-
tection
■ Lowering entertainment - Lowers the audio volume (e.g. radio volume)
with activated parking aid
Light
›
Press the button
→
→ Light .
■ Light assistance - Setting of outdoor lighting
■ Switch-on time: - Set the sensibility of the light sensor against the change
in intensity of the ambient light
■ Early - High sensibility
■ Medium - Medium sensibility
■ Late - Low sensibility
■ Automatic headlight control (rain) - Activate/deactivate automatic head-
light control in rain
■ Daytime running lights - Activate/deactivate daytime running lights
■ Comfort turn signal - Activate/deactivate lane change flashing
■ Background lighting - Sets the interior lighting
■ Instrument/switch lighting - Sets the brightness of the instrument/switch
lighting
■ “Coming home/Leaving home”- function - setting the COMING HOME /
LEAVING HOME-function ■ "Coming Home" function - Sets the period that the lights remain on after
you leave the vehicle (0 - 30 seconds; 0 = function deactivated)
■ "Leaving Home" function - Sets the period that the lights remain on after
you unlock the vehicle (0 - 30 seconds; 0 = function deactivated)
Windscreen wipers
›
Press the button
→
→ Mirrors and wipers .
■ Wipers - Adjusts the windscreen wipers
■ Automatic wiping in rain - Activate/deactivate automatic windscreen wip-
ing in rain
■ Automatic rear wiper - Activate/deactivate automatic rear window wiping
Opening and closing›
Press the button
→
→ Opening and closing .
■ Central locking - Settings for opening and closing of doors
■ Door unlocking: - Set the door unlocking feature
■ All doors - All doors
■ Single door - Driver's door or driver's or passenger door with KESSY sys-
tem
■ Vehicle side - Doors on the driver's side or on the driver's or passenger's
side with KESSY system
■ Automatic locking - Activate/deactivate automatic locking when starting
off
■ Acoustic confirmation - Activate/deactivate acoustic signals when locking/
unlocking the vehicle with an anti-theft alarm system
Instrument cluster (multifunction display)
›
Press the button
→
→ Instrument cluster .
In this menu it is possible to hide/show the appearance of the menu items in
the instrument cluster multifunction display and reset the trip data.
■ Current consumption - Display of current fuel consumption on/off
■ Average consumption - Display of average fuel consumption on/off
■ Travelling time - Display of travelling time on/off
■ Distance - Display of distance travelled on/off
■ Average speed - Display of average speed on/off
■ Digital speed display - Display of current speed on/off
■ Speed warning - Winter tyres warning on/off
■ Oil temperature - Oil temperature on/off
■ Reset "Since start" driving data - Reset the single-trip memory in the device
screen and in the display of the instrument cluster
■ Reset "Long-term" driving data - Reset the long-term memory in the device
screen and in the display of the instrument cluster
Time, date and unit setting
›
Press
→ Time and date .
Description of the time and date settings » page 14 .
›
Press the button
→ Units .
Description of unit settings » page 14.
51Vehicle systems
Page 55 of 60

Index
A
Additional keyboard languages
14
Additional telephone32
Adjust vehicle systems Assistance systems
50
ESC system50
Multi-function display51
Alphanumeric with keyboard8
AM16
Anti-theft protection4
Audio Media
22
Radio16
Audio source24
Automatic driving light in rain51
Automatic locking51
Automatic rear window wiping51
Automatic windscreen wiping in rain51
AUX27
B
Bluetooth Settings
15
Switch on/off15
Update15
Visibility15
Bluetooth - profile32
Bluetooth Player25
Breakdown service39
Button CAR49
C
Call list Call list
42
Comfort turn signal51
COMING HOME51
Communication30
Component protection4
Conditions for coupling35
Conference call43
Connect device connected to a telephone
38
connected to two telephones38
more options of the telephone search38
no telephone connected38
Control lever9
Coupled device connected to a telephone
35
connected to two telephones36
more options of the telephone search36
Couple device no telephone connected
35
Couple telephone Telephone to the device
36
D
DAB
16
Additional information17
Radio text and pictures presentation17
Settings20
Data transmission of mobile devices14
Date14
Daytime driving light51
Declaration of Conformity4
Delete the telephone from the list of paired de- vices
37
Description of the device5
Device connect to the telephone
37
Disconnection39
Pair with your telephone34
Device menu Radio
16
Device menus Device Settings
13
Media22
MirrorLink45
Pictures29
Sound12
Telephone30
Device operation Control lever
9
Device screen7
MAXI DOT display8
Multifunction steering wheel9, 11
device screen keyboard
8
Device screen13
Area7
important information5
Maintenance5
Operation7
Dial telephone number39
Digital radio reception20
Door release51
Driving data49, 51
DTMF42
F
Factory settings
15 , 52
Fatigue detection50
File formats Media
27
File Formats Pictures
29
FM16
Settings20
Frequency range17
See main menu16
Front Assist50
Function keys7
Function problems MirrorLink
47
Telephone33
53Index