2014 Seat Leon 5D window
[x] Cancel search: windowPage 39 of 84
Audio and Media Mode
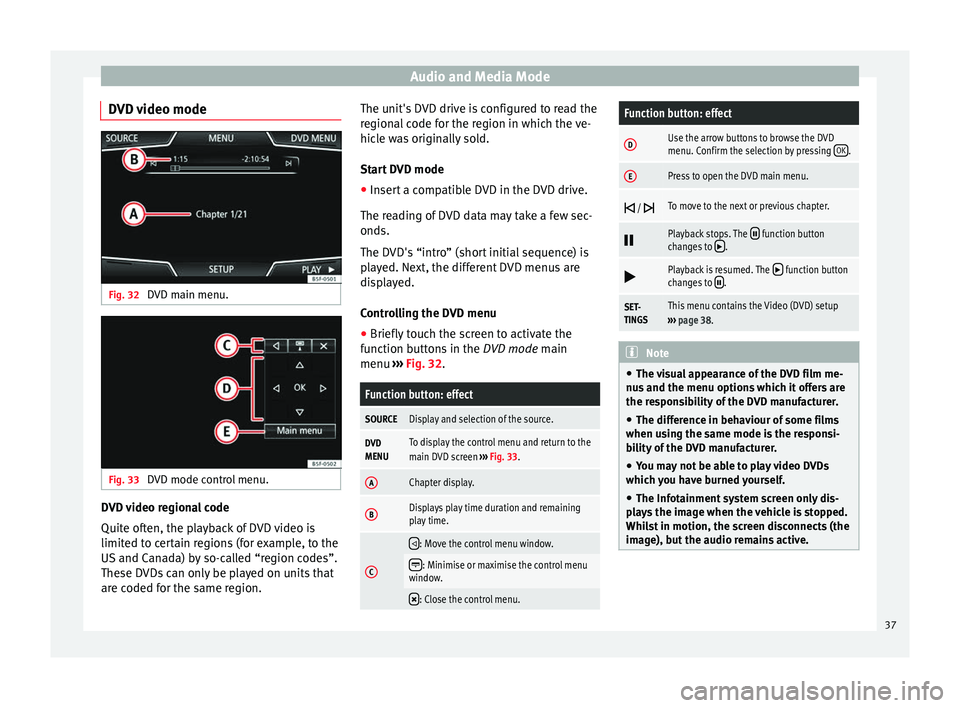
DVD video mode Fig. 32
DVD main menu. Fig. 33
DVD mode control menu. DVD video regional code
Quite often, the playback of DVD video is
limited to certain regions (for example, to the
US and Canada) by so-called “region codes”.
These DVDs can only be played on units that
are coded for the same region. The unit's DVD drive is configured to read the
regional code for the region in which the ve-
hicle was originally sold.
Start DVD mode
● Insert a compatible DVD in the DVD drive.
The reading of DVD data may take a few sec-
onds.
The DVD's “intro” (short initial sequence) is
played. Next, the different DVD menus are
displayed.
Controlling the DVD menu
● Briefly touch the screen to activate the
function buttons in the DVD mode main
menu ›
›
› Fig. 32.
Function button: effect
SOURCEDisplay and selection of the source.
DVD
MENUTo display the control menu and return to the
main DVD screen ››› Fig. 33.
AChapter display.
BDisplays play time duration and remaining
play time.
C
: Move the control menu window.
: Minimise or maximise the control menu
window.
: Close the control menu.
Function button: effect
DUse the arrow buttons to browse the DVD
menu. Confirm the selection by pressing
OK.
EPress to open the DVD main menu.
/ To move to the next or previous chapter.
Playback stops. The function button
changes to .
Playback is resumed. The function button
changes to .
SET-
TINGSThis menu contains the Video (DVD) setup
››› page 38. Note
● The visual appearance of the DVD film me-
nus and the menu options which it offers are
the responsibility of the DVD manufacturer.
● The difference in behaviour of some films
when using the same mode is the responsi-
bility of the DVD manufacturer.
● You may not be able to play video DVDs
which you have burned yourself.
● The Infotainment system screen only dis-
plays the image when the vehicle is stopped.
Whilst in motion, the screen disconnects (the
image), but the audio remains active. 37
Page 44 of 84
Navigation
● Press the Options function button and se-
lect the required type of destination entry
( Address, Point of Interest
or On the map).
Ad dr
ess
After entering a country and a town, you can
start navigating towards the centre of the se-
lected town.
When narrowing down the destination ad-
dress, please note that every entry restricts
the av
ailable range of subsequent selections.
For instance, if the street you are looking for
is not
in the postcode area you have selected
in a previous window, you will not be able to
find the street at the street selection stage.
Function button: effect
Country: To select the desired country.
Location: To enter the desired town or postcode.
Street: To enter the desired street name.
House number: To enter the desired house number.
Dipped beam: To select the desired intersection.
Last destinations: Open the My destinations menu
››› page 44.
Start: Start route guidance to the selected address. Points of Interest (POI)
Start route guidance to a point of interest.
Function button: effect
Search area: To select the search area for the points of in-
terest.
Near current location: The points of interest are
searched for near the current location.
Near destinationa) : The points of interest are
searched for near the destination.
Along the routea) : The points of interest are searched
for along the route.
Near address: The points of interest are searched for
near the address.
Select on map: The points of interest are searched
for near the destination selected on the map. To se-
lect a destination on the map, press the Edit
func-
tion button.
Search category: Select the main category (e.g. Vehicle
and travel), the category (e.g. Airports) and then the de-
sired entry from the list.
Save: To save the selected point of interest in the
destination memory ››› page 44.
Dial number: Establishes a telephone connection to
the number registered under the point of interest.
Start: Starts guided navigation to the selected
point of interest.
Find name: To search for a point of interest by entering
the name or by means of synonyms of categories (e.g.
“Sleep” for hotels and hostels).
a) This function button is only displayed with route guidance ac-
tivated.
Using the
● Select the destination on the map or enter
the GPS coordinates and confirm with OK .
Function button: effect
Save: To save the selected point of interest in the desti-
nation memory ››› page 44.
Edit: To edit a destination or to enter another destina-
tion.
Route options: To adjust route options, see Navigation
Setup ››› page 49.
Start: Starts guided navigation to the selected point of
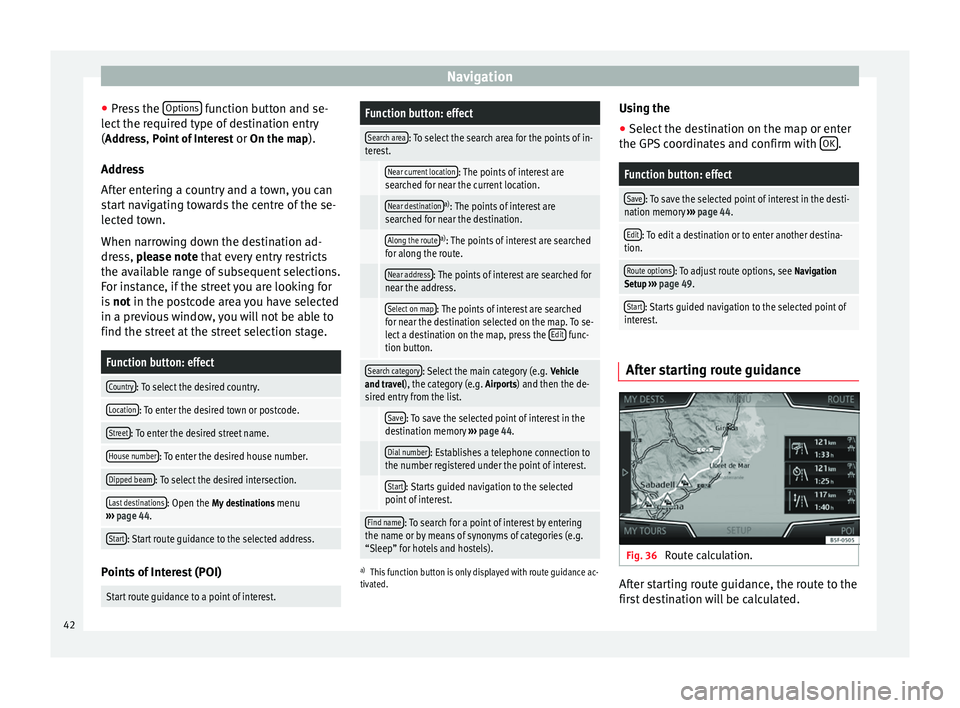
interest. After starting route guidance
Fig. 36
Route calculation. After starting route guidance, the route to the
first destination will be calculated.
42
Page 46 of 84
NavigationFunction button: effect
Route information: View route information for current
route.
Store destination: To store the selected destina-
tion in the destination memory.
Congestion ahead: To exclude a section (of 0.2 to 10 km in
length) from the current route, e.g. to avoid congestion.
To cancel the exclusion, press the Route
function button
and then Cancel congestion.
Change route: The map of the calculated route appears
and by holding a finger on the route and dragging the
finger across said map, the route is changed to the
road(s) that you want and the new route is then recalcu-
lated. My destinations (destination memory)
The stored destinations can be selected from
the My destinations
menu.
● Press the My destinations function button in
the main Navigation
menu.
● Sel
ect the desired function button.
Store position ,
Destinations or
Home address .
Store position ● By pressing the Store position function but-
ton, the indicated position is stored as Flag-
ged destination in the Destination memory.
To permanently retain the position stored as
a Flagged destination, it must be renamed in the Destination memory. Otherwise the stored
position will be overwritten the next time a
flagged destination is stored.
● Mark the Flagged destination in the Destina-
tion memory.
● Press the Save function button.
The name can be changed in the following in-
put window. Press the function button to
store the destination.
Destinations and contacts
● Select the desired function button.
Function button: effect
Recent destinations: View of destinations for which a route
has already been started.
Dest. memory: View of destinations stored manually and
from imported vCards ››› page 48, Importing vCards
(electronic business cards) .
Favourites: View of destinations stored as favourites.
Contacts: View of entries in the phonebook that have a
stored address (postal address). Home address
Only one address or position can be stored
as the home address at any one time. The
stored home address can be edited or over-
written.If a home address has already been stored,
route guidance will be started to the stored
home address.
If a home address has not yet been stored,
an address can be assigned as the home ad-
dress.
Assigning the home address for the first time:
Position: Press to store the vehicle's current position as
the home address.
Address: Press to enter the home address manually.
Editing the home address:
The home address can be edited in the Navigation setup
menu ››› page 49.
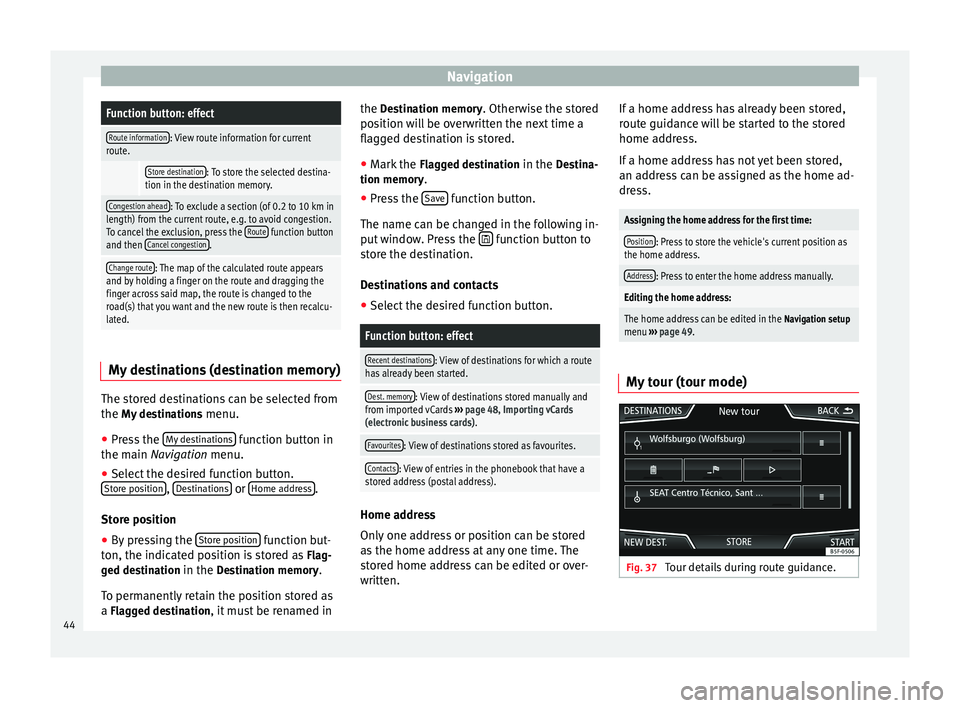
My tour (tour mode) Fig. 37
Tour details during route guidance.44
Page 47 of 84
Navigation
Several destinations can be defined in tour
mode. A trip with multiple destinations is
called a “Tour”.
The “starting point” of a tour is always the
vehicle position determined by the Infotain-
ment system. The “destination” is the end
point of a tour. “Stopover destinations” are
driven to before the destination.
● Press the My tours function button in the
main Navigation
menu.
● Sel
ect the desired function button ( Edit
tour, New tour or Tour Memory).
Function buttons on the My tours pop-up
window
Function button: effect
Edit waypoint toura) : To edit and store the active tour.
New tour: To create a new tour.
Tour memory: To Delete, Edit or Start a stored tour.
a)
This function button is only displayed when route guidance is
activated in tour mode.
Display and function buttons on the New tour
and Edit tour
menu
Function button or message: function or meaning
Stopover.
Destination.
...Estimated time of arrival at destination.
...Calculated distance to destination.
Press on the destination to display the function but-
tons.
Delete destination.
To start guidance direct to the selected
destination. Destinations that come before
the selected destination are ignored.
To open the detailed view of the destina-
tion in question.
Available function buttons.
New desti-
nationTo add a new destination to the tour.
My desti-
nationsTo add a new destination from My destina-
tions to the tour.
StoringTo store the created tour in the tour memo-
ry.
StartTo start route guidance.
CalculateTo update calculated distance and estima-
ted arrival time. a)
StopTo stop route guidance to the active desti-
nation.b)
To move a stopover or a destination to an-
other position on the list. Press and drag
to move the destination.
a)
This function button is only displayed with route guidance ac-
tivated and when a destination has been added to the tour.
b) This function button is only displayed with route guidance ac-
tivated.
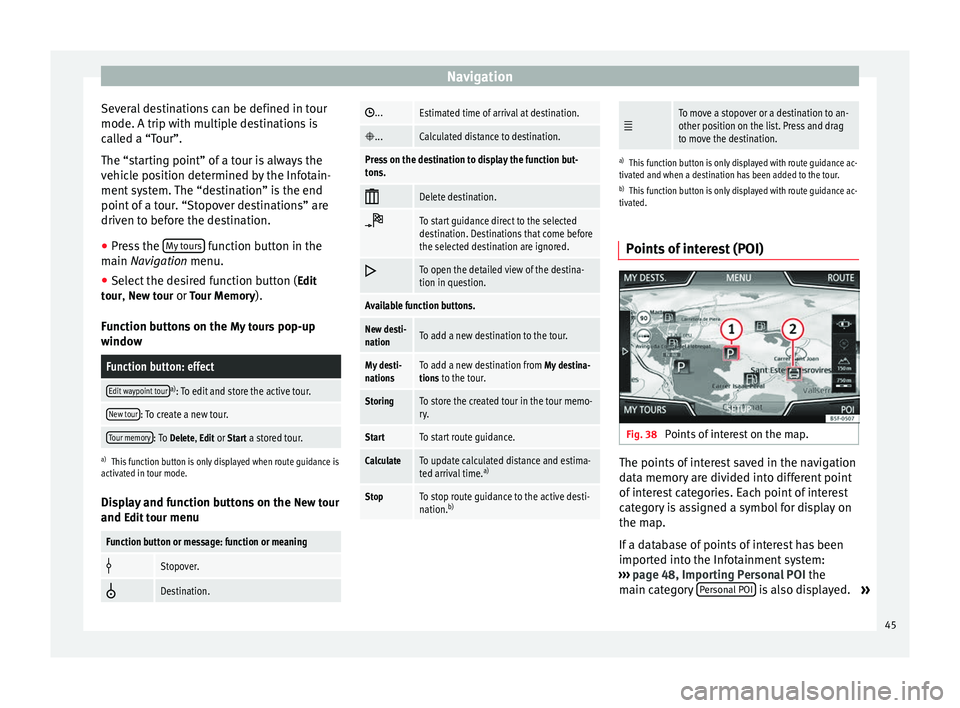
Points of interest (POI) Fig. 38
Points of interest on the map. The points of interest saved in the navigation
data memory are divided into different point
of interest categories. Each point of interest
category is assigned a symbol for display on
the map.
If a database of points of interest has been
imported into the Infotainment system:
››› page 48, Importing Personal POI the
main category Personal POI is also displayed.
»
45
Page 64 of 84
Telephone management system (PHONE)Possible functions
a)
Prefix func-
tion
Enter the telephone number with-
out the prefix and press the function button. The prefix stored
in the User profile setup menu
››› page 66 is automatically
placed before the entered number
and the call is made.
Enter the country
code
To enter a country code, instead of
the first two digits (international
access code e.g. “00”) you can en-
ter the character “+”.
Press the 0 button for approx. 2
seconds to add the +.
Breakdown serv-
ice call Press the function button to obtain
help in the event of breakdown.
For this the network of SEAT deal-
erships is available to you with
their Mobile Service.
Information call Press the function button to obtain
information on the SEAT brand and
the additional services contracted
related to traffic and travel.
a)
The function button is only displayed when the prefix function
is activated in the User profile setup menu ››› page 66. Note
Breakdown service and information calls can
incur an additional cost on your telephone
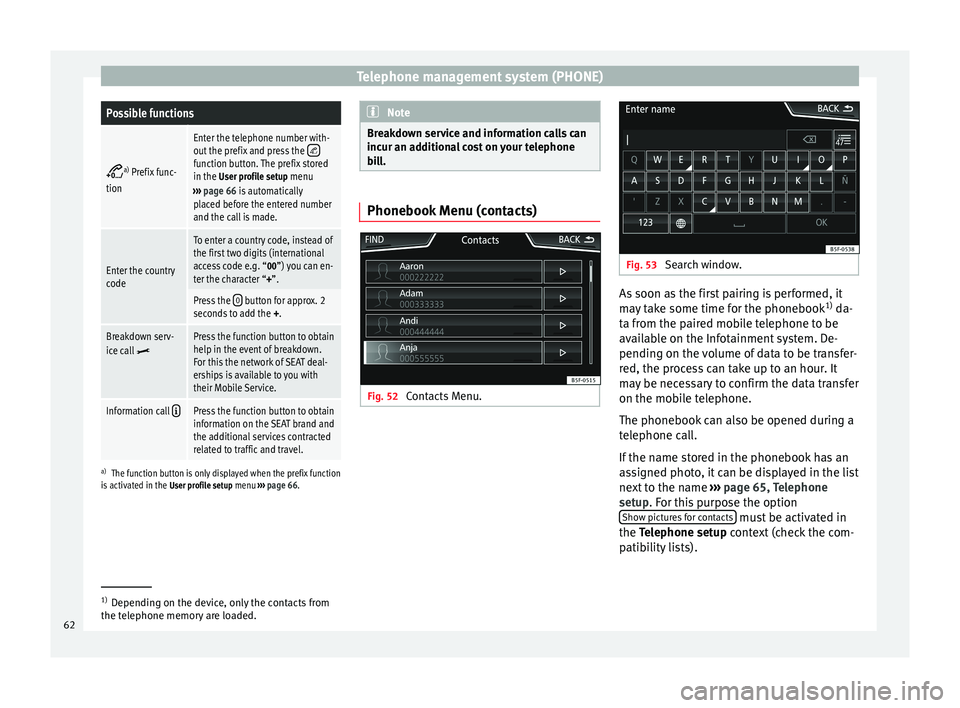
bill. Phonebook Menu (contacts)
Fig. 52
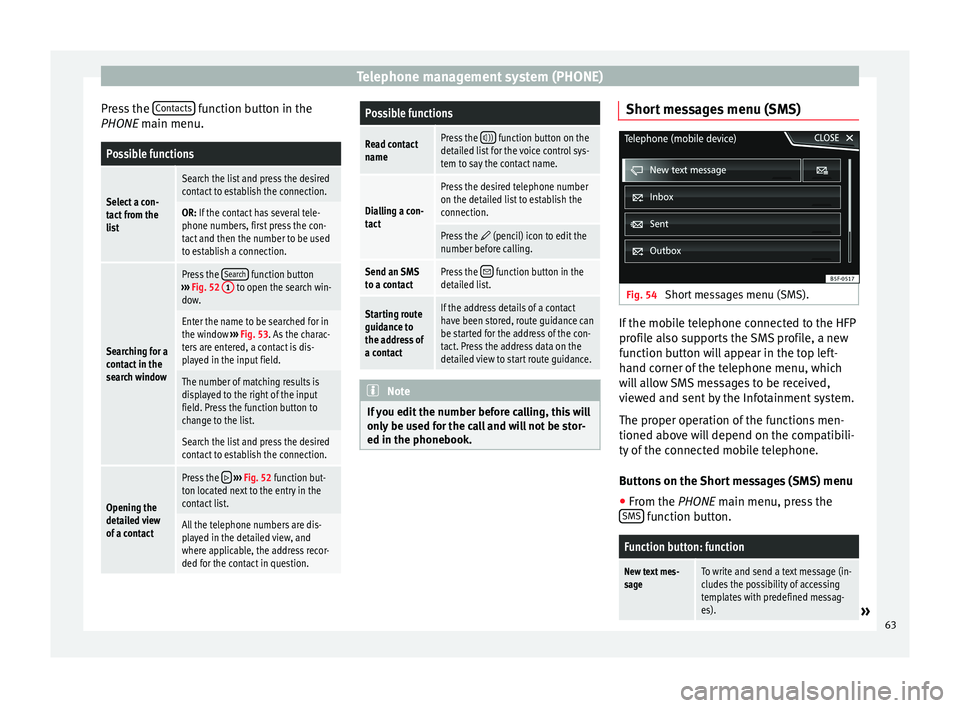
Contacts Menu. Fig. 53
Search window. As soon as the first pairing is performed, it
may take some time for the phonebook
1)
da-
ta from the paired mobile telephone to be
available on the Infotainment system. De-
pending on the volume of data to be transfer-
red, the process can take up to an hour. It
may be necessary to confirm the data transfer
on the mobile telephone.
The phonebook can also be opened during a
telephone call.
If the name stored in the phonebook has an
assigned photo, it can be displayed in the list
next to the name ››› page 65, Telephone
setup . For this purpose the option
Sho w pict
ures for contacts must be activated in
the Telephone setup
context (check the com-
p
atibility lists). 1)
Depending on the device, only the contacts from
the telephone memory are loaded.
62
Page 65 of 84
Telephone management system (PHONE)
Press the Contacts function button in the
PHONE main menu.Possible functions
Select a con-
tact from the
list
Search the list and press the desired
contact to establish the connection.
OR: If the contact has several tele-
phone numbers, first press the con-
tact and then the number to be used
to establish a connection.
Searching for a
contact in the
search window
Press the Search function button
››› Fig. 52 1 to open the search win-
dow.
Enter the name to be searched for in
the window ››› Fig. 53. As the charac-
ters are entered, a contact is dis-
played in the input field.
The number of matching results is
displayed to the right of the input
field. Press the function button to
change to the list.
Search the list and press the desired
contact to establish the connection.
Opening the
detailed view
of a contact
Press the ››› Fig. 52 function but-
ton located next to the entry in the
contact list.
All the telephone numbers are dis-
played in the detailed view, and
where applicable, the address recor-
ded for the contact in question.
Possible functions
Read contact
namePress the )) function button on the
detailed list for the voice control sys-
tem to say the contact name.
Dialling a con-
tact
Press the desired telephone number
on the detailed list to establish the
connection.
Press the (pencil) icon to edit the
number before calling.
Send an SMS
to a contactPress the function button in the
detailed list.
Starting route
guidance to
the address of
a contactIf the address details of a contact
have been stored, route guidance can
be started for the address of the con-
tact. Press the address data on the
detailed view to start route guidance. Note
If you edit the number before calling, this will
only be used for the call and will not be stor-
ed in the phonebook. Short messages menu (SMS)
Fig. 54
Short messages menu (SMS). If the mobile telephone connected to the HFP
profile also supports the SMS profile, a new
function button will appear in the top left-
hand corner of the telephone menu, which
will allow SMS messages to be received,
viewed and sent by the Infotainment system.
The proper operation of the functions men-
tioned above will depend on the compatibili-
ty of the connected mobile telephone.
Buttons on the Short messages (SMS) menu
● From the PHONE
main menu, press the
S
MS function button.
Function button: function
New text mes-
sageTo write and send a text message (in-
cludes the possibility of accessing
templates with predefined messag-
es).
»
63
Page 80 of 84

Index
POI importing . . . . . . . . . . . . . . . . . . . . . . . . . . . . . . 48
Points of interest . . . . . . . . . . . . . . . . . . . . . . . . . . 45
Points of Interest . . . . . . . . . . . . . . . . . . . . . . . . . . 42
Pop-up windows . . . . . . . . . . . . . . . . . . . . . . . . . . . . 8
Preset buttons . . . . . . . . . . . . . . . . . . . . . . . . . . . . 17
Proximity sensor . . . . . . . . . . . . . . . . . . . . . . . . . . . . 5
Q Quick reference guide . . . . . . . . . . . . . . . . . . . . . . . 3
R
RADIO . . . . . . . . . . . . . . . . . . . . . . . . . . . . . . . . . . . 14 additional DAB services . . . . . . . . . . . . . . . . . . . 16
additional DAB stations . . . . . . . . . . . . . . . . . . . 16
AM setup . . . . . . . . . . . . . . . . . . . . . . . . . . . . . . . 21
change frequency . . . . . . . . . . . . . . . . . . . . . . . . 14
DAB display . . . . . . . . . . . . . . . . . . . . . . . . . . . . . 16
DAB operation . . . . . . . . . . . . . . . . . . . . . . . . . . . 16
DAB preset list . . . . . . . . . . . . . . . . . . . . . . . . . . 16
DAB Radio Text . . . . . . . . . . . . . . . . . . . . . . . . . . 16
DAB setup . . . . . . . . . . . . . . . . . . . . . . . . . . . . . . 22
DAB station information . . . . . . . . . . . . . . . . . . . 16
DAB station tracking in FM . . . . . . . . . . . . . . . . . 16
DAB transmission standards . . . . . . . . . . . . . . . 16
EON . . . . . . . . . . . . . . . . . . . . . . . . . . . . . . . . . . . 20
FM setup . . . . . . . . . . . . . . . . . . . . . . . . . . . . . . . 21
main menu . . . . . . . . . . . . . . . . . . . . . . . . . . . . . 14
messages and symbols . . . . . . . . . . . . . . . . . . . 14
preset buttons . . . . . . . . . . . . . . . . . . . . . . . . . . 17
Radio mode . . . . . . . . . . . . . . . . . . . . . . . . . . . . . 14
Radio Text (RDS) . . . . . . . . . . . . . . . . . . . . . . . . . 15
RDS . . . . . . . . . . . . . . . . . . . . . . . . . . . . . . . . . . . 15
scan function (SCAN) . . . . . . . . . . . . . . . . . . . . . 19
select stations . . . . . . . . . . . . . . . . . . . . . . . . . . 18
set a station name . . . . . . . . . . . . . . . . . . . . . . . 19
setup . . . . . . . . . . . . . . . . . . . . . . . . . . . . . . . . . . 21 station list . . . . . . . . . . . . . . . . . . . . . . . . . . . . . . 18
station names display . . . . . . . . . . . . . . . . . . . . 15
station tracking by RDS . . . . . . . . . . . . . . . . . . . 15
store station logos . . . . . . . . . . . . . . . . . . . . . . . 17
store stations . . . . . . . . . . . . . . . . . . . . . . . . . . . 18
TP (traffic news station) . . . . . . . . . . . . . . . . . . . 20
traffic announcement (INFO) . . . . . . . . . . . . . . . 21
traffic news station . . . . . . . . . . . . . . . . . . . . . . . 20
tune stations . . . . . . . . . . . . . . . . . . . . . . . . . . . . 18
tune the frequency of the stations . . . . . . . . . . 18
Radio Text (RDS) . . . . . . . . . . . . . . . . . . . . . . . . . . . 15
Random play (Mix) . . . . . . . . . . . . . . . . . . . . . . . . . 26
RDS . . . . . . . . . . . . . . . . . . . . . . . . . . . . . . . . . . . . . 15 automatic station tracking . . . . . . . . . . . . . . . . . 15
Regional RDS . . . . . . . . . . . . . . . . . . . . . . . . . . . 15
TP (traffic news station) . . . . . . . . . . . . . . . . . . . 20
Repeat . . . . . . . . . . . . . . . . . . . . . . . . . . . . . . . . . . . 26
Repeat function (Repeat) . . . . . . . . . . . . . . . . . . . . 26
Requirements for data storage devices and files . . . . . . . . . . . . . . 23
Restore original setup . . . . . . . . . . . . . . . . . . . . . . 70
Road sign indicators . . . . . . . . . . . . . . . . . . . . . . . 49
rotary knobs . . . . . . . . . . . . . . . . . . . . . . . . . . . . . . . 5
Rotary knobs . . . . . . . . . . . . . . . . . . . . . . . . . . . . . . . 6
Route guidance Demo mode . . . . . . . . . . . . . . . . . . . . . . . . . . . . 49
dynamic . . . . . . . . . . . . . . . . . . . . . . . . . . . . . . . . 47
S Safety Instructions Infotainment system . . . . . . . . . . . . . . . . . . . . . . 3
SCAN MEDIA . . . . . . . . . . . . . . . . . . . . . . . . . . . . . . . . . 26
radio . . . . . . . . . . . . . . . . . . . . . . . . . . . . . . . . . . 19
Scan function (SCAN) RADIO . . . . . . . . . . . . . . . . . . . . . . . . . . . . . . . . . 19 Scan (SCAN)
MEDIA . . . . . . . . . . . . . . . . . . . . . . . . . . . . . . . . . 26
Screen . . . . . . . . . . . . . . . . . . . . . . . . . . . . . . . . . . . . 5
SD Card see: memory card . . . . . . . . . . . . . . . . . . . . . . . . 30
Search lists . . . . . . . . . . . . . . . . . . . . . . . . . . . . . . . . 9
Setup AM . . . . . . . . . . . . . . . . . . . . . . . . . . . . . . . . . . . . 21
Bluetooth . . . . . . . . . . . . . . . . . . . . . . . . . . . . . . 65
DAB . . . . . . . . . . . . . . . . . . . . . . . . . . . . . . . . . . . 22
default setting . . . . . . . . . . . . . . . . . . . . . . . . . . 70
factory setup . . . . . . . . . . . . . . . . . . . . . . . . . . . . 70
FM . . . . . . . . . . . . . . . . . . . . . . . . . . . . . . . . . . . . 21
images . . . . . . . . . . . . . . . . . . . . . . . . . . . . . . . . . 39
main menu . . . . . . . . . . . . . . . . . . . . . . . . . . . . . 70
Media . . . . . . . . . . . . . . . . . . . . . . . . . . . . . . . . . 36
menu and system setup . . . . . . . . . . . . . . . . . . . 70
navigation . . . . . . . . . . . . . . . . . . . . . . . . . . . . . . 49
PHONE . . . . . . . . . . . . . . . . . . . . . . . . . . . . . . . . . 65
radio . . . . . . . . . . . . . . . . . . . . . . . . . . . . . . . . . . 21
sound . . . . . . . . . . . . . . . . . . . . . . . . . . . . . . . . . 72
system . . . . . . . . . . . . . . . . . . . . . . . . . . . . . . . . . 70
user profile setup . . . . . . . . . . . . . . . . . . . . . . . . 66
video . . . . . . . . . . . . . . . . . . . . . . . . . . . . . . . . . . 36
voice control . . . . . . . . . . . . . . . . . . . . . . . . . . . . 13
volume . . . . . . . . . . . . . . . . . . . . . . . . . . . . . . . . 72
WLAN . . . . . . . . . . . . . . . . . . . . . . . . . . . . . . . . . . 71
Short messages (SMS) . . . . . . . . . . . . . . . . . . . . . . 63
Show clock . . . . . . . . . . . . . . . . . . . . . . . . . . . . . . . 70
Slider . . . . . . . . . . . . . . . . . . . . . . . . . . . . . . . . . . . . . 9
Slide (screen) . . . . . . . . . . . . . . . . . . . . . . . . . . . . . . 9
SMS . . . . . . . . . . . . . . . . . . . . . . . . . . . . . . . . . . . . . 63
Sound distribution (Balance and Fader) . . . . . . . . 72
Sound setup (bass and treble) . . . . . . . . . . . . . . . 72
Sound suppression . . . . . . . . . . . . . . . . . . . . . . . . . 7
Sound suppression (mute) . . . . . . . . . . . . . . . . . . . 7
78