2014 Seat Leon 5D window
[x] Cancel search: windowPage 10 of 64
Introduction
The active areas of the screen that represent
a function are called “function buttons” and
are used by pressing them briefly on the dis-
p l
ay or holding them down . The function but-
tons are represented in the instructions with
the word “function buttons” and the button
symbol - - - .
The function buttons activate functions or
open submenus.
The function buttons that appear deactivated
(in grey) may not be selected at that time.
Summary of the indications and function
buttons
Action and effect
A››› Fig. 2
The title line shows the menu selected at
that time and, if applicable, other function
buttons.
B››› Fig. 4Press to open an additional menu.
C››› Fig. 3
Move the little cross around the screen
pressing lightly, without resting your finger
on it.
Or: Press the desired destination on the
screen; the cross will move to this position.
D››› Fig. 2
Move the control around the screen by
pressing lightly, without removing your fin-
ger.
Briefly press to change progressively to
lists at the next level up.
Action and effect
BACK Briefly press to return progressively to the
main menu from a sub-menu, or to undo
the changes made.
/
Activated/deactivated function.
Some functions or instructions are marked
with a checkbox, and are activated or deac-
tivated by touching them briefly.
OKBriefly press to confirm the data entered or
to select.
×
Briefly press to close a pop-up window or a
data entry screen.
/ Briefly press to modify the setup progres-
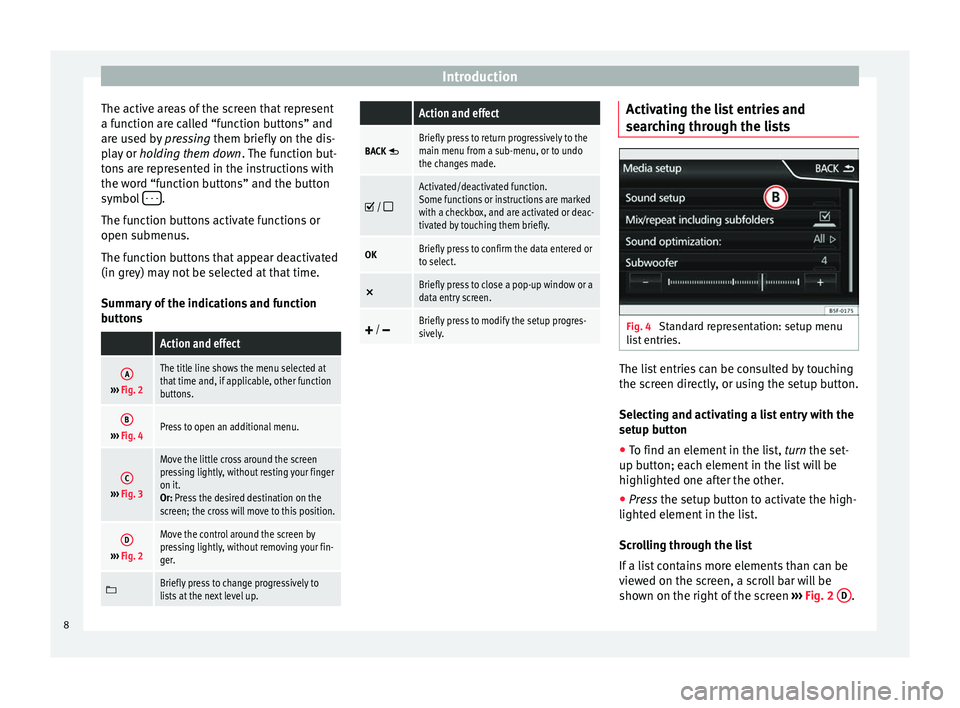
sively. Activating the list entries and
searching through the lists
Fig. 4
Standard representation: setup menu
list entries. The list entries can be consulted by touching
the screen directly, or using the setup button.
Selecting and activating a list entry with the
setup button
● To find an element in the list, turn the set-
up b utt
on; each element in the list will be
highlighted one after the other.
● Press
the setup button to activate the high-
lighted element in the list.
Scrolling through the list
If a list contains more elements than can be
viewed on the screen, a scroll bar will be
shown on the right of the screen ›››
Fig. 2 D .
8
Page 12 of 64
Audio mode
Audio mode
Radio mode Introduction Note
● Please bear in mind that in car parks, tun-
nels, areas with high buildings or mountains
the radio signal can be impaired.
● Foil or metal-coated stickers attached to
the windows may affect reception on vehicles
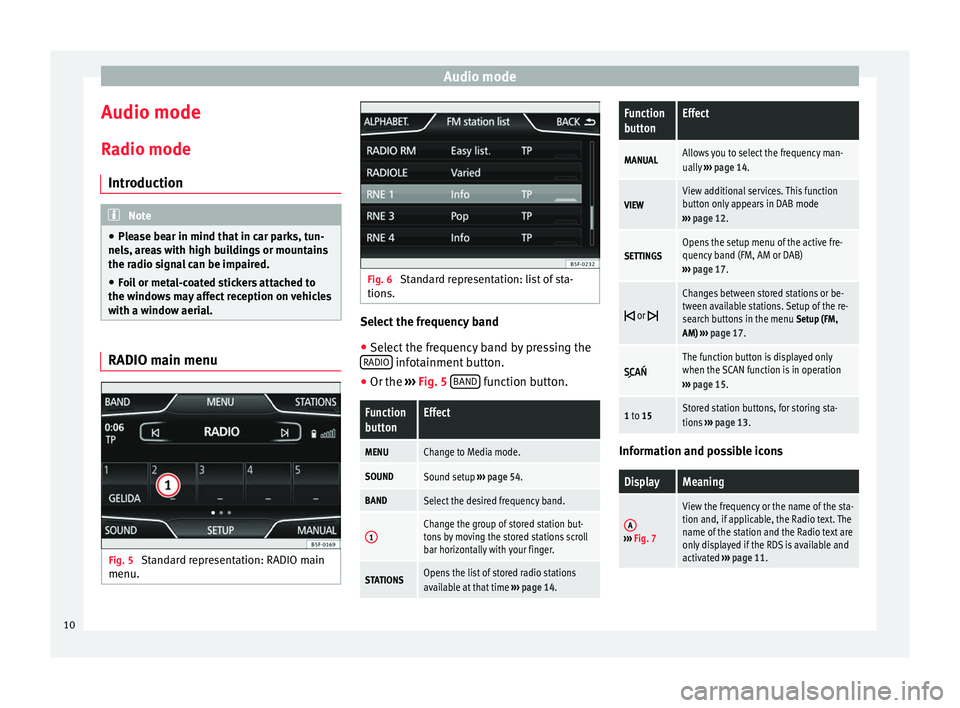
with a window aerial. RADIO main menu
Fig. 5
Standard representation: RADIO main
menu. Fig. 6
Standard representation: list of sta-
tions. Select the frequency band
● Select the frequency band by pressing the
RADIO infotainment button.
● Or the ›››
Fig. 5 B
AND function button.Function
buttonEffect
MENUChange to Media mode.
SOUNDSound setup
››› page 54.
BANDSelect the desired frequency band.
1Change the group of stored station but-
tons by moving the stored stations scroll
bar horizontally with your finger.
STATIONSOpens the list of stored radio stations
available at that time ››› page 14.
Function
buttonEffect
MANUALAllows you to select the frequency man-
ually ››› page 14.
VIEWView additional services. This function
button only appears in DAB mode
››› page 12.
SETTINGSOpens the setup menu of the active fre-
quency band (FM, AM or DAB)
››› page 17.
or
Changes between stored stations or be-
tween available stations. Setup of the re-
search buttons in the menu
Setup (FM,
AM) ››› page 17.
The function button is displayed only
when the SCAN function is in operation
››› page 15.
1 to 15Stored station buttons, for storing sta-
tions ››› page 13. Information and possible icons
DisplayMeaning
A›››
Fig. 7
View the frequency or the name of the sta-
tion and, if applicable, the Radio text. The
name of the station and the Radio text are
only displayed if the RDS is available and
activated ››› page 11. 10
Page 18 of 64
Audio mode
TP (Traffic Program) traffic news
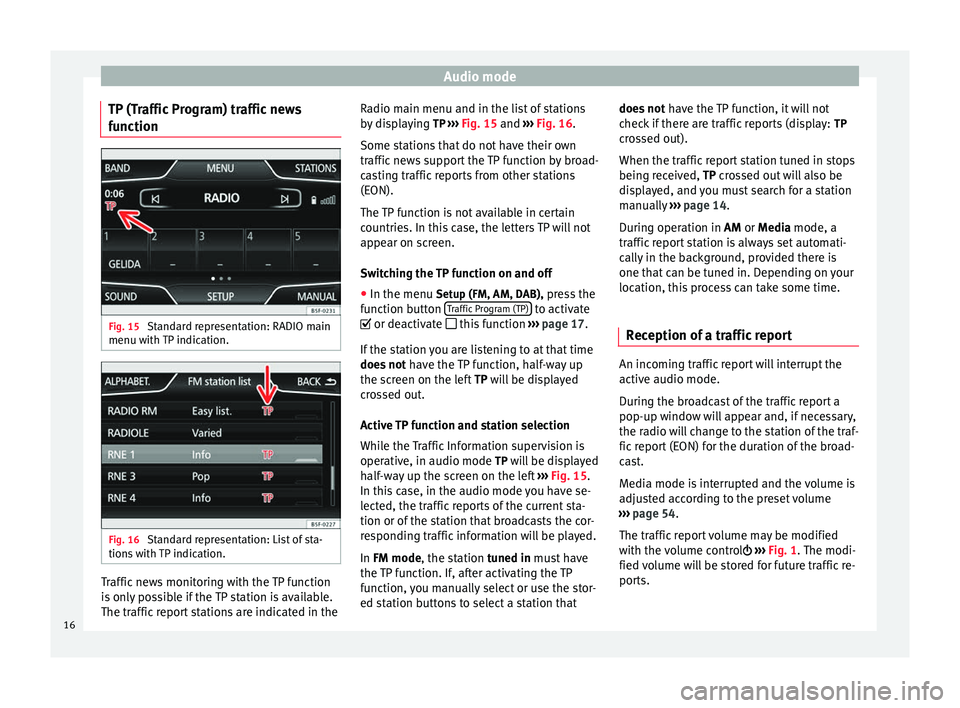
function Fig. 15
Standard representation: RADIO main
menu with TP indication. Fig. 16
Standard representation: List of sta-
tions with TP indication. Traffic news monitoring with the TP function
is only possible if the TP station is available.
The traffic report stations are indicated in the Radio main menu and in the list of stations
by displaying
TP ››› Fig. 15 and
›
›› Fig. 16 .
Some st
ations that do not have their own
traffic news support the TP function by broad-
casting traffic reports from other stations
(EON).
The TP function is not available in certain
countries. In this case, the letters TP will not
appear on screen.
Switching the TP function on and off
● In the menu Setup (FM, AM, DAB), press the
function button Traffic Program (TP) to activate
or deactivate this function ››› page 17.
If the station you are listening to at that time
does not have the TP function, half-way up
the screen on the left TP will be displayed
c r
ossed out.
Active TP function and station selection
While the Traffic Information supervision is
operative, in audio mode TP will be displayed half-way up the screen on the left ››› Fig. 15.
In this
case, in the audio mode you have se-
lected, the traffic reports of the current sta-
tion or of the station that broadcasts the cor-
responding traffic information will be played.
In
FM mode, the station tuned in must have
the TP function. If, after activating the TP
function, you manually select or use the stor-
ed station buttons to select a station that does not
have the TP function, it will not
check if there are traffic reports (display: TP
crossed out).
When the traffic report station tuned in stops
being received, TP crossed out will also be
di
splayed, and you must search for a station
manually ››› page 14.
Durin
g operation in
AM or Media mode, a
traffic report station is always set automati-
cally in the background, provided there is
one that can be tuned in. Depending on your
location, this process can take some time.
Reception of a traffic report An incoming traffic report will interrupt the
active audio mode.
During the broadcast of the traffic report a
pop-up window will appear and, if necessary,
the radio will change to the station of the traf-
fic report (EON) for the duration of the broad-
cast.
Media mode is interrupted and the volume is
adjusted according to the preset volume
››› page 54 .
The tr affic
report volume may be modified
with the volume control ›››
Fig. 1
. The modi-
fied volume will be stored for future traffic re-
ports.
16
Page 24 of 64
Audio modeIndication
››› Fig. 18Meaning
RDS radio data service deactivated. The
RDS can be activated in the menu Setup
(FM, AM) ››› page 17.
TPThe TP is active and receiving
››› page 16.
No traffic news station can be received.
No DAB reception possible.
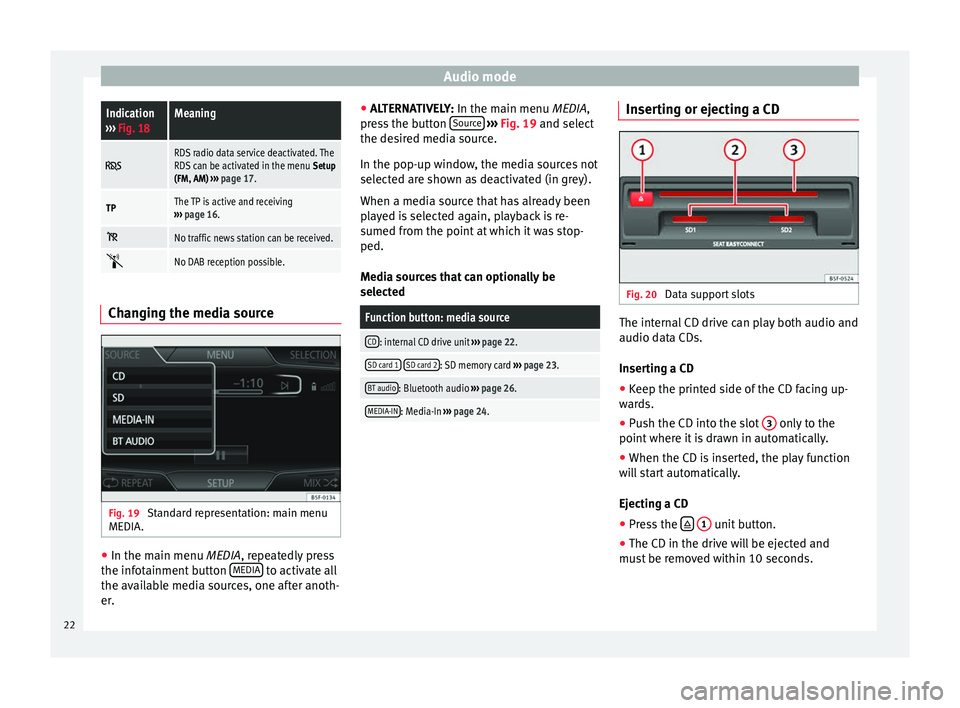
Changing the media source
Fig. 19
Standard representation: main menu
MEDIA. ●
In the main menu MEDIA, repeatedly press
the inf
otainment button MEDIA to activate all
the available media sources, one after anoth-
er. ●
ALTERNATIVELY: In the main menu MEDIA
,
press the button Source
››› Fig. 19 and select
the de s
ired media source.
In the pop-up window, the media sources not
selected are shown as deactivated (in grey).
When a media source that has already been
played is selected again, playback is re-
sumed from the point at which it was stop-
ped.
Media sources that can optionally be
selected
Function button: media source
CD: internal CD drive unit ››› page 22.
SD card 1 SD card 2: SD memory card
››› page 23.
BT audio: Bluetooth audio ››› page 26.
MEDIA-IN: Media-In ››› page 24. Inserting or ejecting a CD
Fig. 20
Data support slots The internal CD drive can play both audio and
audio data CDs.
Inserting a CD
● Keep the printed side of the CD facing up-
wards.
● Push the CD into the slot 3 only to the
point where it is drawn in automatically.
● When the CD is inserted, the play function
will start automatically.
Ejecting a CD
● Press the
1 unit button.
● The CD in the drive will be ejected and
must be removed within 10 seconds.
22
Page 34 of 64
Navigation
Depending on the setup, upon starting gui-
ded navigation, 3 alternative routes
› ›
› Fig. 28 will be proposed. These 3 routes
correspond to the route options selected in
this function: Quick, short and economical
routes.
Route criteria: meaning
Blue route: Economical route: it is calculated seeking a
balance between savings in terms of kilometres and
time.
Red route: Quickest route to the destination, although it
involves diversions.
Orange route: Shortest route to the destination, al-
though it requires more time. The navigation route may
include unusual route sections, e.g. dirt roads. ●
Select the route desired by pressing on the
map.
The criteria setup in the menu Route options
will be modified accordingly.
If you do not select any route, navigation to
the destination will begin after approximately
one minute depending on the settings in Route options .
Navigation instructions (spoken
recommendations for driving)
After calculating the route, you will hear the
first navigation instruction. Before turning
you may hear up to 3 navigation instructions, for example: “Turn left shortly”, “Turn left in
300 metres” and “Turn left now”.
●
Press the setup button to repeat the last
navigation message.
The distances indicated largely depend on
the type of road and the speed at which you
are driving. For example, on motorways the
instructions are given significantly earlier
than in cities.
On roads with several lanes, on roads that di-
vide and on roundabouts, the corresponding
navigation instructions will also be given, for
example: “On the roundabout, take the sec-
ond exit”.
Upon reaching the destination, you will hear
the indication that you have arrived at your
destination.
During dynamic navigation to the destination
y ou w
ill be informed of any traffic incidents
received. An additional announcement is giv-
en if the route is recalculated due to traffic
congestion. An announcement will be given
when sections of the route are excluded man-
ually.
During an acoustic indication, you can modi-
fy the volume with the control to define a
minimum or maximum volume level. All fol-
lowing announcements will then be made at
this volume. For other acoustic indication setups, see
An-
nouncement setup ››› page 37. Note
● If you miss a turning during route guidance
and are currently unable to turn back, keep
on driving until the navigation system offers
a new route.
● The quality of the instructions given by the
unit will depend on the navigation data avail-
able and the traffic reports received. Route
Press the
Route function button in the main
navigation menu ›››
Fig. 27 .
The f u
nction button Route is only displayed
when the guided navigation is activated.
Function button: effect
Stop Route: stops the guided navigation underway.
New destination: Enter a new destination ››› page 30 and
accept it in the destination pop-up window as an inter-
mediate or final destination.
Route information: view information related to the route
underway.
Save: stores the destination currently selected in
the destination memory. Route list
: shows the roads you must drive along on
the route, as well as the respective section. 32
Page 47 of 64
Telephone management (PHONE)
● Briefly press the button on the multi-
f u
nction steering wheel to interrupt the spo-
ken indication of the infotainment system
and give the next command.
IMPORTANT: The system will ONLY recognise
a command when the
“active” symbol is
displayed on the panel or the touch screen.
If you make a mistake when giving a com-
mand or give an incomplete command, and it
has no effect, you can repeat the command.
The symbol remains active.
● Briefly pr
ess the button of the multi-
function steering wheel to repeat the com-
mand.
Instructions for voice control
For optimum functioning of the voice control,
follow these instructions:
● Speak slowly and clearly, as far as possi-
ble. The system will not recognise mispro-
nounced words, or words and figures in
which syllables are omitted.
● Telephone numbers must be indicated fig-
ure by figure or in blocks of numbers in units,
tens or hundreds.
● Speak at a normal volume, without exag-
gerated intonation or long pauses.
● Avoid noise from the exterior and nearby
(for example, conversations inside the vehi- cle). Close all doors, windows and the sliding
roof.
●
Do not aim the air from the diffusers at the
roof of the passenger compartment.
● If you are driving very fast, speak a little
louder.
You can access the instructions by saying:
“Instructions, tutorial, introduction”. You can
also li
sten to the instructions in parts. These
are divided into 7 blocks. To access them,
give any of the previous commands followed
by “part +
xample “Tutorial
part 1 ”.
Voice control (RADIO) – Red
ButtonMain radio commands (FM)
Next station
Previous station
Station
Scan mode
AM mode:
DAB band Voice control (MEDIA) – Red
ButtonMain media commands
Next source
Previous source
Next track
Previous track
Mix Mode
Repeat track mode
Repeat all mode
Scan mode»
45
Page 60 of 64
Index
N Navigation setup . . . . . . . . . . . . . . . . . . . . . . . . . . 37
NAV (navigation) destination memory . . . . . . . . . . . . . . . . . . . . . . 33
entering the destination . . . . . . . . . . . . . . . . . . 30
guide to the destination (Demo mode) . . . . . . . 36
main menu . . . . . . . . . . . . . . . . . . . . . . . . . . . . . 30
partially digitised areas . . . . . . . . . . . . . . . . . . . 29
point of interest . . . . . . . . . . . . . . . . . . . . . . . . . 33
route . . . . . . . . . . . . . . . . . . . . . . . . . . . . . . . . . . 32
selecting the destination . . . . . . . . . . . . . . . . . . 30
setup . . . . . . . . . . . . . . . . . . . . . . . . . . . . . . . . . . 37
split screen . . . . . . . . . . . . . . . . . . . . . . . . . . . . . 34
TMC . . . . . . . . . . . . . . . . . . . . . . . . . . . . . . . . . . . 35
view . . . . . . . . . . . . . . . . . . . . . . . . . . . . . . . . . . . 34
visual presentation of the map . . . . . . . . . . . . . 35
NAV (Navigation) . . . . . . . . . . . . . . . . . . . . . . . . . . 29 Area of navigation . . . . . . . . . . . . . . . . . . . . . . . 29
validity of the navigation data . . . . . . . . . . . . . . 29
O Operating instructions function buttons . . . . . . . . . . . . . . . . . . . . . . . . . . 7
Unit buttons . . . . . . . . . . . . . . . . . . . . . . . . . . . . . 7
verification boxes . . . . . . . . . . . . . . . . . . . . . . . . . 7
P Phone Introduction . . . . . . . . . . . . . . . . . . . . . . . . . . . . 40
PHONE Bluetooth setup . . . . . . . . . . . . . . . . . . . . . . . . . 51
Call lists menu . . . . . . . . . . . . . . . . . . . . . . . . . . 50
Enter number . . . . . . . . . . . . . . . . . . . . . . . . . . . 48
Linking and connecting to the infotainmentsystem . . . . . . . . . . . . . . . . . . . . . . . . . . . . . . . 42
Main menu . . . . . . . . . . . . . . . . . . . . . . . . . . . . . 47
Phonebook menu . . . . . . . . . . . . . . . . . . . . . . . . 49 Places with risk of explosion . . . . . . . . . . . . . . . 41
Places with special regulations . . . . . . . . . . . . . 41
Setup . . . . . . . . . . . . . . . . . . . . . . . . . . . . . . . . . . 51
Voice control . . . . . . . . . . . . . . . . . . . . . . . . . . . . 44
Places with special regulations . . . . . . . . . . . . . . . 41
Pop-up window . . . . . . . . . . . . . . . . . . . . . . . . . . . . . 7
Q
Quick Reference Guide . . . . . . . . . . . . . . . . . . . . . . . 3
R Radio . . . . . . . . . . . . . . . . . . . . . . . . . . . . . . . . . . . . 10
RADIO frequency bands . . . . . . . . . . . . . . . . . . . . . . . . . 14
Main menu . . . . . . . . . . . . . . . . . . . . . . . . . . . . . 10
RDS radio data services . . . . . . . . . . . . . . . . . . . 11
scan function (SCAN) . . . . . . . . . . . . . . . . . . . . . 15
selecting, adjusting and storing a station . . . . 14
Stored station buttons . . . . . . . . . . . . . . . . . . . . 13
RDS . . . . . . . . . . . . . . . . . . . . . . . . . . . . . . . . . . . . . 56 TP (Traffic Program) . . . . . . . . . . . . . . . . . . . 16, 17
Representation in these operating instructions . . . 7
Requirements for adaptor (MDI) . . . . . . . . . . . . . . . . . . . . . . . . . . . 24
CDs . . . . . . . . . . . . . . . . . . . . . . . . . . . . . . . . . . . 19
external data medium (MDI) . . . . . . . . . . . . . . . 24
memory cards . . . . . . . . . . . . . . . . . . . . . . . . . . . 19
SD cards . . . . . . . . . . . . . . . . . . . . . . . . . . . . . . . 19
Rotary/push knobs . . . . . . . . . . . . . . . . . . . . . . . . . 7
Rotary knobs . . . . . . . . . . . . . . . . . . . . . . . . . . . . . . . 6
S
Safety notes . . . . . . . . . . . . . . . . . . . . . . . . . . . . . . . 3
SCAN see scan function . . . . . . . . . . . . . . . . . . . . . . . . 15 Scan function (SCAN)
Radio mode . . . . . . . . . . . . . . . . . . . . . . . . . . . . . 15
SAT . . . . . . . . . . . . . . . . . . . . . . . . . . . . . . . . . . . . 15
SD card . . . . . . . . . . . . . . . . . . . . . . . . . . . . . . . . . . 23
Search for point of interest . . . . . . . . . . . . . . . . . . 33
settings (SETUP) Language . . . . . . . . . . . . . . . . . . . . . . . . . . . . . . 53
Settings (SETUP) Bluetooth . . . . . . . . . . . . . . . . . . . . . . . . . . . . . . 53
factory . . . . . . . . . . . . . . . . . . . . . . . . . . . . . . . . . 54
Keypad . . . . . . . . . . . . . . . . . . . . . . . . . . . . . . . . 53
screen settings . . . . . . . . . . . . . . . . . . . . . . . . . . 53
System . . . . . . . . . . . . . . . . . . . . . . . . . . . . . . . . . 53
Time and Date . . . . . . . . . . . . . . . . . . . . . . . . . . . 53
Unit . . . . . . . . . . . . . . . . . . . . . . . . . . . . . . . . . . . 53
voice command . . . . . . . . . . . . . . . . . . . . . . . . . 54
SETUP see: "Setup (SETUP)" . . . . . . . . . . . . . . . . . . . . . 53
Setup (SETUP) . . . . . . . . . . . . . . . . . . . . . . . . . . . . . 53 sound . . . . . . . . . . . . . . . . . . . . . . . . . . . . . . . . . 54
volume distribution . . . . . . . . . . . . . . . . . . . . . . 54
Softkeys see: function buttons . . . . . . . . . . . . . . . . . . . . . . 7
Sound distribution (Balance/Fader) . . . . . . . . . . . 54
Sound setup . . . . . . . . . . . . . . . . . . . . . . . . . . . . . . 54
Sound (treble/midrange/bass) . . . . . . . . . . . . . . . 54
Station search see scan function . . . . . . . . . . . . . . . . . . . . . . . . 15
Switch-on volume . . . . . . . . . . . . . . . . . . . . . . . . . . 54
Switching off . . . . . . . . . . . . . . . . . . . . . . . . . . . . . . . 7
Switching on . . . . . . . . . . . . . . . . . . . . . . . . . . . . . . . 7
T Telephone . . . . . . . . . . . . . . . . . . . . . . . . . . . . . . . . 40
Things to note AUX mode . . . . . . . . . . . . . . . . . . . . . . . . . . . . . . 24
Touchscreen . . . . . . . . . . . . . . . . . . . . . . . . . . . . . . . 7
58