Page 199 of 240

Fuses and bulbs
Double headlights - H7 Long Life
- H7
- W5W Long Life - PY 21W
Single headlight - H4 Long Life
- W5W Long Life - PY 21W
Xenon 1)
/ adaptive headlights*
- D1S2)
- LED 3)
- LED 3)
- PY 21W
Dipped beam
Main beam
Position
Turn signal
Dipped/Main
Position
Turn signal
Dipped and full beam
Position
DRL (day light)
Turn signals Front fog light
- H11 WARNING
● Take particular care when working on com-
ponents in the engine compartment if the en-
gine is warm, there is a risk of burns.
● Bulbs are highly sensitive to pressure. The
glass can break when you touch the bulb,
causing injury.
● The high voltage element of gas discharge
bulbs* (xenon light) must be handled correct-
ly. Otherwise, there is a risk of death.
● When changing bulbs, please take care not
to injure yourself on sharp parts in the head-
light housing. Fog light/cornering CAUTION
● Remove the ignition key before working on
the electric system. Otherwise, a short circuit
could occur.
● Switch off the lights or parking lights be-
fore you change a bulb. For the sake of the environment
Please ask your specialist retailer how to dis-
pose of used bulbs in the proper manner. Note
● Depending on weather conditions (cold or
wet), the front lights, the fog lights, the tail
lights and the turn signals may be temporari-
ly misted. This has no influence on the useful
life of the lighting system. By switching on
the lights, the area through which the beam
of light is projected will quickly be demisted. »1)
With this type of headlight, the user can replace
the turn signal bulb. Replacement of the dip-
ped/main beam bulb must be done by Technical
Services, given that complex elements must be re-
moved from the vehicle and the automatic control
system that incorporates it must be reset.
2) The Xenon bulbs discharge 2.5 times the light flux
and have an average lifespan of 5 times more than
that of halogen bulbs, this means that, except due to
unusual circumstances, there is no need to change
the bulbs for the whole life of the vehicle.
3) In the event that there is a fault in the LEDs, the
complete headlight must be replaced. 197Technical specifications
Advice
Operation
Safety
The essentials
Page 200 of 240

Advice
However, the edges may continue to be mis-
ted.
● Please check at regular intervals that all
lighting (especially the exterior lighting) on
your vehicle is functioning properly. This is
not only in the interest of your own safety,
but also that of all other road users.
● Before changing a bulb, make sure you
have the correct new bulb.
● Do not touch the glass part of the bulb with
your bare hands, use a cloth or paper towel
instead. The residue left by the fingerprints
would vaporise as a result of the heat gener- ated by the bulb, they will be deposited on
the reflector and will impair its surface. Single headlight bulb change
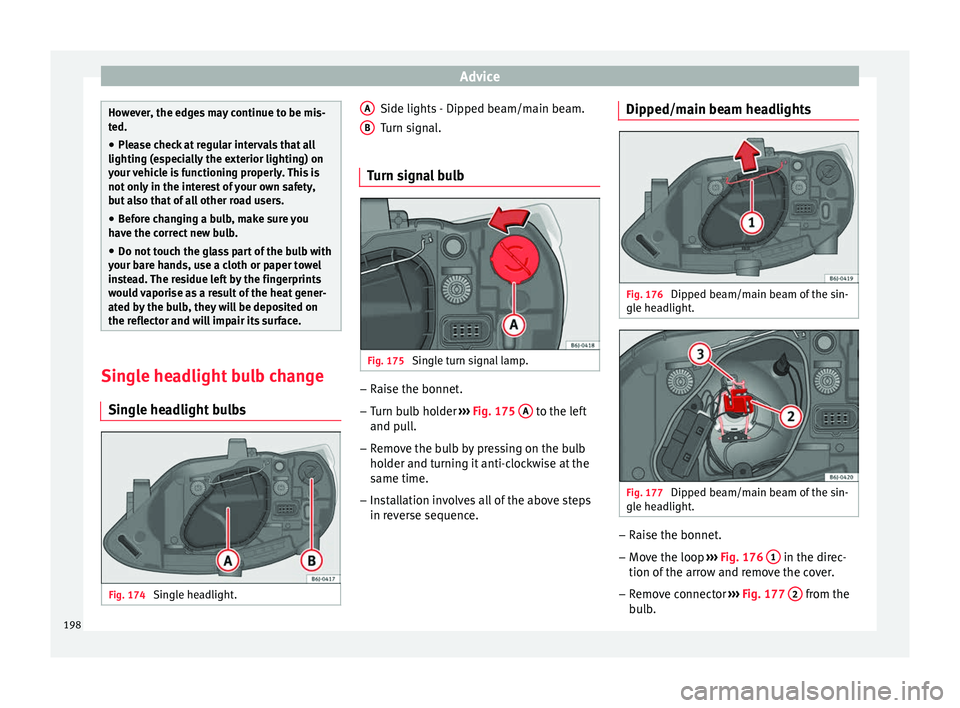
Single headlight bulbs Fig. 174
Single headlight. Side lights - Dipped beam/main beam.
Turn signal.
Turn signal bulb Fig. 175
Single turn signal lamp. –
Raise the bonnet.
– Turn bulb holder ››› Fig. 175 A to the left
and pull.
– Remove the bulb by pressing on the bulb
holder and turning it anti-clockwise at the
same time.
– Installation involves all of the above steps
in reverse sequence.
A B Dipped/main beam headlights
Fig. 176
Dipped beam/main beam of the sin-
gle headlight. Fig. 177
Dipped beam/main beam of the sin-
gle headlight. –
Raise the bonnet.
– Move the loop ››› Fig. 176 1 in the direc-
tion of the arrow and remove the cover.
– Remove connector ››› Fig. 177
2 from the
bulb.
198
Page 201 of 240

Fuses and bulbs
– Unclip the retainer spring ››› Fig. 177 3 pressing inwards to the right.
– Extract the bulb and fit the replacement so
that the lug on the base fits into the recess
on the reflector.
– Fit the connector.
– Fit the cover and close the strap. Make sure
that the gasket sits well on the casing cover
during the operation.
– Check whether the new bulb is working.
Side light Fig. 178
Side lights. –
Raise the bonnet.
– Move the loop ››› Fig. 176 1 in the direc-
tion of the arrow and remove the cover.
– Remove the bulb holder 4
››› Fig. 178 out-
w ar
ds. –
Replace the bulb by pulling it out and in-
serting the replacement.
– Installation is done in the reverse order.
Double headlight bulb change Double headlight bulbs Fig. 179
Double headlight. Side lights
Main beam headlights
Dipped beam headlights
Turn signal lights
A B
C
D Side light
Fig. 180
Side lights. Fig. 181
Side lights. –
Raise the bonnet.
– Move the loop 1 in the direction of the ar-
row and remove the cover ››› Fig. 180 .
– Remo
ve connector ››› Fig. 181 2 by pulling
outward. »
199
Technical specifications
Advice
Operation
Safety
The essentials
Page 202 of 240

Advice
– Remove the bulb by pulling it out and fit-
ting the new one.
– Installation involves all of the above steps
in reverse sequence.
– Fit the cover and close the strap. Make sure
that the gasket sits well on the casing cover
during the operation.
– Check whether the new bulb is working.
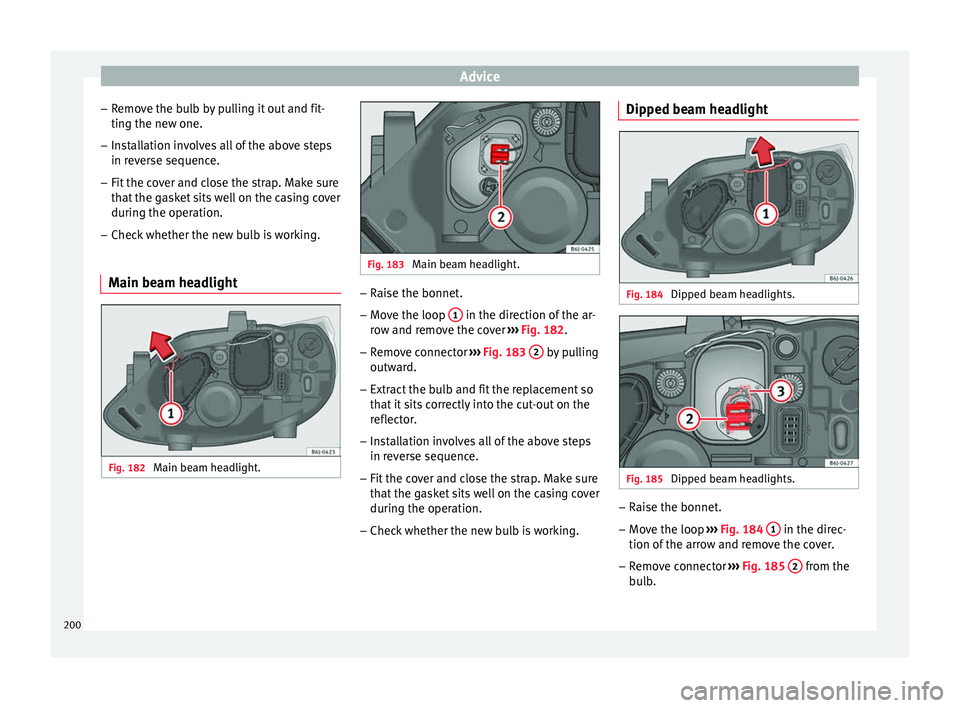
Main beam headlight Fig. 182
Main beam headlight. Fig. 183
Main beam headlight. –
Raise the bonnet.
– Move the loop 1 in the direction of the ar-
row and remove the cover ››› Fig. 182 .
– Remo
ve connector ››› Fig. 183 2 by pulling
outward.
– Extract the bulb and fit the replacement so
that it sits correctly into the cut-out on the
reflector.
– Installation involves all of the above steps
in reverse sequence.
– Fit the cover and close the strap. Make sure
that the gasket sits well on the casing cover
during the operation.
– Check whether the new bulb is working. Dipped beam headlight
Fig. 184
Dipped beam headlights. Fig. 185
Dipped beam headlights. –
Raise the bonnet.
– Move the loop ››› Fig. 184 1 in the direc-
tion of the arrow and remove the cover.
– Remove connector ››› Fig. 185 2 from the
bulb.
200
Page 203 of 240

Fuses and bulbs
– Unclip the retainer spring ››› Fig. 185 3 pressing inwards to the right.
– Extract the bulb and fit the replacement so
that the lug on the base fits into the recess
on the reflector.
– Fit the connector.
– Fit the cover and close the strap. Make sure
that the gasket sits well on the casing cover
during the operation.
– Check whether the new bulb is working.
Turn signal lamp Fig. 186
Turn signal light. –
Raise the bonnet.
– Turn bulb holder ››› Fig. 186 A to the left
and pull. –
Remove the bulb by pressing on the bulb
holder and turning it anti-clockwise at the
same time.
– Installation involves all of the above steps
in reverse sequence.
AFS headlight bulb change AFS headlight bulbs Fig. 187
AFS headlight bulbs. Turn signal lights
Xenon headlight (dipped beam/main
beam)
Changing the xenon bulb The procedure for changing the bulb is the
same on both sides of the vehicle.A B WARNING
This type of bulb should be changed at a spe-
cialised workshop. Turn signal bulb
Fig. 188
Turn signal light. –
Raise the bonnet.
– Turn bulb holder ››› Fig. 188 A to the left
and pull.
– Remove the bulb by pressing on the bulb
holder and turning it anti-clockwise at the
same time.
– Installation involves all of the above steps
in reverse sequence.
201Technical specifications
Advice
Operation
Safety
The essentials
Page 204 of 240

Advice
Changing the fog light bulbs Front fog light bulb Fig. 189
Front fog light. Fig. 190
Front fog light. –
Remove the bolt ››› Fig. 189 1 from the fog
light grille with a screwdriver.
– Subsequently, remove the clips located on
the edge of the grill with gentle leverage. –
Remove the 3 bolts ››› Fig. 190 2 to re-
move the fog light.
– Remove the metal clip situated on the up-
per part of the fog light by pulling towards
the exterior of the vehicle ››› Fig. 190 3 .
Fog light, FR version Fig. 191
Fog light: access to the connector
and to the light bulb holder. –
Remove the 4 bolts A
››› Fig. 191 from the
in s
ide of the wheel housing and the 2 bot-
tom bolts B
››› Fig. 191 from the bumper
with a screwdriver.
– Pull the bumper to release it from its an-
chorages to access the connector and the
light bulb holder. Note
Due to the difficulty of accessing fog light
bulbs, have them replaced at a Technical
Service or specialised workshop. Remove the bulb holder
Fig. 192
Front fog light. –
Remove connector ››› Fig. 192 1 from the
bulb.
– Turn the bulb holder ››› Fig. 192 2 to the
left and pull.
– Remove the bulb by pressing on the bulb
holder and turning it counter-clockwise at
the same time.
– Installation involves all of the above steps
in reverse sequence.
– Check that the bulb works properly.
202
Page 205 of 240
Fuses and bulbs
Changing the rear bulbs Summary of LED tail lights 3 Applies to the model: IBIZA/IBIZA SC
LED
●
Br ak
e lights
● Side lights
Bulbs
● Retro fog light
● Reverse lights
● Turn signal
Tail lights 3 Applies to the model: IBIZA SC
Fig. 193
Left tail light. Fig. 194
Right tail light. Turn signals
Side and brake
Position
Retro-fog light (left tail light)
Reverse light (right tail light)
Note
In countries driving on the right (left-driving),
both the D and
E bulbs are located the oth-
er way round (Retro-fog light on driver side
and reverse light on passenger side). A
B
C
D
E Access to tail lights
3 Applies to the model: IBIZA/IBIZA SC
Fig. 195
Access to tail lights. –
Open the rear lid.
– Turn the bolt in the direction of the arrow,
by hand or with a screwdriver ››› Fig. 195 .
– Remo
ve the tail light, by pulling it out-
wards.
203
Technical specifications
Advice
Operation
Safety
The essentials
Page 206 of 240

Advice
Changing the tail light bulbs 3 Applies to the model: IBIZA/IBIZA SC
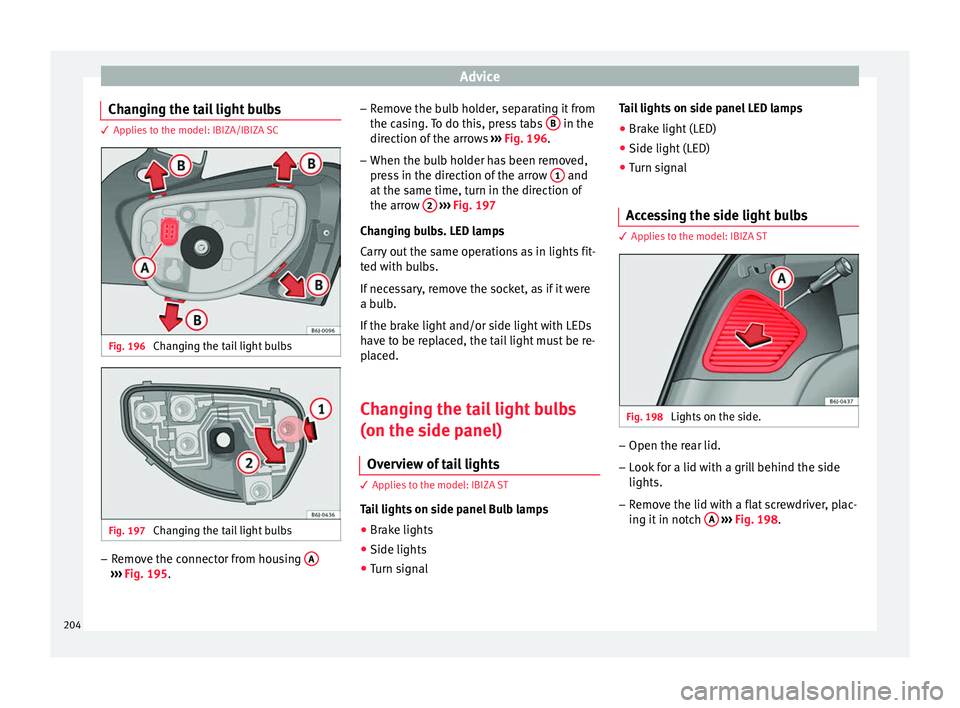
Fig. 196
Changing the tail light bulbs Fig. 197
Changing the tail light bulbs –
Remove the connector from housing A›››
Fig. 195 . –
Remo ve the bulb holder, separating it from
the casing. To do this, press tabs B in the
direction of the arrows ››› Fig. 196 .
– When the b u
lb holder has been removed,
press in the direction of the arrow 1 and
at the same time, turn in the direction of
the arrow 2
››› Fig. 197
Changing bulbs. LED lamps
Carry out the same operations as in lights fit-
ted with bulbs.
If necessary, remove the socket, as if it were
a bulb.
If the brake light and/or side light with LEDs
have to be replaced, the tail light must be re-
placed.
Changing the tail light bulbs
(on the side panel)
Overview of tail lights 3 Applies to the model: IBIZA ST
Tail lights on side panel Bulb lamps ● Brake lights
● Side lights
● Turn signal Tail lights on side panel LED lamps
●
Brake light (LED)
● Side light (LED)
● Turn signal
Accessing the side light bulbs 3 Applies to the model: IBIZA ST
Fig. 198
Lights on the side. –
Open the rear lid.
– Look for a lid with a grill behind the side
lights.
– Remove the lid with a flat screwdriver, plac-
ing it in notch A
››› Fig. 198 .
204