2014 Seat Altea XL warning light
[x] Cancel search: warning lightPage 158 of 321

156Seats and storage
–Extract the shelf from its slot, in its rest position and pull out-
wards. The storage compartment should remain closed.
To remove the storage compartment
– Pull outwards until the compartment is freed from the pivot
point ⇒ Fig. 124.
WARNING
Do not place heavy or hard objects on the rear shelf, because they will
endanger the vehicle occupants in case of sudden braking.
CAUTION
● Before closing the rear lid, ensure that the rear shelf is correctly fitted.
● An overloaded luggage compartment could mean that the rear shelf is
not correctly seated and it may be bent or damaged.
● If the luggage compartment is overloaded, remove the tray.
Note
● Ensure that, when placing items of clothing on the luggage compart-
ment cover, rear visibility is not reduced.
● If the vehicle is fitted with a storage compartment*, it should only be
used to store the emergency triangles* and light objects. Applies to the model: ALTEA XL / ALTEA FREETRACK
Retractable rear shelf
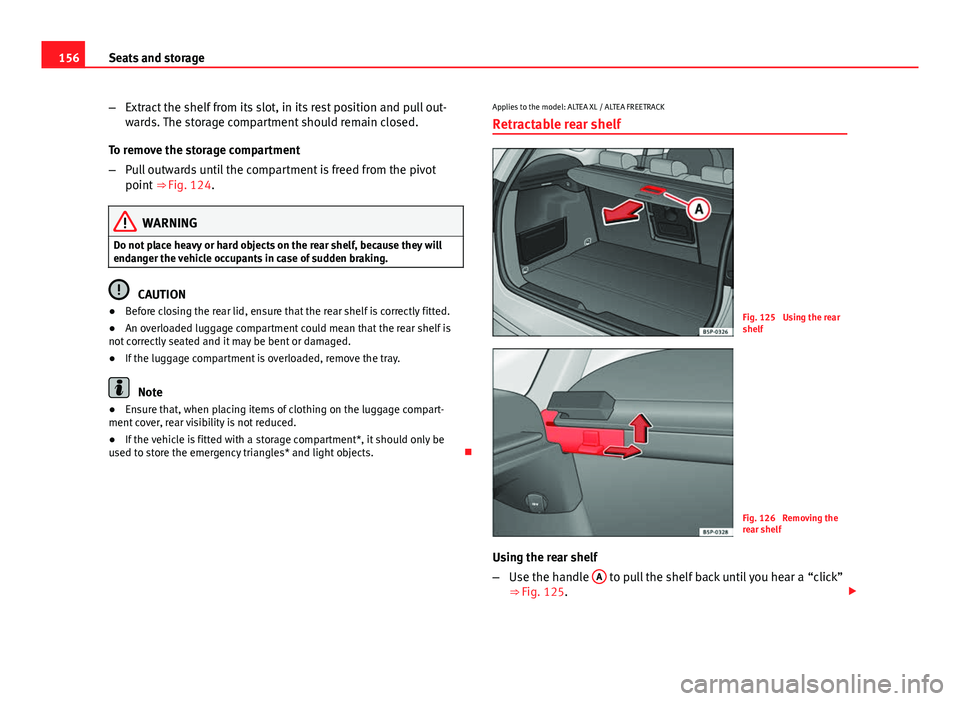
Fig. 125 Using the rear
shelf
Fig. 126 Removing the
rear shelf
Using the rear shelf
– Use the handle A
to pull the shelf back until you hear a “click”
⇒ Fig. 125.
Page 167 of 321

165
Air conditioning
– The functions will be switched on when its buttons are pressed.
When these functions are activated, they are indicated on the
radio display. In addition, all these functions are lit with LEDs.
Press the button again to switch off the function.
The temperature can be adjusted separately for the left and right sides of
the vehicle interior. Button
– defrost function for the windscreen. The air drawn in from
outside the vehicle is directed at the windscreen. The air recirculation
mode, if switched on, will be switched off as soon as the defrost func-
tion is switched on. At temperatures over +3 °C (+37 °F), the air condi-
tioning system will be switched on automatically in order to dehumidify
the air. The button is lit in yellow and the symbol appears on the radio
or navigator display.
button – Upward air distribution
button – Central air distribution
button – Downward air distribution
button – Manual air recirculation mode
button – Heated rear window The heating will be switched off auto-
matically approximately 20 minutes after switching on. However, it may
be turned off by pushing the button. The button lights up yellow and
the symbol appears in the display.
AUTO
button – Automatic temperature, ventilation and air distribution
control ⇒ page 166
SYNC
button – Dual zone synchroniser
OFF button – Switches the 2C-Climatronic on and off ⇒ page 167
Blower control ⇒ page 167
AC
button – Switches heating, ventilation and air-conditioning system
on
1
23456
7
891011
WARNING
For road safety all windows must be clear of ice, snow, and condensation.
This is essential to ensure good visibility. Please familiarise yourself with
the correct operation of the heating and ventilation system, including the
anti-fog/defrost functions for the windscreens.
Safety FirstOperating instructionsPractical TipsTechnical Specifications
Page 174 of 321

172Driving
WARNING (Continued)
● Adjust the driver seat or steering wheel so that there is a distance of
at least 25 cm between the steering wheel and your chest ⇒ Fig. 138. If
you fail to observe the minimum distance, the airbag will not protect you.
Risk of fatal injury.
● If your physical constitution does not allow you to maintain the mini-
mum distance of 25 cm, contact a Technical Service. The Technical Serv-
ice will help you to decide if special specific modifications are necessary.
● If you adjust the steering wheel so that it points towards your face,
the driver airbag will not protect you properly in the event of an accident.
Make sure that the steering wheel points towards your chest.
● When driving, always hold the steering wheel with both hands on the
outside of the ring at the 9 o'clock and 3 o'clock positions. Never hold
the steering wheel at the 12 o'clock position, or in any other manner
(e.g. in the centre of the steering wheel, or on the inside of the rim). In
such cases, if the airbag is triggered, you may sustain injuries to the
arms, hands and head.
Safety
Electronic Stability Control (ESC)*
The ESC helps make driving safer in extreme driving condi-
tions.
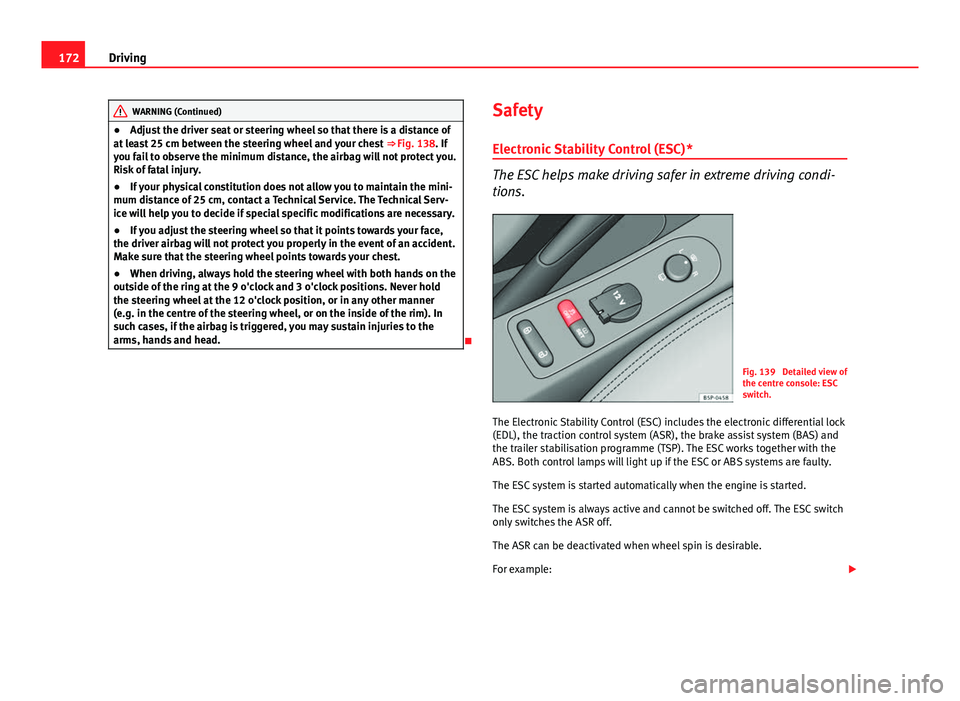
Fig. 139 Detailed view of
the centre console: ESC
switch.
The Electronic Stability Control (ESC) includes the electronic differential lock
(EDL), the traction control system (ASR), the brake assist system (BAS) and
the trailer stabilisation programme (TSP). The ESC works together with the
ABS. Both control lamps will light up if the ESC or ABS systems are faulty.
The ESC system is started automatically when the engine is started.
The ESC system is always active and cannot be switched off. The ESC switch
only switches the ASR off.
The ASR can be deactivated when wheel spin is desirable.
For example:
Page 176 of 321

174Driving
Starting 2
The engine is started when the key is in this position. Electrical components
with a high power consumption are switched off temporarily.
Every time the vehicle is started again, the ignition key must be turned to
position 0
. The
repetitive start prevention lock of the ignition prevents
possible damage to the starter motor if the engine is already running.
WARNING
● The ignition key must NOT be removed from the lock until the vehicle
comes to a standstill. Otherwise, the steering could be immediately
blocked- Risk of accident!
● Always remove the key from the ignition when leaving the vehicle,
even for a short period. This is especially important if children or disa-
bled people are left alone in the vehicle. They could accidentally start the
engine or work electrical equipment such as the electric windows, conse-
quently resulting in an accident.
● Unsupervised use of the keys could start the engine or any electrical
system, such as the electric window. This could result in serious injury.
CAUTION
The starter motor will only work when the engine is stopped (ignition key
position 2
).
Electronic immobiliser
The electronic immobiliser prevents unauthorised persons
from driving the vehicle.
Inside the key there is a chip that deactivates the electronic immobiliser au-
tomatically when the key is inserted into the ignition. The electronic immobiliser will be activated again automatically as soon as
you pull the key out of the ignition lock.
The engine can only be started using a genuine SEAT key with its correct
code.
Note
A perfect operation of the vehicle is ensured if genuine SEAT keys are used.
Starting and stopping the engine Starting petrol engines
The engine can only be started using a genuine SEAT key
with its correct code. – Move the gearbox lever to the neutral position and depress the
clutch pedal thoroughly and hold it in this position for the start-
er to turn the engine on.
– Turn the ignition key to the starting ⇒ page 173 position.
– Let go of the ignition key as soon as the engine starts; the start-
er motor must not run on with the engine.
After starting a very hot engine, you may need to slightly press down the ac-
celerator.
When starting a very cold engine, it may be a little noisy for the first few sec-
onds until oil pressure has built up in the hydraulic valve compensators.
This is quite normal, and no cause for concern.
Page 177 of 321

175
Driving
If the engine does not start immediately, switch the starter off after 10 sec-
onds and try again after half a minute. If the engine still does not start, the
fuel pump fuse should be checked ⇒ page 272, Fuses.
WARNING
● Never start or run the engine in unventilated or closed rooms. The ex-
haust gases contain carbon monoxide, an odourless and colourless poi-
sonous gas. Risk of fatal accidents. Carbon monoxide can cause loss of
consciousness. It can also result in death.
● Never leave the vehicle unattended if the engine is running.
● Never use “cold start sprays”, they could explode or cause the engine
to run at high revs. Risk of injury.
CAUTION
● When the engine is cold, you should avoid high engine speeds, driving
at full throttle and over-loading the engine. Risk of engine damage.
● The vehicle should not be pushed or towed more than 50 metres to start
the engine. Unburnt fuel could enter the catalytic converter and damage it.
● Before attempting to push-start or tow a vehicle in order to start it, you
should first try to start it using the battery of another vehicle. Note and fol-
low the instructions in ⇒ page 287, Jump-starting.
For the sake of the environment
Do not warm-up the engine by running the engine with the vehicle station-
ary. Start off immediately, driving gently. This helps the engine reach oper-
ating temperature faster and reduces emissions. Starting diesel engines
The engine can only be started using a genuine SEAT key
with its correct code.
– Move the gearbox lever to the neutral position and depress the
clutch pedal thoroughly and hold it in this position for the start-
er to turn the engine on.
– Turn the ignition key to the starting position.
– Turn the ignition key to position ⇒ Fig. 140 1
. The warning
lamp will light for engine pre-heating.
– When the lamp turns off, turn the ignition key to position 2
to
start the engine. Do not press the accelerator.
– Let go of the ignition key as soon as the engine starts, the start-
er motor must not be allowed to run on with the engine.
When starting a very cold engine, it may be a little noisy for the first few sec-
onds until oil pressure has built up in the hydraulic valve compensators.
This is quite normal, and no cause for concern.
If there are problems starting the engine, see the ⇒ page 287.
Glow plug system for the diesel engine
To avoid unnecessary discharging of the battery, do not use any other major
electrical equipment while the glow plugs are pre-heating.
Start the engine as soon as the glow plug warning lamp ⇒ page 82 goes
out.
Starting the diesel engine after the fuel tank has been completely run dry
If the fuel tank has been completely run dry, it may take longer than normal
(up to one minute) to start a diesel engine after refuelling. This is because
the fuel system must eliminate air first.
Safety FirstOperating instructionsPractical TipsTechnical Specifications
Page 184 of 321

182Driving
Manual gearbox
Driving with a manual gearbox
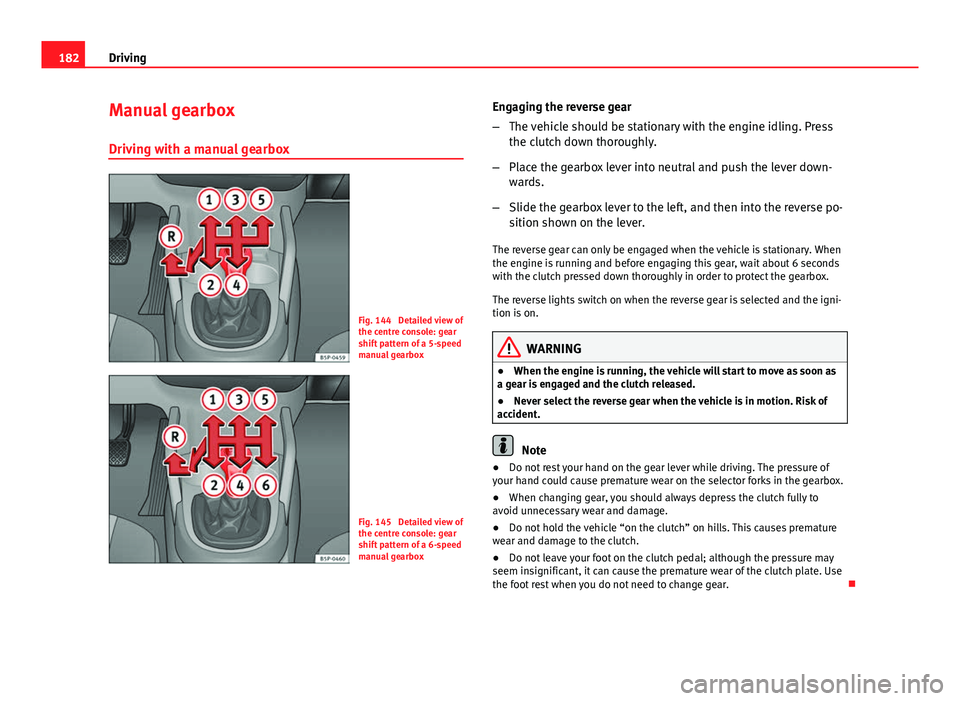
Fig. 144 Detailed view of
the centre console: gear
shift pattern of a 5-speed
manual gearbox
Fig. 145 Detailed view of
the centre console: gear
shift pattern of a 6-speed
manual gearbox Engaging the reverse gear
–
The vehicle should be stationary with the engine idling. Press
the clutch down thoroughly.
– Place the gearbox lever into neutral and push the lever down-
wards.
– Slide the gearbox lever to the left, and then into the reverse po-
sition shown on the lever.
The reverse gear can only be engaged when the vehicle is stationary. When
the engine is running and before engaging this gear, wait about 6 seconds
with the clutch pressed down thoroughly in order to protect the gearbox.
The reverse lights switch on when the reverse gear is selected and the igni-
tion is on.
WARNING
● When the engine is running, the vehicle will start to move as soon as
a gear is engaged and the clutch released.
● Never select the reverse gear when the vehicle is in motion. Risk of
accident.
Note
● Do not rest your hand on the gear lever while driving. The pressure of
your hand could cause premature wear on the selector forks in the gearbox.
● When changing gear, you should always depress the clutch fully to
avoid unnecessary wear and damage.
● Do not hold the vehicle “on the clutch” on hills. This causes premature
wear and damage to the clutch.
● Do not leave your foot on the clutch pedal; although the pressure may
seem insignificant, it can cause the premature wear of the clutch plate. Use
the foot rest when you do not need to change gear.
Page 187 of 321

185
Driving
– Select a gear for driving ( R, D or S).
– Release the button and wait a few seconds for the gear to en-
gage, a light jerk will be felt.
– Release the brake and accelerate.
Short stop
– Hold the vehicle stationary with the brake pressed down (for ex-
ample at traffic lights). The selector lever does not need to be
put into the positions P or N for this.
– Do not press the accelerator.
Parking
– Press the brake pedal and hold to bring the vehicle to a stop.
– Apply the handbrake firmly.
– Press in the button on the selector lever knob, move the lever to
the position P and release the button.
Driving slowly
– Move the selector lever to position D and press to the right to
put the lever into tiptronic mode.
– Press the gear lever towards (-) to select a lower gear.
Hill stop
– Hold the vehicle, in all cases, using the brake pedal to prevent
rolling back.
– Do not try to slow the vehicle using another forward gear (en-
gine braking). Descending gradients
–
With the gear engaged, release the brake and accelerate.
The steeper the gradient the lower the gear must be for effective engine
braking. For example, if 3rd gear is used on a very steep gradient, the en-
gine braking is insufficient and vehicle accelerates. So that the engine
speed does not become excessive, the gearbox changes to the next highest
gear. Depress the brake pedal and move the selector lever to the tiptronic
gate to return to 3rd gear.
WARNING
● The driver should never leave the vehicle while the engine is running
or with any gear selected. If for any reason you must leave the vehicle
with the engine running, apply the handbrake and move the selector lev-
er to position P.
● When the engine is running and the positions D, S or R are selected,
it is necessary to hold the vehicle with the brake pedal because the vehi-
cle will creep at a low speed.
● Never accelerate while changing the position of the gear lever (risk of
an accident).
● The gear lever must never be moved into the positions R or P while
moving (risk of an accident).
● Before descending a steep gradient, reduce speed and use the tip-
tronic programme to select a lower gear.
● If you must stop on a hill, always hold the vehicle using the footbrake
to avoid rolling back.
Safety FirstOperating instructionsPractical TipsTechnical Specifications
Page 188 of 321

186Driving
WARNING (Continued)
● The footbrake must not be held for a long period of time, not even
lightly; continuous braking will cause overheating of the brakes and a re-
duction or even a loss of braking power and a significant increase in
braking distances.
● Never allow the vehicle to coast down a gradient with the selector lev-
er in positions N or D, even when the engine is not running. For descents,
the use of the tiptronic programme is recommended to keep the speed
reduced.
CAUTION
● Never use the automatic gearbox to hold the vehicle stationary on a hill,
even for short periods, as this may overheat the gearbox and cause dam-
age. Apply the handbrake or depress the foot brake to hold the vehicle in
position.
● If the vehicle is allowed to roll with the engine stopped but the selector
in position N then the gearbox may be damaged because it will not be lubri-
cated. Changing gear in tiptronic mode*
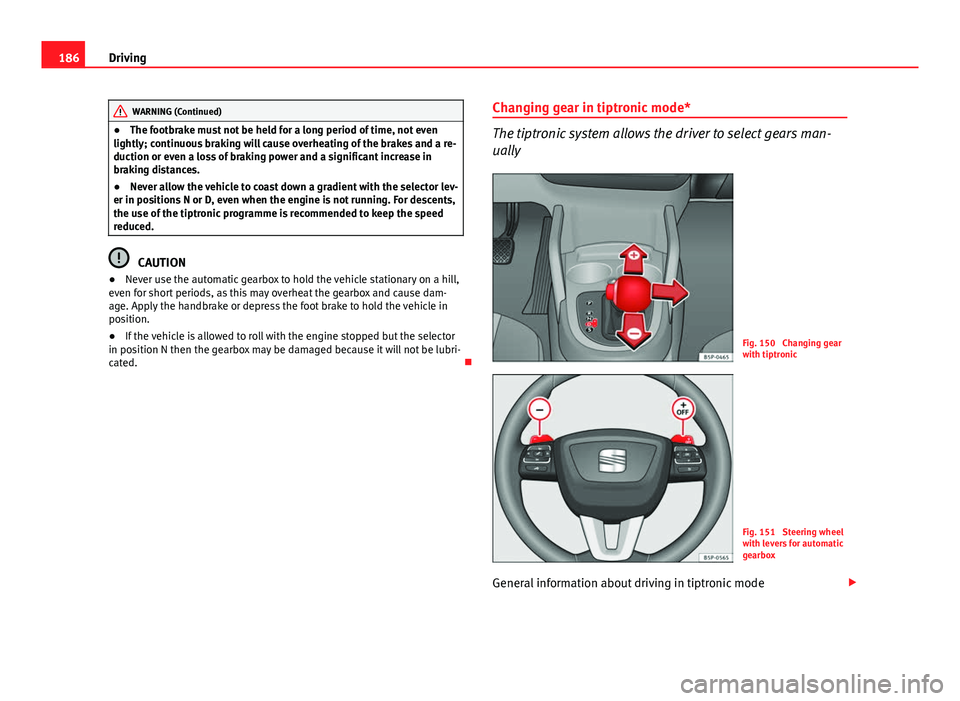
The tiptronic system allows the driver to select gears man-
ually
Fig. 150 Changing gear
with tiptronic
Fig. 151 Steering wheel
with levers for automatic
gearbox
General information about driving in tiptronic mode