Page 111 of 214

Putting the function on
standby
The speed limiter function is sus-
pended when you press switch 4 (O).
In this case, the speed limit remains")
2.21
CRUISE CONTROL, SPEED LIMITER: speed limiter (3/3)
Putting the function on
standby
The speed limiter function is sus-
pended when you press switch 4 (O).
In this case, the speed limit remains
stored and the message “Memorised”
accompanied by this speed appears on
the instrument panel.
Standby is confirmed when the warn-
ing light
Ð on the orange back-
ground goes out and the warning light
� comes on.
Recalling the limit speed
If a speed has been saved, it can be re-
called by pressing switch 5 ((R)).
When the stored speed is recalled, ac-
tivation of the speed limiter is confirmed
by the illumination of the warning light
Ð on an orange background.
When the speed limiter is put on
standby, pressing switch 2 (+) re-
activates the function without taking
into account the stored speed: it is
the speed at which the vehicle is
moving that is taken into account.
Switching off the function
The speed limiter function is deacti-
vated if you press switch 1: in this case
a speed is no longer stored. The warn-
ing light (
� or Ð) on the instru-
ment panel going out confirms that the
function is stopped.
2354
1
Page 113 of 214
2.23
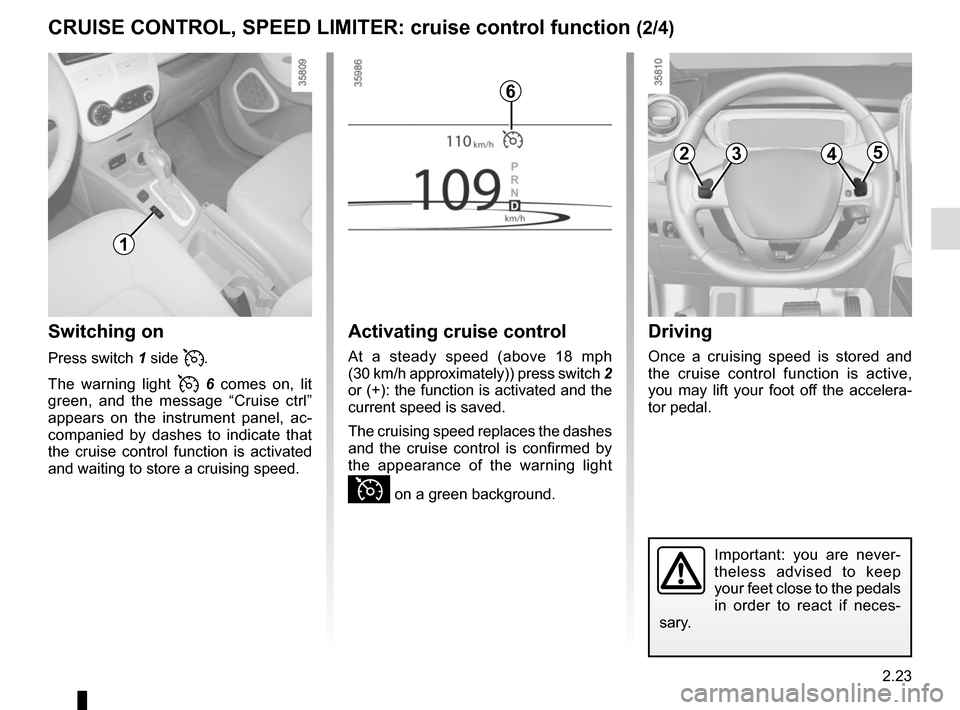
CRUISE CONTROL, SPEED LIMITER: cruise control function (2/4)
Switching on
Press switch 1 side �.
The warning light
� 6 comes on, lit
green, and the message “Cruise ctrl”
appears on the instrument panel, ac-
companied by dashes to indicate that
the cruise control function is activated
and waiting to store a cruising speed.
Activating cruise control
At a steady speed (above 18 mph
(30 km/h approximately)) press switch 2
or (+): the function is activated and the
current speed is saved.
The cruising speed replaces the dashes
and the cruise control is confirmed by
the appearance of the warning light
Ï on a green background.
Driving
Once a cruising speed is stored and
the cruise control function is active,
you may lift your foot off the accelera-
tor pedal.
Important: you are never-
theless advised to keep
your feet close to the pedals
in order to react if neces-
sary.
6
2354
1
Page 114 of 214

The cruise control function
is in no way linked to the
braking system.
Adjusting the cruising speed
The cruising speed may be change")
2.24
CRUISE CONTROL, SPEED LIMITER: cruise control function (3/4)
The cruise control function
is in no way linked to the
braking system.
Adjusting the cruising speed
The cruising speed may be changed by
pressing the following repeatedly:
– switch 2 (+) to increase the speed,
– switch 3 (-) to decrease the speed.
Exceeding the cruising speed
The cruising speed may be exceeded
at any time by depressing the accele-
rator pedal. While it is being exceeded,
the cruising speed flashes on the ins-
trument panel.
Then, release the accelerator: after a
few seconds, the vehicle will automa-
tically return to its set cruising speed.
Cruising speed cannot be
maintained
When driving down a steep gradient,
the system is unable to maintain the
cruising speed: the stored speed will
flash on the instrument panel informa-
tion display to inform you of this situa-
tion.
2354
Putting the function on
standby
The function is set to standby if you:
– use the switch 4 (O);
– the brake pedal;
– move to neutral position;
– ECO mode switch.
In all four cases, the cruising speed
remains stored and the message
“Memorised” appears on the instrument
panel.
Standby is confirmed when the warning
light
Ï on the green background
goes out and the warning light
�
comes on.
The cruise control switches to
standby each time the ECO
mode is activated or deactivated.
Please refer to the information on
“Ecodriving” in Section 2.
Page 115 of 214

When the cruise control function is
put on standby, pressing switch 2
(+) reactivates the cruise control
function without taking in")
2.25
CRUISE CONTROL, SPEED LIMITER: cruise control function (4/4)
When the cruise control function is
put on standby, pressing switch 2
(+) reactivates the cruise control
function without taking into account
the stored speed: it is the speed at
which the vehicle is moving that is
taken into account.Putting the cruise control
on standby or switching it
off does not cause a rapid
reduction in speed: you
must brake by depressing the brake
pedal.
NB: if the speed previously stored is
much higher than the current speed,
the vehicle will accelerate more rapidly
to reach this threshold.
Switching off the function
The cruise control function is deactiva-
ted if you press switch 1: in this case a
speed is no longer stored. The warning
light (
� or Ï) on the instrument
panel going out confirms that the func-
tion is stopped.
2354
1
Returning to the cruising speed
If a speed is stored, it can be recalled,
once you are sure that the road condi-
tions are suitable (traffic, road sur-
face, weather conditions, etc.). Press
switch 5 (R) if the vehicle speed is
above 20 mph (30 km/h).
When the stored speed is recalled, acti-
vation of the cruise control is confirmed
by the illumination of the warning light
Ï on a green background.
Page 117 of 214

In the event of an impact to
the underside of the vehicle
(e.g.: striking a post, raised
kerb or other street furni-
ture), this may result in damage to
the veh")
2.27
PARKING DISTANCE CONTROL (2/2)
In the event of an impact to
the underside of the vehicle
(e.g.: striking a post, raised
kerb or other street furni-
ture), this may result in damage to
the vehicle (e.g.: twisted axle), the
electrical circuit or the traction bat-
tery.
To avoid any risk of accident, have
your vehicle checked by an ap-
proved dealer.
Operating faults
Depending on the vehicle, when the
system detects an operating fault, the
message “check parking distance con-
trol” appears on the instrument panel,
accompanied by the warning light
© and a beep lasting approxi-
mately 5 seconds. Please contact an
authorised dealer.
Special features
Make sure that the ultrasonic sensors
are not obscured (by dirt, mud, snow,
etc.).
Adjusting the parking
distance control volume
Certain settings can be adjusted from
the multimedia display 2. Please see
the equipment instructions for further
information.
Select “Menu”, “Settings”, “Park Assist”,
then adjust the parking distance control
volume by pressing + or -.
2
Deactivating the system
You can deactivate the parking distance
control from the multimedia display.
Select “Menu”, “Settings”, “Park Assist”
then “Rear parking sensor”. Activate or
deactivate the parking distance control
and confirm your choice by selecting
“Done”.
Done
Park Assist
Rear parking sensor
Volume
Image settings Rear camera view settings
Page 130 of 214
3.10
AIR CONDITIONING: programming (2/4)
The two programmed times cannot
be activated simultaneously.
A
12
From the multimedia
display A
Setting the start time for the
function
You can set two different times.
– press button 1 for quick access to the
programming menu on display A;
– select “Change” on one of the two set times;
– adjust the hours then the minutes, then confirm. The function is triggered one hour prior
to the programmed time to reach a
comfortable temperature.
The warning lights integrated in the
button
1, the AUTO button 2 and the
warning light
� on the instrument
panel are lit up.
“Programme” activation
– With the ignition switched on and the
air-conditioning operating (please
refer to the information on “Automatic
air-conditioning” in Section 3);
– select the programme to be acti- vated from menu “Comfort timer“;
– make sure one of the programmes is confirmed.
– switch off the engine;
– plug the vehicle into a power source;
– lock the vehicle.
Page 132 of 214

3.12
Stopping the programmed air
conditioning
The air conditioning stops automati-
cally around ten minutes after the set
end time.
However, the function can be deacti-
vated if:
– the charging socket is disconnected;
– the “Remote Activation” function is activated – please see the informa-
tion on “Air conditioning: remote acti-
vation” in Section 2;
– the traction battery charging level is lower than 30%.Driver’s responsibility
when parking or stopping
the vehicle
Never leave an animal,
child or adult who is not self-suffi-
cient alone on your vehicle, even for
a short time.
In hot and/or sunny weather, please
remember that the temperature
inside the passenger compartment
increases very quickly.
RISK OF DEATH OR SERIOUS
INJURY.
AIR CONDITIONING: programming (4/4)
Connected services
The air conditioning can also be acti-
vated using the connected services.
For more information regarding the op-
erating conditions, please contact an
authorised dealer.
“Programme” activation
– With the ignition switched on and the air-conditioning operating (please
refer to the information on “Automatic
air-conditioning” in Section 3);
– press the button 1.
The function is triggered one hour prior
to the programmed time to reach a
comfortable temperature.
The warning lights integrated in the
button 1, the AUTO button 2 and the
warning light
� on the instrument
panel are lit up.
12
Page 136 of 214

3.16
Safety of rear occupants
The driver can prevent op-
eration of the rear elec-
tric windows by pressing
switch 4. A confirmation message is
displayed on the instrument panel.
Driver’s responsibility
Never leave your vehicle with the
key inside and never leave a child
(or a pet) unsupervised, even for a
short while. They may pose a risk
to themselves or to others by start-
ing the engine, activating equipment
such as the electric windows or by
locking the doors. If a body part
gets trapped, reverse the direction
of travel of the window as soon as
possible by pressing the relevant
switch.
Risk of serious injury.
ELECTRIC WINDOWS (1/2)
These systems operate with the igni-
tion on or off, until one of the front doors
is opened (limited to about 3 minutes).
From the driver’s seat, use switch:
1 for the driver’s side;
2 for the front passenger side;
3 and 5 for the rear passenger win-
dows.
From the passenger seats, use
switch 6.
Note: if the window detects resistance
when closing (e.g.: fingers, branch of
a tree, etc.) it stops and then lowers
again by a few centimetres.Electric windowsPress or pull the switch to raise or lower
a window to the desired height (the rear
windows do not open fully);
One-touch mode
(depending on vehicle)
This mode works in addition to the
operation of the electric windows de-
scribed previously. It can be fitted to the
driver’s window.
Briefly press or pull the window switch
fully: the window is fully lowered or
raised. Pressing the switch again stops
the window moving.
1
2
34
5
6
Avoid resting any objects against
a half-open window: there is a risk
that the electric window could be
damaged.

The two programmed times cannot
be activated simultaneously.
A
12
From the multimedia
display A
Setting the start time for the
function
You can set two diff")