Page 135 of 244
133
Partner-2-VU_en_Chap08_Aide-rapide_ed02-2014
4. Procedure
- Place the jack in contact with the
locating point provided, the one
which is closest to the wheel to
be changed. Ensure that the jack
is straight and that the base of
the jack is fully in contact with the
ground.
-
Extend the jack to lift the wheel
clear of the ground.
-
Resume and complete the
unscrewing of the wheel bolts.
-
Remove the bolts and remove the
wheel.
-
Remove the wheel trim.
-
Loosen the wheel bolts and start
unscrewing them. Do not extend the jack until you have
started unscrewing the bolts on the
wheel to be changed and have placed
the chock under the wheel diagonally
opposite.
QUICK HELP
8
Changing a wheel
Page 141 of 244

139
Partner-2-VU_en_Chap08_Aide-rapide_ed02-2014
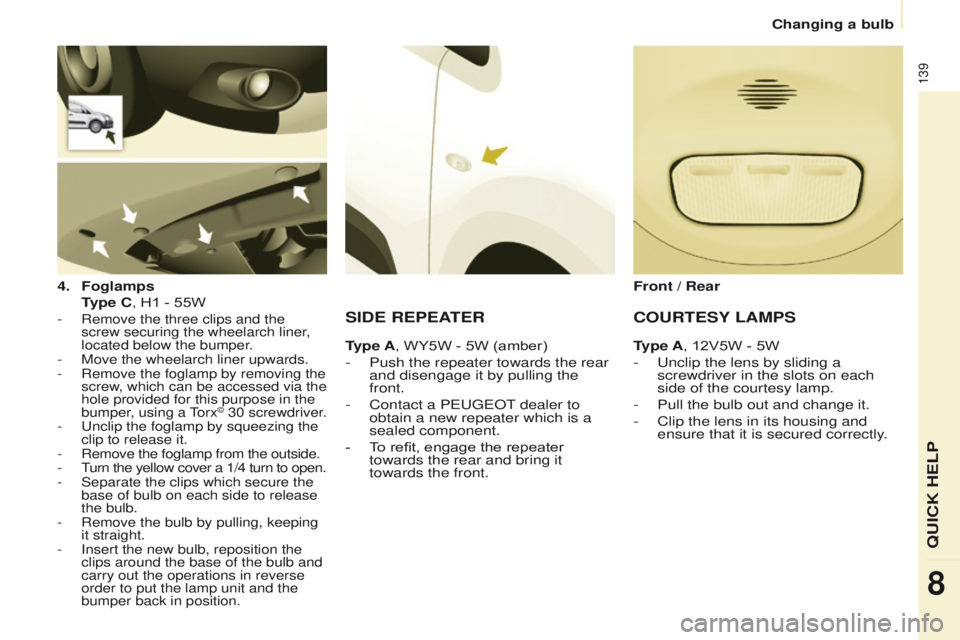
4. Foglamps
T
ype C, H1 - 55W
- Remove the three clips and the
screw securing the wheelarch liner ,
located below the bumper.
-
Move the wheelarch liner upwards.
-
Remove the foglamp by removing the
screw
, which can be accessed via the
hole provided for this purpose in the
bumper, using a Torx
© 30 screwdriver.
-
Unclip the foglamp by squeezing the
clip to release it.
-
Remove the foglamp from the outside.
- T
urn the yellow cover a 1/4 turn to open.
-
Separate the clips which secure the
base of bulb on each side to release
the bulb.
-
Remove the bulb by pulling, keeping
it straight.
-
Insert the new bulb, reposition the
clips around the base of the bulb and
carry out the operations in reverse
order to put the lamp unit and the
bumper back in position.
SIDE REPEATER
Type A, WY5W - 5W (amber)
-
Push the repeater towards the rear
and disengage it by pullin
g the
front.
-
Contact a PEUGEOT
dealer to
obtain a new repeater which is a
sealed component.
-
T
o refit, engage the repeater
towards the rear and bring it
towards the front. Front / Rear
COURTESY LAMPS
Type A, 12V5W - 5W
-
Unclip the lens by sliding a
screwdriver in the slots on each
side of the courtesy lamp.
-
Pull the bulb out and change it.
-
Clip the lens in its housing and
ensure that it is secured correctly
.
QUICK HELP
8
Changing a bulb
Page 142 of 244

140
Partner-2-VU_en_Chap08_Aide-rapide_ed02-2014
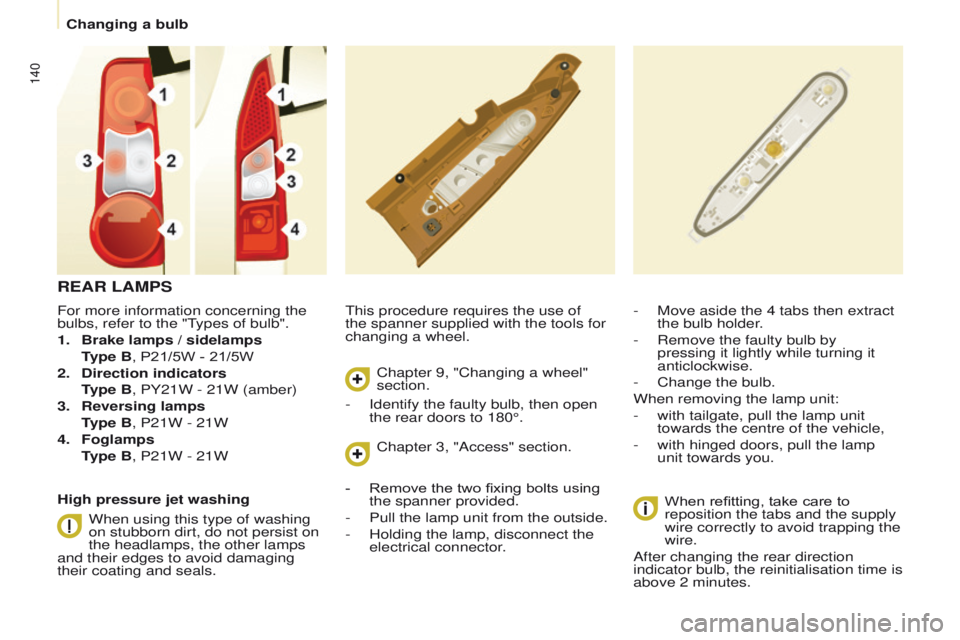
For more information concerning the
bulbs, refer to the "Types of bulb".
1.
Brake lamps / sidelamps
T
ype B, P21/5W - 21/5W
2.
Direction indicators
T
ype B, PY21W - 21W (amber)
3.
Reversing lamps
T
ype B, P21W - 21W
4.
Foglamps
T
ype B, P21W - 21W This procedure requires the use of
the spanner supplied with the tools for
changing a wheel.
-
Move aside the 4 tabs then extract
the bulb holder
.
-
Remove the faulty bulb by
pressing it lightly while turning it
anticlockwise.
-
Change the bulb.
When removing the lamp unit:
-
with tailgate, pull the lamp unit
towards the centre of the vehicle,
-
with hinged doors, pull the lamp
unit towards you.
When refitting, take care to
reposition the tabs and the supply
wire correctly to avoid trapping the
wire.
After changing the rear direction
indicator bulb, the reinitialisation time is
above 2 minutes.
REAR LAMPS
High pressure jet washing
When using this type of washing
on stubborn dirt, do not persist on
the headlamps, the other lamps
and their edges to avoid damaging
their coating and seals. Chapter 9, "Changing a wheel"
section.
Chapter 3, "Access" section.
-
Identify the faulty bulb, then open
the rear doors to 180°.
-
Remove the two fixing bolts using
the spanner provided.
-
Pull the lamp unit from the outside.
-
Holding the lamp, disconnect the
electrical connector
.
Changing a bulb
Page 194 of 244
07
10.36
Partner-2-VU_en_Chap10b_RT6-2-8_ed02-2014
By alphabetical list
Press RADIO, select the station of your
choice and confirm.
By automatic frequency search
Press 7 or 8 for the automatic search
for a lower or higher radio frequency.
Or turn the thumb wheel at the steering
mounted controls.
By manual frequency search
Press 5 or 6 to adjust the radio
frequency step by step.
Selecting a station
The external environment (hill, building, tunnel, underground car park.\
..) may interfere with the reception, including in RDS station tracking mode. This
phenomenon is a normal result of the way in which radio waves are transm\
itted and does not in any way indicate a fault with the audio system.The quality of reception is represented by the number of
active waves in this symbol.
Press RADIO or OK to display the
contextual menu.
Changing waveband
Select "Change waveband".
Select "AM / FM" and confirm.
RADIO