2014 Peugeot Boxer change wheel
[x] Cancel search: change wheelPage 15 of 240

13
1
AT A GLANCE
Limit the causes of excess consumption
Spread loads throughout the vehicle; place the heaviest items in
the bottom of the boot, as close as possible to the rear seats.
Limit the loads carried in the vehicle and reduce wind resistance
(roof bars, roof rack, bicycle carrier, trailer...). Use a roof box in
preference.
Remove roof bars and roof racks after use.
At the end of winter, remove snow tyres and refit your summer
tyres.
Observe the recommendations on maintenance
Check the tyre pressures regularly, when cold, referring to the
label in the door aperture, driver's side.
Carry out this check in particular:
- before a long journey,
- at each change of season,
- after a long period out of use.
Don't forget the spare wheel and the tyres on any trailer or
caravan.
Have your vehicle serviced regularly (engine oil, oil filter, air
filter, cabin filter...) and observe the schedule of operations in the
warranty and maintenance record.
When refuelling, do not continue after the 3
rd cut-off of the nozzle
to avoid any overflow.
At the wheel of your new vehicle, it is only after the first
1 800 miles (3 000 kilometres) that you will see the fuel
consumption settle down to a consistent average.
Page 29 of 240

Instruments and controls
27
2
READY TO SET OFF
Warning lamp is indicates Solution - action
DSC/ASR flashing.
that it is in operation. The system optimises traction and allows improved
directional stability of the vehicle.
on,
accompanied
by an audible
signal and a
message in the
screen. a fault with the system or the
hill start assist.
Contact a PEUGEOT dealer or a qualified workshop.
"Safety - Driving safely" section.
on. a fault with the Intelligent
Traction Control.
Emissions
control on. the regeneration of the particle
emissions filter. It is recommended that you leave the engine running
until the warning lamp goes off so that regeneration can
be completed.
"Checks - Levels and checks" section.
Emission control
system on.
a fault with the system. Have the system checked by a PEUGEOT dealer or a
qualified workshop without delay.
Tyre under-
inflation
detection on.
a tyre deflated or punctured. Park and switch off the ignition. Change or repair the
wheel.
on,
accompanied
by the service
warning lamp. a faulty sensor.
Have it checked by a PEUGEOT dealer or a qualified
workshop.
Page 30 of 240

Instruments and controls
28
Warning lamp is indicates Solution - action
Lane departure
warning flashing,
accompanied
by an audible
signal. unintended wander to the left.
Turn the steering wheel in the other direction to return
to the correct trajectory.
unintended wander to the right.
Electronic
immobiliser on.
the ignition key introduced has
not been recognised
Staring is not possible. Change the key and have the faulty key checked by
a PEUGEOT dealer.
"Ready to set off - Access" section.
on for
10 seconds
when switching
on the ignition. triggering of the alarm.
Have the state of the locks checked by a PEUGEOT
dealer or a qualified workshop.
Water in Diesel
fuel filter on,
accompanied by
a message on
the screen. that there is water in the fuel
filter.
Have the filter bled by a PEUGEOT dealer or a qualified
workshop.
"Checks - Levels and checks" section.
Low fuel level on with the
needle in
zone E.
that the fuel reserved is being
used. Fill up with fuel without delay. The calculation of the
remaining fuel depends on the style of driving, the
profile of the road, the time elapsed and the distance
travelled since the warning lamp first came on.
flashing. a fault with the system. Contact a PEUGEOT dealer or a qualified workshop.
Diesel pre-
heating on. that the weather conditions
impose pre-heating. Wait for the warning lamp to switch off before operating
the starter.
Page 38 of 240

Gearbox and steering wheel
36
To change gear easily, always depress the
clutch pedal fully.
To prevent the mat from becoming caught
under the pedal:
- ensure that the mat is positioned correctly,
- never fit one mat on top of another.
Avoid leaving your hand on the gear knob as
the force exerted, even if slight, may wear
the internal components of the gearbox over
time.
MANUAL GEARBOX
Reverse gear
Raise the collar under the gear knob to
engage reverse gear. Never engage reverse gear before the
vehicle is completely stationary.
The lever should be moved slowly to reduce
the noise on engaging reverse gear.
Your reversing manoeuvre is indicated by an
audible exterior warning.
If your vehicle is fitted with parking
sensors, the system comes into
operation when reverse gear is engaged and
an audible signal is heard.
Refer to the "Technology on board -
Parking sensors" section.
GEAR SHIFT INDICATOR
This system allows fuel consumption to be
reduced by suggesting when to change up.
The gear engagement recommendations
should not be considered to be compulsory.
This because the configuration of the
road, the traffic density and safety remain
determining factors when choosing the
best gear. Therefore, the driver remains
responsible for deciding whether or not to
follow the advice given by the system.
The system never recommends engaging
first gear or reverse, or changing down.
Page 39 of 240

Gearbox and steering wheel
37
2
READY TO SET OFF
STEERING WHEEL ADJUSTMENT
With the vehicle stationary, first adjust your
seat to the most suitable position.
Unlock the steering wheel adjustment
mechanism by pulling the lever towards you.
Adjust the reach of the steering wheel, then
lock the mechanism by pushing the lever
fully forwards. Operation
The information appears in the
instrument panel screen in the
form of the SHIFT indicator,
accompanied by an upward
arrow to signal to the driver that they can
change up.
The system adapts its gear change
recommendations according to the driving
conditions (slope, load, ...) and demands
from the driver (for power, acceleration,
braking, ...).
Switching off
This system cannot be deactivated by
the driver.
As a safety measure, these operations
must not be carried out while driving.
Page 49 of 240

47
3
EASE OF USE and COMFORT
Steering mounted controls
WIPER CONTROL STALK Slow continuous wiping: 2 notches downwards. Do not cover the rain sensor, located at
the top centre of the windscreen.
Screenwash and headlamp wash
Pull the wiper control stalk towards you,
the screenwash is accompanied by a timed
operation of the wipers.
The headlamp wash is coupled with the
screenwash, it is triggered if the dipped
beam headlamps are on.
Windscreen wipers
Wiping is only active when the ignition key is
in the RUNNING position.
The control stalk has five different positions:
Wipers off.
Intermittent wiping: 1 notch downwards.
In this position, four frequencies can be
selected by turning the ring:
- very slow frequency
- slow frequency
- nominal frequency,
- fast frequency.
Automatic rain sensitive windscreen wipers
If your vehicle is fitted with this system, the
wiping speed is adapted automatically to the
intensity of the rainfall.
Automatic wiping: 1 notch downwards.
This is confirmed by one wipe. Must
be reactivated each time the ignition is
switched on.
In this position, the sensitivity of the rain
sensor can be increased by turning the ring.
Good practice
Check that the windscreen wiper blades can
operate freely when using the wipers in icy
weather.
Use the step in the front bumper, to remove
any accumulation of snow at the base of the
windscreen and on the blades. You can change the wiper blades.
Refer to the "Quick help - Worn wiper
blade" section.
You can check the fluid level.
Refer to the " Checks - Levels and
checks" section.
Fast continuous wiping: 3 notches
downwards.
Single wipe: pull the control stalk towards
the steering wheel.
With Stop & Start, when the wiper
control stalk is in the fast wipe position,
the STOP mode is not available.
When washing the vehicle, switch off the
ignition or deactivate the automatic rain
sensitive wipers.
Page 77 of 240

Practical information
75
3
EASE OF USE and COMFORT
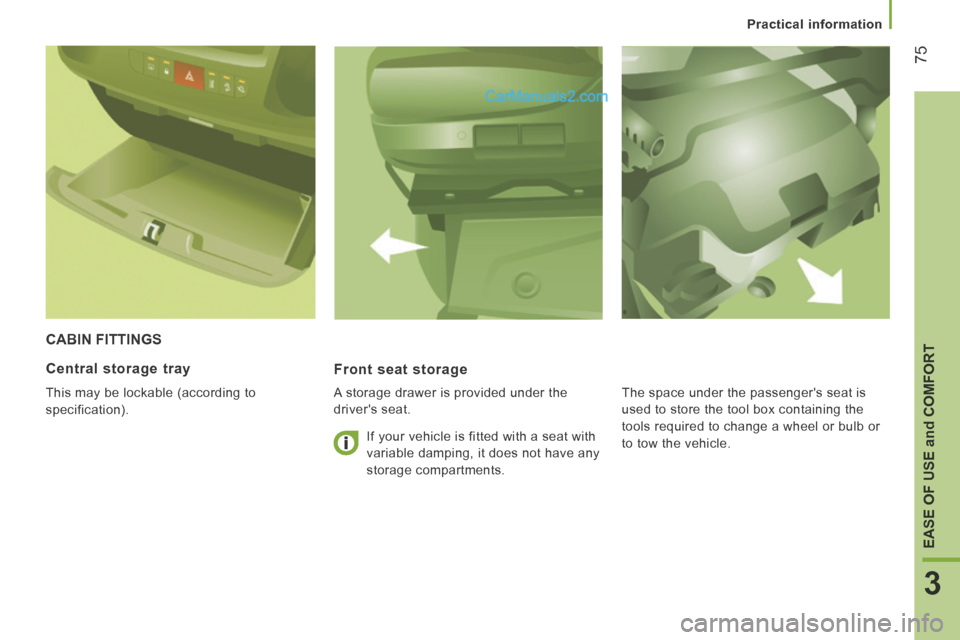
CABIN FITTINGS
Front seat storage
A storage drawer is provided under the
driver's seat.
Central storage tray
This may be lockable (according to
specification). If your vehicle is fitted with a seat with
variable damping, it does not have any
storage compartments. The space under the passenger's seat is
used to store the tool box containing the
tools required to change a wheel or bulb or
to tow the vehicle.
Page 96 of 240

Loading assistance
94
Deactivation
Make a long press on both controls
simultaneously to deactivate the system.
The LEDs remain on. Return to the nominal floor height
Press the same number of times in reverse
as the level of the position displayed.
Reactivation
A second long press on both controls
simultaneously reactivates the system.
The LEDs go off.
Automatic correction of loading floor height
Above 12 mph (20 km/h), the system
automatically returns the rear height to its
nominal value.
Operating fault
If a fault occurs with the system,
this warning lamp comes on.
Good practice
Driving with the suspension set too high or
too low risks damaging components under
the body.
The height may be adjusted automatically to
take account of changes of temperature or
loading.
You must avoid using this control in the
following circumstances:
- when working underneath the vehicle,
- when changing a wheel,
- when the vehicle is being transported by lorry, train, ferry, boat, ...
Above 3 mph (5 km/h), the system
reactivates automatically. Have the system checked by a
PEUGEOT dealer or a qualified workshop.