2014 Peugeot 508 RXH clock
[x] Cancel search: clockPage 118 of 338

116
508RXH_en_Chap03_confort_ed01-2014
F Select:
- i mmediate to start the heating or
ventilation (once confirmed "OK"),
-
t
he first clock to programme/store your
departure time,
-
t
he second clock to programme/store
a
second departure time.
the immediate or programmed
activation of Ventilation mode depends
on the temperatures inside and outside
the vehicle.
Depending on the departure time chosen, the
system calculates automatically the optimum
time to start operating.
us
ing these two clocks and according
to season you can, for example, select
one or the other departure time.
A message in the instrument panel
screen confirms your choice. Only one programmed or immediate
preheating/preventilation can be
activated between two starts of the
vehicle.
the
heating and the ventilation in
immediate or programmable mode is
not activated when:
-
t
he fuel level is too low,
-
t
he battery is not sufficiently
charged.
to p
rogramme the heating and the
ventilation, it is necessary to first
deactivate the alarm volumetric and tilt
monitoring (see the "Alarm" section). Always switch off the programmable
heating while refuelling to avoid any risk
of fire or explosion.
to a
void the risk of intoxication and
asphyxiation, the programmable
heating must not be used, even for
short periods, in an enclosed area such
as a garage or workshop not equipped
with exhaust gas extraction.
Do not park the vehicle on an
inflammable sur face (dry grass, dead
leaves, paper…), there is a risk of fire.
Comfort
Page 325 of 338

323
508RXH_en_Chap13_index-alpha_ed01-2014
Screen, instrument panel ..........................40, 57
Screen menu ....................... 250, 252, 254, 266,
268, 270, 286, 298, 300
Screenwash fluid level
..........................153, 232
Screenwash, front
......................................... 153
Screen-wash reservoir
.................................232
Seat adjustment
...............................
...............87
Seat belts
............................................... 18
0 -182
Seats, rear
....................................................... 91
Selector lever, electronic gearbox
................124
Serial number, vehicle
.................................. 24
0
Service indicator
............................................. 54
Service warning lamp
..................................... 47
ta
ble of weights
............................................23
8
tab
les of engines
..................................236-237
ta
bles of fuses ..............................................205
te
chnical data
.......................................236-239
Removing the mat
...........................................
97
Repair kit, puncture
.......................................
187
Replacing bulbs
...................................
19 9 - 20 4
Replacing fuses
..............................
..............
205
Replacing the air filter
...................................
233
Replacing the oil filter
................................... 23
3
Replacing the passenger compartment filter
......................................
233
Replacing wiper blades .........................15 5 , 217
Reset history
...............................
..............
32, 58
Resetting the service indicator
.......................
55
Reversing camera
.........................................
141
Reversing lamp
............................................. 2
02
Risk areas (update) .......................................
275
Roof bars
....................................................... 2
22
Roof blind
........................................................
83
Routine checks
.....................................
233-235
Running out of fuel (Diesel)
..........................
2
28
te
lephone
.....................................................
302
tem
perature control for heated seats
............
89
te
mperature, coolant
......................................
52
te
mporary puncture repair kit
......................
187
th
ird brake lamp
...........................................
204
thr
ee flashes (direction indicators)
..............
172
tM
C (
tr
affic info)
..........................................
28
0
to
o l s
..............................................................
193
to
uch screen
........................................... 61, 24 5
to
w b a r
...........................................................
220
to
wed loads
..................................................
238
to
wing another vehicle
...................
3
8, 218, 219
tra
ction control (ASR)
......................
45, 49, 177
tr
affic information (
tA
)
.................................
281
tr
affic information (
tM
C)
......................
28
0, 281
t
r a i l e r
............................................................
220
tr
ajectory control systems ............................
17 7
tr
ip computer
............................................
57- 6 0
ty
re pressures
..............................................
240
ty
r e s
........................................................
30, 240
ty
re under-inflation detection
...............
175 , 19 6
S
T
Servicing ............................... ..........................30
Setting the clock ............................................. 64
Sidelamps
.............142, 145, 146, 199, 201, 202
Side repeater
..............................
..................201
Ski flap
..............................
..............................98
Snow chains
.......................................... 19
8, 240
Spare wheel
...............................
...........193, 19 6
Speed limiter
......................................... 13 4, 13 5
Speedometer
............................................ 22, 39
Spotlamps, side
.................................... 149, 201
Starting using another battery
...................... 2
10
Starting the engine
...............15, 18, 19, 25, 124
Steering mounted controls, audio
................249
Stop Start
.......107, 110, 114, 209, 227-230, 233
Storage
................................................ 96, 97, 99
Storage wells
.................................................. 99
Storing a speed
............................................. 13 4
Storing driving positions
.................................88
Stowing rings
.................................................. 99
Switching off the engine
............. 1
5, 18, 19, 124
Switch off
..............................
..........................15
Synchronising the remote control
.............72, 73
Synthesiser, voice
......................................... 28
5
System settings
....................................... 40, 294
un
der-inflation (detection)
............................17
5
unl
ocking
..............................
.......65, 66 , 71, 72
un
locking the boot ..........................................68
up
date risk areas
..........................................2
75
up
dating the date
............................................64
upd
ating the time
............................................64
uS
B (Peuge
O
t Connect)
.................... 9
8, 260
U
.
Alphabetical index
Page 335 of 338

Practical information
4
508-add_en_Chap08_info-pratiques_ed01-2016
Fitting the towball
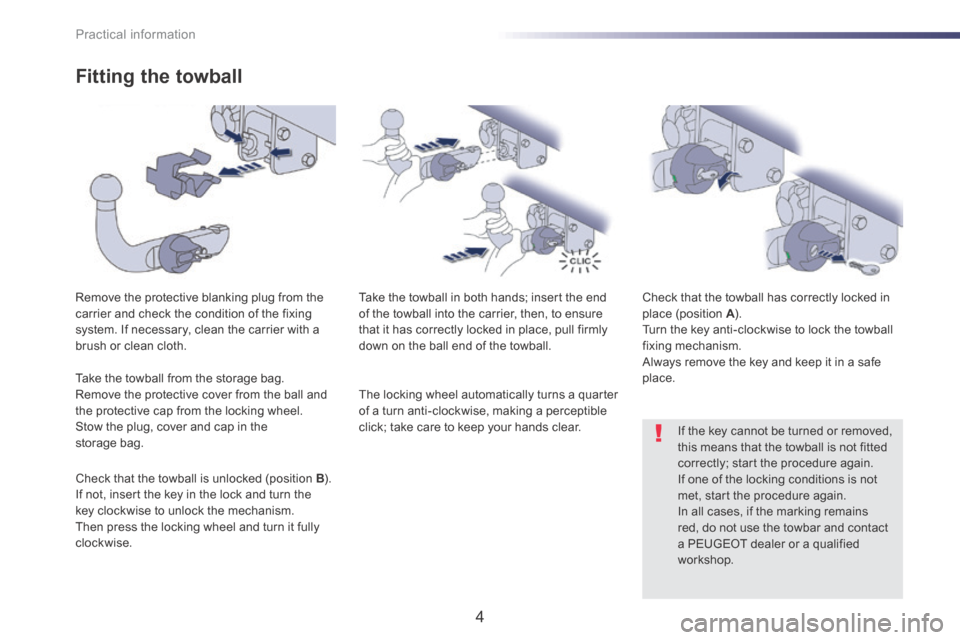
Remove the protective blanking plug from the carrier and check the condition of the fixing system. If necessary, clean the carrier with a brush or clean cloth.
Take the towball in both hands; insert the end of the towball into the carrier, then, to ensure that it has correctly locked in place, pull firmly down on the ball end of the towball.
Check that the towball has correctly locked in place (position A ). A ). A Turn the key anti-clockwise to lock the towball fixing mechanism. Always remove the key and keep it in a safe place.
If the key cannot be turned or removed, this means that the towball is not fitted correctly; start the procedure again. If one of the locking conditions is not met, start the procedure again. In all cases, if the marking remains red, do not use the towbar and contact
a PEUGEOT dealer or a qualified workshop.
Take the towball from the storage bag. Remove the protective cover from the ball and the protective cap from the locking wheel. Stow the plug, cover and cap in the storage bag.
Check that the towball is unlocked (position B ). If not, insert the key in the lock and turn the key clockwise to unlock the mechanism. Then press the locking wheel and turn it fully clockwise.
The locking wheel automatically turns a quarter of a turn anti-clockwise, making a perceptible click; take care to keep your hands clear.
Page 336 of 338

8
Practical information
5
508-add_en_Chap08_info-pratiques_ed01-2016
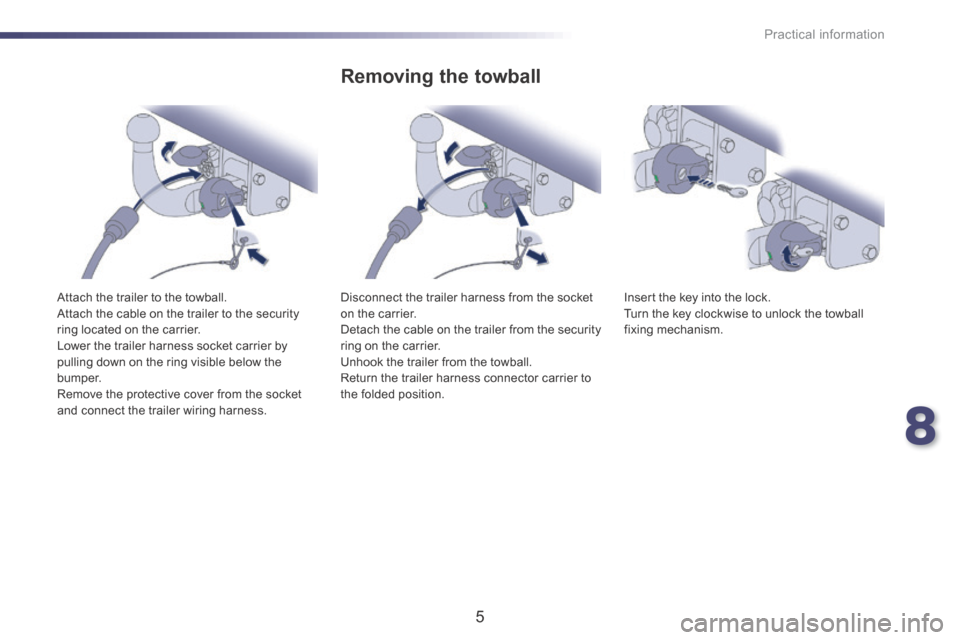
Attach the trailer to the towball. Attach the cable on the trailer to the security ring located on the carrier. Lower the trailer harness socket carrier by pulling down on the ring visible below the b u m p e r. Remove the protective cover from the socket and connect the trailer wiring harness.
Removing the towball
Disconnect the trailer harness from the socket on the carrier. Detach the cable on the trailer from the security ring on the carrier. Unhook the trailer from the towball. Return the trailer harness connector carrier to the folded position.
Insert the key into the lock. Turn the key clockwise to unlock the towball fixing mechanism.
Page 337 of 338

Practical information
6
508-add_en_Chap08_info-pratiques_ed01-2016
Maintenance
Correct operation is only possible if the towball and its carrier remain clean. Before cleaning the vehicle with a high pressure jet wash, the towbar harness socket carrier must be folded away, the towball removed and the protective blanking plug inserted in the carrier.
For any work on the towbar, go to a PEUGEOT
dealer or a qualified workshop.
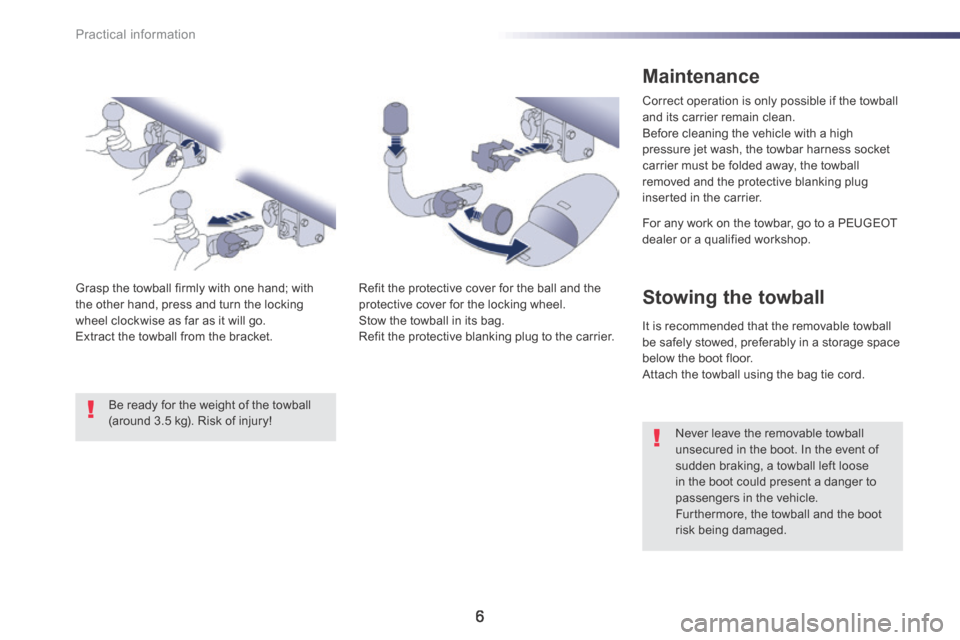
Refit the protective cover for the ball and the protective cover for the locking wheel. Stow the towball in its bag. Refit the protective blanking plug to the carrier.
Grasp the towball firmly with one hand; with the other hand, press and turn the locking wheel clockwise as far as it will go. Extract the towball from the bracket.
Be ready for the weight of the towball (around 3.5 kg). Risk of injury!
Stowing the towball
It is recommended that the removable towball be safely stowed, preferably in a storage space below the boot floor. Attach the towball using the bag tie cord.
Never leave the removable towball unsecured in the boot. In the event of sudden braking, a towball left loose in the boot could present a danger to passengers in the vehicle. Furthermore, the towball and the boot risk being damaged.