2014 Peugeot 508 Hybrid buttons
[x] Cancel search: buttonsPage 10 of 380

8
508_en_Chap00b_vue-ensemble_ed02-2014
9. Fusebox.
10. F ront door window demisting/defrosting
vent.
11.
W
indscreen demisting/defrosting vent.
12 .
S
teering lock and starting with the key.
13.
S
tarting using the electronic key.
14 .
A
udio equipment steering wheel controls.
15.
W
iper / screenwash / trip computer stalk.
16.
C
entral locking and hazard warning
buttons.
17.
t
ou
ch screen (depending on version).
Instruments and controls
1. Cruise control / speed limiter controls.
2. Headlamp height adjustment.
3.
L
ighting and direction indicator stalk
4.
I
nstrument panel.
5.
D
river's airbag.
Horn.
6.
g
ea
r lever.
7.
1
2 V accessory socket
u
S
B port / auxiliary socket.
8.
B
onnet release lever. 18. C
entral adjustable air vents.
19. P assenger's airbag.
20.
S
ide adjustable air vents.
21.
g
l
ove box / Passenger's airbag
deactivation.
22.
e
l
ectric parking brake.
23.
C
entral armrest with storage.
24.
Storage.
25.
A
udio system.
26.
H
eating / air conditioning controls.
Over view
Page 14 of 380

12
Monitoring
Instrument panel
1. Rev counter (x 1 000 tr/min or rpm), graduation according to engine (petrol or
Diesel).
2.
e
n
gine oil temperature gauge.
3.
F
uel gauge.
4.
e
ng
ine coolant temperature gauge.
5.
Spe
edometer (mph or km/h).
6.
C
ruise control or speed limiter settings.
7.
g
e
ar shift indicator for a manual gearbox
or gear lever position and gear for an
electronic or automatic gearbox. A. M
ain lighting dimmer.
B. D isplay of alert log.
R
ecall of information:
●
o
n servicing,
●
o
n driving range for the emissions
control additive (AdBlue
®).
C. R
eset the trip distance recorder.
8.
D
isplay zone: alert messages or state of
functions, trip computer.
9.
t
r
ip distance recorder (miles or km).
10.
Aut
omatic wipers
S
ervice indicator (
miles or km) then, t
otal distance recorder.
t
h
ese two functions are displayed
successively when switching on the
ignition.
Dials and screens Control buttons
Page 35 of 380

33
Information display
the information is accessible in the "Driving" menu.
Permanent display:
F
Sel
ect the " Driving" menu.
th
e trip computer information is displayed in
the primary page of the menu.
F
P
ress one of the buttons to display the
desired tab.
te
mporary display in a new window:
F
P
ress the end of the wiper control stalk for
access to the information and display the
different tabs.
th
e current instantaneous fuel
consumption tab with:
-
t
he range,
-
t
he current fuel consumption,
-
t
he Stop & Start time counter.
th
e trip "1" tab with:
-
t
he distance travelled.
-
t
he average fuel consumption,
-
t
he average speed,
f
or the first trip.
th
e trip "2" tab with:
-
t
he distance travelled.
-
t
he average fuel consumption,
-
t
he average speed,
f
or the second trip.
Trip reset
F When the desired trip is displayed, press the reset button or on the end of the wiper
control stalk.
t
r i p s "1" and "2" are independent but their use
is identical.
For example, trip "1" can be used for daily
figures, and trip "2" for monthly figures.
1
Monitoring
Page 37 of 380

35
touch screen
It gives access to:
- m enus for adjusting settings for vehicle
functions and systems,
-
a
udio and display configuration menus,
-
a
udio system and telephone controls and
the display of associated information.
And, depending on equipment, it allows:
-
t
he display of alert messages and the
visual parking sensors information,
-
a
ccess to the controls for the navigation
system and Internet services, and the
display of associated information.
For reasons of safety, the driver
should only carr y out operations
that require close attention, with the
vehicle stationary.
Some functions are not accessible
when driving.General operation
Recommendations
It is necessary to press firmly, particularly for
"flick" gestures (scrolling through lists, moving
the map...).
A light wipe is not enough.
th
e screen does not recognise pressing with
more than one finger.
th
is technology allows use at all temperatures
and when wearing gloves.
Do not use pointed objects on the touch
screen.
Do not touch the touch screen with wet hands.
us
es a soft clean cloth to clean the touch
screen.
State of indicator lamps
Some buttons contain an indicator lamp that
gives the state of the corresponding function.
gr
een indicator: you have switched on the
corresponding function.
Orange indicator: you have switched off the
corresponding function.
1
Monitoring
Page 38 of 380

36
use this button to go to the
secondary page.
us
e this button to return to the
primary page.
us
e this button for access to
additional information and to the
settings for certain functions.
us
e this button to confirm.
us
e this button to quit.
Principles
Press the virtual buttons in the touch screen.each menu is displayed over one or two pages
(primary page and secondary page).
Menus
Driving gi
ves access to the trip computer
and, depending on version, allows
settings to be adjusted for certain
functions.
See the corresponding section.
Internet.
these services are available as standard or as an
option.
See the "Audio equipment and telematics" section.
Telephone .
See the "Audio equipment and
telematics" section.
Radio Media .
See the "Audio equipment and
telematics" section. Navigation .
Depending on trim level, navigation
can be not available, an option or
standard.
See the "Audio equipment and
telematics" section.
Settings .
Allows configuration of the display
and the system.
After a few moments with no action on
the secondary page, the primary page
is displayed automatically.
Press this button for access to the
main menu or press one of the
buttons on the control panel for direct
access to a particular menu. 1.
V
olume / mute.
See the "Audio equipment and telematics" section.
Monitoring
Page 48 of 380

46
508_en_Chap02_ouvertures_ed02-2014
If one of the doors or the boot is still
open or if the key for Keyless en try and
Starting system has been left inside
the vehicle or if the ignition is on, the
central locking does not take place.
When the vehicle is locked, if it is
unlocked inadvertently, it will lock itself
again automatically after about thirty
seconds unless a door is opened.
If the alarm was previously activated,
it will not be reactivated automatically.
th
e folding and unfolding of the door
mirrors by the remote control can be
deactivated by a P
e
uge
Ot
dealer or a
qualified workshop. As a safety measure (children on
board), never leave the vehicle without
taking the key for the Keyless
e
n
try and
Starting system, even for a short period.
gu
ard against theft when the key for the
Keyless
e
n
try and Starting system is
in the recognition zone with the vehicle
unlocked.
In order to preserve the charge of the
cell battery in the remote control, the
"hands-free" functions go into extended
stand-by after 21 days of non-use.
t
o
r
estore these functions, press one of
the remote control buttons or start the
engine with the electronic key in the
reader.
Access
Page 51 of 380
49
508_en_Chap02_ouvertures_ed02-2014
emergency procedure
Emergency unlocking/
locking using the electronic
key
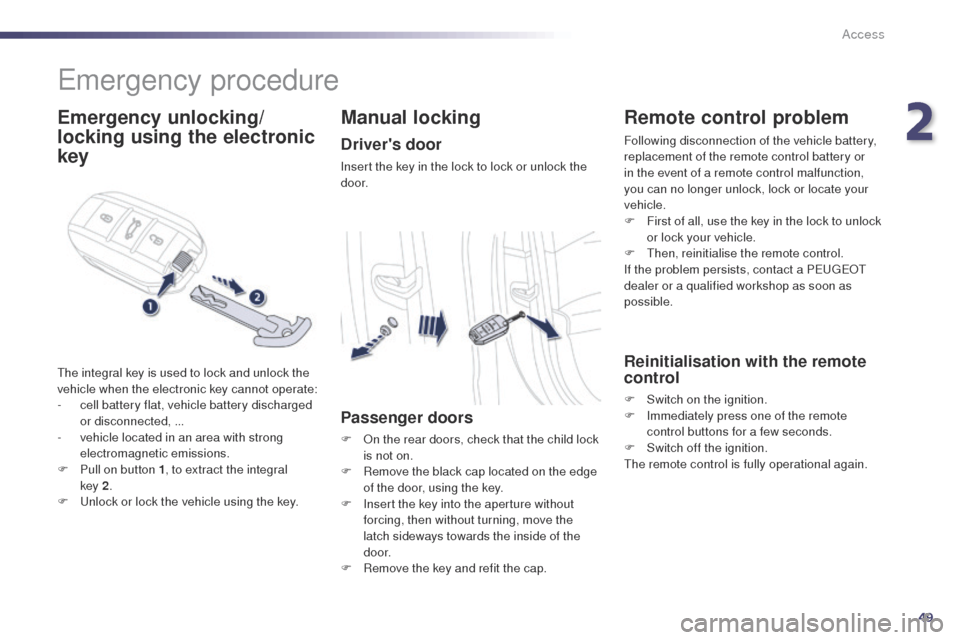
the integral key is used to lock and unlock the
vehicle when the electronic key cannot operate:
-
c
ell battery flat, vehicle battery discharged
or disconnected, ...
-
v
ehicle located in an area with strong
electromagnetic emissions.
F
P
ull on button 1 , to extract the integral
key
2.
F
u
n
lock or lock the vehicle using the key.
Manual locking
Driver's door
Insert the key in the lock to lock or unlock the
d o o r.
Passenger doors
F On the rear doors, check that the child lock is not on.
F
R
emove the black cap located on the edge
of the door, using the key.
F
I
nsert the key into the aperture without
forcing, then without turning, move the
latch sideways towards the inside of the
d o o r.
F
R
emove the key and refit the cap.
Remote control problem
Following disconnection of the vehicle battery,
replacement of the remote control battery or
in the event of a remote control malfunction,
you can no longer unlock, lock or locate your
vehicle.
F
F
irst of all, use the key in the lock to unlock
or lock your vehicle.
F
t
hen
, reinitialise the remote control.
If the problem persists, contact a P
e
uge
Ot
dealer or a qualified workshop as soon as
possible.
Reinitialisation with the remote
control
F Switch on the ignition.
F I mmediately press one of the remote
control buttons for a few seconds.
F
S
witch off the ignition.
th
e remote control is fully operational again.
2
Access
Page 52 of 380

50
508_en_Chap02_ouvertures_ed02-2014
Changing the battery of the key
Battery ref.: CR2032 / 3 volts.this replacement battery is available from a
P
e
uge
Ot
dealer or a qualified workshop.
A message appears in the instrument panel
screen when replacement of the battery is
needed.
F
u
n
clip the cover using a small screwdriver
at the cutout.
F
L
ift off the cover.
F
R
emove the flat battery from its location.
F
F
it the new battery into its location
observing the original direction of fitment.
F
C
lip the cover onto the casing.Do not throw the remote control
batteries away, they contain metals
which are harmful to the environment.
ta
ke them to an approved collection
point.
Reinitialisation with the
electronic key
F Switch of the ignition.
F I mmediately press one of the remote
control buttons for a few seconds.
F
S
witch on the ignition
th
e electronic key is fully operational again.
Changing the battery of the
electronic key
Battery ref.: CR2032 / 3 volts.this replacement battery is available from a
P
e
uge
Ot
dealer or a qualified workshop.
A message is displayed in the instrument panel
screen when replacement of the battery is
needed.
F
u
n
clip the cover using a pointed object at
the key ring.
F
S
lide the flat battery out of its location.
F
S
lide the new battery into its location
observing the original direction of fitment.
F
C
lip the cover in place starting at the front.
F
R
einitialise the electronic key.
Access