Page 113 of 404
5
Visibility111
Windscreen wash
Pull the wiper stalk towards you. The windscreen wash then the wipers operate for a set time. The headlamp wash is also activated if the dipped beam headlamps are on .
Screenwash/headlamp wash low level
In the case of vehicles fitted with headlamp washers, when the minimum level of the reservoir is reached, this warning lamp is displayed in the instrument panel, accompanied by an audible signal and a message. The warning lamp is displayed when the ignition is switched on, or every time the stalk is operated, until the reservoir is refilled. Next time you stop, refill the screenwash / headlamp wash reservoir.
Headlamp wash
Press the end of the lighting stalk to activate the headlamp wash, when the dipped beam headlamps are on.
To reduce the consumption of screenwash fluid, the headlamp washers only operate with the first operation of the screenwash.
Page 117 of 404

5
Visibility115
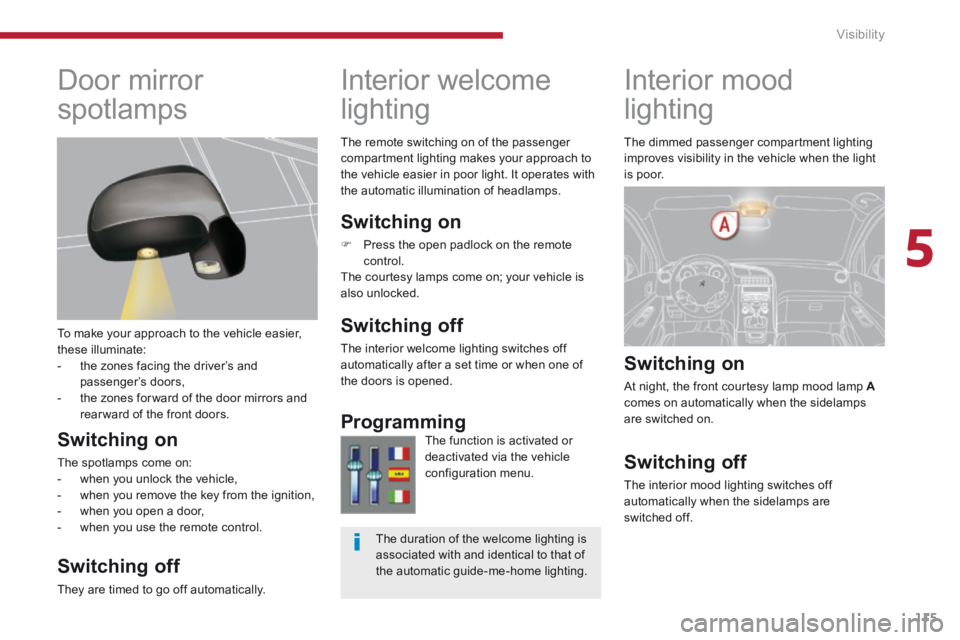
Interior mood
lighting
Switching on
At night, the front courtesy lamp mood lamp Acomes on automatically when the sidelamps are switched on.
Switching off
The interior mood lighting switches off automatically when the sidelamps are switched off.
Interior welcome
lighting
Switching on
Press the open padlock on the remote control. The courtesy lamps come on; your vehicle is also unlocked.
Switching off
The interior welcome lighting switches off automatically after a set time or when one of the doors is opened.
Programming
The function is activated or deactivated via the vehicle configuration menu.
Door mirror
spotlamps
To make your approach to the vehicle easier, these illuminate: - the zones facing the driver’s and passenger’s doors, - the zones for ward of the door mirrors and rear ward of the front doors.
Switching on
The spotlamps come on: - when you unlock the vehicle, - when you remove the key from the ignition, - when you open a door, - when you use the remote control.
Switching off
They are timed to go off automatically.
The dimmed passenger compartment lighting improves visibility in the vehicle when the light is poor.
The duration of the welcome lighting is associated with and identical to that of the automatic guide-me-home lighting.
The remote switching on of the passenger compartment lighting makes your approach to the vehicle easier in poor light. It operates with the automatic illumination of headlamps.
Page 208 of 404
Checks
206
Petrol engines
The various caps and covers allow access for checking the levels of the various fluids and for replacing certain components.
1. Power steering reservoir.
2. Screenwash and headlamp wash reservoir.
3. Coolant reservoir.
4. Brake fluid reservoir.
5. Battery/Fuses.
6. Fusebox.
7. Air filter.
8. Engine oil dipstick.
9. Engine oil filler cap.
Page 209 of 404
10
Checks207
Diesel engines
The various caps and covers allow access for checking the levels of the various fluids, for replacing certain components and for priming the fuel system.
1. Power steering reservoir.
2. Screenwash and headlamp wash reservoir.
3. Coolant reservoir.
4. Brake fluid reservoir.
5. Battery/Fuses.
6. Fusebox.
7. Air filter.
8. Engine oil dipstick.
9. Engine oil filler cap.
10. Priming pump * .
11. Bleed screw * .
* According to engine.
Page 212 of 404

Checks
210
Diesel additive level
(Diesel engine with particle
emission filter)
Used products
Topping up
This additive must be topped up by a PEUGEOT dealer or a qualified workshop
without delay.
A low additive level is indicated by illumination of the service warning lamp, accompanied by an audible warning and a message in the instrument panel screen.
Fluid specifi cation
For optimum cleaning and to avoid freezing, this fluid must not be topped up with or replaced with plain water.
In the case of vehicles fitted with headlamp washers, the low fluid level is indicated by an audible signal and a message in the instrument panel screen. Top up the reservoir when you next stop the vehicle.
Screenwash and headlamp
wash fluid
Avoid prolonged contact of used oil or fluids with the skin. Most of these fluids are harmful to health or indeed very corrosive.
Do not discard used oil or fluids into sewers or onto the ground. Take used oil to a PEUGEOT dealer or a qualified workshop (France) or to an authorised waste disposal site.
The cooling fan may star t after switching off the engine: take care with ar ticles and clothing that might become caught by the fan blades.
Fluid specifi cation
The coolant must conform to the manufacturer's recommendations.
Coolant level
The coolant level should be close to the "MA X" mark but should never exceed it. When the engine is warm, the temperature of the coolant is regulated by the fan.
In addition, as the cooling system is pressurised, wait at least one hour after switching off the engine before carrying out any work. To avoid any risk of scalding, unscrew the cap by two turns to allow the pressure to drop. When the pressure has dropped, remove the cap and top up the level.
Page 233 of 404

11
Practical information231
Changing a bulb
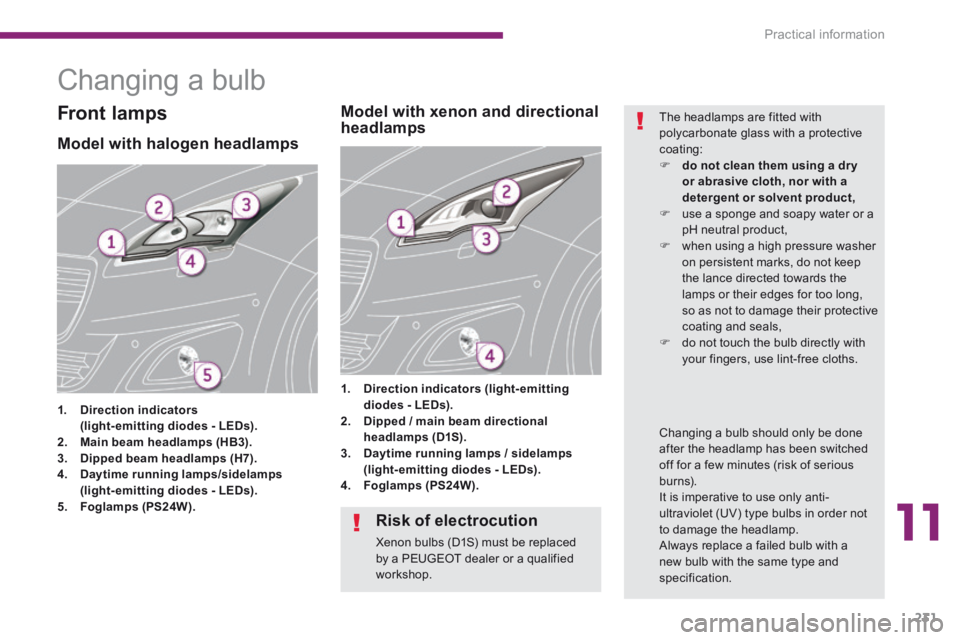
Model with halogen headlamps
1. Direction indicators (light-emitting diodes - LEDs).2. Main beam headlamps (HB3).3. Dipped beam headlamps (H7).4. Daytime running lamps/sidelamps (light-emitting diodes - LEDs).5. Foglamps (PS24W).
1. Direction indicators (light-emitting diodes - LEDs).2. Dipped / main beam directional headlamps (D1S).3. Daytime running lamps / sidelamps (light-emitting diodes - LEDs).4. Foglamps (PS24W).
Model with xenon and directional headlamps Front lamps The headlamps are fitted with polycarbonate glass with a protective coating: do not clean them using a dr y or abrasive cloth, nor with a detergent or solvent product, use a sponge and soapy water or a pH neutral product, when using a high pressure washer on persistent marks, do not keep the lance directed towards the lamps or their edges for too long, so as not to damage their protective coating and seals, do not touch the bulb directly with your fingers, use lint-free cloths.
Changing a bulb should only be done after the headlamp has been switched off for a few minutes (risk of serious burns). It is imperative to use only anti-ultraviolet (UV) type bulbs in order not to damage the headlamp.
Always replace a failed bulb with a new bulb with the same type and specification.
Risk of electrocution
Xenon bulbs (D1S) must be replaced by a PEUGEOT dealer or a qualified workshop.
Page 234 of 404
Practical information
232
Changing main beam headlamp bulbs (halogen model) Changing dipped beam headlamp bulbs (models with halogen headlamps)
Remove the protective plastic cover by pulling the tab. Disconnect the bulb connector. Extract the bulb by pulling and change it. To refit, carry out these operations in reverse o r d e r.
Remove the protective plastic cover by pulling the tab. Without disconnecting the connector, turn the body of the bulb a quarter of a turn to the left to disengage the assembly. Disconnect the connector to release the bulb. To refit, carry out these operations in reverse
o r d e r.
Changing direction indicators and daytime running lamps / sidelamps
For the replacement of these LED (light emitting diode) lamps, contact a PEUGEOT dealer or a qualified workshop.
Page 235 of 404
11
Practical information233
Changing foglamp bulbs
Contact a PEUGEOT dealer or a qualified workshop. Insert a screwdriver towards the centre of the repeater between the repeater and the base of the mirror. Tilt the screwdriver to extract the repeater and remove it. Disconnect the repeater connector.
Changing integrated direction indicator side repeaters Changing dipped beam and main beam headlamp bulbs (models with xenon headlamps)
D1S xenon bulbs must be changed by a PEUGEOT dealer or a qualified workshop as there is a risk of electrocution. It is recommended that all D1S bulbs are changed at the same time if one of them fails.
You can also contact a PEUGEOT dealer or a qualified workshop to have these lamps changed.
To refit, carry out these operations in reverse o r d e r. Contact a PEUGEOT dealer or a qualified workshop to obtain a new repeater.