2014 Peugeot 308 key
[x] Cancel search: keyPage 239 of 389
11
Practical information237
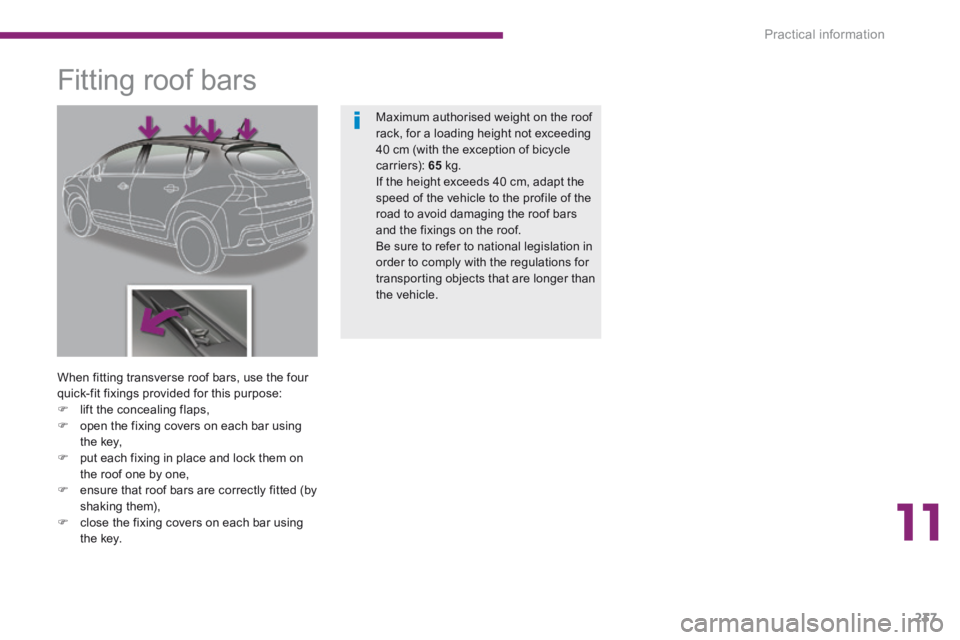
Fitting roof bars
When fitting transverse roof bars, use the four quick-fit fixings provided for this purpose: lift the concealing flaps, open the fixing covers on each bar using the key, put each fixing in place and lock them on the roof one by one, ensure that roof bars are correctly fitted (by shaking them), close the fixing covers on each bar using
the key.
Maximum authorised weight on the roof rack, for a loading height not exceeding 40 cm (with the exception of bicycle c a r r i e r s): 65 kg. If the height exceeds 40 cm, adapt the speed of the vehicle to the profile of the road to avoid damaging the roof bars and the fixings on the roof. Be sure to refer to national legislation in order to comply with the regulations for transporting objects that are longer than the vehicle.
Page 256 of 389
254
01 FIRST STEPS
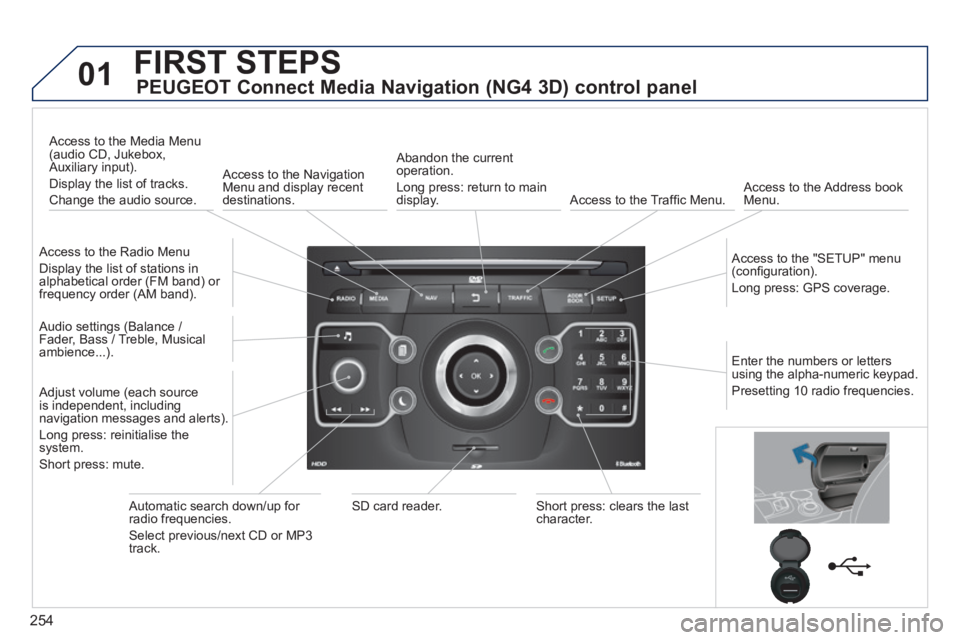
PEUGEOT Connect Media Navigation (NG4 3D) control panel
Access to the Radio Menu
Display the list of stations in alphabetical order (FM band) or frequency order (AM band).
Access to the Media Menu (audio CD, Jukebox, Auxiliary input).
Display the list of tracks.
Change the audio source.
Access to the Navigation Menu and display recent destinations.
Abandon the current operation.
Long press: return to main display. Access to the Traffi c Menu. Access to the Address book Menu.
Access to the "SETUP" menu (confi guration).
Long press: GPS coverage.
Audio settings (Balance / Fader, Bass / Treble, Musical ambience...).
Adjust volume (each source is independent, including navigation messages and alerts).
Long press: reinitialise the system.
Short press: mute.
Automatic search down/up for radio frequencies.
Select previous/next CD or MP3 track.
SD card reader. Short press: clears the last character.
Enter the numbers or letters using the alpha-numeric keypad.
Presetting 10 radio frequencies.
Page 257 of 389
255
01 FIRST STEPS
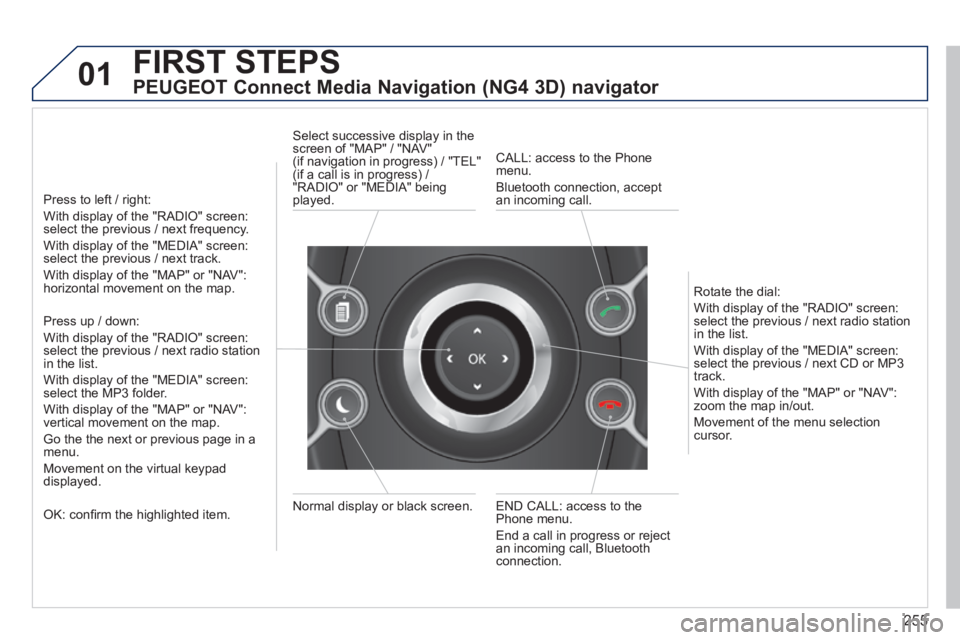
PEUGEOT Connect Media Navigation (NG4 3D) navigator
Press to left / right:
With display of the "RADIO" screen: select the previous / next frequency.
With display of the "MEDIA" screen: select the previous / next track.
With display of the "MAP" or "NAV": horizontal movement on the map.
Press up / down:
With display of the "RADIO" screen: select the previous / next radio station in the list.
With display of the "MEDIA" screen: select the MP3 folder.
With display of the "MAP" or "NAV": vertical movement on the map.
Go the the next or previous page in a menu.
Movement on the virtual keypad displayed.
OK: confi rm the highlighted item. END CALL: access to the Phone menu.
End a call in progress or reject an incoming call, Bluetooth connection.
Normal display or black screen.
Select successive display in the screen of "MAP" / "NAV" (if navigation in progress) / "TEL" (if a call is in progress) / "RADIO" or "MEDIA" being played.
CALL: access to the Phone menu.
Bluetooth connection, accept an incoming call.
Rotate the dial:
With display of the "RADIO" screen: select the previous / next radio station in the list.
With display of the "MEDIA" screen: select the previous / next CD or MP3 track.
With display of the "MAP" or "NAV": zoom the map in/out.
Movement of the menu selection cursor.
Page 266 of 389
264
04
NAV2AB C3DEF5JKL4GHI6MNO8TUV7PQR S9WXYZ0*#
1RADIO MEDIA NA
V TRAFFIC
SETUPADDR
BOOK
2ABC3DEF5JKL4GHI6MNO8TUV7PQR S9WXYZ0*#
1RADIO MEDIA NA
V TRAFFIC
SETUPADDR
BOOK
2ABC3DEF5JKL4GHI6MNO8TUV7PQR S9WXYZ0*#
1RADIO MEDIA NA
V TRAFFIC
SETUPADDR
BOOK
2ABC3DEF5JKL4GHI6MNO8TUV7PQR S9WXYZ0*#
1RADIO MEDIA NA
V TRAFFIC
SETUPADDR
BOOK
2ABC3DEF5JKL4GHI6MNO8TUV7PQR S9WXYZ0*#
1RADIO MEDIA NA
V TRAFFIC
SETUPADDR
BOOK
2ABC3DEF5JKL4GHI6MNO8TUV7PQR S9WXYZ0*#
1RADIO MEDIA NA
V TRAFFIC
SETUPADDR
BOOK
NAVIGATION - GUIDANCE
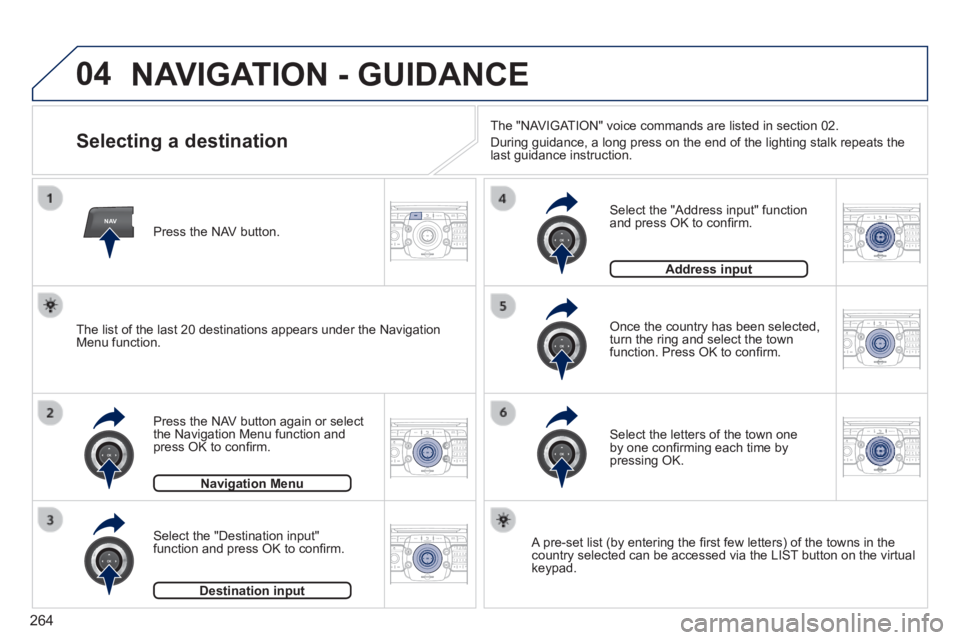
Selecting a destination
Press the NAV button again or select the Navigation Menu function and press OK to confi rm.
Select the "Destination input" function and press OK to confi rm.
Press the NAV button.
Select the letters of the town one by one confi rming each time by pressing OK.
Once the country has been selected, turn the ring and select the town function. Press OK to confi rm.
Navigation MenuNavigation Menu
Destination inputDestination input
A pre-set list (by entering the fi rst few letters) of the towns in the country selected can be accessed via the LIST button on the virtual keypad.
Select the "Address input" function and press OK to confi rm.
Address inputAddress input
The list of the last 20 destinations appears under the Navigation Menu function.
The "NAVIGATION" voice commands are listed in section 02.
During guidance, a long press on the end of the lighting stalk repeats t\
he last guidance instruction.
Page 267 of 389
265
04
2ABC3DEF5JKL4GHI6MNO8TUV7PQR S9WXYZ0*#
1RADIO MEDIA NA
V TRAFFIC
SETUPADDR
BOOK
2ABC3DEF5JKL4GHI6MNO8TUV7PQR S9WXYZ0*#
1RADIO MEDIA NA
V TRAFFIC
SETUPADDR
BOOK
2ABC3DEF5JKL4GHI6MNO8TUV7PQR S9WXYZ0*#
1RADIO MEDIA NA
V TRAFFIC
SETUPADDR
BOOK
2ABC3DEF5JKL4GHI6MNO8TUV7PQR S9WXYZ0*#
1RADIO MEDIA NA
V TRAFFIC
SETUPADDR
BOOK
2ABC3DEF5JKL4GHI6MNO8TUV7PQR S9WXYZ0*#
1RADIO MEDIA NA
V TRAFFIC
SETUPADDR
BOOK
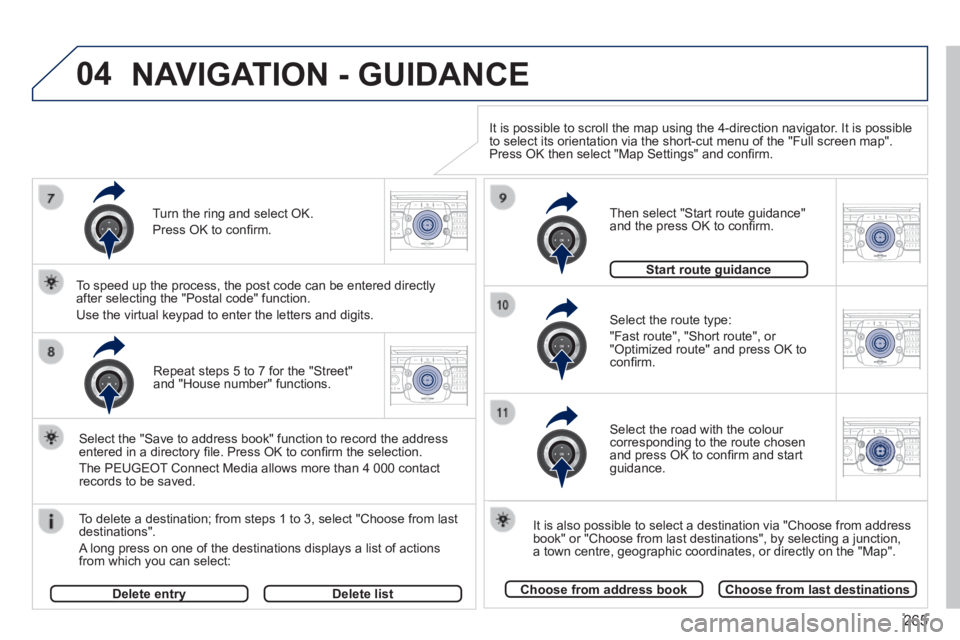
Repeat steps 5 to 7 for the "Street" and "House number" functions.
To delete a destination; from steps 1 to 3, select "Choose from last destinations".
A long press on one of the destinations displays a list of actions from which you can select:
Select the "Save to address book" function to record the address entered in a directory fi le. Press OK to confi rm the selection.
The PEUGEOT Connect Media allows more than 4 000 contact records to be saved.
To speed up the process, the post code can be entered directly after selecting the "Postal code" function.
Use the virtual keypad to enter the letters and digits. Select the route type:
"Fast route", "Short route", or "Optimized route" and press OK to confi rm.
Then select "Start route guidance" and the press OK to confi rm.
It is also possible to select a destination via "Choose from address book" or "Choose from last destinations", by selecting a junction, a town centre, geographic coordinates, or directly on the "Map".
Choose from address bookChoose from last destinations
Start route guidanceStart route guidance
It is possible to scroll the map using the 4-direction navigator. It is possible to select its orientation via the short-cut menu of the "Full screen map\
". Press OK then select "Map Settings" and confi rm.
Select the road with the colour corresponding to the route chosen and press OK to confi rm and start guidance.
Turn the ring and select OK.
Press OK to confi rm.
Delete entryDelete entryDelete list
NAVIGATION - GUIDANCE
Page 271 of 389
269
04
NAV2AB C3DEF5JKL4GHI6MNO8TUV7PQR S9WXYZ0*#
1RADIO MEDIA NA
V TRAFFIC
SETUPADDR
BOOK
2ABC3DEF5JKL4GHI6MNO8TUV7PQR S9WXYZ0*#
1RADIO MEDIA NA
V TRAFFIC
SETUPADDR
BOOK
2ABC3DEF5JKL4GHI6MNO8TUV7PQR S9WXYZ0*#
1RADIO MEDIA NA
V TRAFFIC
SETUPADDR
BOOK
2ABC3DEF5JKL4GHI6MNO8TUV7PQR S9WXYZ0*#
1RADIO MEDIA NA
V TRAFFIC
SETUPADDR
BOOK
2ABC3DEF5JKL4GHI6MNO8TUV7PQR S9WXYZ0*#
1RADIO MEDIA NA
V TRAFFIC
SETUPADDR
BOOK
2ABC3DEF5JKL4GHI6MNO8TUV7PQR S9WXYZ0*#
1RADIO MEDIA NA
V TRAFFIC
SETUPADDR
BOOK
2ABC3DEF5JKL4GHI6MNO8TUV7PQR S9WXYZ0*#
1RADIO MEDIA NA
V TRAFFIC
SETUPADDR
BOOK
2ABC3DEF5JKL4GHI6MNO8TUV7PQR S9WXYZ0*#
1RADIO MEDIA NA
V TRAFFIC
SETUPADDR
BOOK
NAVIGATION - GUIDANCE
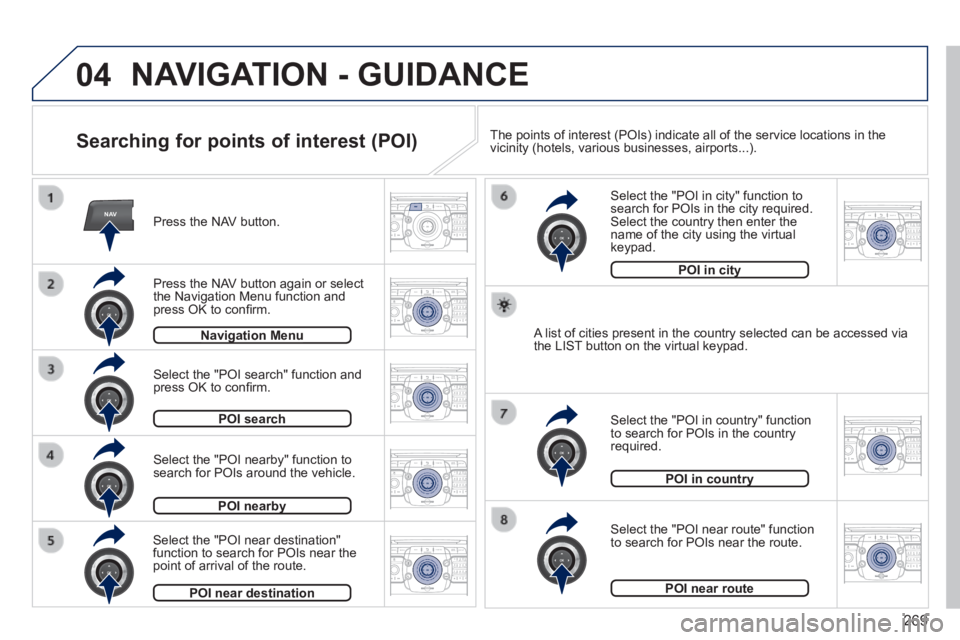
Searching for points of interest (POI)
Press the NAV button.
Press the NAV button again or select the Navigation Menu function and press OK to confi rm.
Select the "POI nearby" function to search for POIs around the vehicle.
Select the "POI search" function and press OK to confi rm.
Navigation MenuNavigation Menu
POI search
POI nearbyPOI nearby
Select the "POI in city" function to search for POIs in the city required. Select the country then enter the name of the city using the virtual keypad.
Select the "POI near route" function to search for POIs near the route.
Select the "POI in country" function to search for POIs in the country required.
Select the "POI near destination" function to search for POIs near the point of arrival of the route.
POI near destination
POI in countryPOI in country
POI near route
A list of cities present in the country selected can be accessed via the LIST button on the virtual keypad.
POI in cityPOI in city
The points of interest (POIs) indicate all of the service locations in\
the vicinity (hotels, various businesses, airports...).
Page 277 of 389

275
06
RADIO
2ABC3DEF5JKL4GHI6MNO8TUV7PQR S9WXYZ0*#
1RADIO MEDIA NA
V TRAFFIC
SETUPADDR
BOOK
2ABC3DEF5JKL4GHI6MNO8TUV7PQR S9WXYZ0*#
1RADIO MEDIA NA
V TRAFFIC
SETUPADDR
BOOK
2ABC3DEF5JKL4GHI6MNO8TUV7PQR S9WXYZ0*#
1RADIO MEDIA NA
V TRAFFIC
SETUPADDR
BOOK2ABC3DEF5JKL4GHI6MNO8TUV7PQR S9WXYZ0*#
1RADIO MEDIA NA
V TRAFFIC
SETUPADDR
BOOK
RADIO NA
V TRAFFICMEDIA
RADIO NA
V TRAFFICMEDIA
Selecting a station
When the current radio station is displayed on the screen, press OK.
The radio source short-cuts menu appears and provides access to the following short-cuts:
Select the function required and press OK to confi rm to gain access to the corresponding settings.
TA
RDS, if displayed, allows you to continue listening to the same station by automatic retuning to alternative frequencies. However, in certain conditions, coverage of an RDS station may not be assured throughout the country as radio stations do not cover 100 % of the territory. This explains the loss of reception of the station during a journey.
The external environment (hill, building, tunnel, underground car park.\
..) may interfere with the reception, including in RDS following mode. This phenomenon is a normal result of the way in which radio waves are transmitted and d\
oes not in any way indicate a failure of the audio equipment.
RDS - Regional mode
Press the RADIO button to display the list of stations received locally sorted in alphabetical order.
Press one of the buttons on the numeric keypad for more than 2 seconds to store the current station. A bleep confi rms that it has been stored.
Press the button on the numeric keypad to recall the stored radio station.
RDS
Radiotext
Regional prog.Regional prog.
RADIO
When the "RADIO" screen is displayed, turn the ring or use the 4-direction navigator to select the previous or next station on the list.
While listening to the radio, press buttons and for the automatic search for a lower or higher frequency.
Select the station required by turning the ring and press to confi rm.
AM
Page 286 of 389
284
08
2ABC3DEF5JKL4GHI6MNO8TUV7PQRS9WXYZ0*#
1
2ABC3DEF5JKL4GHI6MNO8TUV7PQR S9WXYZ0*#
1RADIO MEDIA NA
V TRAFFIC
SETUPADDR
BOOK
2ABC3DEF5JKL4GHI6MNO8TUV7PQR S9WXYZ0*#
1NAV TRAFFICADDR
BOOKSETUP2ABC3DEF5JKL4GHI6MNO8TUV7PQRS9WXYZ0*#
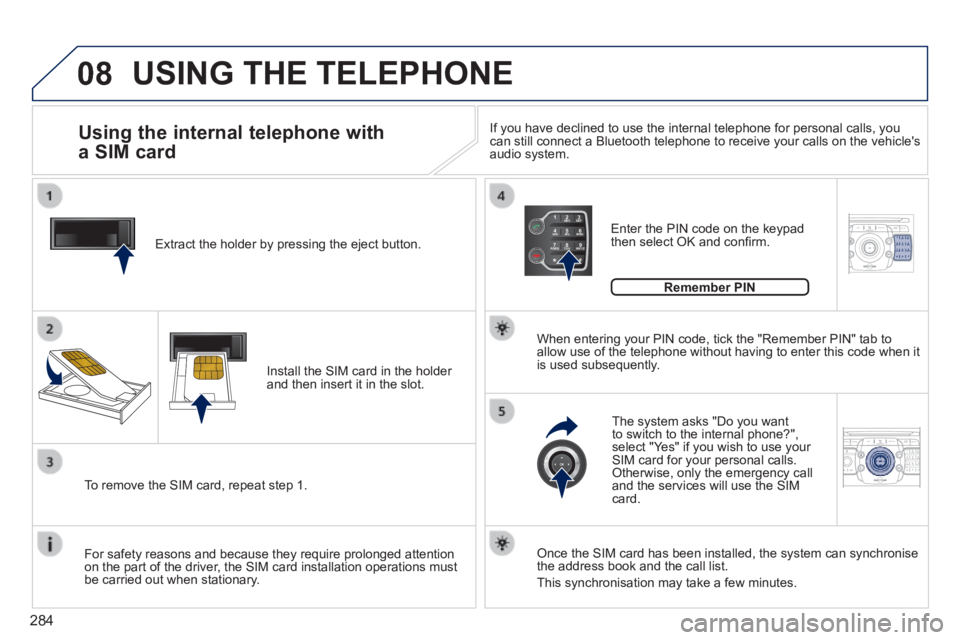
1 Extract the holder by pressing the eject button.
Install the SIM card in the holder and then insert it in the slot.
To remove the SIM card, repeat step 1.
For safety reasons and because they require prolonged attention on the part of the driver, the SIM card installation operations must be carried out when stationary.
Enter the PIN code on the keypad then select OK and confi rm.
The system asks "Do you want to switch to the internal phone?", select "Yes" if you wish to use your SIM card for your personal calls. Otherwise, only the emergency call and the services will use the SIM card.
Remember PIN
When entering your PIN code, tick the "Remember PIN" tab to allow use of the telephone without having to enter this code when it is used subsequently.
Using the internal telephone with
a SIM card
USING THE TELEPHONE
Once the SIM card has been installed, the system can synchronise the address book and the call list.
This synchronisation may take a few minutes.
If you have declined to use the internal telephone for personal calls, y\
ou can still connect a Bluetooth telephone to receive your calls on the veh\
icle's audio system.