Page 222 of 400
220
Safety
308_EN_CHAP06_SECURITE_ED02-2013
Child lock
This mechanical system prevents opening of the rear door using its interior control. The control is located on the edge of each rear door and locking is independent for each door.
Locking
Using the integral ignition key, turn the control as far as it will go: - to the left on the left-hand rear door, - to the right on the right-hand rear door.
Unlocking
Using the integral ignition key, turn the control as far as it will go: - to the right on the left-hand rear door, - to the left on the right-hand rear door.
Page 225 of 400
223
7
Practical information
308_EN_CHAP07_INFO PR ATIQUES_ED02-2013
Repair procedure
1. Sealing
Uncoil the white pipe G fully. Unscrew the cap from the white pipe. Connect the white pipe to the valve of the tyre to be repaired.
Connect the compressor's electric plug to the vehicle's 12 V socket. Start the vehicle and leave the engine running.
Take care, this product is harmful (e.g. ethylene-glycol, colophony...) if swallowed and causes irritation to the eyes. Keep this product out of the reach of children.
Avoid removing any foreign bodies which have penetrated into the tyre.
Do not start the compressor before connecting the white pipe to the tyre valve: the sealant product would be expelled through the pipe.
Switch off the ignition.
Turn the selector A to the "sealant" position. Check that the switch B is in position "O" .
Page 232 of 400
230
Practical information
308_EN_CHAP07_INFO PR ATIQUES_ED02-2013
Removing a wheel
Parking the vehicle
Immobilise the vehicle where it does not block traffic: the ground must be level, stable and not slippery. Apply the parking brake unless it has been programmed to automatic mode, switch off the ignition and engage first gear to block the wheels. Check that the braking warning lamp and the P warning lamp in the parking brake control lever come on. The occupants must get out of the vehicle and wait where they are safe. Never go underneath a vehicle raised using a jack; use an axle stand.
List of operations
Remove the bolt cover from each of the bolts using the tool 3 (according to equipment). Fit the security socket 4 on the wheelbrace 1 to slacken the security bolt (if fitted). Slacken the other bolts using the wheelbrace 1 o n l y.
Page 247 of 400

245
7
Practical information
308_EN_CHAP07_INFO PR ATIQUES_ED02-2013
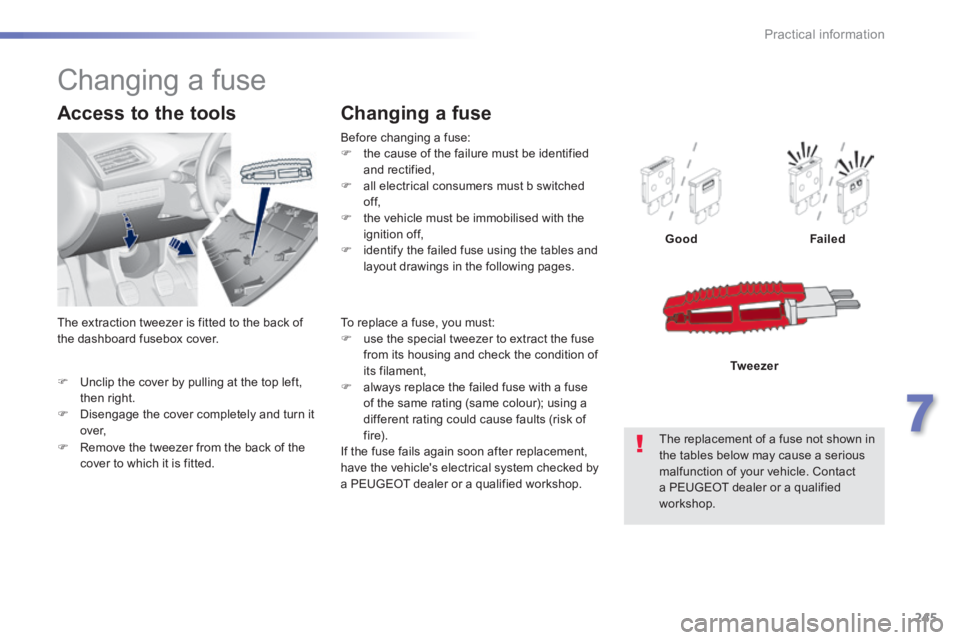
Unclip the cover by pulling at the top left, then right. Disengage the cover completely and turn it over,
Access to the tools
Before changing a fuse: the cause of the failure must be identified and rectified, all electrical consumers must b switched of f, the vehicle must be immobilised with the ignition off, identify the failed fuse using the tables and layout drawings in the following pages.
Changing a fuse
GoodFailed
The replacement of a fuse not shown in the tables below may cause a serious malfunction of your vehicle. Contact a PEUGEOT dealer or a qualified workshop.
Tw e e z e r
Changing a fuse
To replace a fuse, you must: use the special tweezer to extract the fuse from its housing and check the condition of its filament, always replace the failed fuse with a fuse of the same rating (same colour); using a different rating could cause faults (risk of f i r e). If the fuse fails again soon after replacement, have the vehicle's electrical system checked by a PEUGEOT dealer or a qualified workshop.
Remove the tweezer from the back of the cover to which it is fitted.
The extraction tweezer is fitted to the back of the dashboard fusebox cover.
Page 253 of 400

251
7
Practical information
308_EN_CHAP07_INFO PR ATIQUES_ED02-2013
12 V battery
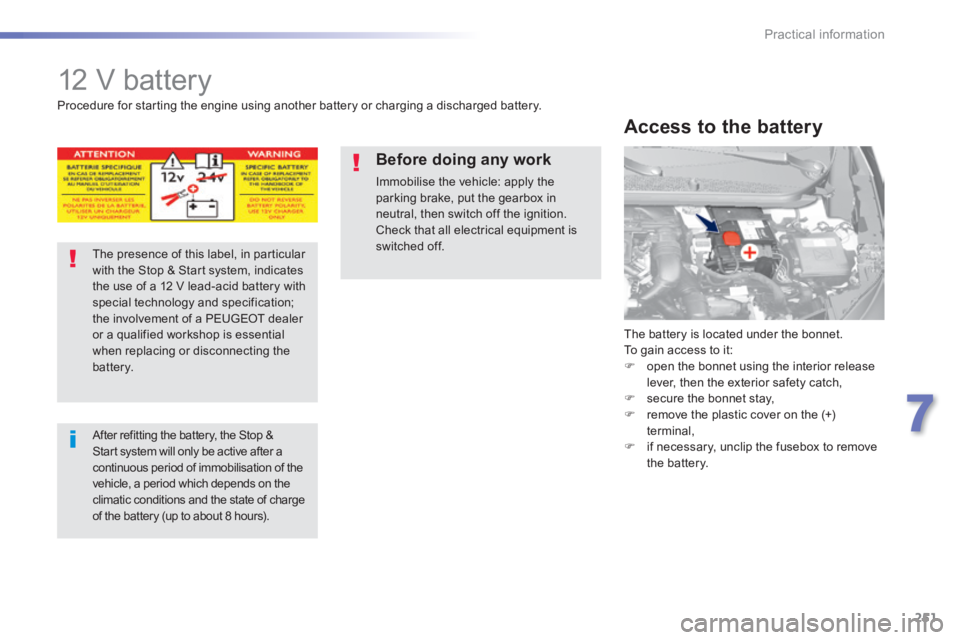
The battery is located under the bonnet. To gain access to it: open the bonnet using the interior release lever, then the exterior safety catch, secure the bonnet stay, remove the plastic cover on the (+) terminal, if necessary, unclip the fusebox to remove the battery.
Access to the battery
Procedure for starting the engine using another battery or charging a discharged battery.
The presence of this label, in particular with the Stop & Start system, indicates the use of a 12 V lead-acid battery with special technology and specification; the involvement of a PEUGEOT dealer or a qualified workshop is essential when replacing or disconnecting the battery.
After refitting the battery, the Stop & Start system will only be active after a continuous period of immobilisation of the vehicle, a period which depends on the climatic conditions and the state of charge of the battery (up to about 8 hours).
Before doing any work
Immobilise the vehicle: apply the parking brake, put the gearbox in neutral, then switch off the ignition.
Check that all electrical equipment is switched off.
Page 255 of 400

253
7
Practical information
308_EN_CHAP07_INFO PR ATIQUES_ED02-2013
Starting using another
battery
First check that the slave battery has a nominal voltage of 12 V and a capacity at least equal to that of the discharged battery. Do not try to start the engine by connecting a battery charger. Do not disconnect the (+) terminal when the engine is running.
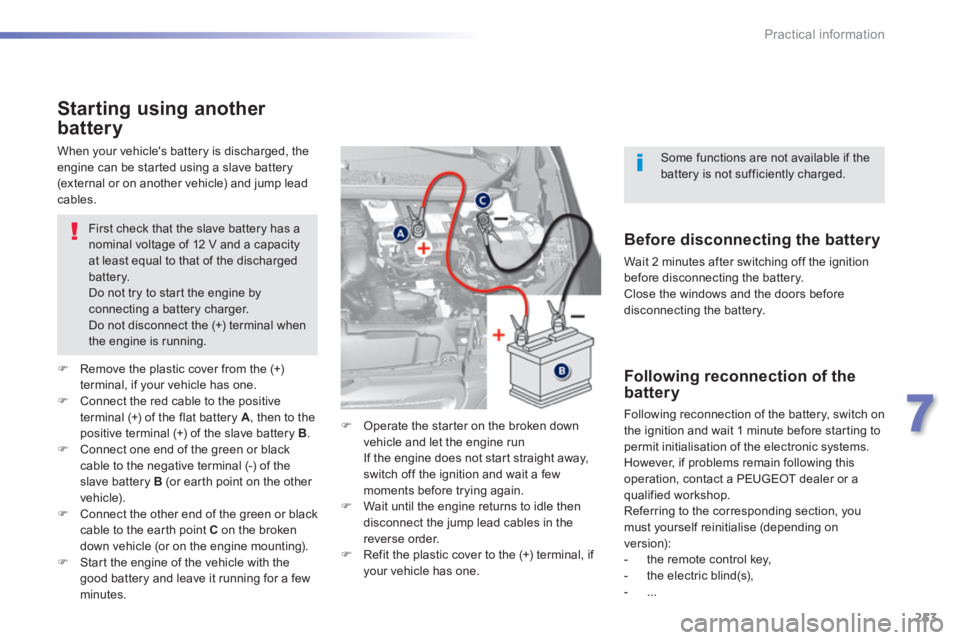
Remove the plastic cover from the (+) terminal, if your vehicle has one. Connect the red cable to the positive terminal (+) of the flat battery A , then to the
positive terminal (+) of the slave battery B . Connect one end of the green or black cable to the negative terminal (-) of the slave battery B (or earth point on the other vehicle). Connect the other end of the green or black cable to the earth point C on the broken down vehicle (or on the engine mounting). Start the engine of the vehicle with the good battery and leave it running for a few minutes.
Operate the starter on the broken down vehicle and let the engine run If the engine does not start straight away, switch off the ignition and wait a few moments before trying again. Wait until the engine returns to idle then disconnect the jump lead cables in the reverse order. Refit the plastic cover to the (+) terminal, if your vehicle has one.
When your vehicle's battery is discharged, the engine can be started using a slave battery (external or on another vehicle) and jump lead cables.
Before disconnecting the battery
Wait 2 minutes after switching off the ignition before disconnecting the battery. Close the windows and the doors before disconnecting the battery.
Following reconnection of the battery
Following reconnection of the battery, switch on
the ignition and wait 1 minute before starting to permit initialisation of the electronic systems. However, if problems remain following this operation, contact a PEUGEOT dealer or a qualified workshop. Referring to the corresponding section, you must yourself reinitialise (depending on version): - the remote control key, - the electric blind(s), - ...
Some functions are not available if the battery is not sufficiently charged.
Page 258 of 400
256
Practical information
308_EN_CHAP07_INFO PR ATIQUES_ED02-2013
Changing a wiper blade
Before removing a front
wiper blade
Removing
Fitting
After fitting a front wiper
blade
Within one minute after switching off the ignition, operate the wiper stalk to position the wiper blades vertically on the windscreen.
Put the corresponding new wiper blade in place and clip it. Fold down the wiper arm carefully.
Raise the corresponding wiper arm. Unclip the wiper blade and remove it. Switch on the ignition. Operate the wiper stalk again to park the wiper blades.
Page 274 of 400

272
Checks
308_EN_CHAP08_VERIFICATIONS_ED02-2013
Range indicators
When switching on the ignition, an indicator gives an estimate of the distance that can be travelled with your vehicle before engine starting is automatically prevented, once the vehicle starts using the reserve of AdBlue ® or ® or ®
after a fault is detected with the SCR system. In the event of simultaneous system fault and low AdBlue ® level, the shortest range is the one ® level, the shortest range is the one ®
displayed.
In the event of the risk of non-starting related to a lack of AdBlue ® In the event of the risk of non-starting related to a lack of AdBlue ® In the event of the risk of non-starting related to a lack of AdBlue
The engine start prevention system required by regulations is activated automatically once the AdBlue ® tank is ® tank is ®
e m pt y.
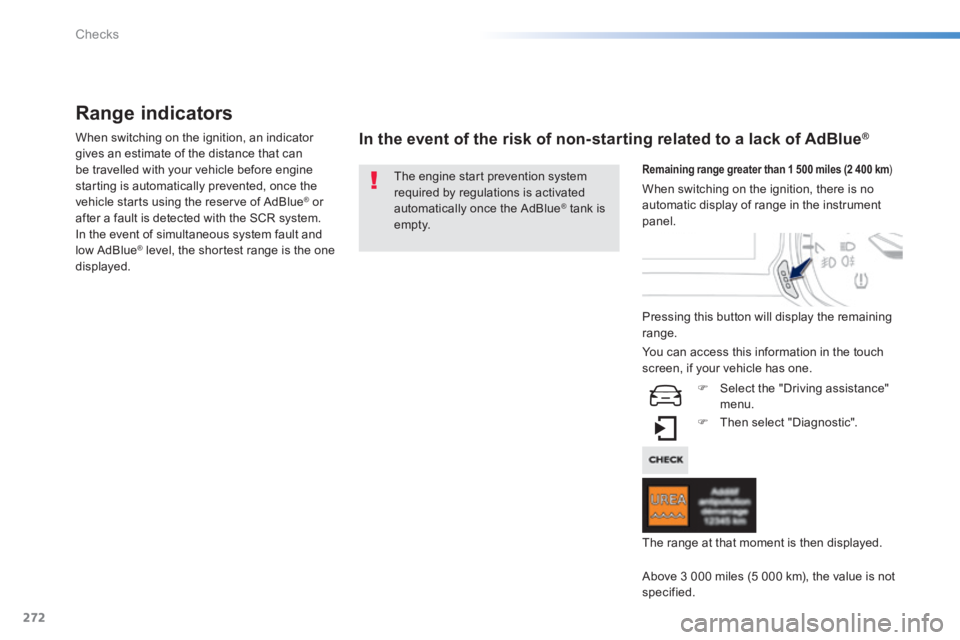
Remaining range greater than 1 500 miles (2 400 km ) miles (2 400 km ) miles (2 400 km
Pressing this button will display the remaining range.
Then select "Diagnostic".
Above 3 000 miles (5 000 km), the value is not specified.
When switching on the ignition, there is no automatic display of range in the instrument panel.
The range at that moment is then displayed.
You can access this information in the touch screen, if your vehicle has one.
Select the "Driving assistance" menu.