Page 216 of 400
214
Safety
The incorrect installation of a child seat in a vehicle compromises the child's
protection in the event of an accident.
Observe strictly the fitting instructions provided with the child seat. For information regarding the ISOFIX child seats which can be installed in your vehicle, refer to the table showing the locations for
installing ISOFIX child seats.
To secure the child seat to the top tether: - Remove and stow the head restraint before installing the child seat on the vehicle seat (refit it when the child seat is removed). - Pass the child seat upper strap over the top of the seat backrest, centred between the holes for the head restraint rods. - Attach the upper strap to the ring B . - Tighten the upper strap.
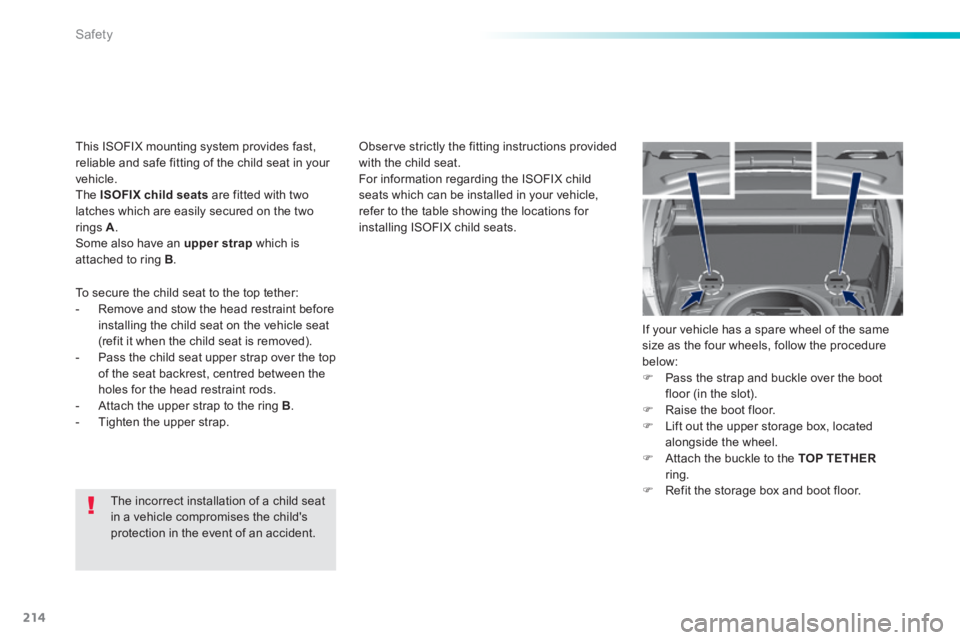
If your vehicle has a spare wheel of the same size as the four wheels, follow the procedure below: Pass the strap and buckle over the boot floor (in the slot). Raise the boot floor. Lift out the upper storage box, located alongside the wheel. Attach the buckle to the TOP TETHERring. Refit the storage box and boot floor.
This ISOFIX mounting system provides fast, reliable and safe fitting of the child seat in your vehicle. The ISOFIX child seats are fitted with two latches which are easily secured on the two
rings A . Some also have an upper strap which is attached to ring B .
Page 220 of 400
218
Safety
I UF: seat suitable for the installation of an I sofix U niversal seat, " F or ward facing" secured using the upper strap. IL- SU: seat suitable for the installation of an I sofix S emi- U niversal seat either: - "rear facing" fitted with an upper strap or a support leg, - "for ward facing" fitted with a support leg, - an infant car seat fitted with an upper strap or a support leg.
For advice on securing of the upper strap, refer to the "ISOFIX mountings" section.
X: seat not suitable for the installation of a child seat for the weight group indicated. (1) move a seat without height adjustment for wards by 1 notch from the mid position for wards and backwards A seat with height adjustment must be in the highest position. (2) the installation of an infant carrier on one of the outer seats makes use of the other two seats impossible. (3) a seat with height adjustment must be placed in the highest position. Move the seat without height adjustment for ward by 5 notches from the mid-position for wards and backwards.
Remove and stow the head restraint before fitting a child seat with a backrest to a passenger seat. Refit the head restraint when the child seat is removed.
Page 221 of 400
219
6
Safety
Child seats Installing a booster
cushion
Advice
The legislation on carrying a child on the front passenger seat is specific to each country. Refer to the legislation in force in your country. Deactivate the passenger's airbag when a "rear ward facing" child seat is installed on the front seat. Otherwise, the child would risk
being seriously injured or killed if the airbag were deployed.
For optimum installation of the "forward facing" child seat, ensure that the back of the child seat is as close as possible to the backrest of the vehicle's seat, or in contact if possible . The head restraint must be removed before installing a child seat with a backrest on the passenger seat. Ensure that the head restraint is stowed or attached securely so that it is not thrown around the vehicle in the event of sharp braking. Refit the head restraint as soon as the child seat is removed.
The incorrect installation of a child seat in a vehicle compromises the child's protection in the event of an accident. Check that there is no seat belt or seat belt buckle under the child seat as this could destabilise it. Remember to fasten the seat belts or the child seat harnesses keeping the slack in relation to the child's body to a minimum , even for short journeys. For the installation of a child seat using a seat belt, ensure that this is well tensioned on the child seat and that it is holding the child seat firmly against the seat of your vehicle. If your front passenger seat is adjustable, move it for ward if necessary. At the rear seats, always leave sufficient space between the front seat and: - a rear ward facing child seat, - the feet of a child seated in a for ward facing child seat. For this, move the front seat for ward and if necessary straighten its backrest.
Children at the front
The chest part of the seat belt must be positioned on the child's shoulder without touching the neck. Ensure that the lap part of the seat belt passes correctly over the child's thighs. PEUGEOT recommends the use of a booster seat which has a back, fitted with a seat belt guide at shoulder level.
As a safety precaution, do not leave: - one or more children alone and unsupervised in a vehicle, - a child or an animal in a vehicle which is exposed to the sun, with the windows closed, - the keys within reach of children inside the vehicle. To prevent accidental opening of the doors, use the "Child lock". Take care not to open the rear windows by more than one third. To protect young children from the rays of the sun, fit side blinds on the rear windows.
Page 223 of 400
221
7
Practical information
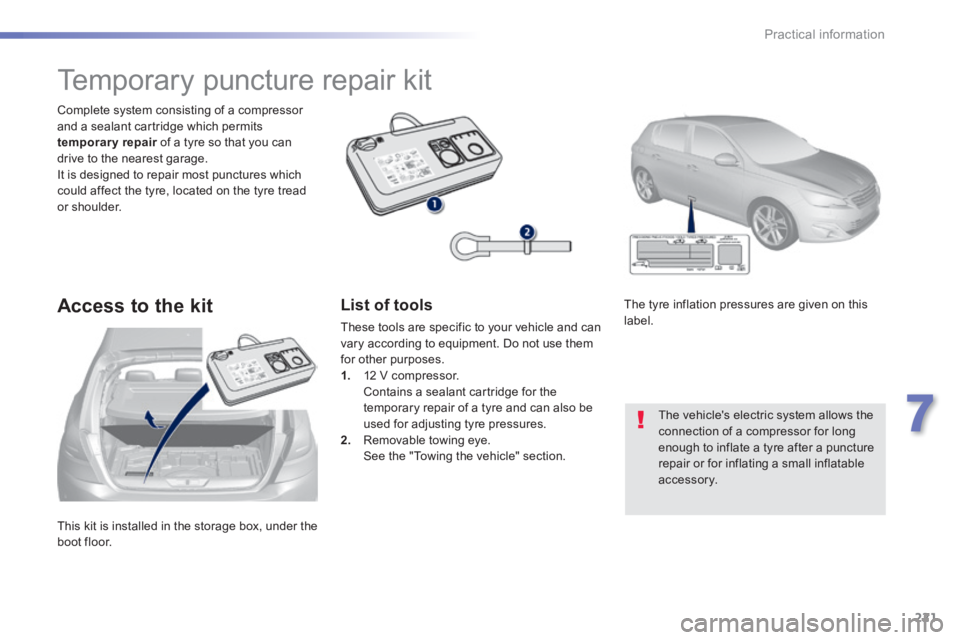
This kit is installed in the storage box, under the boot floor.
Complete system consisting of a compressor and a sealant cartridge which permits temporary repair of a tyre so that you can temporary repair of a tyre so that you can temporary repairdrive to the nearest garage. It is designed to repair most punctures which could affect the tyre, located on the tyre tread or shoulder.
Temporary puncture repair kit
Access to the kit List of tools
These tools are specific to your vehicle and can vary according to equipment. Do not use them for other purposes. 1. 12 V compressor. Contains a sealant cartridge for the temporary repair of a tyre and can also be used for adjusting tyre pressures. 2. Removable towing eye. See the "Towing the vehicle" section.
The tyre inflation pressures are given on this label.
The vehicle's electric system allows the connection of a compressor for long enough to inflate a tyre after a puncture repair or for inflating a small inflatable accessory.
Page 227 of 400
225
7
Practical information
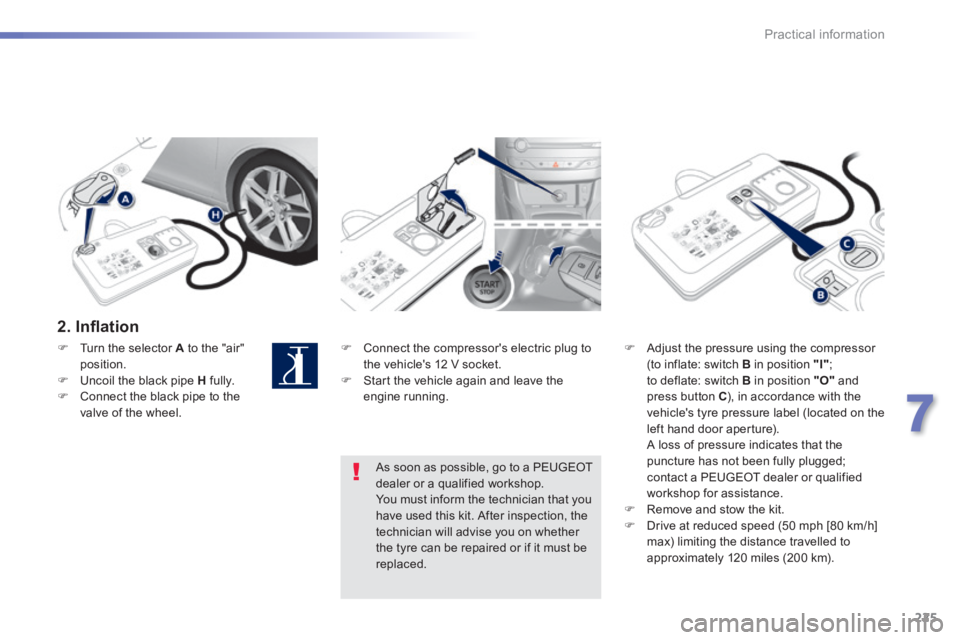
2 . I n fl a t i o n
Connect the compressor's electric plug to the vehicle's 12 V socket. Start the vehicle again and leave the engine running.
Adjust the pressure using the compressor (to inflate: switch B in position "I" ; to deflate: switch B in position "O" and press button C ), in accordance with the vehicle's tyre pressure label (located on the left hand door aperture).
A loss of pressure indicates that the puncture has not been fully plugged; contact a PEUGEOT dealer or qualified workshop for assistance. Remove and stow the kit. Drive at reduced speed (50 mph [80 km/h] max) limiting the distance travelled to approximately 120 miles (200 km).
As soon as possible, go to a PEUGEOT dealer or a qualified workshop. You must inform the technician that you have used this kit. After inspection, the technician will advise you on whether
the tyre can be repaired or if it must be replaced.
Turn the selector A to the "air" position. Uncoil the black pipe H fully. Connect the black pipe to the valve of the wheel.
Page 228 of 400
226
Practical information
Removing the cartridge
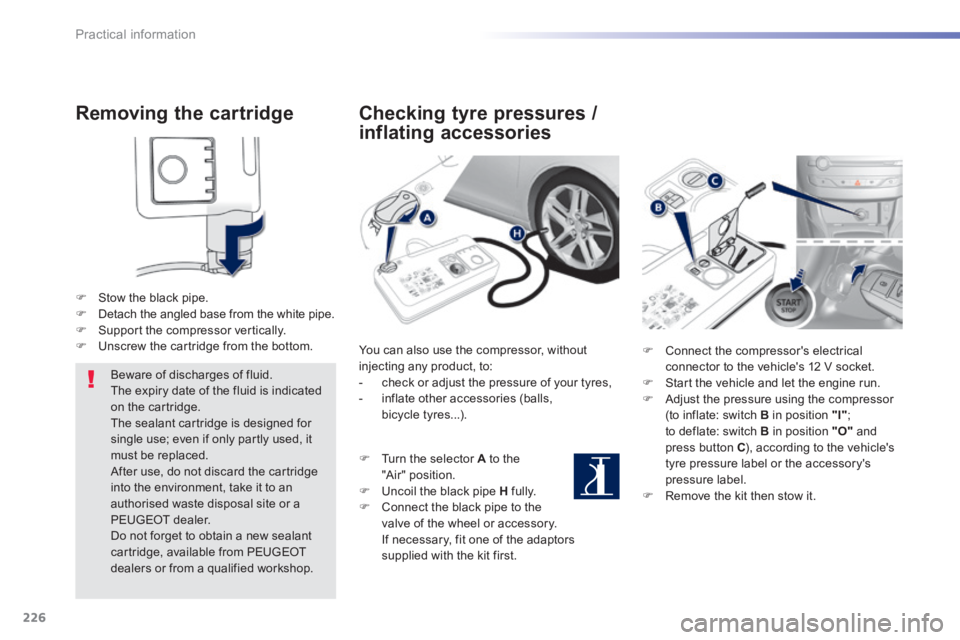
Stow the black pipe. Detach the angled base from the white pipe. Support the compressor vertically. Unscrew the cartridge from the bottom.
Beware of discharges of fluid. The expiry date of the fluid is indicated on the cartridge. The sealant cartridge is designed for single use; even if only partly used, it must be replaced. After use, do not discard the cartridge into the environment, take it to an authorised waste disposal site or a PEUGEOT dealer.
Do not forget to obtain a new sealant cartridge, available from PEUGEOT dealers or from a qualified workshop.
Checking tyre pressures /
inflating accessories
You can also use the compressor, without injecting any product, to: - check or adjust the pressure of your tyres, - inflate other accessories (balls, bicycle tyres...).
Turn the selector A to the "Air" position. Uncoil the black pipe H fully. Connect the black pipe to the valve of the wheel or accessory. If necessary, fit one of the adaptors supplied with the kit first.
Connect the compressor's electrical connector to the vehicle's 12 V socket. Start the vehicle and let the engine run. Adjust the pressure using the compressor (to inflate: switch B in position "I" ; to deflate: switch B in position "O" and press button C ), according to the vehicle's tyre pressure label or the accessory's pressure label. Remove the kit then stow it.
Page 229 of 400
227
7
Practical information
Changing a wheel
The tools are installed in the boot under the f l o o r.
Access to the tools
List of tools
These tools are specific to your vehicle and can vary according to the level of equipment. Do not use them for other purposes. 1. Wheelbrace. For removing the wheel trim and removing the wheel bolts. 2. Jack with integral handle. For raising the vehicle.
3. "Bolt cover" tool. For removing the bolt protectors (covers) on alloy wheels. 4. Socket for the security bolts (located in the glove box). For adapting the wheelbrace to the special "security" bolts. 5. Towing eye. See "Towing the vehicle".
Procedure for changing a faulty wheel for the spare wheel using the tools provided with the vehicle.
Page 230 of 400
228
Practical information
Wheel with trim
When refitting the wheel , refit the trim starting by placing its notch facing the valve and press around its edge with the palm of your hand.
The spare wheel is located in the boot under the floor. According to country, the spare wheel may be steel, alloy or of the "space-saver" type. To gain access to it, refer to the "Access to the tools" section.
Access to the spare wheel
Taking out the wheel
Unscrew the (coloured) central bolt. Raise the spare wheel towards you from the rear. Take the wheel out of the boot.