2014 PEUGEOT 3008 display
[x] Cancel search: displayPage 55 of 389
2
Multifunction screens53
Trip computer
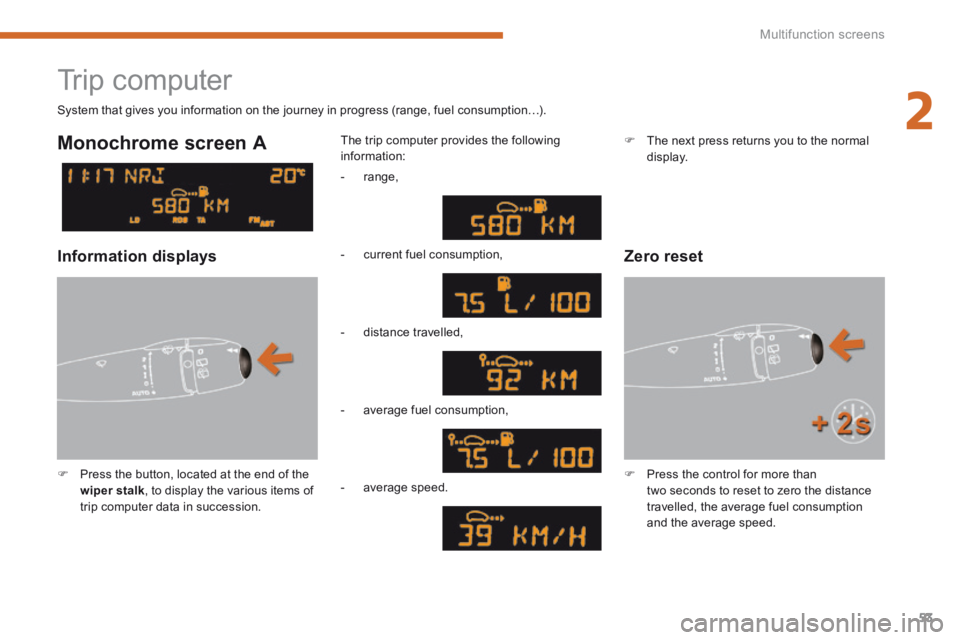
Press the button, located at the end of the wiper stalk , to display the various items of trip computer data in succession.
The trip computer provides the following information:
System that gives you information on the journey in progress (range, fuel consumption…).
Press the control for more than two seconds to reset to zero the distance travelled, the average fuel consumption and the average speed.
Monochrome screen A
Zero reset Information displays
- range,
- current fuel consumption,
- distance travelled,
- average fuel consumption,
- average speed.
The next press returns you to the normal display.
Page 56 of 389
Multifunction screens
54
Monochrome screen C
16/9 colour screen
Trip computer
System which provides current information concerning the trip (range, consumption…).
Instrument panel screen
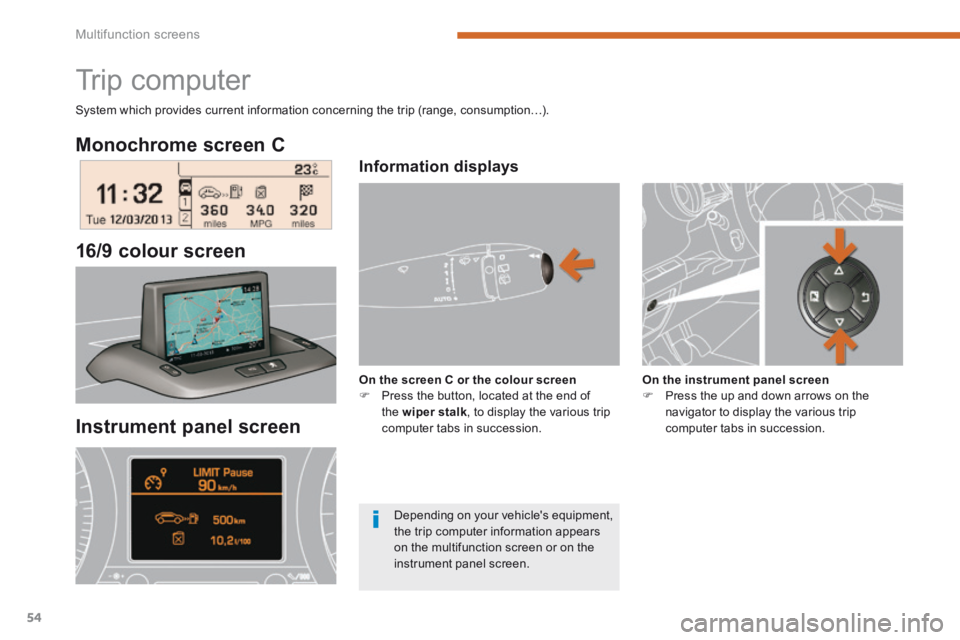
On the instrument panel screen Press the up and down arrows on the navigator to display the various trip computer tabs in succession.
Depending on your vehicle's equipment, the trip computer information appears on the multifunction screen or on the instrument panel screen.
Information displays
On the screen C or the colour screen Press the button, located at the end of the wiper stalk , to display the various trip computer tabs in succession.
Page 57 of 389
2
Multifunction screens55
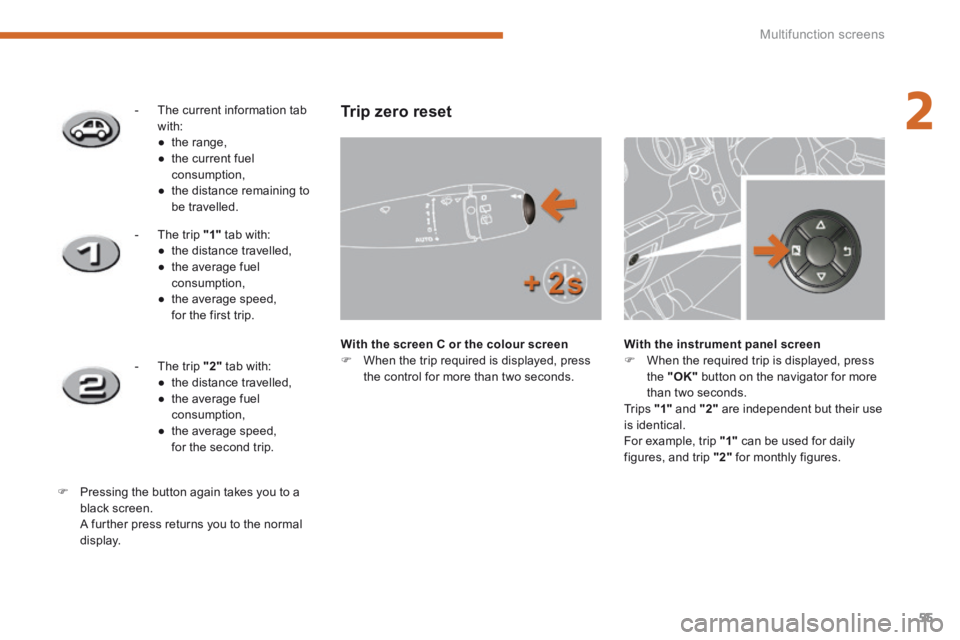
- The current information tab with: ● t h e r a n g e , ● the current fuel consumption, ● the distance remaining to be travelled.
- The trip "1" tab with: ● the distance travelled, ● the average fuel consumption, ● the average speed, for the first trip.
- The trip "2" tab with: ● the distance travelled, ● the average fuel consumption,
● the average speed, for the second trip.
Pressing the button again takes you to a black screen. A further press returns you to the normal
display.
Trip zero reset
With the screen C or the colour screen When the trip required is displayed, press the control for more than two seconds.
With the instrument panel screen When the required trip is displayed, press the "OK" button on the navigator for more than two seconds. Tr i p s "1" and "2" are independent but their use is identical. For example, trip "1" can be used for daily figures, and trip "2" for monthly figures.
Page 58 of 389
Multifunction screens
56
Trip computer, a few definitions
When the range falls below 20 miles (30 km), dashes are displayed. After filling with at least
5 litres of fuel, the range is recalculated and is displayed when it exceeds 60 miles (100 km).
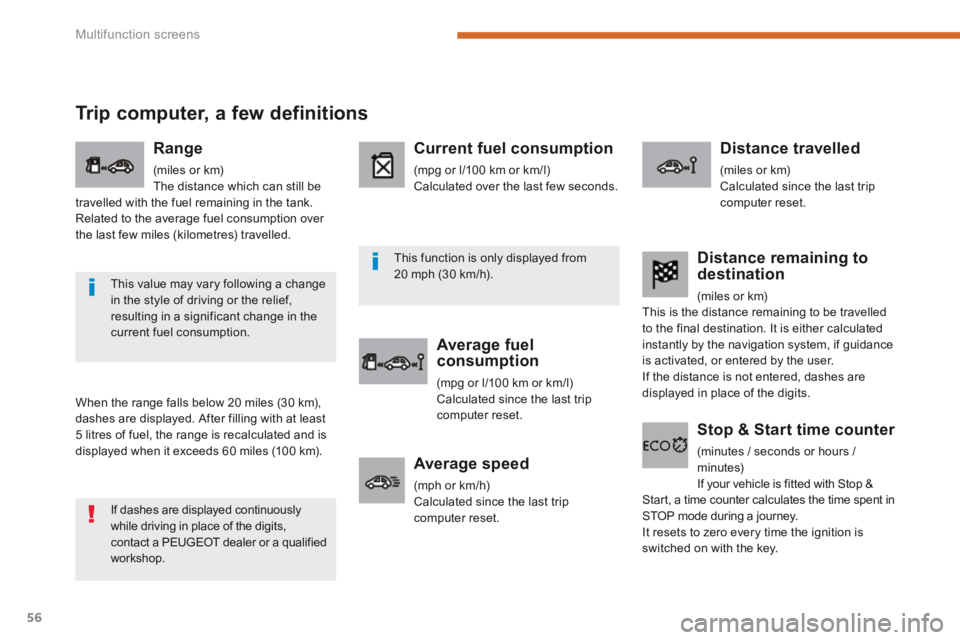
Range
(miles or km) The distance which can still be travelled with the fuel remaining in the tank. Related to the average fuel consumption over the last few miles (kilometres) travelled.
Current fuel consumption
(mpg or l/100 km or km/l) Calculated over the last few seconds.
Average fuel consumption
(mpg or l/100 km or km/l) Calculated since the last trip computer reset.
Distance travelled
(miles or km) Calculated since the last trip computer reset.
Average speed
(mph or km/h) Calculated since the last trip computer reset.
Distance remaining to destination
(miles or km) This is the distance remaining to be travelled to the final destination. It is either calculated instantly by the navigation system, if guidance is activated, or entered by the user. If the distance is not entered, dashes are displayed in place of the digits.
Stop & Start time counter
(minutes / seconds or hours / minutes) If your vehicle is fitted with Stop & Start, a time counter calculates the time spent in STOP mode during a journey. It resets to zero every time the ignition is switched on with the key.
If dashes are displayed continuously while driving in place of the digits, contact a PEUGEOT dealer or a qualified workshop.
This value may vary following a change in the style of driving or the relief, resulting in a significant change in the current fuel consumption.
This function is only displayed from 20 mph (30 km/h).
Page 64 of 389
Comfort
62
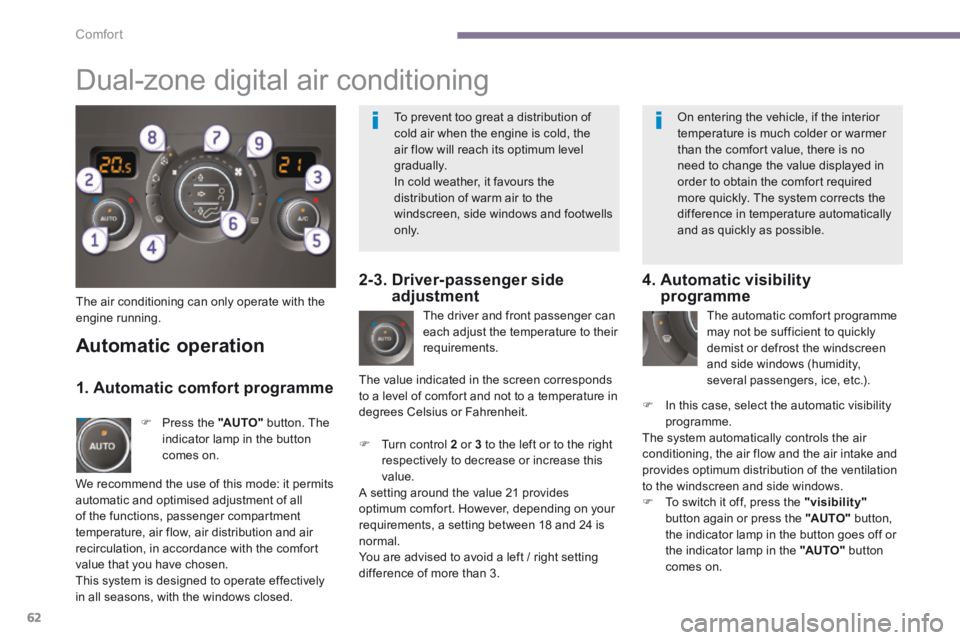
The air conditioning can only operate with the engine running. The driver and front passenger can each adjust the temperature to their requirements.
Turn control 2 or 3 to the left or to the right respectively to decrease or increase this value. A setting around the value 21 provides optimum comfort. However, depending on your requirements, a setting between 18 and 24 is normal. You are advised to avoid a left / right setting difference of more than 3.
4. Automatic visibility programme
The automatic comfort programme may not be sufficient to quickly demist or defrost the windscreen and side windows (humidity, several passengers, ice, etc.).
In this case, select the automatic visibility programme. The system automatically controls the air conditioning, the air flow and the air intake and provides optimum distribution of the ventilation to the windscreen and side windows. To switch it off, press the "visibility"button again or press the "AUTO" button, the indicator lamp in the button goes off or the indicator lamp in the "AUTO" button comes on.
Automatic operation
Press the "AUTO" button. The indicator lamp in the button comes on.
2-3. Driver-passenger side adjustment
Dual-zone digital air conditioning
We recommend the use of this mode: it permits automatic and optimised adjustment of all of the functions, passenger compartment temperature, air flow, air distribution and air recirculation, in accordance with the comfort value that you have chosen. This system is designed to operate effectively in all seasons, with the windows closed.
The value indicated in the screen corresponds to a level of comfort and not to a temperature in degrees Celsius or Fahrenheit.
1. Automatic comfort programme
To prevent too great a distribution of cold air when the engine is cold, the air flow will reach its optimum level gradually. In cold weather, it favours the distribution of warm air to the windscreen, side windows and footwells o n l y.
On entering the vehicle, if the interior temperature is much colder or warmer than the comfort value, there is no need to change the value displayed in order to obtain the comfort required more quickly. The system corrects the difference in temperature automatically and as quickly as possible.
Page 65 of 389
3
Comfort63
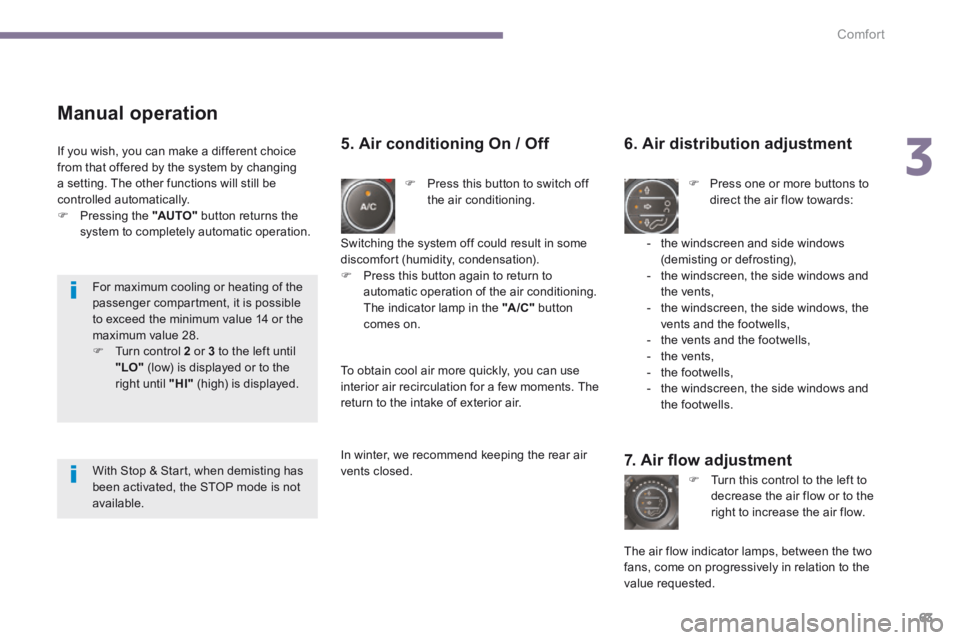
Manual operation
Press this button to switch off the air conditioning.
6. Air distribution adjustment
Press one or more buttons to direct the air flow towards:
7. Air fl ow adjustment
Turn this control to the left to decrease the air flow or to the right to increase the air flow.
5. Air conditioning On / Off
- the windscreen and side windows (demisting or defrosting), - the windscreen, the side windows and the vents, - the windscreen, the side windows, the vents and the footwells, - the vents and the footwells, - the vents, - the footwells, - the windscreen, the side windows and the footwells.
The air flow indicator lamps, between the two fans, come on progressively in relation to the value requested.
Switching the system off could result in some discomfort (humidity, condensation). Press this button again to return to automatic operation of the air conditioning. The indicator lamp in the "A /C " button comes on.
If you wish, you can make a different choice from that offered by the system by changing a setting. The other functions will still be controlled automatically. Pressing the "AUTO" button returns the
system to completely automatic operation.
To obtain cool air more quickly, you can use interior air recirculation for a few moments. The return to the intake of exterior air.
In winter, we recommend keeping the rear air vents closed.
For maximum cooling or heating of the passenger compartment, it is possible to exceed the minimum value 14 or the maximum value 28. Turn control 2 or 3 to the left until "LO" (low) is displayed or to the right until "HI" (high) is displayed.
With Stop & Start, when demisting has been activated, the STOP mode is not available.
Page 88 of 389
Access
86
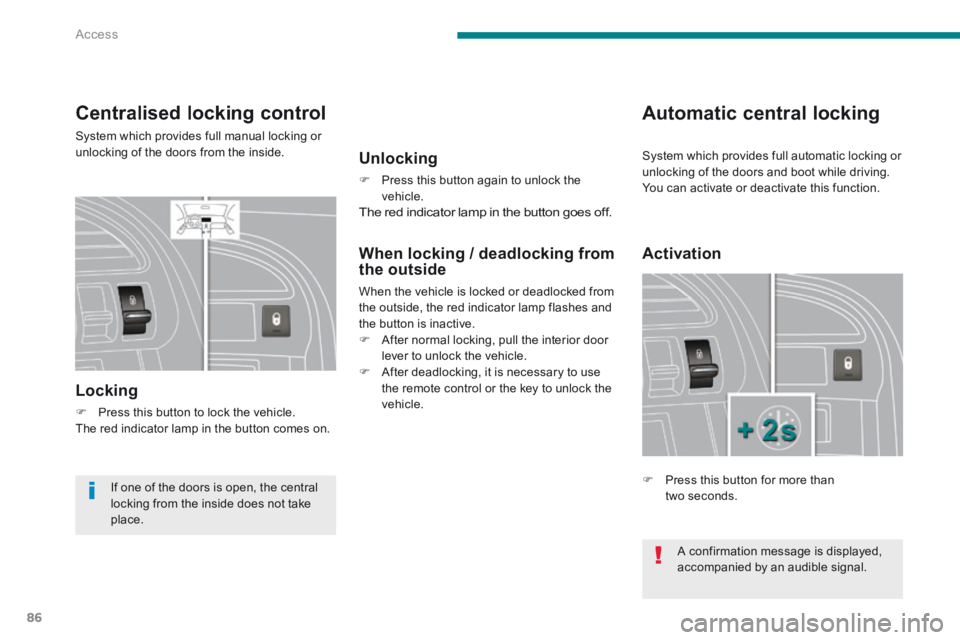
Centralised locking control
System which provides full manual locking or unlocking of the doors from the inside.
Locking
Press this button to lock the vehicle. The red indicator lamp in the button comes on.
Automatic central locking
Unlocking
Press this button again to unlock the vehicle. The red indicator lamp in the button goes off.
Activation
Press this button for more than two seconds. If one of the doors is open, the central locking from the inside does not take place.
When locking / deadlocking from the outside
When the vehicle is locked or deadlocked from the outside, the red indicator lamp flashes and the button is inactive. After normal locking, pull the interior door lever to unlock the vehicle. After deadlocking, it is necessary to use the remote control or the key to unlock the vehicle.
A confirmation message is displayed, accompanied by an audible signal.
System which provides full automatic locking or unlocking of the doors and boot while driving. You can activate or deactivate this function.
Page 89 of 389
4
Access87
Automatic locking
Above 6 mph (10 km/h), the doors and boot lock automatically. If one of the doors is open, the automatic central locking does not take place. If the boot is open, the automatic central locking of the doors is active.
Deactivation
Press this button again for more than two seconds.
Unlocking
Above 6 mph (10 km/h), press this button to unlock the doors and boot temporarily.
In the event of an impact, the doors unlock automatically.
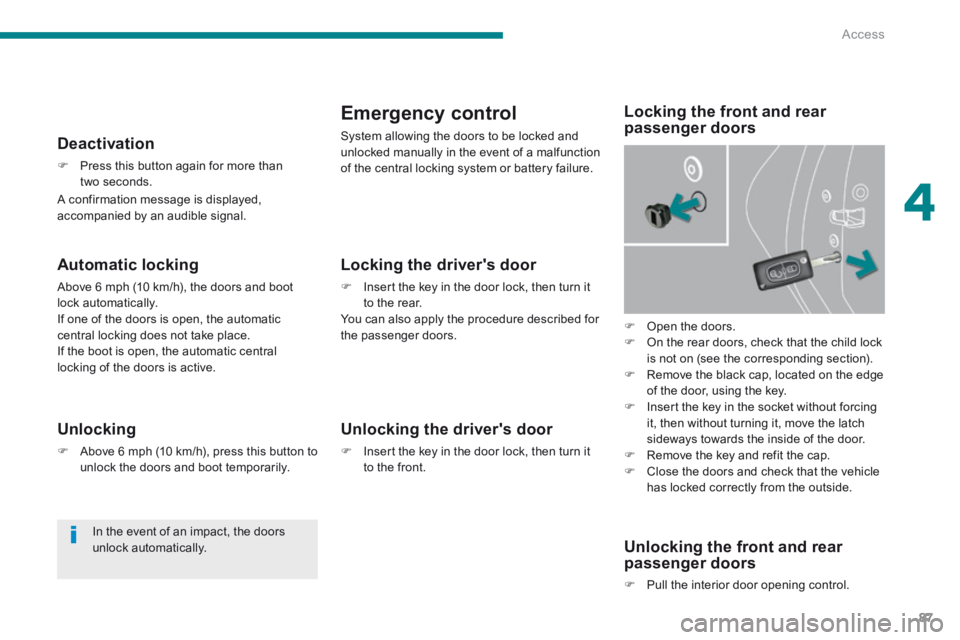
Emergency control
System allowing the doors to be locked and unlocked manually in the event of a malfunction of the central locking system or battery failure.
Open the doors. On the rear doors, check that the child lock is not on (see the corresponding section). Remove the black cap, located on the edge of the door, using the key. Insert the key in the socket without forcing it, then without turning it, move the latch sideways towards the inside of the door. Remove the key and refit the cap. Close the doors and check that the vehicle has locked correctly from the outside.
Locking the driver's door
Insert the key in the door lock, then turn it to the rear. You can also apply the procedure described for the passenger doors.
Unlocking the driver's door
Insert the key in the door lock, then turn it to the front.
Locking the front and rear passenger doors
Unlocking the front and rear passenger doors
Pull the interior door opening control.
A confirmation message is displayed, accompanied by an audible signal.