2014 Peugeot 3008 Hybrid 4 warning light
[x] Cancel search: warning lightPage 4 of 378
.
.
Contents
Interior fi ttings 124Front armrest 126Rear multimedia 128Panoramic sunroof 131Boot fi ttings 132
Fittings
Child seats 137Deactivating the passenger's front airbag 139ISOFIX mountings 146Child lock 150
Child safetyInstrument panels 48Indicator and warning lamps 50Indicators 60Adjustment buttons 64
Monitoring
Familiarisation
Screen C (PEUGEOT Connect Sound (RD5)) 6516/9 retractable colour screen (PEUGEOT Connect Navigation (RT6) or PEUGEOT Connect Media Navigation (NG4 3D))
68
Multifunction screens
Heating and Ventilation 74Rear screen demist - defrost 75Dual-zone digital air conditioning 76Front seats 80Rear seats 85Steering wheel adjustment 87Mirrors 88
Comfort
Remote control key 90Alarm 96Electric windows 98Doors 10 0Boot 103Lower tailgate 104Fuel tank 105Misfuel prevention (Diesel) 107
Access
Lighting controls 108Daytime running lamps 112Automatic illumination of headlamps 114Headlamp adjustment 115Wiper controls 116Automatic rain sensitive wipers 119Courtesy lamps 121Interior mood lighting 122Boot lamp 123
Visibility
Presentation 24Ready lamp 28HYbrid4 mode selector 29Energy consumption / generation indicator 32Display of hybrid power fl ow 33Eco off 36HYbrid4 frequently asked questions 37Eco-driving 40Consumption 42High voltage battery 43Car washing machine or tunnel 46Vehicle recovery 47
Hybrid system
Page 13 of 378
.Familiarisation11
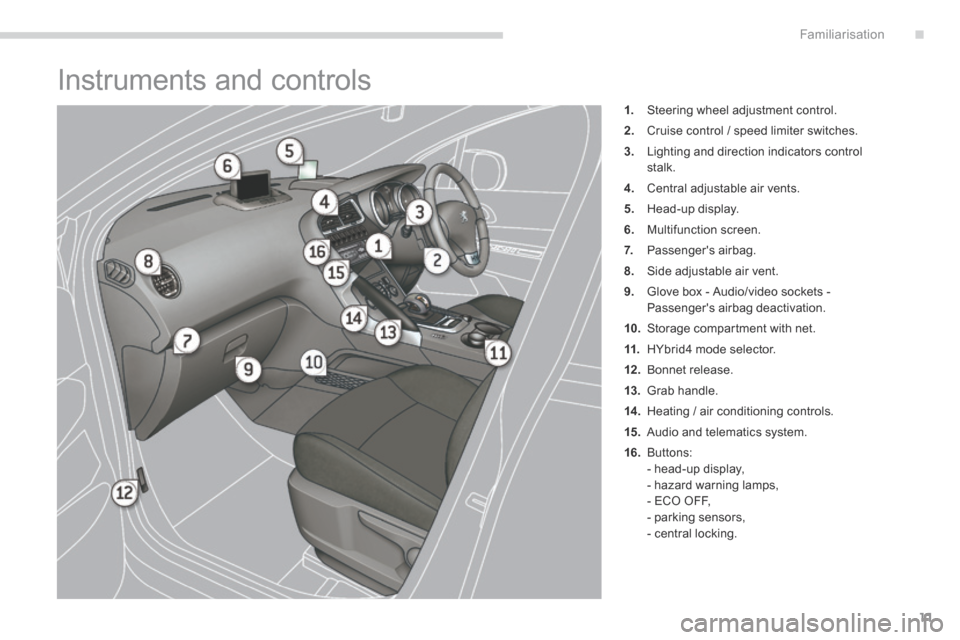
Instruments and controls
1. Steering wheel adjustment control.
2. Cruise control / speed limiter switches.
3. Lighting and direction indicators control stalk.
4. Central adjustable air vents.
5. Head-up display.
6. Multifunction screen.
7. Passenger's airbag.
8. Side adjustable air vent.
9. Glove box - Audio/video sockets - Passenger's airbag deactivation.
10. Storage compartment with net.
11. HYbrid4 mode selector.
12 . Bonnet release.
13. Grab handle.
14 . Heating / air conditioning controls.
15. Audio and telematics system.
16. Buttons: - head-up display, - hazard warning lamps, - ECO OFF, - parking sensors, - central locking.
Page 19 of 378
.
48
183
155
96
186
36
171
151
36
183
50
101
Familiarisation17
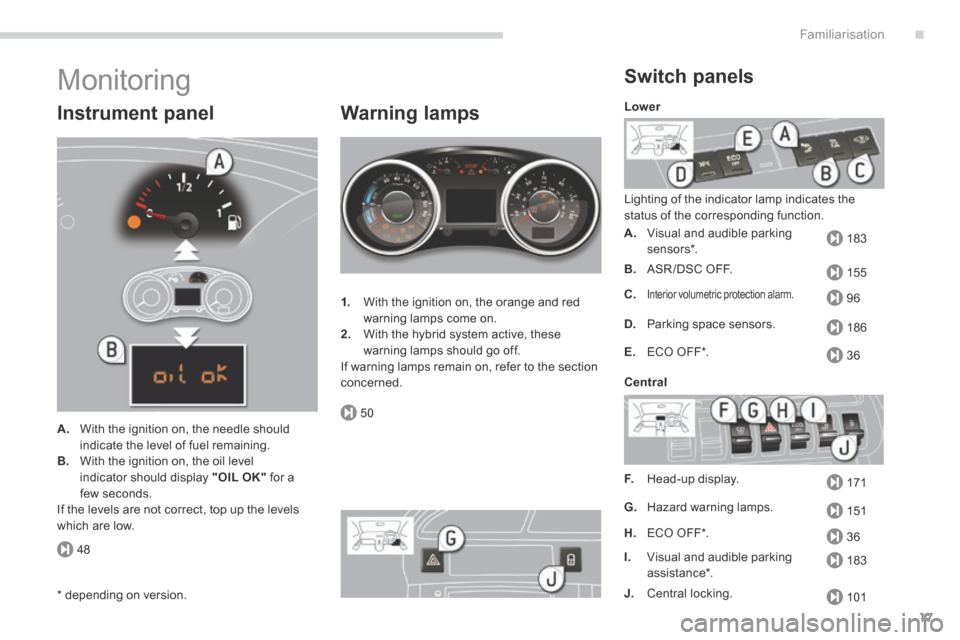
Monitoring
Instrument panel
A. With the ignition on, the needle should
indicate the level of fuel remaining. B. With the ignition on, the oil level indicator should display "OIL OK" for a few seconds. If the levels are not correct, top up the levels which are low.
Warning lamps
1. With the ignition on, the orange and red warning lamps come on. 2. With the hybrid system active, these warning lamps should go off. If warning lamps remain on, refer to the section concerned.
Switch panels
Lighting of the indicator lamp indicates the status of the corresponding function.
Lower
Central
A. Visual and audible parking sensors * .
B. ASR /DSC OFF.
C.Interior volumetric protection alarm.
D. Parking space sensors.
E. ECO OFF * .
F. Head-up display.
G. Hazard warning lamps.
H. ECO OFF * .
I. Visual and audible parking assistance * .
J. Central locking. * depending on version.
Page 29 of 378
.Hybrid system27
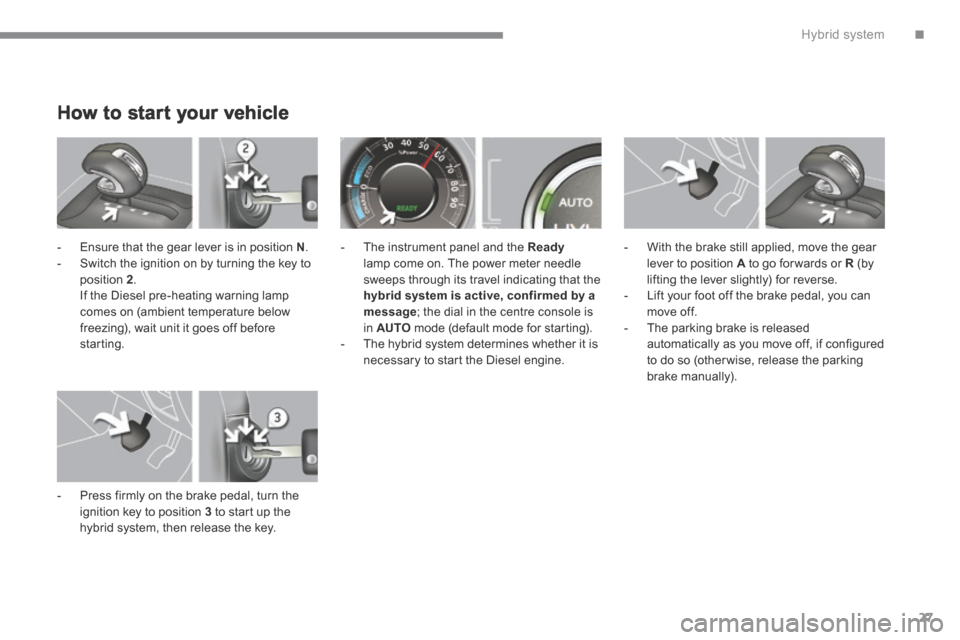
How to start your vehicle
- Ensure that the gear lever is in position N . - Switch the ignition on by turning the key to position 2 . If the Diesel pre-heating warning lamp comes on (ambient temperature below freezing), wait unit it goes off before starting.
- Press firmly on the brake pedal, turn the ignition key to position 3 to start up the hybrid system, then release the key.
- The instrument panel and the Readylamp come on. The power meter needle sweeps through its travel indicating that the hybrid system is active, confirmed by a message ; the dial in the centre console is in AUTO mode (default mode for starting). - The hybrid system determines whether it is necessary to start the Diesel engine.
- With the brake still applied, move the gear lever to position A to go for wards or R (by lifting the lever slightly) for reverse. - Lift your foot off the brake pedal, you can move off. - The parking brake is released automatically as you move off, if configured to do so (otherwise, release the parking brake manually).
Page 50 of 378
Monitoring
48
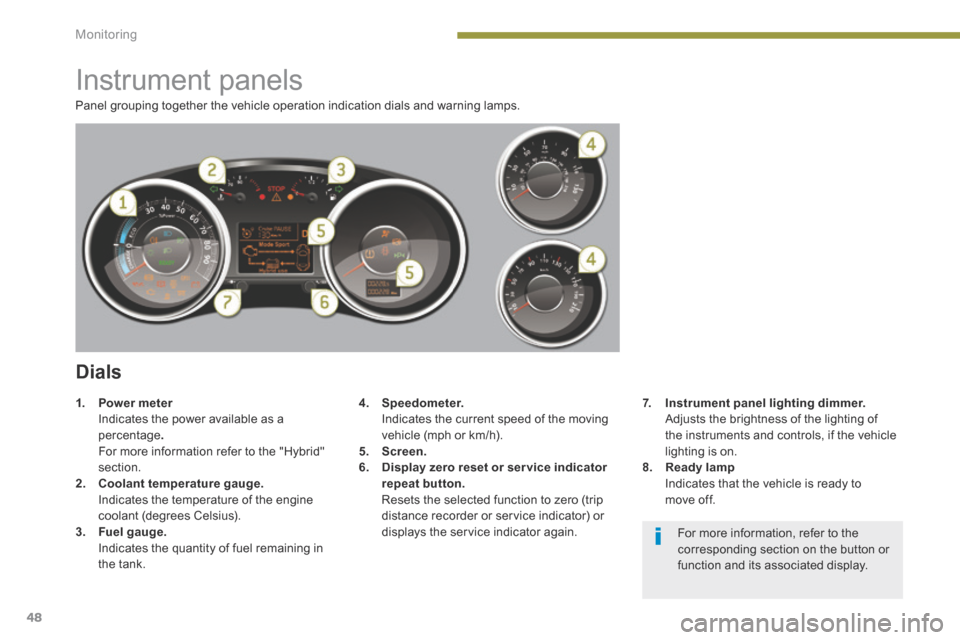
Panel grouping together the vehicle operation indication dials and warning lamps.
Instrument panels
Dials
4. Speedometer. Indicates the current speed of the moving vehicle (mph or km/h). 5. Screen.6. Display zero reset or ser vice indicatorrepeat button. Resets the selected function to zero (trip distance recorder or service indicator) or displays the service indicator again.
1. Power meter Power meter Power meter Indicates the power available as a percentage . For more information refer to the "Hybrid" section. 2. Coolant temperature gauge. Indicates the temperature of the engine coolant (degrees Celsius). 3. Fuel gauge.
Indicates the quantity of fuel remaining in the tank.
For more information, refer to the corresponding section on the button or function and its associated display.
7. Instrument panel lighting dimmer. Adjusts the brightness of the lighting of the instruments and controls, if the vehicle lighting is on. 8. Ready lamp Indicates that the vehicle is ready to move off.
Page 52 of 378
Monitoring
50
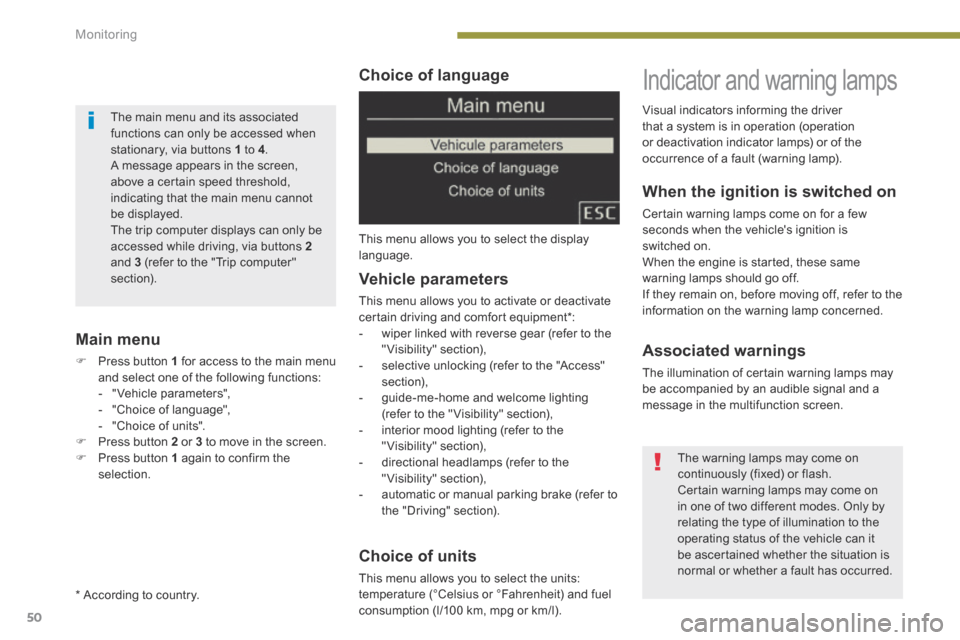
Choice of language
This menu allows you to select the display language.
Choice of units
This menu allows you to select the units:
temperature (°Celsius or °Fahrenheit) and fuel consumption (l/100 km, mpg or km/l).
Vehicle parameters
This menu allows you to activate or deactivate certain driving and comfort equipment * : - wiper linked with reverse gear (refer to the "Visibility" section), - selective unlocking (refer to the "Access" section), - guide-me-home and welcome lighting (refer to the " Visibility" section),
- interior mood lighting (refer to the "Visibility" section), - directional headlamps (refer to the "Visibility" section), - automatic or manual parking brake (refer to the "Driving" section).
Indicator and warning lamps
When the ignition is switched on
Certain warning lamps come on for a few seconds when the vehicle's ignition is switched on. When the engine is started, these same warning lamps should go off. If they remain on, before moving off, refer to the information on the warning lamp concerned.
Associated warnings
The illumination of certain warning lamps may be accompanied by an audible signal and a message in the multifunction screen.
Visual indicators informing the driver that a system is in operation (operation or deactivation indicator lamps) or of the occurrence of a fault (warning lamp).
The warning lamps may come on continuously (fixed) or flash. Certain warning lamps may come on in one of two different modes. Only by relating the type of illumination to the operating status of the vehicle can it be ascertained whether the situation is normal or whether a fault has occurred.
Main menu
Press button 1 for access to the main menu and select one of the following functions: - " Vehicle parameters", - "Choice of language", - "Choice of units". Press button 2 or 3 to move in the screen. Press button 1 again to confirm the selection.
The main menu and its associated functions can only be accessed when stationary, via buttons 1 to 4 . A message appears in the screen, above a certain speed threshold, indicating that the main menu cannot be displayed. The trip computer displays can only be accessed while driving, via buttons 2and 3 (refer to the "Trip computer" section).
* According to country.
Page 53 of 378
1
Monitoring51
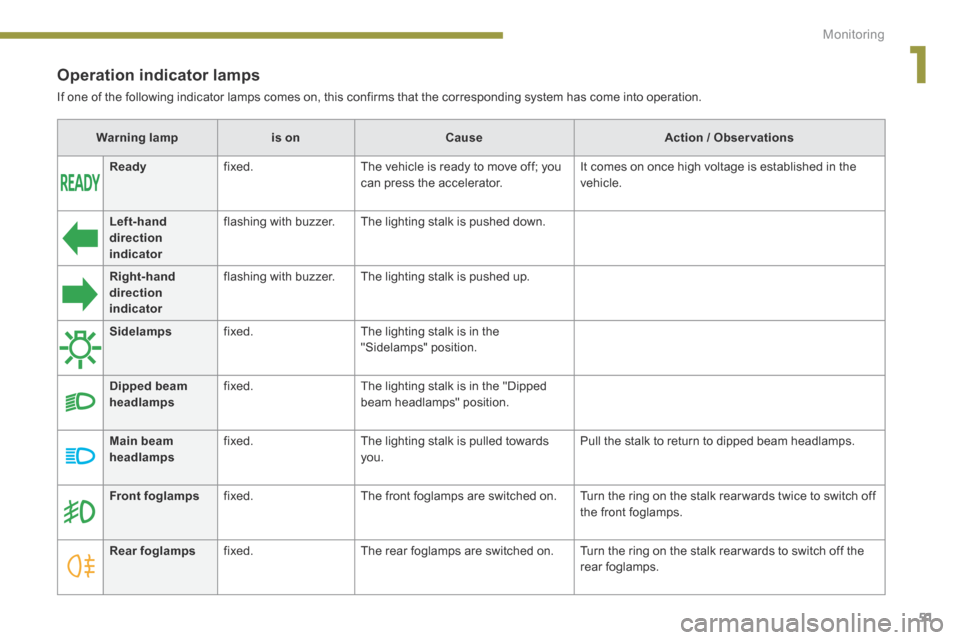
Operation indicator lamps
If one of the following indicator lamps comes on, this confirms that the corresponding system has come into operation.
Warning lampis onCauseAction / Observations
Left-hand
direction indicator
flashing with buzzer. The lighting stalk is pushed down.
Right-hand direction indicator
flashing with buzzer. The lighting stalk is pushed up.
Sidelamps fixed. The lighting stalk is in the "Sidelamps" position.
Dipped beam headlamps fixed. The lighting stalk is in the "Dipped beam headlamps" position.
Main beam headlamps fixed. The lighting stalk is pulled towards you. Pull the stalk to return to dipped beam headlamps.
Ready fixed. The vehicle is ready to move off; you can press the accelerator. It comes on once high voltage is established in the vehicle.
Front foglamps fixed. The front foglamps are switched on. Turn the ring on the stalk rear wards twice to switch off the front foglamps.
Rear foglamps fixed. The rear foglamps are switched on. Turn the ring on the stalk rear wards to switch off the rear foglamps.
Page 68 of 378
Multifunction screens
66
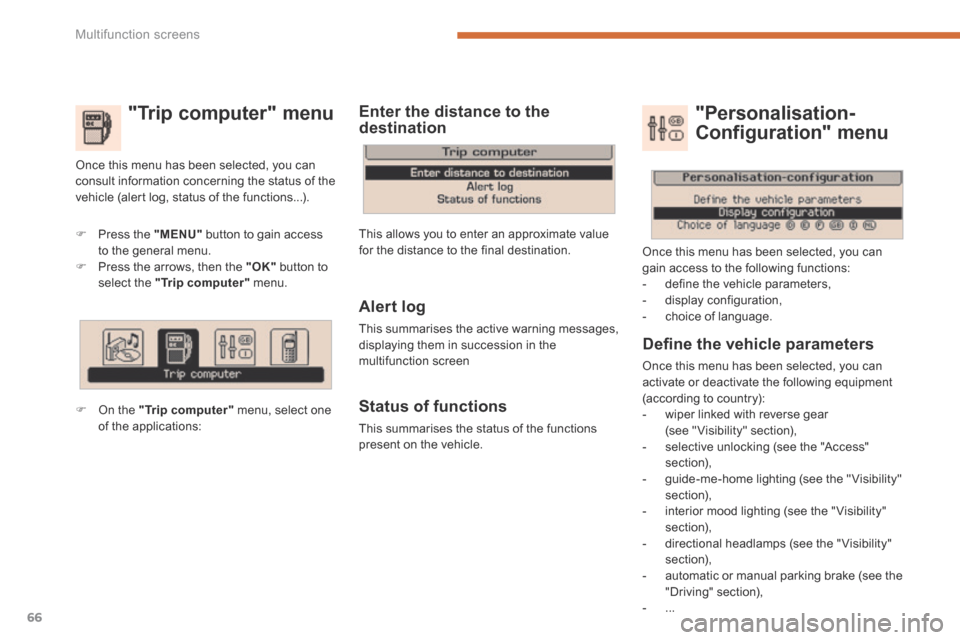
"Trip computer" menu
Press the "MENU" button to gain access to the general menu. Press the arrows, then the "OK" button to select the "Trip computer" menu.
On the "Trip computer" menu, select one of the applications:
Enter the distance to the destination
Once this menu has been selected, you can consult information concerning the status of the vehicle (alert log, status of the functions...).
Defi ne the vehicle parameters
Once this menu has been selected, you can activate or deactivate the following equipment (according to country): - wiper linked with reverse gear (see " Visibility" section), - selective unlocking (see the "Access" section), - guide-me-home lighting (see the " Visibility" section), - interior mood lighting (see the " Visibility" section),
- directional headlamps (see the "Visibility" section), - automatic or manual parking brake (see the "Driving" section), - ...
"Personalisation-
Configuration" menu
Once this menu has been selected, you can gain access to the following functions: - define the vehicle parameters, - display configuration, - choice of language. Alert log
This summarises the active warning messages, displaying them in succession in the multifunction screen
Status of functions
This summarises the status of the functions present on the vehicle.
This allows you to enter an approximate value for the distance to the final destination.