2014 Peugeot 3008 Hybrid 4 ignition
[x] Cancel search: ignitionPage 171 of 378
9
169
Driving
Operating faults
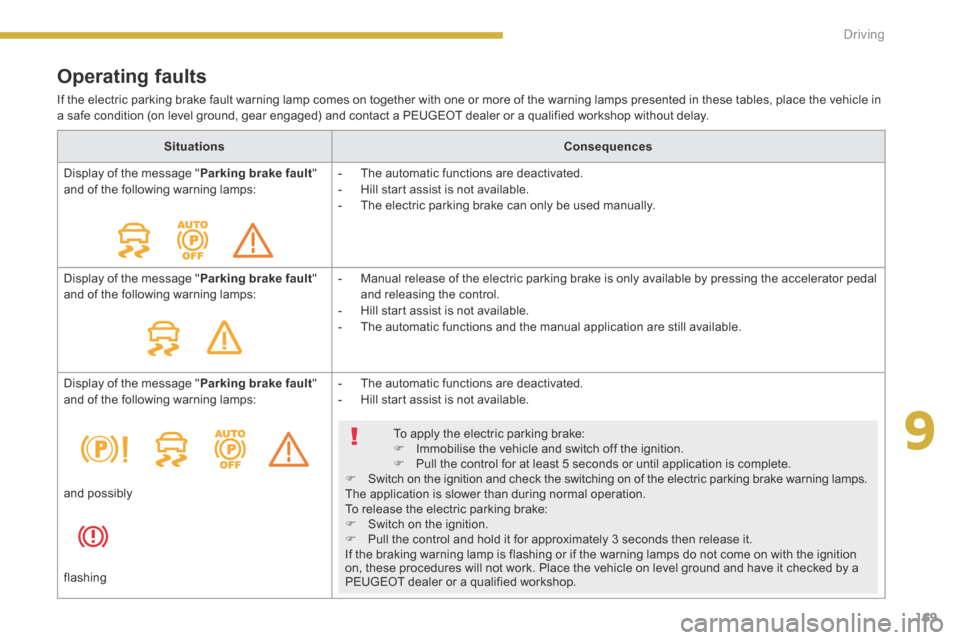
If the electric parking brake fault warning lamp comes on together with one or more of the warning lamps presented in these tables, place the vehicle in a safe condition (on level ground, gear engaged) and contact a PEUGEOT dealer or a qualified workshop without delay.
Situations Consequences
Display of the message " Parking brake fault " and of the following warning lamps: - The automatic functions are deactivated. - Hill start assist is not available. - The electric parking brake can only be used manually.
Display of the message " Parking brake fault " and of the following warning lamps: - Manual release of the electric parking brake is only available by pressing the accelerator pedal and releasing the control. - Hill start assist is not available. - The automatic functions and the manual application are still available.
Display of the message " Parking brake fault " and of the following warning lamps: - The automatic functions are deactivated. - Hill start assist is not available.
To apply the electric parking brake: Immobilise the vehicle and switch off the ignition. Pull the control for at least 5 seconds or until application is complete. Switch on the ignition and check the switching on of the electric parking brake warning lamps. The application is slower than during normal operation. To release the electric parking brake: Switch on the ignition. Pull the control and hold it for approximately 3 seconds then release it. If the braking warning lamp is flashing or if the warning lamps do not come on with the ignition on, these procedures will not work. Place the vehicle on level ground and have it checked by a PEUGEOT dealer or a qualified workshop.
and possibly
flashing
Page 173 of 378
9
171
Driving
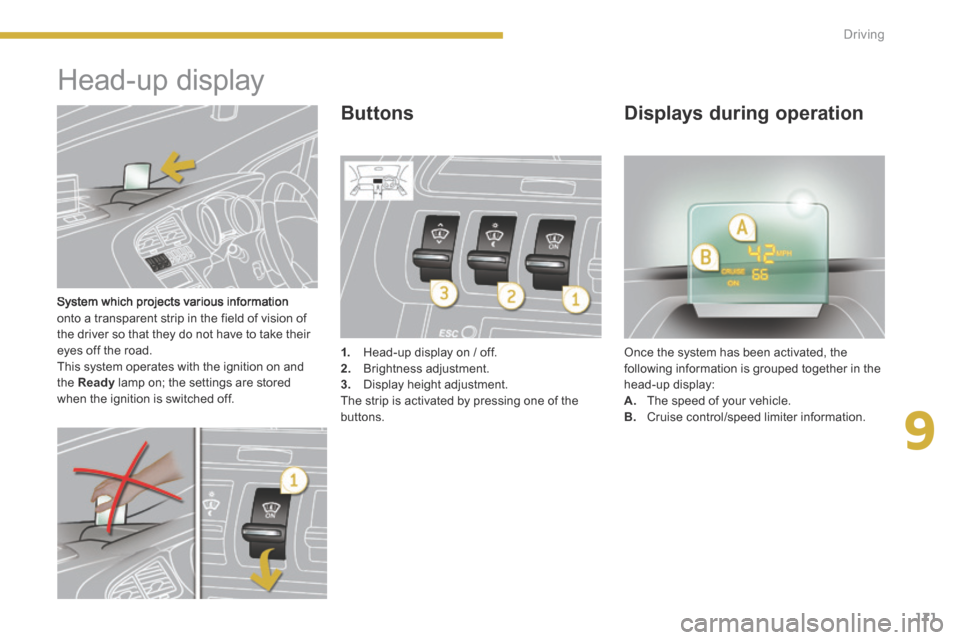
System which projects various information onto a transparent strip in the field of vision of the driver so that they do not have to take their eyes off the road. This system operates with the ignition on and the Ready lamp on; the settings are stored when the ignition is switched off.
Head-up display
1. Head-up display on / off. 2. Brightness adjustment. 3. Display height adjustment. The strip is activated by pressing one of the buttons.
Once the system has been activated, the following information is grouped together in the head-up display: A. The speed of your vehicle. B. Cruise control/speed limiter information.
Buttons Displays during operation
Page 175 of 378
9
173
Driving
Speed limiter
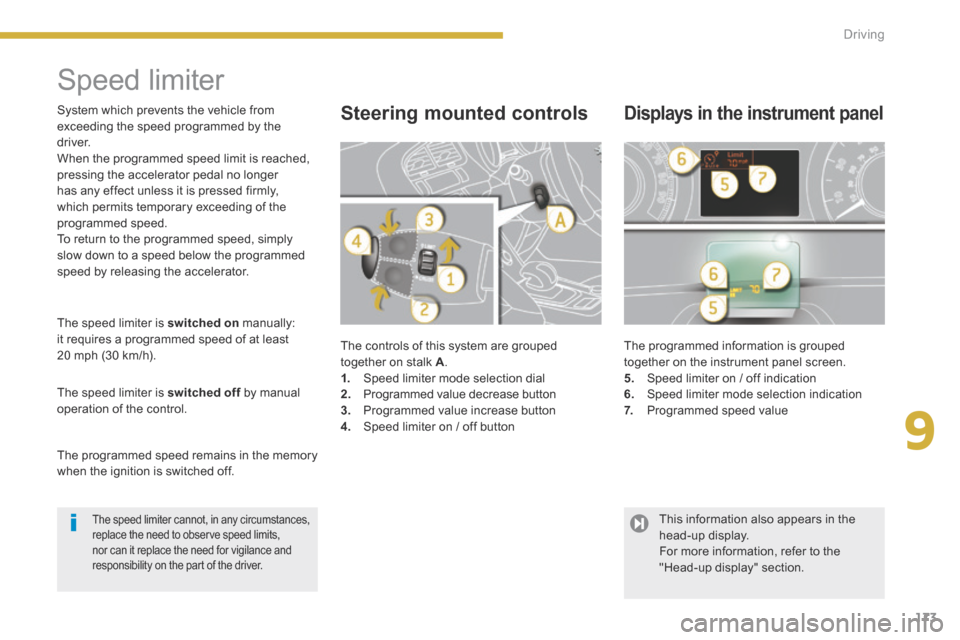
The controls of this system are grouped together on stalk A . 1. Speed limiter mode selection dial 2. Programmed value decrease button 3. Programmed value increase button 4. Speed limiter on / off button
The programmed information is grouped together on the instrument panel screen. 5. Speed limiter on / off indication 6. Speed limiter mode selection indication 7. Programmed speed value
Steering mounted controls Displays in the instrument panel
The speed limiter is switched on manually: it requires a programmed speed of at least 20 mph (30 km/h).
The speed limiter is switched off by manual switched off by manual switched offoperation of the control.
The programmed speed remains in the memory when the ignition is switched off.
System which prevents the vehicle from exceeding the speed programmed by the driver. When the programmed speed limit is reached, pressing the accelerator pedal no longer has any effect unless it is pressed firmly, which permits temporary exceeding of the programmed speed. To return to the programmed speed, simply slow down to a speed below the programmed speed by releasing the accelerator.
The speed limiter cannot, in any circumstances, replace the need to observe speed limits, nor can it replace the need for vigilance and responsibility on the part of the driver.
This information also appears in the head-up display. For more information, refer to the "Head-up display" section.
Page 178 of 378
176Driving
Cruise control
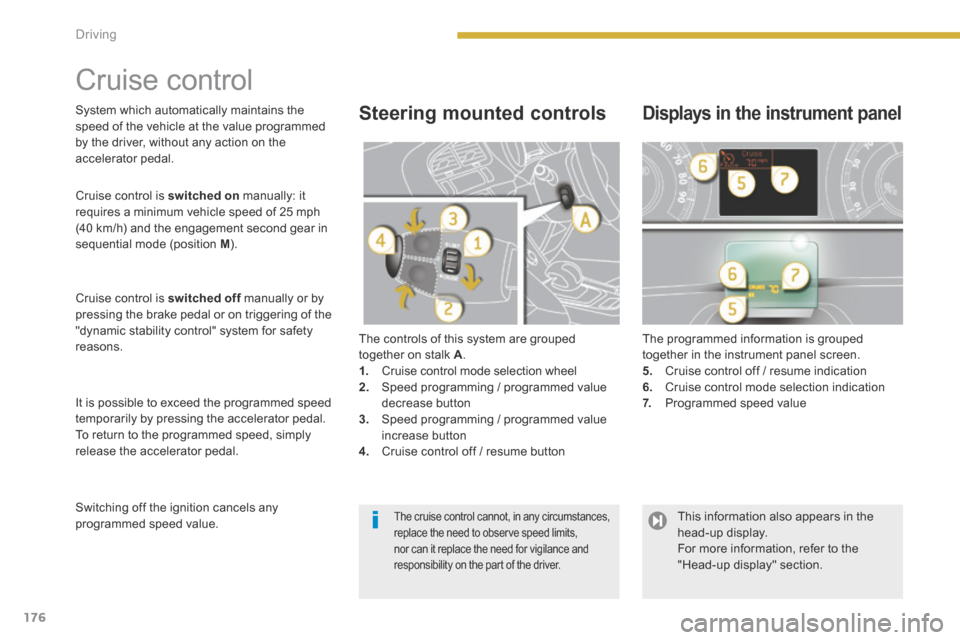
The controls of this system are grouped together on stalk A . 1. Cruise control mode selection wheel 2. Speed programming / programmed value decrease button 3. Speed programming / programmed value increase button 4. Cruise control off / resume button
The programmed information is grouped together in the instrument panel screen. 5. Cruise control off / resume indication 6. Cruise control mode selection indication 7. Programmed speed value
Steering mounted controls Displays in the instrument panel
Cruise control is switched on manually: it requires a minimum vehicle speed of 25 mph (40 km/h) and the engagement second gear in sequential mode (position M ).
Cruise control is switched off manually or by switched off manually or by switched offpressing the brake pedal or on triggering of the "dynamic stability control" system for safety reasons.
It is possible to exceed the programmed speed temporarily by pressing the accelerator pedal. To return to the programmed speed, simply release the accelerator pedal.
Switching off the ignition cancels any programmed speed value.
System which automatically maintains the speed of the vehicle at the value programmed by the driver, without any action on the accelerator pedal.
The cruise control cannot, in any circumstances, replace the need to observe speed limits, nor can it replace the need for vigilance and responsibility on the part of the driver.
This information also appears in the head-up display. For more information, refer to the "Head-up display" section.
Page 182 of 378
180Driving
Displays in the instrument panel
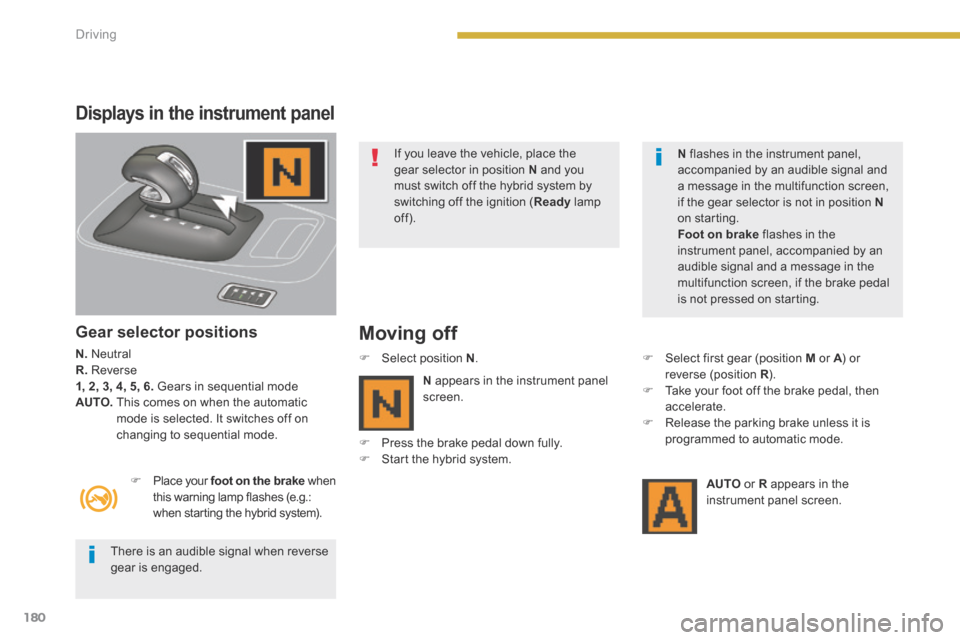
Gear selector positions
N. Neutral R. Reverse 1, 2, 3, 4, 5, 6. Gears in sequential mode AUTO. This comes on when the automatic mode is selected. It switches off on
changing to sequential mode.
Moving off
Place your foot on the brake when this warning lamp flashes (e.g.: when starting the hybrid system).
Select position N . Select first gear (position M or A ) or A ) or Areverse (position R ). R ). R Take your foot off the brake pedal, then accelerate. Release the parking brake unless it is
programmed to automatic mode.
AUTO or R appears in the instrument panel screen.
N appears in the instrument panel screen.
Press the brake pedal down fully. Start the hybrid system.
If you leave the vehicle, place the gear selector in position N and you must switch off the hybrid system by switching off the ignition ( Ready lamp off).
There is an audible signal when reverse gear is engaged.
N flashes in the instrument panel, accompanied by an audible signal and a message in the multifunction screen, if the gear selector is not in position Non starting. Foot on brake flashes in the instrument panel, accompanied by an audible signal and a message in the multifunction screen, if the brake pedal is not pressed on starting.
Page 184 of 378
182Driving
Stopping the vehicle
Before switching off the hybrid system, you can choose to: - move to position N to engage neutral, - leave the gear engaged; in this case, it will not be possible to move the vehicle.
In both cases, it is essential that you apply the parking brake to immobilise the vehicle.
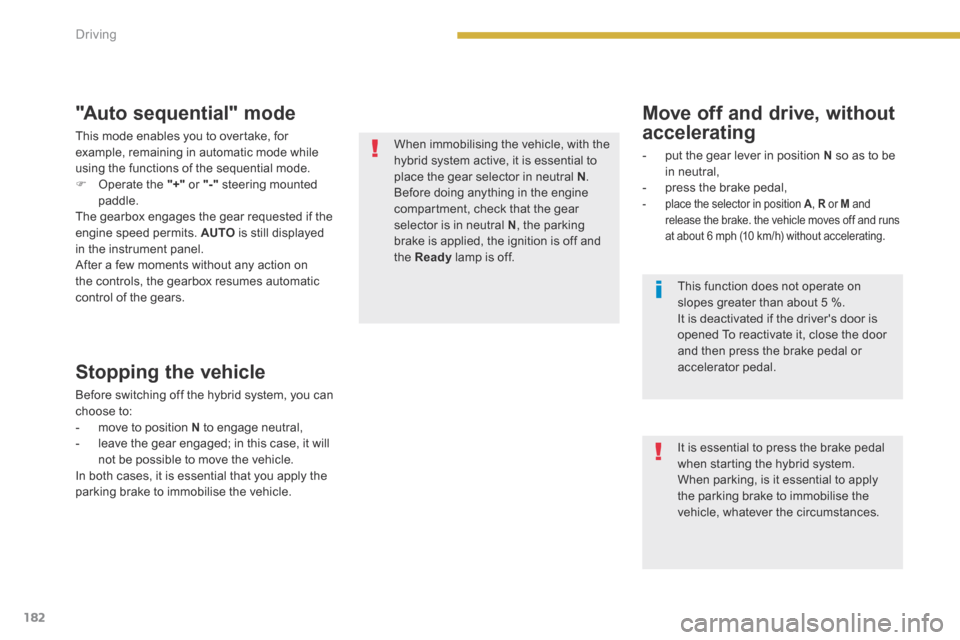
"Auto sequential" mode
This mode enables you to overtake, for example, remaining in automatic mode while using the functions of the sequential mode. Operate the "+" or "-" steering mounted paddle. The gearbox engages the gear requested if the engine speed permits. AUTO is still displayed in the instrument panel. After a few moments without any action on the controls, the gearbox resumes automatic control of the gears.
When immobilising the vehicle, with the hybrid system active, it is essential to place the gear selector in neutral N . Before doing anything in the engine compartment, check that the gear selector is in neutral N , the parking brake is applied, the ignition is off and the Ready lamp is off.
Move off and drive, without
accelerating
- put the gear lever in position N so as to be in neutral, - press the brake pedal, - place the selector in position A , R or R or RM and release the brake. the vehicle moves off and runs
at about 6 mph (10 km/h) without accelerating.
It is essential to press the brake pedal when starting the hybrid system. When parking, is it essential to apply the parking brake to immobilise the vehicle, whatever the circumstances.
This function does not operate on slopes greater than about 5 %. It is deactivated if the driver's door is opened To reactivate it, close the door and then press the brake pedal or accelerator pedal.
Page 189 of 378
9
187
Driving
Operation
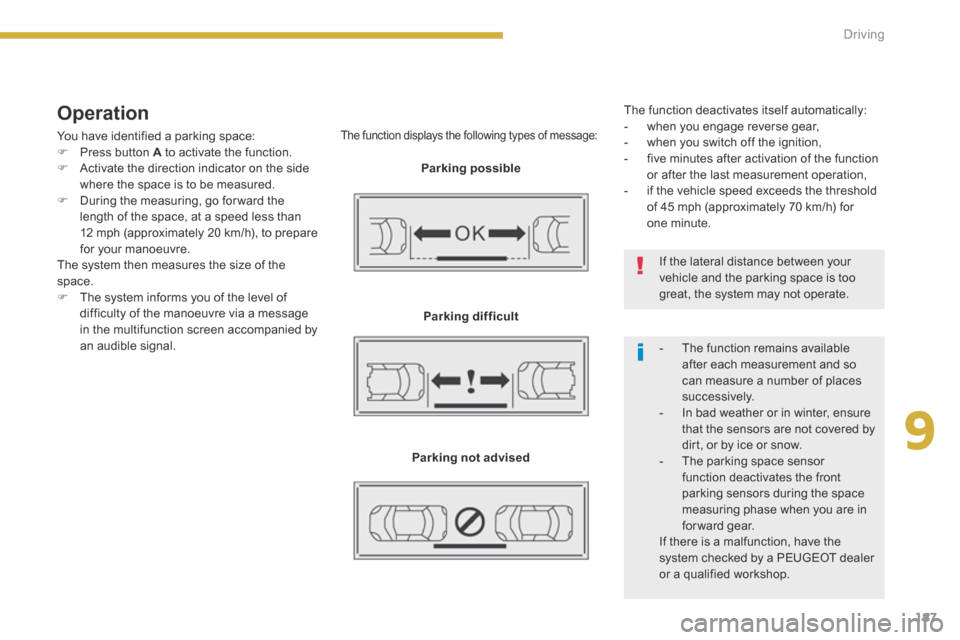
You have identified a parking space: Press button A to activate the function. Activate the direction indicator on the side where the space is to be measured. During the measuring, go for ward the length of the space, at a speed less than 12 mph (approximately 20 km/h), to prepare for your manoeuvre. The system then measures the size of the space. The system informs you of the level of difficulty of the manoeuvre via a message in the multifunction screen accompanied by an audible signal.
The function displays the following types of message:
Parking possible
Parking difficult
Parking not advised
The function deactivates itself automatically: - when you engage reverse gear, - when you switch off the ignition, - five minutes after activation of the function or after the last measurement operation, - if the vehicle speed exceeds the threshold of 45 mph (approximately 70 km/h) for one minute.
- The function remains available after each measurement and so can measure a number of places su c c e s s i ve l y. - In bad weather or in winter, ensure that the sensors are not covered by dirt, or by ice or snow. - The parking space sensor function deactivates the front parking sensors during the space measuring phase when you are in forward gear.
If there is a malfunction, have the system checked by a PEUGEOT dealer or a qualified workshop.
If the lateral distance between your vehicle and the parking space is too great, the system may not operate.
Page 191 of 378
10
Checks189
Bonnet
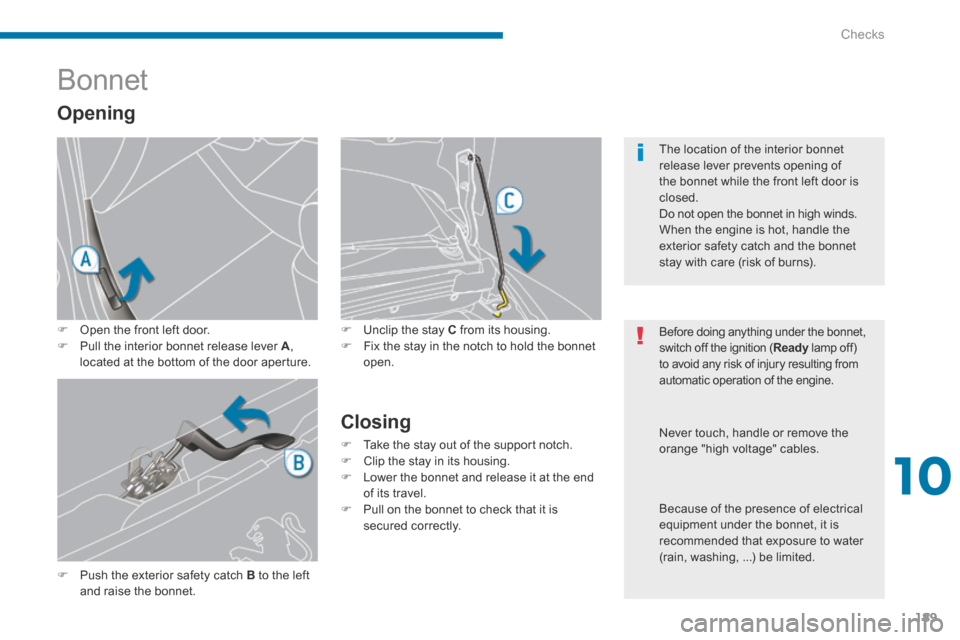
Unclip the stay C from its housing. Fix the stay in the notch to hold the bonnet open.
Closing
Take the stay out of the support notch. Clip the stay in its housing. Lower the bonnet and release it at the end of its travel. Pull on the bonnet to check that it is secured correctly.
Opening
Open the front left door. Pull the interior bonnet release lever A , located at the bottom of the door aperture.
Before doing anything under the bonnet, switch off the ignition ( Ready lamp off) Ready lamp off) Readyto avoid any risk of injury resulting from automatic operation of the engine.
The location of the interior bonnet release lever prevents opening of the bonnet while the front left door is closed. Do not open the bonnet in high winds.
When the engine is hot, handle the exterior safety catch and the bonnet stay with care (risk of burns).
Push the exterior safety catch B to the left and raise the bonnet.
Never touch, handle or remove the orange "high voltage" cables.
Because of the presence of electrical equipment under the bonnet, it is
recommended that exposure to water (rain, washing, ...) be limited.