2014 PEUGEOT 108 steering wheel
[x] Cancel search: steering wheelPage 9 of 256

7
Instruments and controls
1. Lighting and direction indicator stalk
2. Steering mounted controls for the audio
system or the touch screen
3.
S
teering mounted controls for the etg
electronic gearbox
4.
Spe
ed limiter control
5.
S
creen wash/wipe control stalk
6.
e
le
ctric window controls
7.
B
onnet release
8.
F
uel filler flap release
9.
D
eactivation of Stop & Start
H
eadlamp height adjustment
10.
D
oor mirror adjustment controls 11. D
eactivation of VSC / tR C systems
12 . S teering wheel adjustment control
13.
D
river's front airbag
Horn
14 .
S
ide air vents
15.
I
nstrument panel
16.
C
ourtesy lamp
e
le
ctric fabric roof control
17.
P
assenger's front airbag
18.
g
l
ove box /
D
eactivation of the passenger's front
airbag/
R
einitialisation of the tyre under-inflation
detection system
19.
R
adio, touch screen or open storage20. S
tA Rt/ S tO P button
21. H azard warning lamps
22.
M
anual or automatic air conditioning
controls
23.
A
uxiliary sockets for portable devices
24.
g
ea
r lever
25.
C
up holder and storage
26.
P
arking brake
2 7.
Ca
n holder
B3_en_Chap00b_vue-ensemble_ed01-2014
.
Over view
Page 24 of 256

22
Electric power
steeringflashing or fixed,
accompanied by an
audible signal.th
e electric power steering has a
fault. Drive carefully at reduced speed.
Have it checked by a Pe
ugeOt dealer or qualified
workshop.
Airbags
fixed. One of the airbags or seat belt
pretensioners has a fault. Have it checked by a P
e
uge
Ot
dealer or a qualified
workshop.
ETG electronic
gearbox fixed.
th
e etg electronic gearbox has a
fault. Contact a P
e
uge
Ot
dealer or a qualified workshop
without delay.
Clutch flashing, accompanied
by an audible signal.
th
e clutch temperature is too high. Stop as soon as it is safe to do so, place the etg
electronic gearbox in position N , and wait about
15 minutes for the clutch cools down.
Warning / indicator lamp
StateCause Action / Observations
Under-inflation fixed.
th
e pressure in one or more wheels
is too low. Check the pressure of the tyres as soon as possible.
th
is check should preferably be carried out when the
tyres are cold.
You must reinitialise the system after the adjustment
of one or more tyre pressures and after changing one
or more wheels.
For more information, refer to the "
un
der-inflation
detection" section.
Monitoring
Page 25 of 256

23
Stop & Star t
(e-VTi 68 engine)flashing.th
e Stop & Start system has a fault. Have the system checked by a Pe ugeOt dealer or a
qualified workshop.
Warning / indicator lamp
StateCause Action / Observations
Speed limiter fixed.
th
e speed limiter has a fault.Have it checked by a P
e
uge
Ot
dealer or a qualified
workshop.
Door(s) open /
Boot open fixed, accompanied by
an audible signal. A door or the boot is still open. Close the door or boot.
Keyless Entr y
and Starting
system flashing quickly.
th
e steering column has not been
unlocked. Change to "
OFF" mode, then " ON" mode and turn the
wheel slightly to unlock the steering column.
flashing, accompanied
by an audible signal.
th
e battery in the electronic key is
discharged. Replace the battery.
Refer to the corresponding section.
You are leaving the vehicle without
activating " OFF" mode. With the electronic key on your person, press the
S
tA
R
t/
S
tO
P button to change to "OFF" mode.
th
e electronic key has not been
detected. Check that you have the electronic key with you.
th
e Keyless e
n
try and Starting
system has a fault. Have the system checked by a P
e
uge
Ot
dealer or a
qualified workshop.
1
Monitoring
Page 54 of 256

52
Steering wheel adjustment
(with power steering)
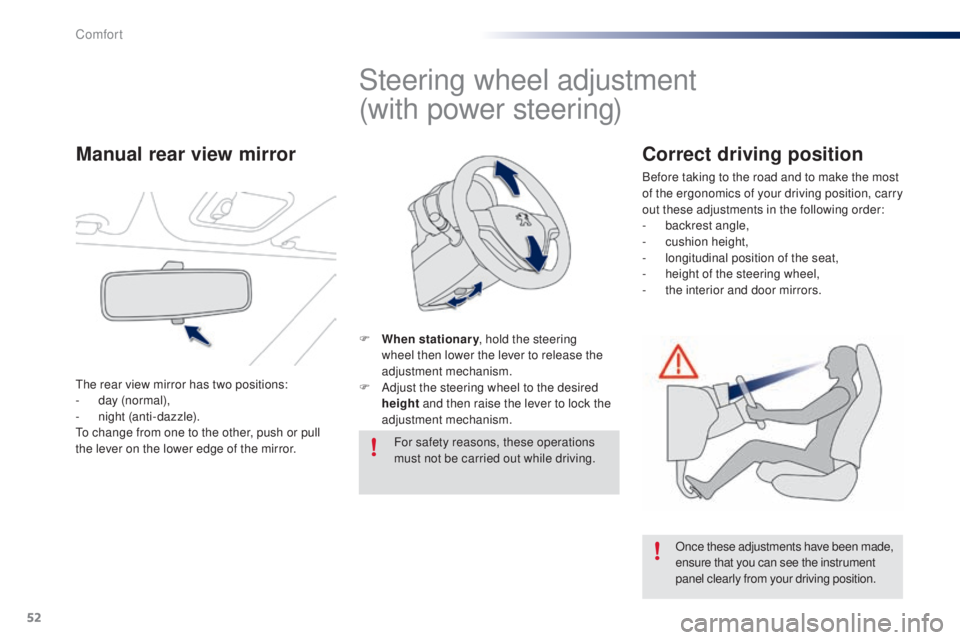
F When stationary, hold the steering
wheel then lower the lever to release the
adjustment mechanism.
F
A
djust the steering wheel to the desired
height and then raise the lever to lock the
adjustment mechanism.
For safety reasons, these operations
must not be carried out while driving.
Once these adjustments have been made,
ensure that you can see the instrument
panel clearly from your driving position.
Manual rear view mirror
the rear view mirror has two positions:
- d ay (normal),
-
n
ight (anti-dazzle).
to c
hange from one to the other, push or pull
the lever on the lower edge of the mirror.
Correct driving position
Before taking to the road and to make the most
of the ergonomics of your driving position, carry
out these adjustments in the following order:
-
b
ackrest angle,
-
c
ushion height,
-
l
ongitudinal position of the seat,
-
hei
ght of the steering wheel,
-
t
he interior and door mirrors.
Comfort
Page 73 of 256

71
Starting - stopping the engine with the key
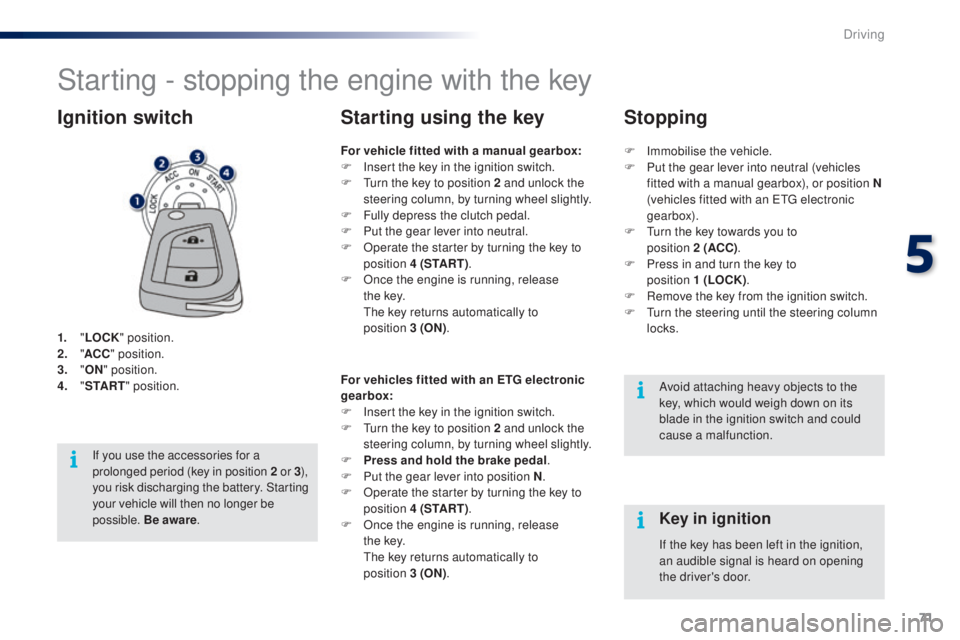
1. "LOCK " position.
2. " AC
C" position.
3.
"ON " position.
4.
" S
TA R T" position.
Ignition switch
Avoid attaching heavy objects to the
key, which would weigh down on its
blade in the ignition switch and could
cause a malfunction.
Key in ignition
For vehicle fitted with a manual gearbox:
F
I nsert the key in the ignition switch.
F
t
u
rn the key to position 2 and unlock the
steering column, by turning wheel slightly.
F
F
ully depress the clutch pedal.
F
P
ut the gear lever into neutral.
F
O
perate the starter by turning the key to
position 4 (S TA R T ) .
F
O
nce the engine is running, release
t h e
key.
t
h
e key returns automatically to
position
3
(ON).
Starting using the key
If the key has been left in the ignition,
an audible signal is heard on opening
the driver's door.
For vehicles fitted with an ETG electronic
gearbox:
F
I
nsert the key in the ignition switch.
F
t
u
rn the key to position 2 and unlock the
steering column, by turning wheel slightly.
F
P
ress and hold the brake pedal
.
F
P
ut the gear lever into position N
.
F
O
perate the starter by turning the key to
position 4 (S TA R T ) .
F
O
nce the engine is running, release
t h e
key.
th
e key returns automatically to
position
3
(ON) .
If you use the accessories for a
prolonged period (key in position 2
or 3),
you risk discharging the battery. Starting
your vehicle will then no longer be
possible. Be aware . F
Imm
obilise the vehicle.
F
P
ut the gear lever into neutral (vehicles
fitted with a manual gearbox), or position N
(vehicles fitted with an etg electronic
gearbox).
F
t
u
rn the key towards you to
position
2
(ACC)
.
F
P
ress in and turn the key to
position
1 (LOCK)
.
F
R
emove the key from the ignition switch.
F
t
u
rn the steering until the steering column
locks.
Stopping
5
Driving
Page 75 of 256

73
Starting using the
electronic key
With the first press on the "S TA R T/
STOP " button, this indicator lamp
flashes slowly in the instrument panel. Depending on the ambient temperature,
each attempt at starting can take up to
around 30 seconds. During this period,
do not press the "
START/STOP" button
again, or release the clutch pedal or
brake pedal (depending on the type of
gearbox).
After this period, if the engine has not
started, press the " START/STOP"
button again for another attempt at
starting. If one of the starting conditions
is not met, the Keyless
e
n
try and
Starting system indicator lamp flashes
in the instrument panel. In some
circumstances, it is necessary to
turn the steering wheel slightly while
pressing the " START/STOP " button to
assist unlocking of the steering.
For vehicles fitted with a manual gearbox:
F
W
ith the electronic key inside the vehicle,
put the gear lever into neutral and fully
depress the clutch pedal.th e presence of the electronic key in
the vehicle is essential for switching
on the ignition and starting only. Once
the engine has started,
make sure
that the electronic key remains with
the vehicle until the end of the journey:
other wise you would not be able to lock
the vehicle.
F
P
ress and release the " S TA R T/
STOP " button.
th
is indicator lamp comes on in the
instrument panel. For vehicles fitted with an ETG electronic
gearbox
:
F
W
ith the electronic key inside the vehicle,
put the gear lever at N and press the brake
pedal.
th
is indicator lamp comes on in the
instrument panel.
F
P
ress and release the "
S TA R T/
STOP " button.
5
Driving
Page 88 of 256

86
the speed limiter cannot, in any
circumstances, replace the need to
observe speed limits, nor can it replace the
need for vigilance on the part of the driver.
Speed limiter (Vti 82 engine)
the speed limiter is switched on manually:
this can be done whatever the speed of the
vehicle. However, if you are driving at less than
20 mph (30 km/h), the programmed speed will
be fixed at 20 mph (30 km/h).
th
e speed limiter is paused by operation of the
control.
th
e programmed speed can be exceeded
temporarily by pressing the accelerator firmly
beyond the point of resistance.
to r
eturn to the programmed speed, simply
release the accelerator pedal until the vehicle
returns to the programmed speed limit. System which prevents the vehicle from exceeding the speed programmed by the driver.Steering mounted controls
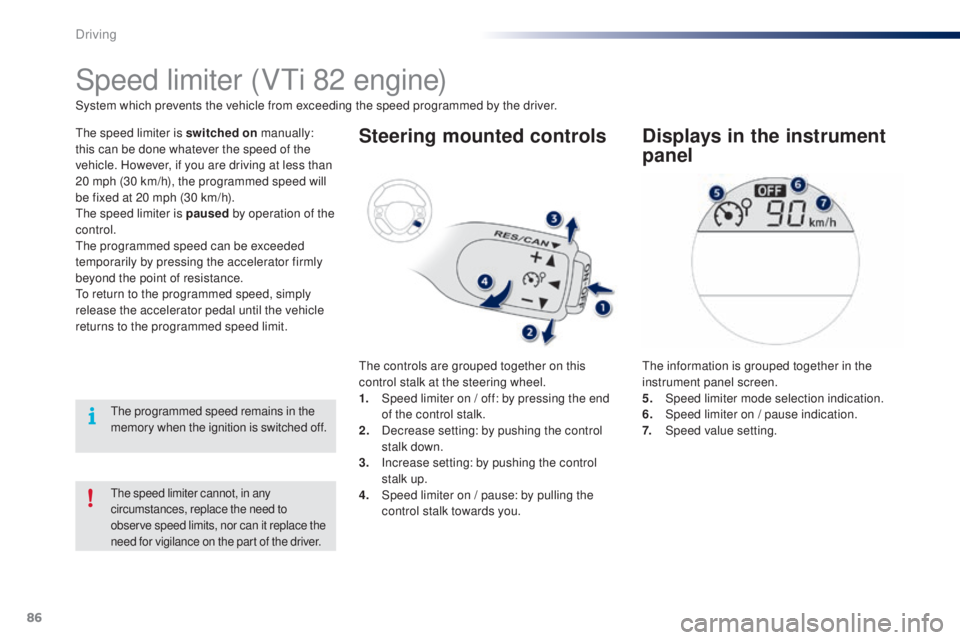
the controls are grouped together on this
control stalk at the steering wheel.
1.
S
peed limiter on / off: by pressing the end
of the control stalk.
2.
D
ecrease setting: by pushing the control
stalk down.
3.
I
ncrease setting: by pushing the control
stalk up.
4.
S
peed limiter on / pause: by pulling the
control stalk towards you.
Displays in the instrument
panel
the information is grouped together in the
instrument panel screen.
5.
Spe
ed limiter mode selection indication.
6.
S
peed limiter on / pause indication.
7.
Spe
ed value setting.
th
e programmed speed remains in the
memory when the ignition is switched off.
Driving
Page 91 of 256

89
Speed limiter (Vti 68 engine)
System which prevents the vehicle from exceeding the speed programmed by the driver.
th
e speed limiter is switched on manually:
this can be done whatever the speed of the
vehicle. However, if you are driving at less than
20 mph (30 km/h), the programmed speed will
be fixed at 20 mph (30 km/h).
th
e speed limiter is paused by operation of the
control.
th
e programmed speed can be exceeded
temporarily by pressing the accelerator firmly
beyond the point of resistance.
to r
eturn to the programmed speed, simply
release the accelerator pedal until the vehicle
returns to the programmed speed limit.
th
e programmed limit speed is erased
when switching off the ignition.
Steering mounted controls
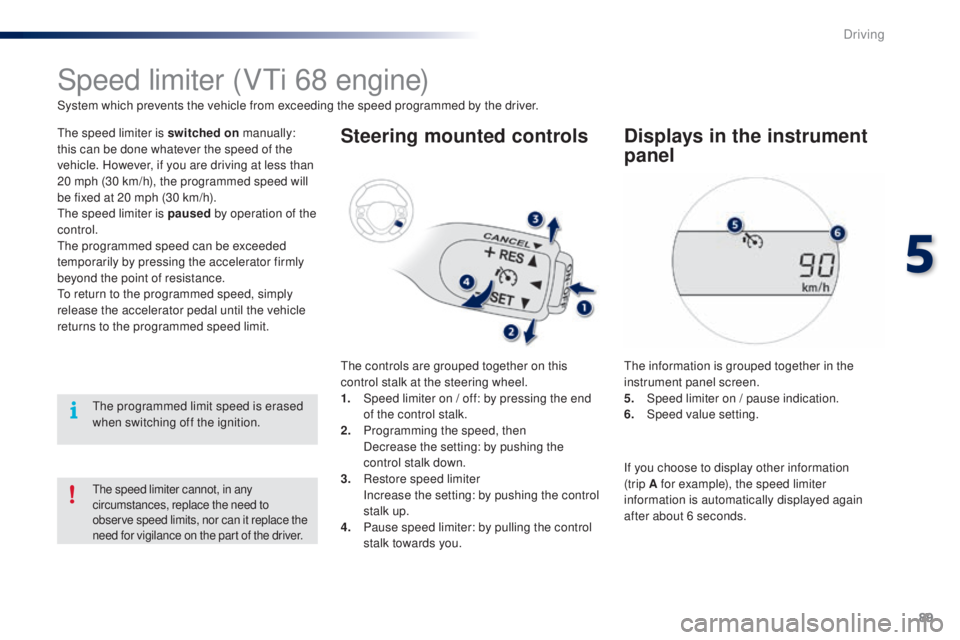
the controls are grouped together on this
control stalk at the steering wheel.
1.
S
peed limiter on / off: by pressing the end
of the control stalk.
2.
P
rogramming the speed, then
D
ecrease the setting: by pushing the
control stalk down.
3.
R
estore speed limiter
I
ncrease the setting: by pushing the control
stalk up.
4.
P
ause speed limiter: by pulling the control
stalk towards you.
Displays in the instrument
panel
the information is grouped together in the
instrument panel screen.
5.
S
peed limiter on / pause indication.
6.
Spe
ed value setting.
the speed limiter cannot, in any
circumstances, replace the need to
observe speed limits, nor can it replace the
need for vigilance on the part of the driver.
If you choose to display other information
(trip A for example), the speed limiter
information is automatically displayed again
after about 6 seconds.
5
Driving