Page 2 of 256
On-line handbook
Select one of the following means of access to view your
handbook on-line...
Referring to the handbook on-line also gives you access to the latest information available, easily identified by the bookmark, associated with
this symbol:If the "My
Peuge
Ot" f
unction is not available on the Peuge
Ot
p
ublic website for your country, you can find your handbook at the
following address:
http://public.servicebox.peugeot.com/ddb/
the language,
the vehicle, its body style,
the print edition of your handbook appropriate for the date of registration of
your vehicle.
Select:
Find your handbook on the Peuge
Ot
w
ebsite, under
"My Peuge
Ot". S
can this code for direct access to your handbook.
Page 11 of 256

9
Limit the causes of excess consumption
Spread loads throughout the vehicle; place the heaviest items in the
bottom of the boot, as close as possible to the rear seats.
Limit the loads carried in the vehicle and reduce wind resistance (roof
bars, roof rack...). u
s
e a roof box in preference.
Remove roof bars and roof racks after use.
At the end of winter, remove snow tyres and refit your summer tyres.
Observe the recommendations on
maintenance
Check the tyre pressures regularly, when cold, referring to the label in
the door aperture, driver's side.
Carry out this check in particular:
-
b
efore a long journey,
-
a
t each change of season,
-
a
fter a long period out of use.
Don't forget the spare wheel and the tyres on any trailer or caravan.
Have your vehicle serviced regularly (engine oil, oil filter, air filter,
passenger compartment filter...) and observe the schedule of
operations recommended in the warranty and maintenance record.
When refuelling, do not continue after the third cut-off of the nozzle to
avoid any over flow.
At the wheel of your new vehicle, it is only after the first 1 800 miles
(3
000 kilometres) that you will see the fuel consumption settle down to
a consistent average.
.
Eco-driving
Page 40 of 256
38
Locking/unlocking from
the inside
Doors
to lock /unlock a door, press/pull button A.
Vehicles with central locking
Pressing button A, driver's side, locks/unlocks
all of the doors and the boot.
Pressing button A , passenger's side, locks/
unlocks just that door.
Door open
If a door is open, the courtesy lamp remains on
if the button is in this position.
Operating the handle always opens the
door, even if it is locked.
Driving with the doors locked may make
access to the passenger compartment
by the emergency services more
difficult in an emergency.
Vehicles without central locking
Pressing button A locks/unlocks the driver's
d o o r o n l y.
Access
Page 167 of 256

165
towing the vehicle
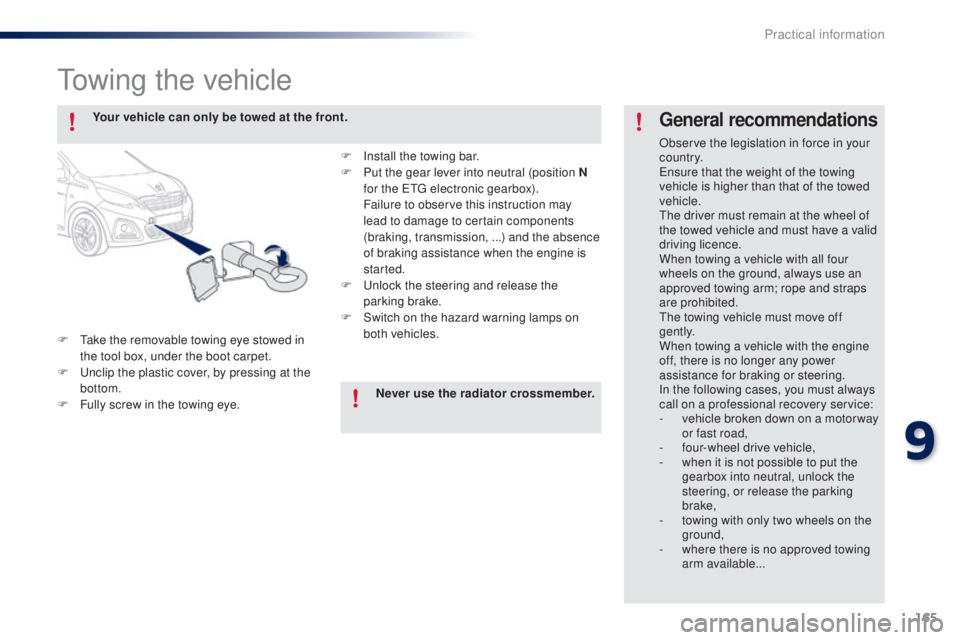
F take the removable towing eye stowed in the tool box, under the boot carpet.
F
u
n
clip the plastic cover, by pressing at the
bottom.
F
F
ully screw in the towing eye.
General recommendations
Observe the legislation in force in your
c o unt r y.
en
sure that the weight of the towing
vehicle is higher than that of the towed
vehicle.
th
e driver must remain at the wheel of
the towed vehicle and must have a valid
driving licence.
When towing a vehicle with all four
wheels on the ground, always use an
approved towing arm; rope and straps
are prohibited.
th
e towing vehicle must move off
g e nt l y.
When towing a vehicle with the engine
off, there is no longer any power
assistance for braking or steering.
In the following cases, you must always
call on a professional recovery service:
-
v
ehicle broken down on a motor way
or fast road,
-
f
our-wheel drive vehicle,
-
w
hen it is not possible to put the
gearbox into neutral, unlock the
steering, or release the parking
brake,
-
t
owing with only two wheels on the
ground,
-
w
here there is no approved towing
arm available...
Your vehicle can only be towed at the front.
F
I
nstall the towing bar.
F
P
ut the gear lever into neutral (position N
for the
etg
electronic gearbox).
F
ailure to observe this instruction may
lead to damage to certain components
(braking, transmission, ...) and the absence
of braking assistance when the engine is
started.
F
u
n
lock the steering and release the
parking brake.
F
S
witch on the hazard warning lamps on
both vehicles.
Never use the radiator crossmember.
9
Practical information
Page 174 of 256

172
Checking levels
take care when working under the
bonnet, as certain areas of the engine
may be extremely hot (risk of burns) and
the cooling fan could start at any time
(even with the ignition off).
Oil level
the check of the oil level is carried
out with the dipstick, located under
the bonnet. For the position of the
dipstick, refer to the under-bonnet
view on a previous page.
Checking with dipstick
Check all of these levels regularly, in line with the warranty and maintenance record. top them up if necessary, unless other wise indicated.
If a level drops significantly, have the corresponding system checked by a Pe ugeOt dealer or a qualified workshop.
to e
nsure the accuracy of the reading,
your vehicle must be on a level
sur face, with the engine off for at least
30
minutes.
It is normal to top up the oil level between
two services (or oil changes). P
e
uge
Ot
recommends that you check the level, and top
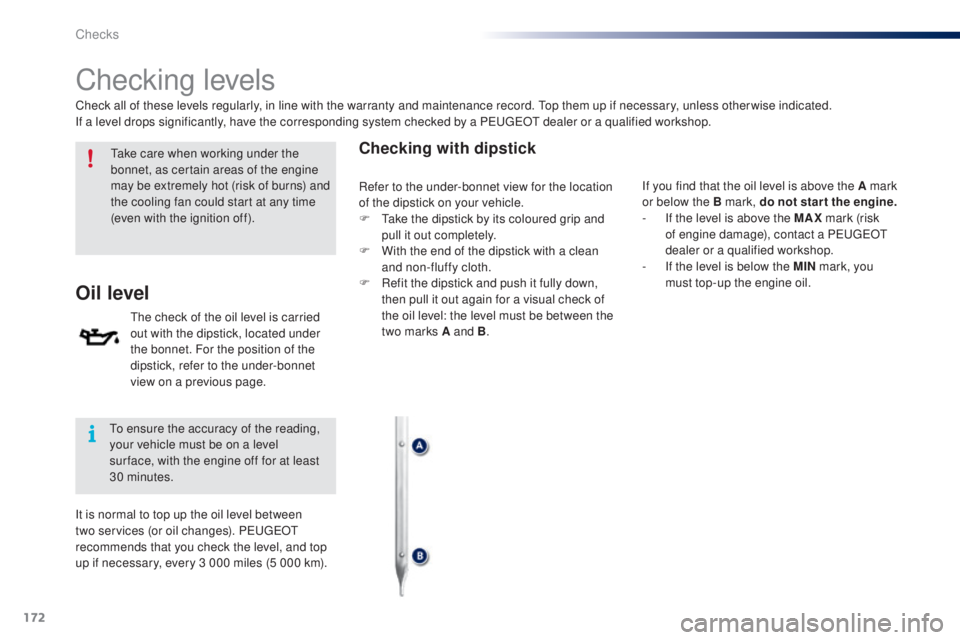
up if necessary, every 3 000 miles (5 000 km). If you find that the oil level is above the A mark
or below the B mark, do not star t the engine.
-
I
f the level is above the MAX mark (risk
of engine damage), contact a P
e
uge
Ot
dealer or a qualified workshop.
-
I
f the level is below the MIN mark, you
must top-up the engine oil.
Refer to the under-bonnet view for the location
of the dipstick on your vehicle.
F
t
a
ke the dipstick by its coloured grip and
pull it out completely.
F
W
ith the end of the dipstick with a clean
and non-fluffy cloth.
F
R
efit the dipstick and push it fully down,
then pull it out again for a visual check of
the oil level: the level must be between the
two marks A and B .
Checks
Page 178 of 256

176
ETG electronic gearbox
the etg gearbox does not require
any maintenance (no oil change).
Refer to the warranty and
maintenance record for information
on when this unit should be checked.
Brake wear depends on the style
of driving, particularly in the case
of vehicles used in town, over short
distances. It may be necessary to
Brake pads
For information on checking brake
disc wear, contact a Pe ugeOt
dealer or a qualified workshop.
Brake disc wearOnly use products recommended by
Pe ugeOt or products of equivalent
quality and specification.
In order to optimise the operation of
units as important as those in the
braking system, P
e
uge
Ot
selects and
offers very specific products.
After washing the vehicle, dampness,
or in wintry conditions, ice can form
on the brake discs and pads: braking
efficiency may be reduced. Make light
brake applications to dry and defrost
the brakes.
Parking brake
If excessive travel or a loss of
effectiveness of this system is
noticed, the parking brake must
be checked, even between two
services.
Checking this system must be done by a
P
e
uge
Ot
dealer or a qualified workshop.
have the condition of the brakes checked, even
between vehicle services.
un
less there is a leak in the circuit, a drop in
the brake fluid level indicates that the brake
pads are worn.
Checks
Page 194 of 256
04
192
RADIO
Display "DAB" waveband.Display the name and Radiotext for
the current station.
Short-cut: access to the choice of
audio source, telephone functions and
SmartphoneLink
® mode.
Select the radio station.
If the "DAB" radio station being
listened to is not available, the
"FM" waveband appears in the
screen.
Preset stations.
Short press: select the
preset radio station.
Long press: preset a radio
station.
"Next multiplex".
Next radio station.
Display the name and number of the
"Multiplex" service being used.
"Previous multiplex". "DAB radio configuration".
Previous radio station.
Page 201 of 256
199
Level 1
Level 2Level 3Comment
Contacts
After making choices, start the call.Favourites
Call history
Enter a number Call
enter a number then start the call.
Telephone/message
configurationConnect the telephone
telephoneSelect the services to use on the
peripheral device
Audio player
Sounds configuration Ringtone
Choose settings, activate or deactivate
options.
Ringtone volume
Incoming SMS/MMS tone
Incoming SMS/MMS volume
Incoming e-mail tone
Incoming e-mail volume
Incoming call volume
Contacts/call history
configuration Automatic transfer
u
pdate telephone contacts
Sort contacts by
Add favourite
Remove favourite
Message configuration Display of incoming calls
Contacts/call history transfer
state
Telephone display
configuration Display of incoming calls
Contacts/call history transfer
state
B3_en_Chap12a_Autoradio-t
oyota-tactile-1_ed01-2014