2014 PEUGEOT 108 dashboard
[x] Cancel search: dashboardPage 116 of 256

114
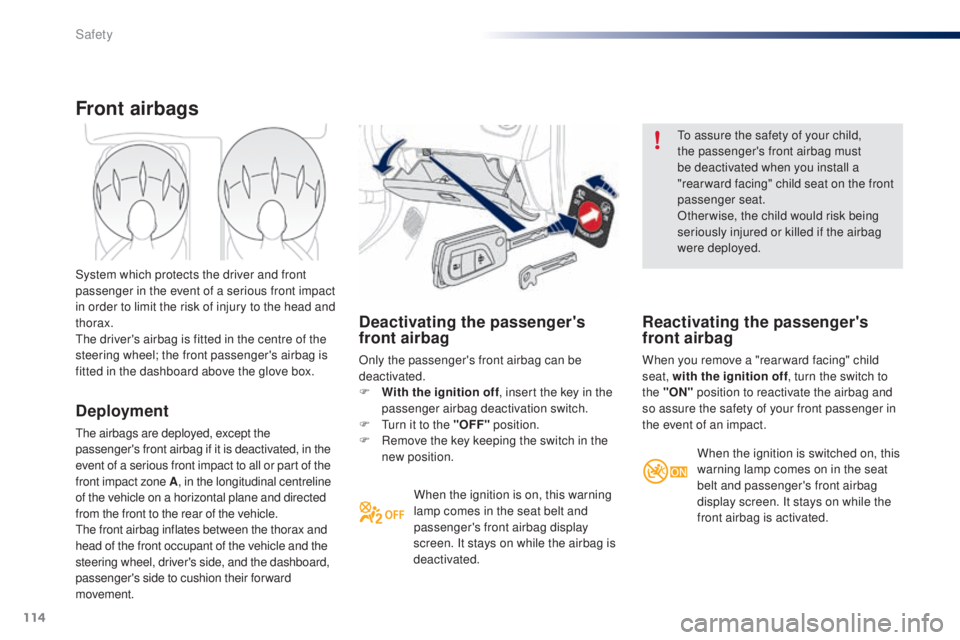
Deactivating the passenger's
front airbag
Only the passenger's front airbag can be
deactivated.
F
W
ith the ignition off , insert the key in the
passenger airbag deactivation switch.
F
t
u
rn it to the "OFF" position.
F
R
emove the key keeping the switch in the
new position.
When the ignition is on, this warning
lamp comes in the seat belt and
passenger's front airbag display
screen. It stays on while the airbag is
deactivated.
to a
ssure the safety of your child,
the passenger's front airbag must
be deactivated when you install a
"rear ward facing" child seat on the front
passenger seat.
Otherwise, the child would risk being
seriously injured or killed if the airbag
were deployed.
Reactivating the passenger's
front airbag
When you remove a "rear ward facing" child
seat, with the ignition off , turn the switch to
the "ON" position to reactivate the airbag and
so assure the safety of your front passenger in
the event of an impact.
Front airbags
Deployment
the airbags are deployed, except the
passenger's front airbag if it is deactivated, in the
event of a serious front impact to all or part of the
front impact zone A , in the longitudinal centreline
of the vehicle on a horizontal plane and directed
from the front to the rear of the vehicle.
th
e front airbag inflates between the thorax and
head of the front occupant of the vehicle and the
steering wheel, driver's side, and the dashboard,
passenger's side to cushion their forward
movement. System which protects the driver and front
passenger in the event of a serious front impact
in order to limit the risk of injury to the head and
thorax.
th
e driver's airbag is fitted in the centre of the
steering wheel; the front passenger's airbag is
fitted in the dashboard above the glove box.
When the ignition is switched on, this
warning lamp comes on in the seat
belt and passenger's front airbag
display screen. It stays on while the
front airbag is activated.
Safety
Page 119 of 256

117
Sit in a normal upright position.
Wear a correctly adjusted seat belt.
Do not leave anything between the
occupants and the airbags (a child, pet,
object...). t
h
is could hamper the operation of
the airbags or injure the occupants.
After an accident or if the vehicle has been
stolen or broken into, have the airbag
systems checked.
All work on the airbag system must be
carried out by a P
e
uge
Ot
dealer or a
qualified workshop.
ev
en if all of the precautions mentioned
are observed, a risk of injury or of minor
burns to the head, chest or arms when an
airbag is deployed cannot be ruled out.
t
h
e
bag inflates almost instantly (within a few
milliseconds) then deflates within the same
time discharging the hot gas via openings
provided for this purpose.Front airbags
Do not drive holding the steering wheel by its
spokes or resting your hands on the centre
part of the wheel.
Passengers must not place their feet on the
dashboard.
Do not smoke as deployment of the airbags
can cause burns or the risk of injury from a
cigarette or pipe.
Never remove or pierce the steering wheel or
hit it violently.
Do not fit or attach anything to the steering
wheel or dashboard, this could cause
injuries with deployment of the airbags.
For the airbags to be fully effective, observe the following safety rules:
Lateral airbags
use only approved covers on the seats,
compatible with the deployment the lateral
airbags. For information on the range of seat
covers suitable for your vehicle, you can
contact a P
e
uge
Ot
dealer.
Refer to the "Accessories" section.
Do not fix or attach anything to the seat
backs (clothing...).
t
h
is could cause injury
to the chest or arms if the lateral airbag is
deployed.
Do not sit with the upper part of the body any
nearer to the door than necessary.
Curtain airbags
Do not fix or attach anything to the roof. th is
could cause injury to the head if the curtain
airbag is deployed.
If fitted on your vehicle, do not remove the
grab handles installed on the roof, they play
a part in securing the curtain airbags.
7
Safety
Page 136 of 256

134
Fuel tank
Low fuel levelRefuelling
When the low fuel level is reached,
this warning lamp comes on and the
last bar flashes, accompanied by an
audible signal.
You have approximately 5 litres remaining.
In certain driving conditions and depending on
the engine, the distance which can be travelled
with the fuel remaining may be less than
30
miles (50 km).
When the frequency of the flashing increases,
you have approximately 3 litres remaining .
to r
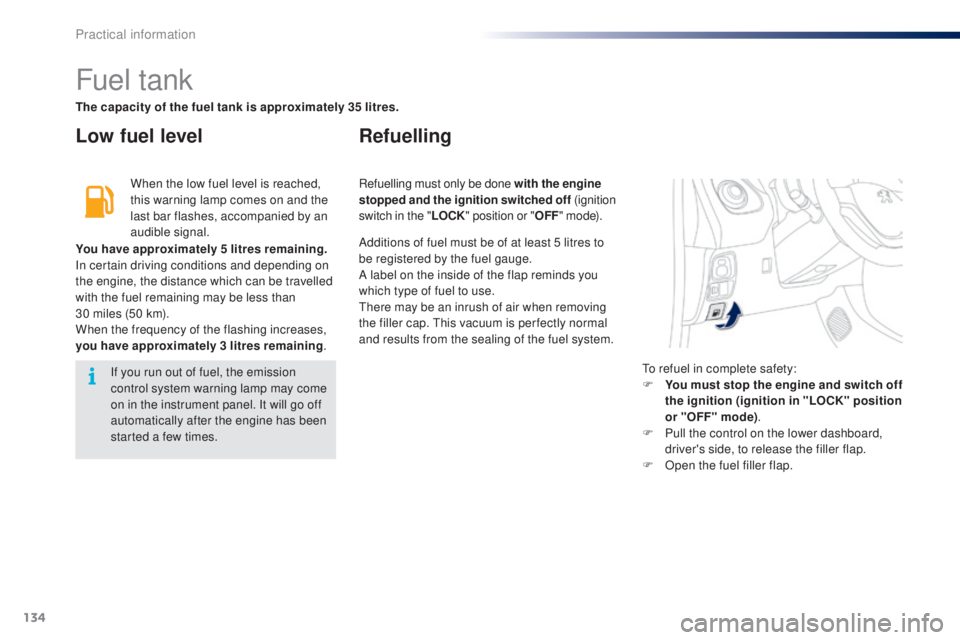
efuel in complete safety:
F
Y
ou must stop the engine and switch off
the ignition (ignition in "LOCK" position
or "OFF" mode) .
F
P
ull the control on the lower dashboard,
driver's side, to release the filler flap.
F
O
pen the fuel filler flap.
If you run out of fuel, the emission
control system warning lamp may come
on in the instrument panel. It will go off
automatically after the engine has been
started a few times. Refuelling must only be done with the engine
stopped and the ignition switched off
(ignition
switch in the " LOCK" position or " OFF" m o d e).
The capacity of the fuel tank is approximately 35 litres.
Additions of fuel must be of at least 5 litres to
be registered by the fuel gauge.
A label on the inside of the flap reminds you
which type of fuel to use.
th
ere may be an inrush of air when removing
the filler cap.
t
h
is vacuum is per fectly normal
and results from the sealing of the fuel system.
Practical information
Page 154 of 256

152
Changing a fuse
Access to toolsthe fuseboxes are located behind the
dashboard in the passenger compartment and
next to the battery under the bonnet.
th
e extraction tweezer is fixed at the front of
the underbonnet fusebox.
F
u
n
clip the plastic cover, located below
the windscreen, by pressing on the
two
catches.F
u
n
clip the fusebox cover by pressing on
the lug on the right.
F
R
emove the tweezer.
When unclipping the plastic cover, take
care not to remove the seal.
Practical information
Page 156 of 256

154
Dashboard fuses
the fusebox is located below the dashboard
(driver's side).
F u
n
clip the plastic cover for access to the
fuses.
When you have finished, carefully refit the
c ove r. Fuse
N° Rating
(A) Functions
1 5Fuel injection system - Audio system - VSC system
2 15Front and rear screenwash
3 5Main distribution unit - Instrument panel - Display screen -
Air conditioning - Heated rear screen and door mirror heating -
Heated seats - e
l
ectric fabric roof - Audio system
4 5
el
ectric power steering - Stop & Start
5 15Rear wiper
6 5Cooling fan - ABS system
e
S
P - VSC system
7 25Front wiper
8 10Heated door mirrors
9 1512 V socket (120 W max)
10 7. 5Door mirrors - Audio system - Stop & Start - Instrument panel -
Display screen
Practical information
Page 172 of 256

170
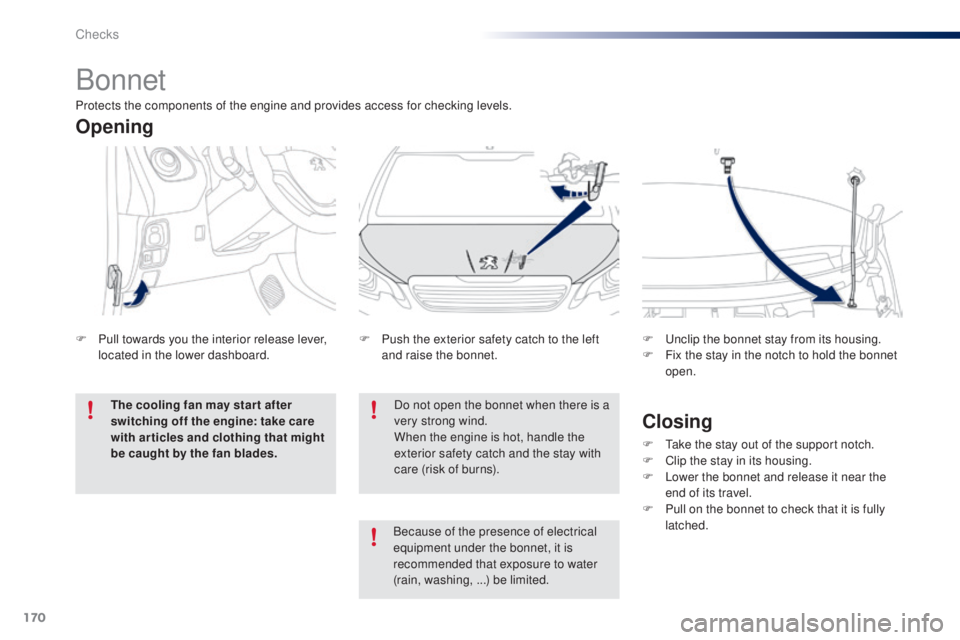
Bonnet
Do not open the bonnet when there is a
very strong wind.
When the engine is hot, handle the
exterior safety catch and the stay with
care (risk of burns).
F
P
ush the exterior safety catch to the left
and raise the bonnet. F u
n
clip the bonnet stay from its housing.
F
F
ix the stay in the notch to hold the bonnet
open.
Opening
F Pull towards you the interior release lever, located in the lower dashboard.
The cooling fan may star t after
switching off the engine: take care
with articles and clothing that might
be caught by the fan blades.
Closing
F take the stay out of the support notch.
F C lip the stay in its housing.
F
L
ower the bonnet and release it near the
end of its travel.
F
P
ull on the bonnet to check that it is fully
latched.
Protects the components of the engine and provides access for checking levels.
Because of the presence of electrical
equipment under the bonnet, it is
recommended that exposure to water
(rain, washing, ...) be limited.
Checks
Page 241 of 256

239
Dashboard fuses 152-156
Instruments and controls
Opening the bonnet 1 70
Door mirrors
5
1
el
ectric windows
4
2
Courtesy lamp
1
01
Control for electric fabric roof
4
2
Rear view mirror
5
2
Sun visors
6
5
Manual parking brake
7
6Heating, ventilation
5
3-55
Manual air conditioning
5
6-57
Automatic air conditioning
5
8 - 61
Windscreen demist / defrost
6
2
Rear screen demist / defrost
6
3
7-inch touch screen
1
81-220
Setting the time
2
9
Radio
221-236
Setting the time
2
8
Manual gearbox
7
6
e
tg
el
ectronic gearbox
7
7-80
ge
ar shift indicator
8
1
Stop & Start
8
3 - 85
Hill start assist
8
2
12 V accessory socket
6 5uS
B port 6 6
Jack auxiliary socket
6
6
B3_en_Chap13_recherche-visuelle_ed01-2014
.
Visual search
Page 245 of 256

243
Head restraints, rear .......................................50
H eating ............................................... 55, 56, 59
Hill start assist
................................................. 8
2
Hooks
.............................................................. 70
I
engine, petrol ................................ 13 5 , 171, 17 7en
gines ......................................................... 17 7
en
vironment
................. 8 , 5
4, 63, 103, 163, 174
Identification plates
....................................... 18
0
Indicators, direction
......................................102
Inflating accessories (using the kit)
..............13 9
Inflating tyres
............................................8, 180
Instrument panel
...............................
..............10
Instrument panel screen
................................. 11
I
nterior fittings
...........................................64, 65
Interior lamp
..................................................101
iPhone connection
........................................206
ISOFIX
..........................................................131
ISOFIX mountings ................................. 1 2 7, 1 3 1
L
Filling with fuel ...................................... 13 4, 13 5
Fitting a wheel ............................... ................14 4
Fittings, boot
................................................... 69
F
lashing indicators
................102, 148, 150, 151
Folding/unfolding the door mirrors
.................51
Frequency (radio)
.................................. 191, 2 25
Front foglamps
........................................ 9 5, 149
Front seats
...................................................... 47
Fuel ..............................................8, 25, 134, 135
Fuel gauge
.............................................. 25, 13 4
Fuel tank .................................................. 25, 13 4
Fusebox, dashboard
..................................... 15 4
Fuses
............................................................. 152
Jack
........
.......................................................142
Jack cable
.............................................19 4, 228
JACK socket
.............................64, 66, 194, 228
J
Keeping children safe .............11 2 , 114 , 118 -13 3
Key .................................................................. 30
Key, electronic
..................................... 33-35, 37
Key in ignition warning
....................................71
Keyless
e
n
try and Starting ................33, 34, 72
K
F
G
gearbox - etg .................................... 8, 77, 176ge
arbox, manual ..........................8, 76, 83, 175
gea
r lever
..............................
...........................8
ge
ar lever, etg gearbox ................................77
ge
ar lever, manual gearbox
...........................76
ge
ar shift indicator
......................................... 81
gl
ove box .................................................. 64, 65
H
Hands-free kit ....................................... 200, 231
Hazard warning lamps ..................................103
Headlamps
................................ 93, 98, 148, 149 Lamps, front
...........................................
148 -149
Lamps, rear
............................................
150 -151
Lamps, warning and indicator
..................
13 -23
Level, brake fluid
...........................................
17
3
Levels and checks .................................
171-174
Lighting
................
..........................................
148
Lighting bulbs (replacement)
................. 1
47-151
Lighting control stalk
.................................93, 94
Lighting dimmer
..............................
................
26
Lighting, guide-me home
................................
97
Lighting on reminder
.......................................
95
Loading
.............................................................
8
Locating your vehicle
...................................... 3
1
Locking/unlocking a door from the inside....... 38
M
Main beam .............................................. 93, 148
Maintenance ..................................................... 8
Manual mode
.................................................. 77
Mat
.................................................................. 67
Menu
............................. 186, 188, 198, 214, 216
Menus (
tou
ch screen)
.................................. 18
2
Mini fuel level
.......................................... 25, 13 4
Mirrorlink connection
.............................210 -212
Mirror, rear view
.............................................. 52
Mirrors, door .................................................... 51
Mountings for ISOFIX seats
.................1 2 7, 1 3 1
N
Number plate lamps ...................................... 1 51
.
Alphabetical index