2014 PEUGEOT 108 tyre pressure
[x] Cancel search: tyre pressurePage 138 of 256

136
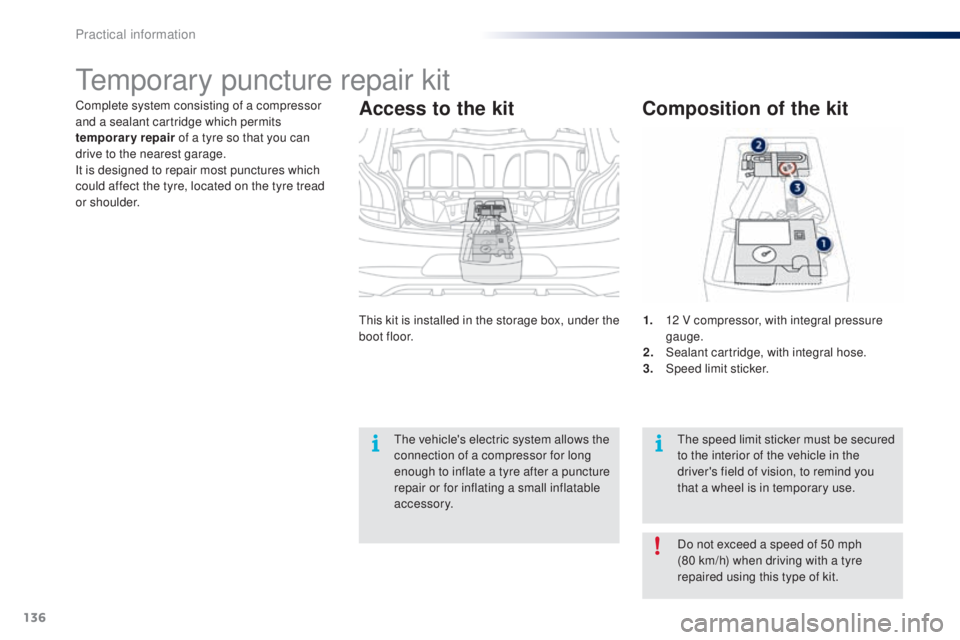
Complete system consisting of a compressor
and a sealant cartridge which permits
temporary repair of a tyre so that you can
drive to the nearest garage.
It is designed to repair most punctures which
could affect the tyre, located on the tyre tread
or shoulder.
temporary puncture repair kit
Composition of the kit
1. 12 V compressor, with integral pressure gauge.
2.
S
ealant cartridge, with integral hose.
3.
Spe
ed limit sticker.
th
e speed limit sticker must be secured
to the interior of the vehicle in the
driver's field of vision, to remind you
that a wheel is in temporary use.th
is kit is installed in the storage box, under the
boot floor.
th
e vehicle's electric system allows the
connection of a compressor for long
enough to inflate a tyre after a puncture
repair or for inflating a small inflatable
accessory.
Do not exceed a speed of 50 mph
(80
km/h) when driving with a tyre
repaired using this type of kit.
Access to the kit
Practical information
Page 140 of 256

138
F Check that the compressor switch is at the "O " position).
F
u
n
coil fully the electric cable, stowed under
the compressor.
F
C
onnect compressor's plug to the vehicle's
12 V socket.
F
S
witch on the ignition.
ta
ke care, the sealant product
is harmful (e.g. ethylene-glycol,
colophony...) if swallowed and causes
irritation to the eyes.
Keep this product out of the reach of
children.
th
e use-by date is marked on the
cartridge.
After use, do not discard the
cartridge by the roadside, take it to a
P
e
uge
Ot
dealer or an authorised
waste disposal site.
Don't forget to obtain a new sealant
cartridge, available from a P
e
uge
Ot
dealer or a qualified workshop. If after around 5 to 7 minutes the
pressure is not attained, this indicates
that the tyre is not repairable; contact
a P
e
uge
Ot
dealer or a qualified
workshop for assistance.
F S tart the compressor by placing the switch
at the " I" position and leave it running until
the tyre pressure reaches 2.0 bar.
t
h
e sealant product is injected into the tyre
under pressure; do not disconnect the pipe
from the valve during this operation (risk of
splashing and stains).
Practical information
Page 141 of 256

139
F Place the switch in the "O" position.
F R emove the kit.
F
D
rive immediately for approximately
three miles (five kilometres), at reduced
speed (between 15 and 35 mph (20 and
60
km/h)), to plug the puncture.
F
S
top to check the repair and the tyre
pressure using the kit.
Checking / adjusting tyre pressures
F Check that the compressor switch is at the "O " position.
F
u
n
coil fully the electric cable, stowed under
the compressor.
F
C
onnect the compressor's plug to the
vehicle's 12 V socket.
F
S
witch on the ignition.
You can also use the compressor, without
injecting sealant, to check and if necessary
adjust the tyre pressures
F
R
emove the valve cap from the tyre and
place it in a clean area.
F
u
n
coil the pipe stowed under the
compressor.
F
S
crew the pipe onto the valve and tighten
f i r m l y.
9
Practical information
Page 142 of 256

140
Should the pressure of one or more
tyres be adjusted, it is necessary to
reinitialise the under-inflation detection
system.
Refer to the "
un
der-inflation detection"
section.
Tyre under-inflation
detection
After repair of the tyre, the warning
lamp will remain on until the system is
reinitialised.
For more information, refer to the
"
un
der-inflation detection" section.
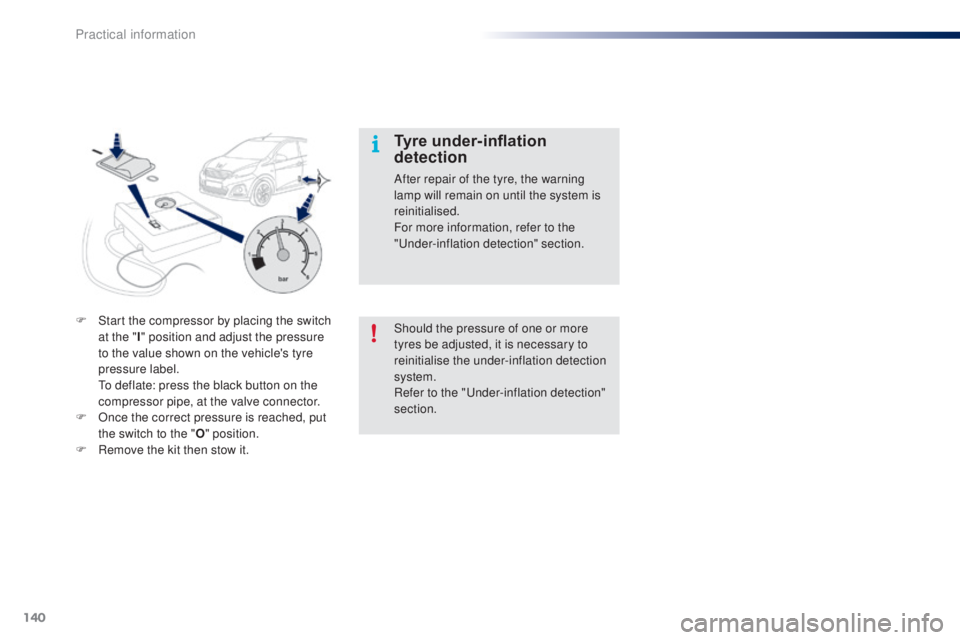
F
S
tart the compressor by placing the switch
at the " I" position and adjust the pressure
to the value shown on the vehicle's tyre
pressure label.
t
o d
eflate: press the black button on the
compressor pipe, at the valve connector.
F
O
nce the correct pressure is reached, put
the switch to the " O" position.
F
R
emove the kit then stow it.
Practical information
Page 144 of 256

142
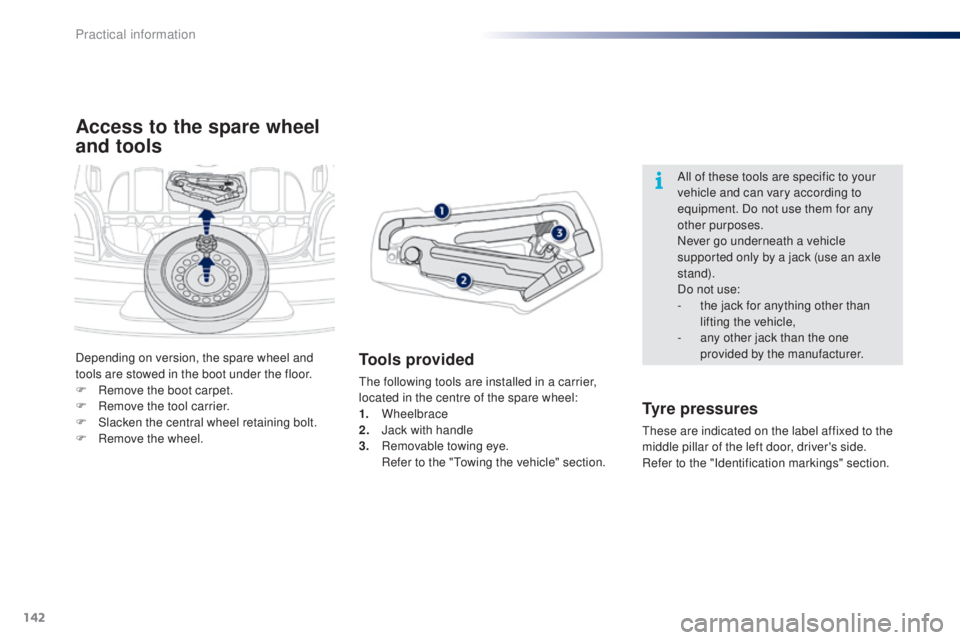
Access to the spare wheel
and tools
Tools provided
the following tools are installed in a carrier,
located in the centre of the spare wheel:
1.
Wheelbrace
2.
J
ack with handle
3.
R
emovable towing eye.
R
efer to the "
to
wing the vehicle" section.
Tyre pressures
these are indicated on the label affixed to the
middle pillar of the left door, driver's side.
Refer to the "Identification markings" section.All of these tools are specific to your
vehicle and can vary according to
equipment. Do not use them for any
other purposes.
Never go underneath a vehicle
supported only by a jack (use an axle
stand).
Do not use:
-
t
he jack for anything other than
lifting the vehicle,
-
a
ny other jack than the one
provided by the manufacturer.
Depending on version, the spare wheel and
tools are stowed in the boot under the floor.
F
R
emove the boot carpet.
F
R
emove the tool carrier.
F
S
lacken the central wheel retaining bolt.
F
R
emove the wheel.
Practical information
Page 147 of 256

145
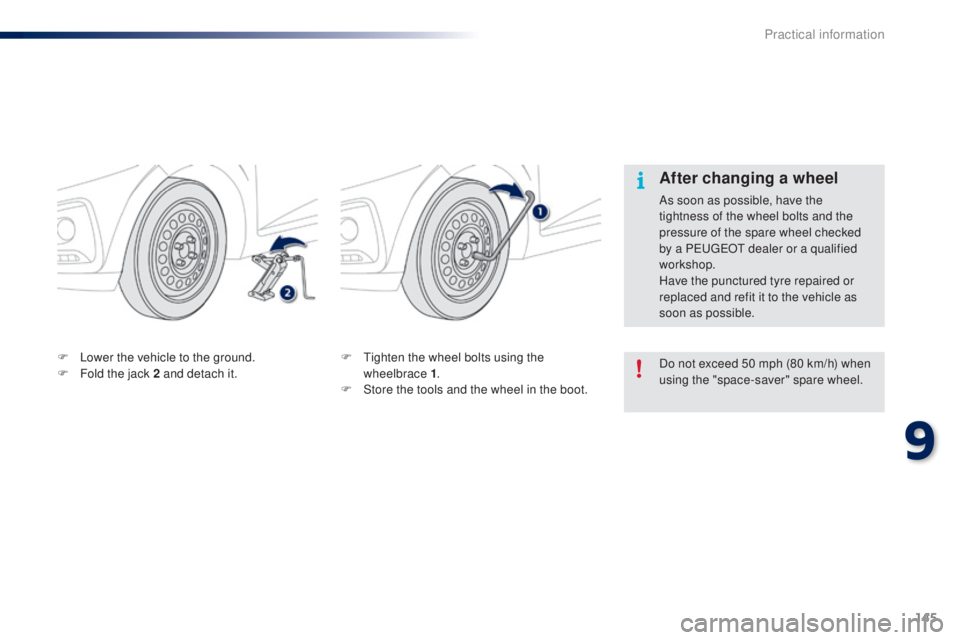
F tighten the wheel bolts using the wheelbrace 1 .
F
S
tore the tools and the wheel in the boot.
F
L
ower the vehicle to the ground.
F
F
old the jack 2 and detach it.
After changing a wheel
As soon as possible, have the
tightness of the wheel bolts and the
pressure of the spare wheel checked
by a P
e
uge
Ot
dealer or a qualified
workshop.
Have the punctured tyre repaired or
replaced and refit it to the vehicle as
soon as possible.
Do not exceed 50 mph (80 km/h) when
using the "space-saver" spare wheel.
9
Practical information
Page 182 of 256

180
Identification markings
A. Vehicle Identification Number (VIN) on the body.
this number is engraved on the middle door
pillar, or the rear door pillar, right hand side.
th
e tyre pressures must be checked
when cold, at least once a month. Low tyre pressures increase fuel
consumption.
B. Vehicle Identification Number
(VIN) in the passenger
compartment.
this is engraved on the crossmember, under
the front right seat.
C. Tyre label.
this label on the middle door pillar, driver's
side, carries the following information:
-
t
he tyre sizes,
-
t
he tyre pressures.
3-door 5-door
Technical data
Page 244 of 256

242
ABS .......................................................107, 108
Accessories .................................................. 167
Accessory socket, 12V
.............................64, 65
Access to rear seats (3 -door)
.........................48
Adjusting headlamps
...................................... 98
Adjusting the steering wheel
..........................52
Airbags
.................................................... 2 2 , 113
Airbags, curtain
..................................... 11
6 , 117
Airbags, front .......................................... 114 , 117
Airbags, lateral
....................................... 115 , 117
Air conditioning
..................................... 8, 57, 60
Air conditioning, automatic
.............................58
Air conditioning, manual
.................................56
Air distribution adjustment
..............................55
Air filter
.......................................................... 175
Air flow
..............................
..............................53
Air flow adjustment
................................... 56, 59
Air intake
................................................... 5 7, 6 0
Air recirculation
......................................... 5 7, 6 0
Air vents
.......................................................... 53
Anti-lock braking system (ABS)
............107, 108
Audible warning
............................................ 102
Audio cable
........................................... 19 4, 228
Audio streaming (Bluetooth)
......... 19
5, 197, 230
Automatic illumination of headlamps
........94, 96
Auxiliary socket
................64, 66, 194, 195, 228 Bonnet
...........................................................
170
Boot .................................................................39
Boot lamp
......................................................101
Brake discs
.................................................... 17
6
Brake lamps
..................................................150
Brake pads
....................................................176
A
C
DAB
(Digital Audio Broadcasting) .......192, 193, 227
Daytime running lamps
...................94, 147, 149
Deactivating the passenger airbag
...............114
Defrosting
........................................... 53, 56, 63
Defrosting, front
.............................................. 62
D
emisting
............................... 5
3, 56, 58, 62, 63
Demisting, front
............................................... 62
Demisting the rear screen
.............................. 63
D
igital Audio Broadcasting
(DA B)
.......................................... 192, 193, 227
Dimensions
................................................... 179
Dipped beam
...............................
............93, 148
Dipstick
................
.......................................... 172
Direction indicators
.......................102, 148, 150
Display screen
.......................................... 11, 2 4
Doors
............................................................... 38
Door pockets
................................................... 64
D
riving economically ........................................ 8
Driving mode
................................................... 77
Dynamic stability control (DSC) .....17, 20, 107-109
Battery
............................................ 161-163, 175
Battery, charging
........................................... 163
Battery for electronic key
................................ 36
Battery, remote control
................................... 32
B
luetooth (hands-free)
.......................... 20
0, 231
Bluetooth (telephone)
............................ 200, 231
B
easy mode (automatic mode) .........................77eBA
(em ergency braking assistance) ..........107
eB
FD
..................................................... 107, 108
ec
o-driving ....................................................... 8
ec
onomy mode
............................................. 16 4
el
ectronic brake force distribution
(
eB
FD)
................................................ 107, 108
el
ectronic engine immobiliser .........................32
em
ergency starting
....................................... 162
em
ergency warning lamps
........................... 10
3
en
ergy economy mode
.................................16 4
en
gine compartment
.................................... 171
en
gine compartment fusebox
.......................157
E
D
Capacity, fuel tank .............................. ..........13 4
Central locking .................................... 31, 33, 38
Changing a bulb
..................................... 147-151
Changing a fuse
..................................... 152-16 0
Changing a wheel
.................................. 141-145
Changing a wiper blade
................................16 4
Changing the electronic key battery
...............36
Changing the remote control battery
..............32
Checking levels
...................................... 17
2-174
Checking tyre pressures (using the kit)
........13 9
Checks
...............
............................171, 175 , 176
Child lock
...............................
........................13 3
Children
...............................
....112 , 114 , 118 -13 3
Child seats
..............................
..............118 -13 2
Child seats, conventional
..............................124
Child seats, ISOFIX
..............................12
8, 129
Closing the boot
.............................................. 39
Closing the doors
............................................ 34
Clutch
............................................................ 175
Colour screen
...............................
.........182, 183
Connectors, audio
.................... 6
4, 66, 195, 228
Coolant level
................................................. 174
Cup holder
...............................
........................64
Alphabetical index