2014 NISSAN XTERRA key
[x] Cancel search: keyPage 4 of 24

2
NAvIGATION SYSTEM (if so equipped)
Your Navigation System can calculate a route from the current location to\
a preferred destination.
The real-time map display and turn-by-turn voice guidance will lead you a\
long the route.
The Navigation System will continually update your vehicle’s position. If you have deviated
from the original route, it will recalculate the route from your current\
location.
NissanConnect™ Google™ services require an active subscription. Please contact a NISSAN
dealer for more information.
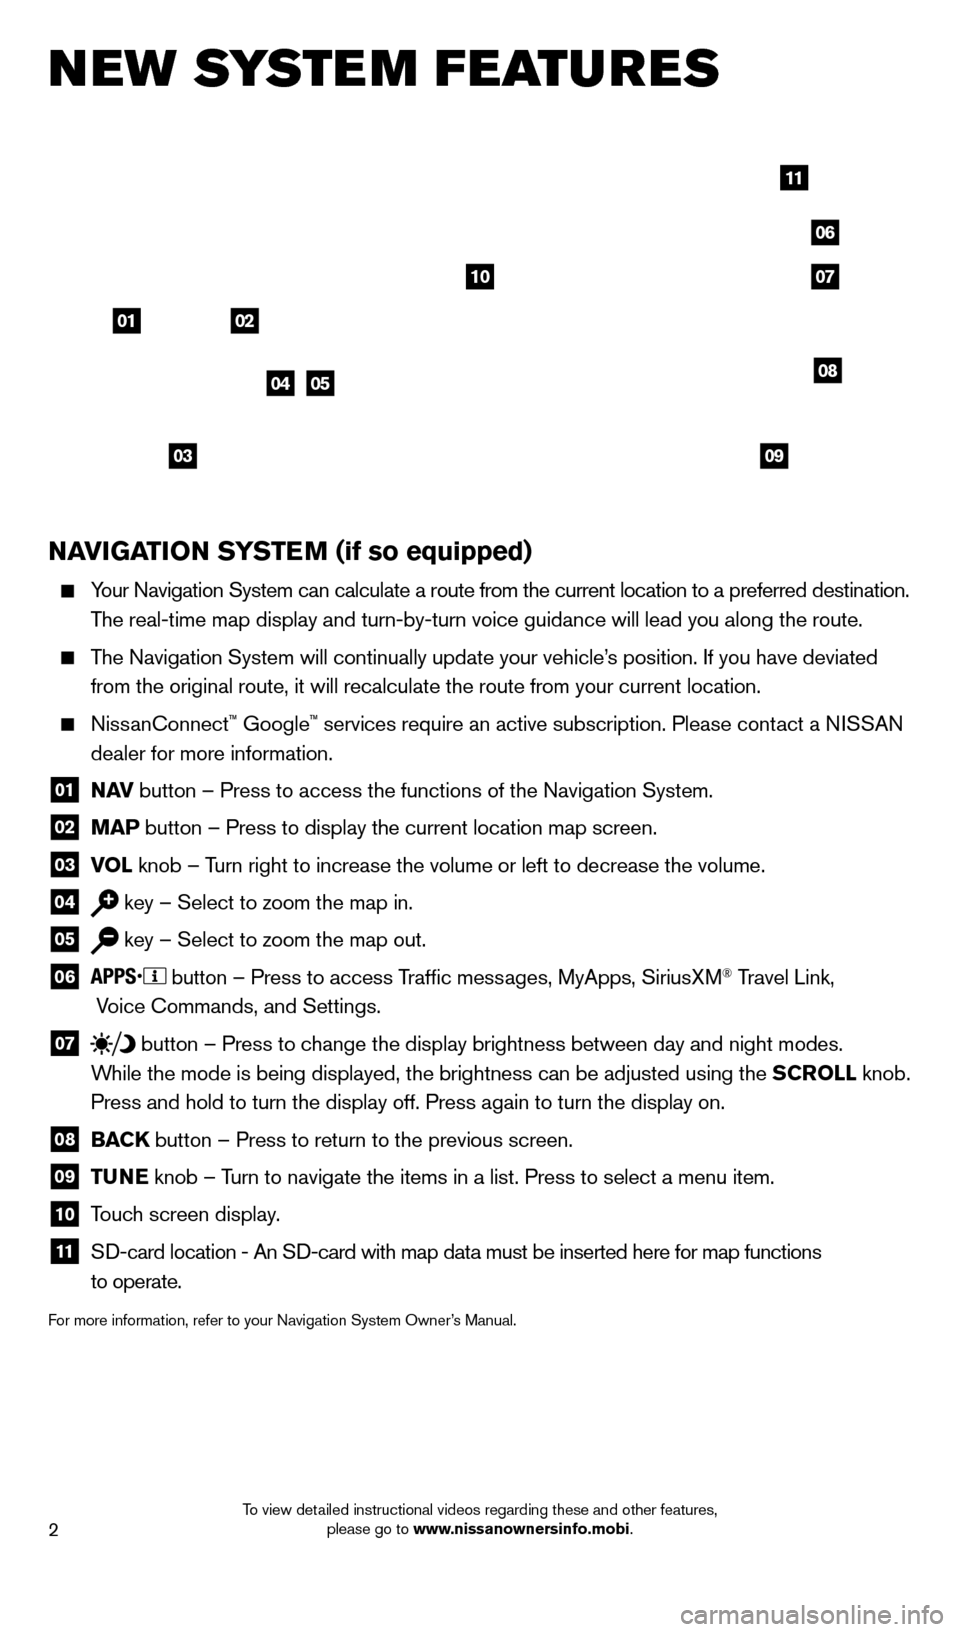
01 N A v button – Press to access the functions of the Navigation System.
02 MAP button – Press to display the current location map screen.
03 v OL
knob – Turn right to increase the volume or left to decrease the volume.
04 key – Select to zoom the map in.
05 key – Select to zoom the map out.
06
button – Press to access Traffic messages, MyApps, SiriusXM® Travel Link,
Voice Commands, and Settings.
07 button
– Press to change the display brightness between day and night modes.
While the mode is being displayed, the brightness can be adjusted using t\
he SCROLL knob.
Press and hold to turn the display off. Press again to turn the display \
on.
08 BAC K
button – Press to return to the previous screen.
09 T UNE
knob – Turn to navigate the items in a list. Press to select a menu item.
10 Touch screen display.
11 Sd -card location - An Sd -card with map data must be inserted here for map functions
to operate.
For more information, refer to your Navigation System Owner’s Manual.
new system features
04
03
06
07
05
0102
08
09
10
11
1631777_14b_Xterra_NAM_QRG_120413.indd 212/4/13 11:30 AM
To view detailed instructional videos regarding these and other features, please go to www.nissanownersinfo.mobi.
Page 7 of 24

5
CLOCK SET/ADJUSTMENT
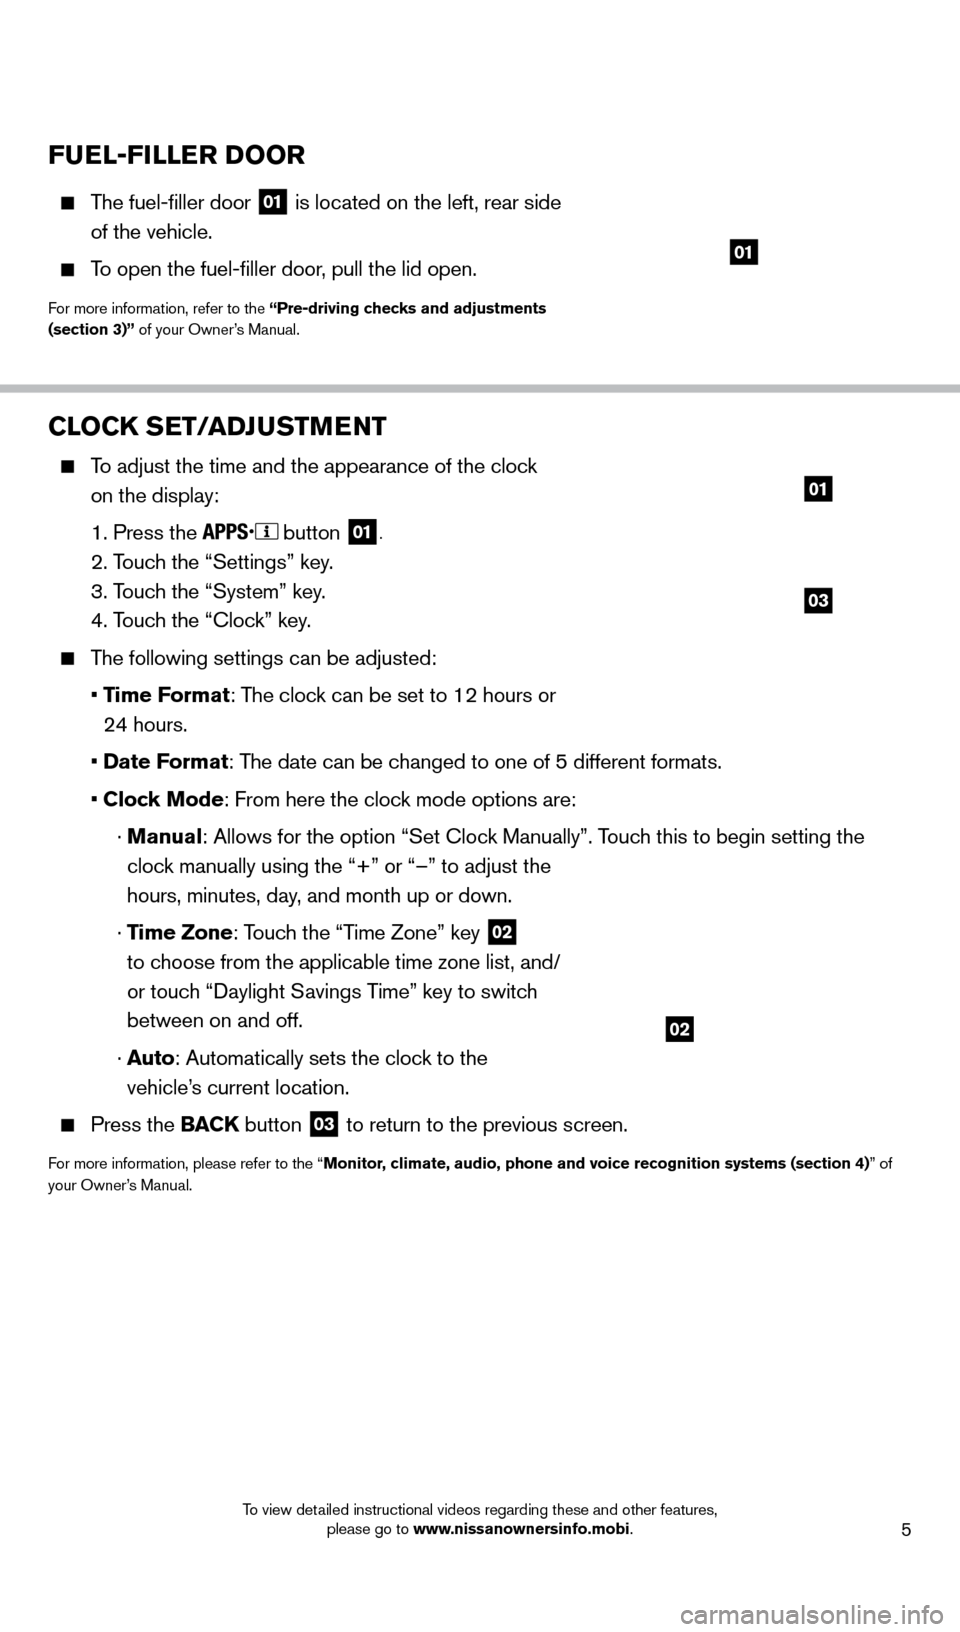
To adjust the time and the appearance of the clock on the display:
1. Press the button 01.
2. Touch the “Settings” key.
3. T
ouch the “System” key.
4. T
ouch the “Clock” key.
The following settings can be adjusted:
•
Time Format: The clock can be set to 12 hours or
24 hours.
•
Date Format: The date can be changed to one of 5 different formats.
•
Clock Mode: From here the clock mode options are:
·
Manual
: Allows for the option “Set Clock Manually”. Touch this to begin setting the
clock manually using the “+” or “–” to adjust the
hours, minutes, day, and month up or down.
·
Time Zone: Touch the “Time Zone” key
02
to choose from the applicable time zone list, and/
or touch “
d
aylight Savings Time” key to switch
between on and off.
·
A
uto: Automatically sets the clock to the
vehicle’s current location.
Press the BAC K button 03 to return to the previous screen.
For more information, please refer to the “Monitor, climate, audio, phone and voice recognition systems (section 4)” of
your Owner’s Manual.
03
01
02
FUEL-FILLER DOOR
The fuel-filler door
01 is located on the left, rear side
of the vehicle.
To open the fuel-filler door, pull the lid open.
For more information, refer to the “Pre-driving checks and adjustments
(section 3)” of your Owner’s Manual.
01
1631777_14b_Xterra_NAM_QRG_120413.indd 512/4/13 11:30 AM
To view detailed instructional videos regarding these and other features, please go to www.nissanownersinfo.mobi.
Page 8 of 24

6
SEAT ADJUSTMENTS
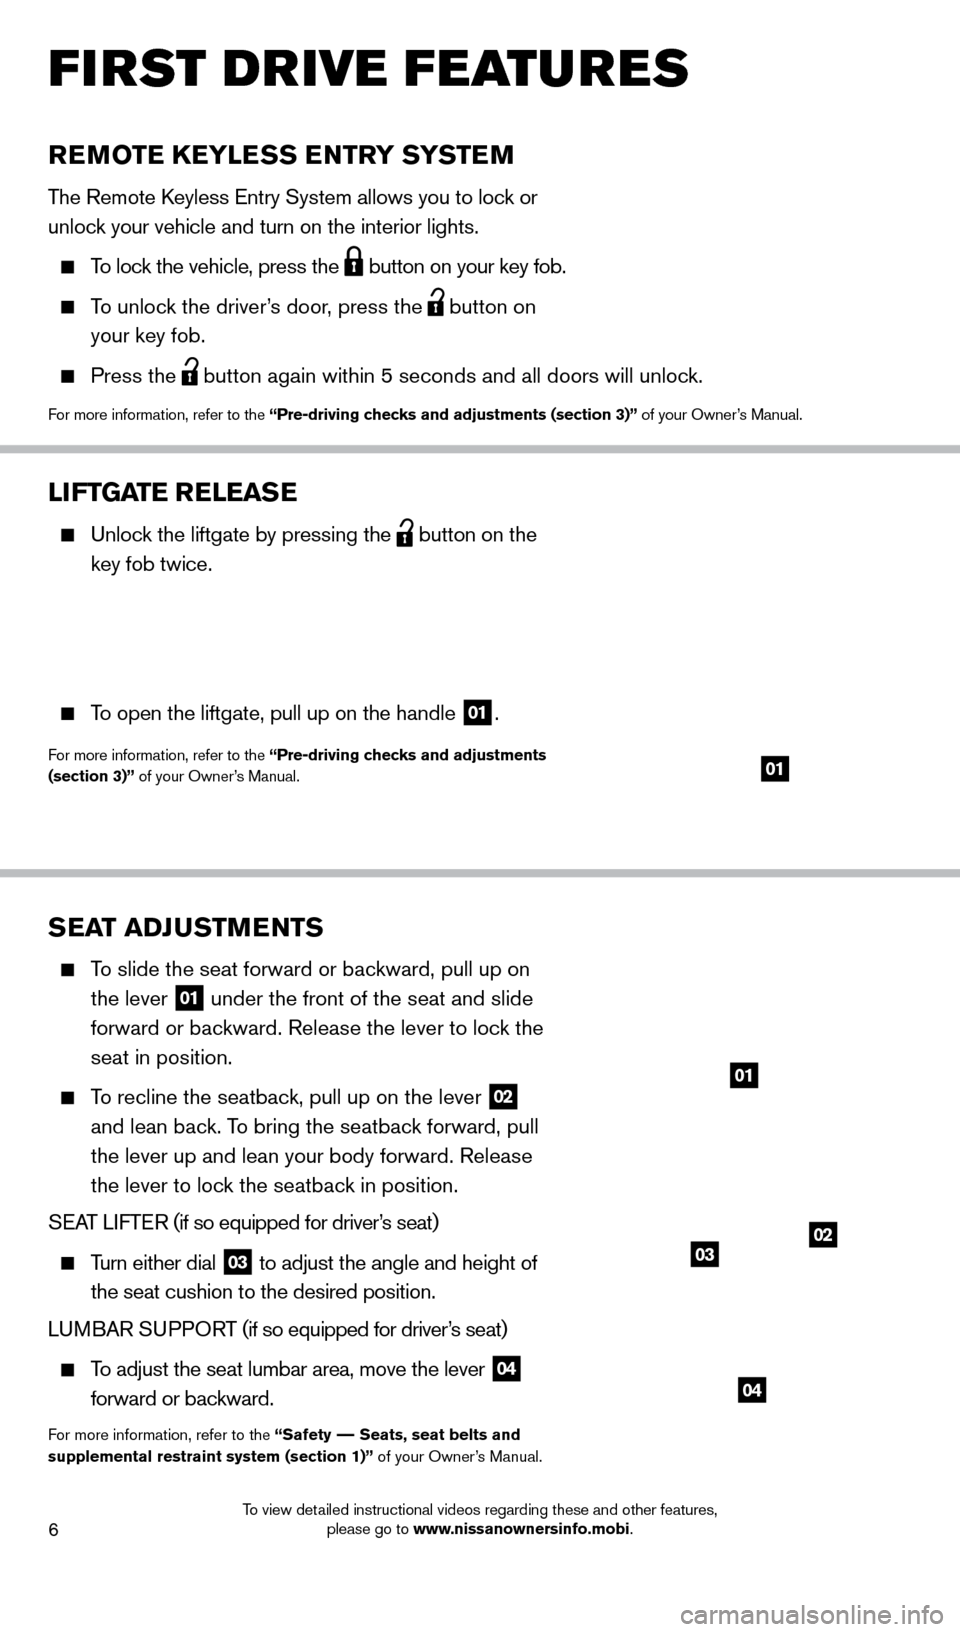
To slide the seat forward or backward, pull up on the lever
01 under the front of the seat and slide
forward or backward. Release the lever to lock the
seat in position.
To recline the seatback, pull up on the lever 02
and lean back. To bring the seatback forward, pull
the lever up and lean your body forward. Release
the lever to lock the seatback in position.
S
EA
T
LIFTER
(if so equipped for driver
’s seat)
Turn either dial 03 to adjust the angle and height of
the seat cushion to the desired position.
LU M BAR SU PPORT (if so equipped for driver’s seat)
To adjust the seat lumbar area, move the lever 04
forward or backward.
For more information, refer to the “Safety –– Seats, seat belts and
supplemental restraint system (section 1)” of your Owner’s Manual.
REMOTE KEYLESS ENTRY SYSTEM
The Remote keyless Entry System allows you to lock or
unlock your vehicle and turn on the interior lights.
To lock the vehicle, press the
button on your key fob.
To unlock the driver’s door, press the
button on
your key fob.
Press the button again within 5 seconds and all doors will unlock.
For more information, refer to the “Pre-driving checks and adjustments (section 3)” of your Owner’s Manual.
LIFTGATE RELEASE
Unlock the liftgate by pressing the
button on the
key fob twice.
To open the liftgate, pull up on the handle 01.
For more information, refer to the “Pre-driving checks and adjustments
(section 3)” of your Owner’s Manual.01
02
04
01
03
first drive features
1631777_14b_Xterra_NAM_QRG_120413.indd 612/4/13 11:30 AM
To view detailed instructional videos regarding these and other features, please go to www.nissanownersinfo.mobi.
Page 18 of 24

16
BLUETOOTH® SYSTEM WITH NAvIGATION (if so equipped)
Send predefined or custom text mess ages* through your vehicle’s Bluetooth® system.
Receive texts through your vehicle’s Bluetooth® system that can be read to you.
Bluetooth® Streaming Audio allows you to use a compatible Bluetooth® phone to play
audio files on your device. Your compatible cellular phone can be connected to the vehicle’s audio system, allowing audio files to play through the vehicle’s speakers.
SMARTPHONE INTEGRATION
For information on how to pair your phone and
use popular smartphone apps in your Nissan, please
visit: www.nissanusa.com/connect/support.
CONNECTING PROCE
d
URE
1.
Press the button on the control panel.
2.
Select the “Settings” key 01.
3.
Select the “Phone & Bluetooth” key 02.
4.
Select the “Connect New
d
evice” key
03.
5.
Initiate the connecting process from the handset.
The system will display the message:
“Is P
IN XXXXXX displayed on your Bluetooth device?”
If the P
IN is displayed on your Bluetooth
® device,
select “Yes” to complete the connecting process.
VEHICLE PHONEBOO
k
T
o access the vehicle phonebook:
1.
Press the button on the instrument panel.
2.
Select the “Phonebook” key 04.
3.
Choose the desired entry from the displayed list.
MA
k
I
NG A CALL
1.
Press the
button on the instrument panel. The
“Phone” screen 05 will appear on the display.
2.
Select one of the following options to make a call:
“Phonebook”: Select the name from an entry stored in
the vehicle phonebook.
*Laws in some jurisdictions may restrict the use of “Text-to-Speech.” Some of the applications and features, such as social networking and texting, may also be restricted. Check local regulations for any requirements before using these features.
system guide
02
01
04
05
03
1631777_14b_Xterra_NAM_QRG_120413.indd 1612/4/13 11:31 AM
To view detailed instructional videos regarding these and other features, please go to www.nissanownersinfo.mobi.
Page 19 of 24

17
“Call Lists”: Select the name from the incoming, outgoing or misse\
d call history.
“Redial”: d ial the last outgoing call from the vehicle.
— Input the phone number manually using the keypad displayed on the s\
creen.
RECEIVING/EN d
IN
G A CALL
To accept the incoming call, either:
• Press the button on the steering wheel, or
• Select the icon on the screen.
To reject the incoming call, either:
• Press the button on the steering wheel, or
• Select the icon on the screen.
For more information, refer to the “Monitor, climate, audio, phone and
voice recognition systems (section 4)” of your Owner’s Manual.
1631777_14b_Xterra_NAM_QRG_120413.indd 1712/4/13 11:31 AM
To view detailed instructional videos regarding these and other features, please go to www.nissanownersinfo.mobi.