2014 NISSAN XTERRA heater
[x] Cancel search: heaterPage 113 of 384
To turn the off road lights off, press the off road
lamps switch again. If the high beam function of
the headlights is turned off at any time, the off
road lights will turn off as well. If the high beam
function is turned back on, the off road lamps
switch needs to be pressed again with the covers
still removed in order to turn on the off road lights.
The covers should remain on the off road lights
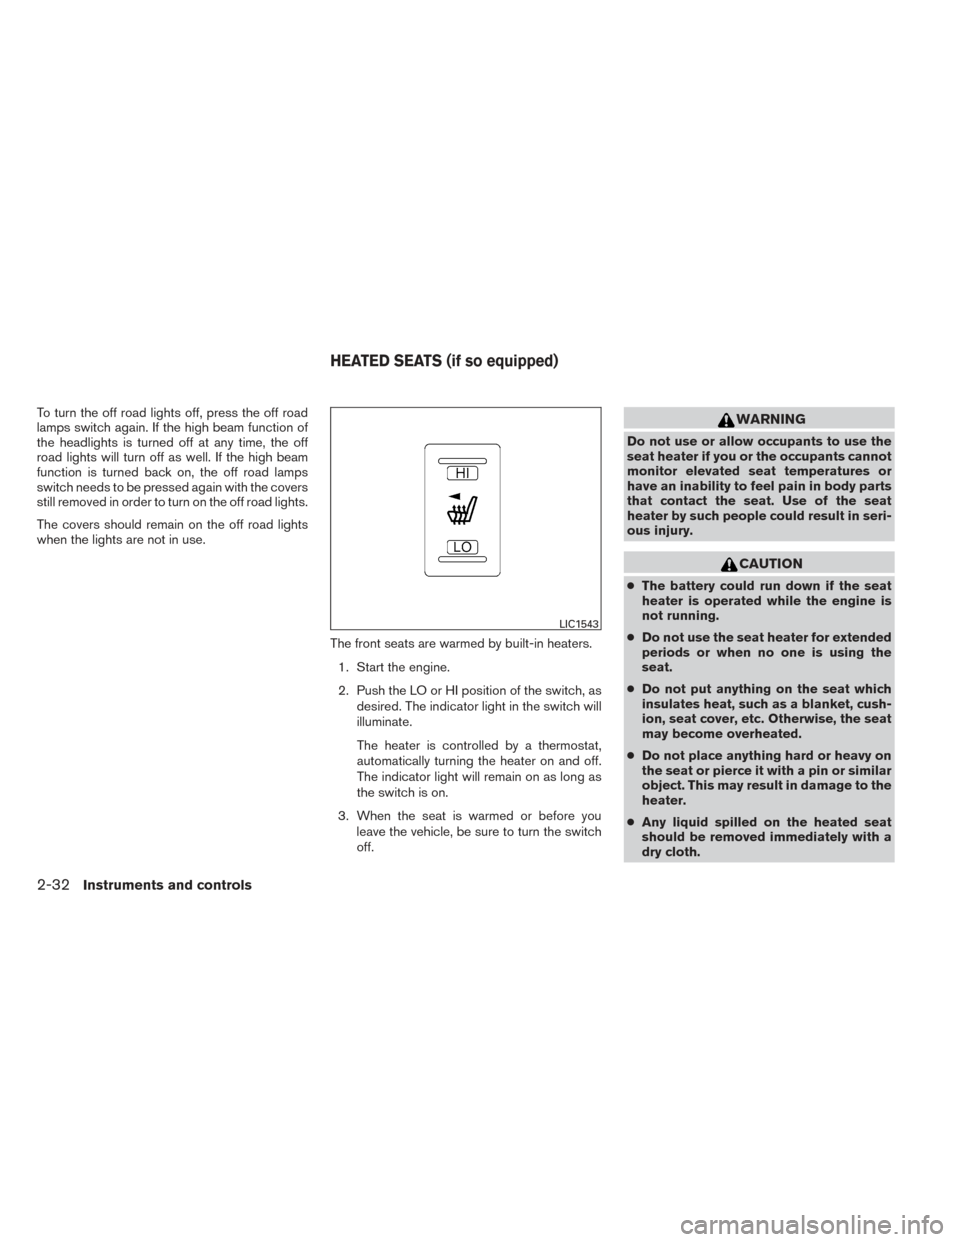
when the lights are not in use.The front seats are warmed by built-in heaters.1. Start the engine.
2. Push the LO or HI position of the switch, as desired. The indicator light in the switch will
illuminate.
The heater is controlled by a thermostat,
automatically turning the heater on and off.
The indicator light will remain on as long as
the switch is on.
3. When the seat is warmed or before you leave the vehicle, be sure to turn the switch
off.WARNING
Do not use or allow occupants to use the
seat heater if you or the occupants cannot
monitor elevated seat temperatures or
have an inability to feel pain in body parts
that contact the seat. Use of the seat
heater by such people could result in seri-
ous injury.
CAUTION
●The battery could run down if the seat
heater is operated while the engine is
not running.
● Do not use the seat heater for extended
periods or when no one is using the
seat.
● Do not put anything on the seat which
insulates heat, such as a blanket, cush-
ion, seat cover, etc. Otherwise, the seat
may become overheated.
● Do not place anything hard or heavy on
the seat or pierce it with a pin or similar
object. This may result in damage to the
heater.
● Any liquid spilled on the heated seat
should be removed immediately with a
dry cloth.
LIC1543
HEATED SEATS (if so equipped)
2-32Instruments and controls
Page 151 of 384
4 Monitor, climate, audio, phone and voice
recognition systems
Control panel buttons — color screen with
Navigation System (if so equipped)..................4-2
How to use the touch screen ....................4-3
How to use the BACK button ....................4-5
How to use the APPS – i button .................4-5
button...................................4-7
How to use the ON-OFF button/VOL
(volume) control knob ...........................4-7
How to use the CAMERA button .................4-7
RearView Monitor (if so equipped) ...................4-8
How to read the displayed lines ..................4-8
Difference between predicted and actual
distances ......................................4-9
Adjusting the screen ........................... 4-11
Operating tips ................................. 4-12
Vents . .......................................... 4-13
Heater and air conditioner (manual) .................4-14
Controls ...................................... 4-14
Heater operation .............................. 4-15
Air conditioner operation .......................4-16
Air flow charts ................................. 4-17
Servicing air conditioner ........................... 4-21
Audio system .................................... 4-21Radio
........................................ 4-21
FM radio reception ............................ 4-21
AM radio reception ............................ 4-22
Satellite radio reception (if so equipped) . . . ......4-22
Audio operation precautions ....................4-22
FM/AM radio with compact disc (CD) player
(if so equipped) ............................... 4-29
FM/AM/SAT radio with compact disc (CD)
player (Type A) (if so equipped) .................4-34
FM/AM/SAT radio with compact disc (CD)
player (Type B) (if so equipped) .................4-39
USB interface (models without Navigation
System) (if so equipped) .......................4-44
USB interface (models with Navigation
System) ...................................... 4-46
iPod®* player operation without Navigation
System (if so equipped) ........................ 4-48
iPod®* player operation with Navigation
System (if so equipped) ........................ 4-50
Bluetooth® streaming audio with Navigation
System (if so equipped) ........................ 4-53
Pandora® audio (United States only)
(if so equipped) ............................... 4-54
CD care and cleaning .......................... 4-55
Page 165 of 384
WARNING
●The air conditioner cooling function op-
erates only when the engine is running.
● Do not leave children or adults who
would normally require the assistance
of others alone in your vehicle. Pets
should also not be left alone. They
could accidentally injure themselves or
others through inadvertent operation of
the vehicle. Also, on hot, sunny days,
temperatures in a closed vehicle could
quickly become high enough to cause
severe or possibly fatal injuries to
people or animals.
● Do not use the recirculation mode for
long periods as it may cause the interior
air to become stale and the windows to
fog up.
NOTE: ● Odors from inside and outside the vehicle
can build up in the air conditioner unit. Odor
can enter the passenger compartment
through the vents.
● When parking, set the heater and air condi-
tioner controls to turn off air recirculation to
allow fresh air into the passenger compart-
ment. This should help reduce odors inside
the vehicle.
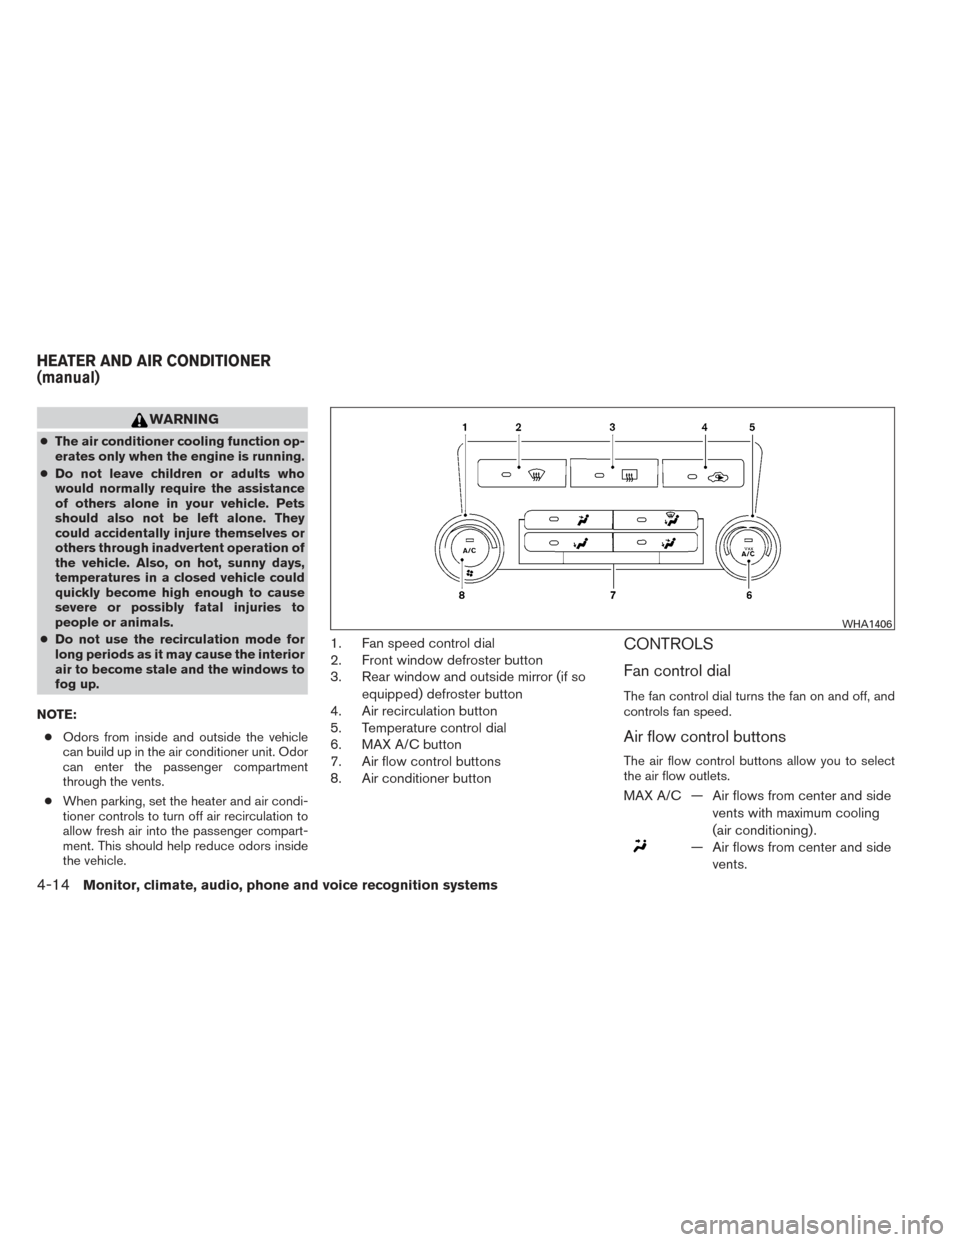
1. Fan speed control dial
2. Front window defroster button
3. Rear window and outside mirror (if so
equipped) defroster button
4. Air recirculation button
5. Temperature control dial
6. MAX A/C button
7. Air flow control buttons
8. Air conditioner buttonCONTROLS
Fan control dial
The fan control dial turns the fan on and off, and
controls fan speed.
Air flow control buttons
The air flow control buttons allow you to select
the air flow outlets.
MAX A/C — Air flows from center and side
vents with maximum cooling
(air conditioning) .
— Air flows from center and sidevents.
WHA1406
HEATER AND AIR CONDITIONER
(manual)
4-14Monitor, climate, audio, phone and voice recognition systems
Page 166 of 384
— Air flows from center and sidevents and foot outlets.
— Air flows mainly from footoutlets.
— Air flows from defroster out-lets and foot outlets.
— Air flows mainly from defrosteroutlets.
Temperature control dial
The temperature control dial allows you to adjust
the temperature of the outlet air. To lower the
temperature, turn the dial to the left. To increase
the temperature, turn the dial to the right.
Air recirculation button
ON position (Indicator light on):
Interior air is recirculated inside the vehicle.
Press the
button to the on position when:
● driving on a dusty road.
● to prevent traffic fumes from entering pas-
senger compartment.
● for maximum cooling when using the air con-
ditioner. OFF position (Indicator light off):
Outside air is drawn into the passenger compart-
ment and distributed through the selected outlet.
Use the off position for normal heater or air con-
ditioner operation.
Air conditioner button
Start the engine, turn the fan control dial to the
desired position and press the
button to
turn on the air conditioner. The indicator light
comes on when the air conditioner is operating.
To turn off the air conditioner, press the
button again.
The air conditioner cooling function oper-
ates only when the engine is running.
Rear window and outside mirror (if so
equipped) defroster switch
For more information about the rear window and
outside mirror (if so equipped) defroster switch,
see “Rear window and outside mirror defroster
switch” in the “Instruments and controls” section
of this manual.
HEATER OPERATION
Heating
This mode is used to direct heated air to the foot
outlets. Some air also flows from the defrost
outlets.
1. Press the
button to the OFF position
for normal heating. The indicator light on
the
button will go off.
2. Press the
air flow control button.
3. Turn the fan control dial to the desired posi- tion.
4. Turn the temperature control dial to the de- sired position between the middle and the
hot position.
Ventilation
This mode directs outside air to the side and
center vents.
1. Press the
button to the OFF position.
The indicator light on the
button will
go off.
2. Press the
air flow control button.
3. Turn the fan control dial to the desired posi- tion.
Monitor, climate, audio, phone and voice recognition systems4-15
Page 167 of 384
4. Turn the temperature control dial to the de-sired position.
Defrosting or defogging
This mode directs the air to the defrost outlets to
defrost/defog the windows.
1. Press the defrost/defog button
.
2. Turn the fan control dial to the desired posi- tion.
3. Turn the temperature control dial to the de- sired position between the middle and the
hot position.
● To quickly remove ice or fog from the win-
dows, turn the fan control dial to the highest
setting and the temperature control to the
full HOT position.
● When the
position is selected, the air
conditioner automatically turns on (the indi-
cator light on the
button will come on)
if the outside temperature is more than 36°F
(2°C) . This dehumidifies the air which helps
defog the windshield. The
mode au-
tomatically turns off, allowing outside air to
be drawn into the passenger compartment
to further improve the defogging perfor-
mance.
Bi-level heating
The bi-level mode directs warmed air to the side
and center vents and to the front and rear floor
outlets.
1. Press the
button to the OFF position.
The indicator light on the
button will
go off.
2. Press the
air flow control button.
3. Turn the fan control dial to the desired posi- tion.
4. Turn the temperature control dial to the de- sired position.
Heating and defogging
This mode heats the interior and defogs the wind-
shield.
1. Press the
air flow control button.
2. Turn the fan control dial to the desired posi- tion.
3. Turn the temperature control dial to the de- sired position between the middle and the
hot position. ●
When the
position is selected, the air
conditioner automatically turns on (however,
the indicator light on the
button will
not come on) if the outside temperature is
more than 36°F (2°C) . If the
air flow
control button is selected for more than one
minute, the air conditioning system will con-
tinue to operate until the fan control dial is
turned to OFF, the vehicle is shut off, or the
A/C button is used to turn off the compres-
sor even if the air flow control dial is turned to
a position other than the
position.
This dehumidifies the air which helps defog
the windshield. The
mode automati-
cally turns off, allowing outside air to be
drawn into the passenger compartment to
further improve the defogging performance.
Operating tips
Clear snow and ice from the wiper blades
and air inlet in front of the windshield. This
improves heater operation.
AIR CONDITIONER OPERATION
Start the engine, turn the fan control dial to the
desired position, and press the
button to
activate the air conditioner. When the air condi-
tioner is on, cooling and dehumidifying functions
are added to the heater operation.
4-16Monitor, climate, audio, phone and voice recognition systems
Page 168 of 384
The air conditioner cooling function oper-
ates only when the engine is running.
Cooling
This mode is used to cool and dehumidify the air.1. Press the
button to the OFF position.
2. Press the
air flow control button.
3.
Turn the fan control dial to the desired position.
4. Press thebutton. The indicator light
on the
button will come on.
5. Turn the temperature control dial to the de- sired position.
● For quick cooling when the outside tem-
perature is high, push the
button to
the ON position. The indicator light on
the
button will come on. Be sure to
return the
to the OFF position for nor-
mal cooling. The indicator light on the
button will go off. You may also select MAX
A/C for quick cooling.
Dehumidified defogging
This mode is used to defog the windows and
dehumidify the air.
1. Press the
air flow control button. 2.
Turn the fan control dial to the desired position.
3. Press thebutton. The indicator light
comes on.
When the
orpositions are se-
lected, the air conditioner automatically turns on
(however, the indicator light will not illuminate) if
the outside temperature is more than 36°F (2°C) .
If one of these air flow control buttons is selected
for more than one minute, the air conditioning
system will continue to operate until the fan con-
trol dial is turned to OFF, the air conditioner is
turned OFF, or the vehicle is shut off, even if a
position other than these positions is selected.
This dehumidifies the air which helps defog the
windshield. The
mode automatically turns
off, allowing outside air to be drawn into the
passenger compartment to further improve the
defogging performance.
4. Turn the temperature control dial to the de- sired position.
Operating tips
●Keep the windows closed while the air con-
ditioner is in operation.
● After parking in the sun, drive for 2 or 3 min-
utes with the windows open to vent hot air
from the passenger compartment. Then,
close the windows. This allows the air con-
ditioner to cool the interior more quickly. ●
The air conditioning system should be
operated for approximately 10 minutes
at least once a month. This helps pre-
vent damage to the system due to lack
of lubrication.
● A visible mist may be seen coming from the
ventilators in hot, humid conditions as the air
is cooled rapidly. This does not indicate a
malfunction.
● If the engine coolant temperature
gauge indicates engine coolant tem-
perature over the normal range, turn
the air conditioner off. See “If your
vehicle overheats” in the “In case of
emergency” section of this manual.
AIR FLOW CHARTS
The following charts show the button and dial
positions for MAXIMUM AND QUICK heating,
cooling or defrosting. For additional information
on heating and cooling, see “Heater and air con-
ditioner (manual)” in this section. The air recir-
culation (
) button should always be in
the OFF position for heating and defrost-
ing.
Monitor, climate, audio, phone and voice recognition systems4-17
Page 205 of 384
4. Select the “Connect New Device” key.
5. The system acknowledges the commandand asks you to initiate connecting from the
phone handset. The connecting procedure
of the cellular phone varies according to
each cellular phone model. See the cellular
phone Owner’s Manual for details. You can
also visit www.nissanusa.com/bluetooth for
instructions on connecting NISSAN recom-
mended cellular phones.
Audio main operation
To switch to the Bluetooth® audio mode, press
the AUX button repeatedly until the Bluetooth®
audio mode is displayed on the screen.
The controls for the Bluetooth® audio are dis-
played on the screen.
PANDORA® AUDIO (United States
only) (if so equipped)
The vehicle’s audio system is capable of playing
audio streaming through a compatible, USB-
connected audio device using the Pandora® mu-
sic service.
Connecting a device for use with
Pandora® audio
Devices capable of streaming Pandora® audio
can be connected to the vehicle’s audio system
via the USB input jack. The USB input jack is
located on the center console beneath the heater
and air conditioner controls.
Launch the Pandora® application on the phone
and then connect with the USB jack. Once con-
nected, the Pandora® controls will be displayed
on the control panel display screen.
Compatibility
The following iPhone® models are compatible
with the system:
● iPhone® 3GS
● iPhone® 4
● iPhone® 4S
● iPhone® 5
The latest Pandora® application should be in-
stalled on the phone.
LHA2844
4-54Monitor, climate, audio, phone and voice recognition systems
Page 238 of 384
Draining of coolant water.......................5-38
Tire equipment ................................ 5-38
Special winter equipment .......................5-38Driving on snow or ice
......................... 5-38
Engine block heater (if so equipped) .............5-39