2014 NISSAN XTERRA ECO mode
[x] Cancel search: ECO modePage 223 of 384
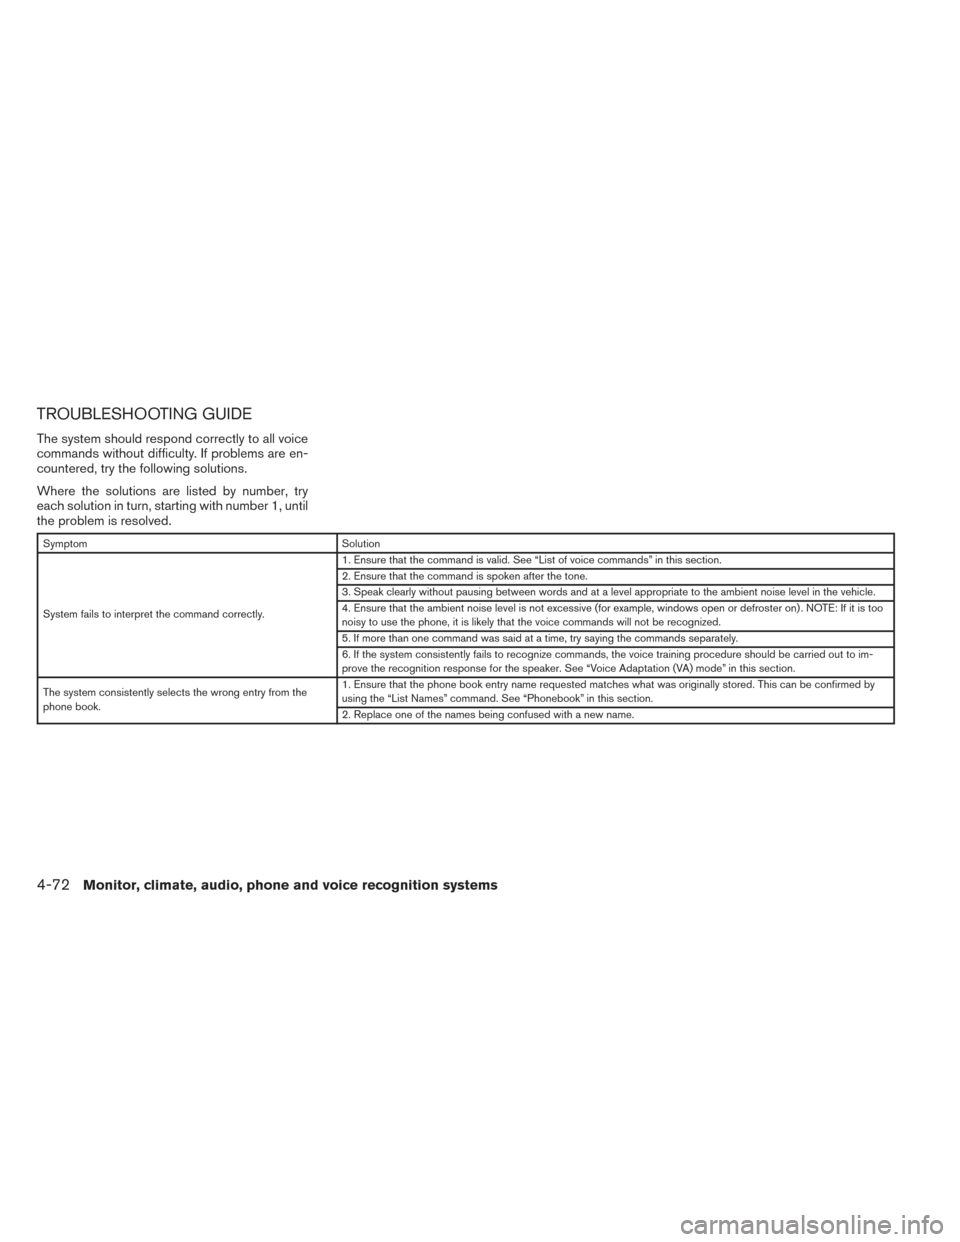
TROUBLESHOOTING GUIDE
The system should respond correctly to all voice
commands without difficulty. If problems are en-
countered, try the following solutions.
Where the solutions are listed by number, try
each solution in turn, starting with number 1, until
the problem is resolved.
SymptomSolution
System fails to interpret the command correctly. 1. Ensure that the command is valid. See “List of voice commands” in this section.
2. Ensure that the command is spoken after the tone.
3. Speak clearly without pausing between words and at a level appropriate to the ambient noise level in the vehicle.
4. Ensure that the ambient noise level is not excessive (for example, windows open or defroster on) . NOTE: If it is too
noisy to use the phone, it is likely that the voice commands will not be recognized.
5. If more than one command was said at a time, try saying the commands separately.
6. If the system consistently fails to recognize commands, the voice training procedure should be carried out to im-
prove the recognition response for the speaker. See “Voice Adaptation (VA) mode” in this section.
The system consistently selects the wrong entry from the
phone book. 1. Ensure that the phone book entry name requested matches what was originally stored. This can be confirmed by
using the “List Names” command. See “Phonebook” in this section.
2. Replace one of the names being confused with a new name.
4-72Monitor, climate, audio, phone and voice recognition systems
Page 227 of 384
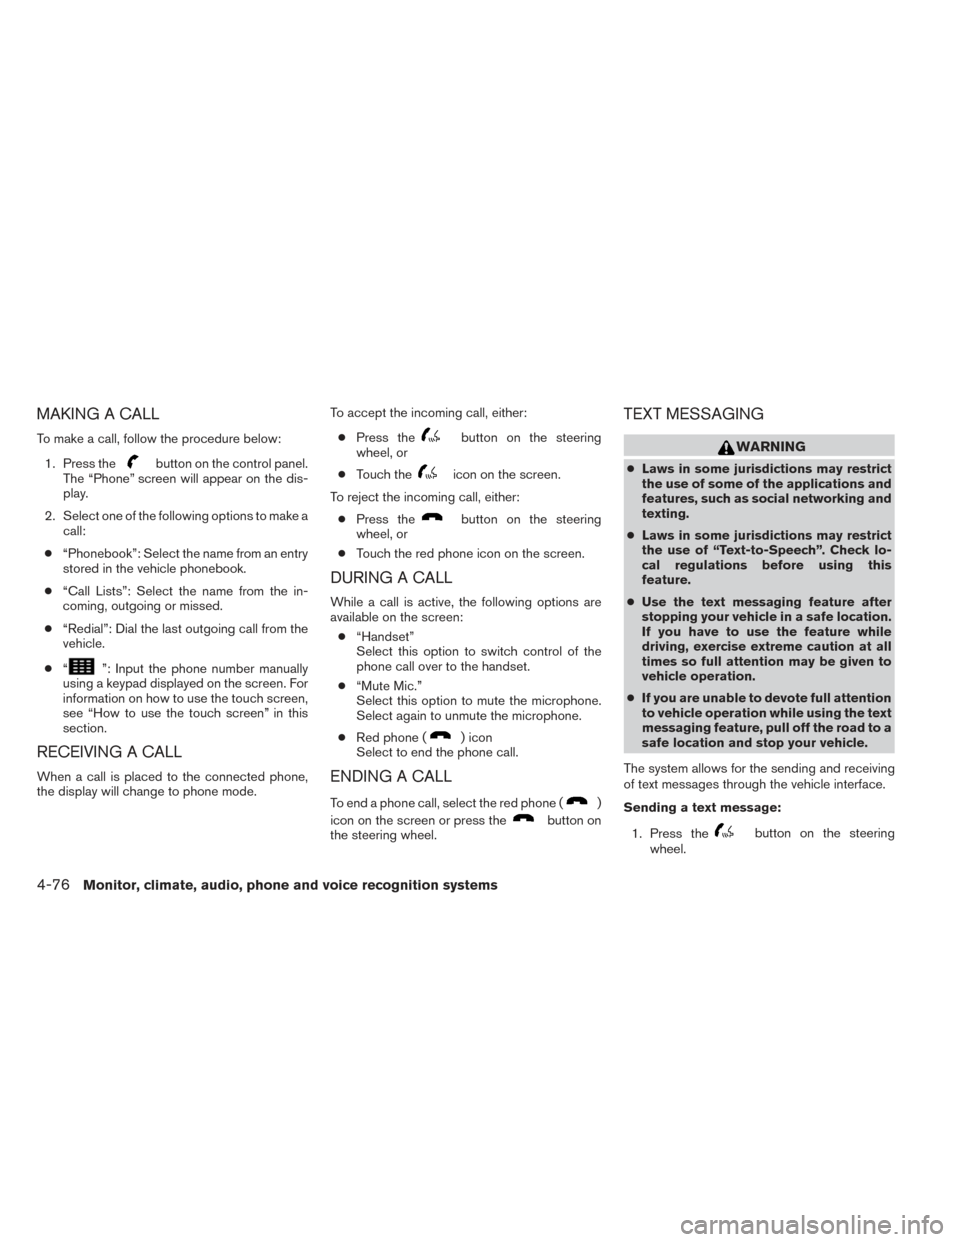
MAKING A CALL
To make a call, follow the procedure below:1. Press the
button on the control panel.
The “Phone” screen will appear on the dis-
play.
2. Select one of the following options to make a call:
● “Phonebook”: Select the name from an entry
stored in the vehicle phonebook.
● “Call Lists”: Select the name from the in-
coming, outgoing or missed.
● “Redial”: Dial the last outgoing call from the
vehicle.
● “
”: Input the phone number manually
using a keypad displayed on the screen. For
information on how to use the touch screen,
see “How to use the touch screen” in this
section.
RECEIVING A CALL
When a call is placed to the connected phone,
the display will change to phone mode. To accept the incoming call, either:
● Press the
button on the steering
wheel, or
● Touch the
icon on the screen.
To reject the incoming call, either: ● Press the
button on the steering
wheel, or
● Touch the red phone icon on the screen.
DURING A CALL
While a call is active, the following options are
available on the screen:
● “Handset”
Select this option to switch control of the
phone call over to the handset.
● “Mute Mic.”
Select this option to mute the microphone.
Select again to unmute the microphone.
● Red phone (
) icon
Select to end the phone call.
ENDING A CALL
To end a phone call, select the red phone ()
icon on the screen or press the
button on
the steering wheel.
TEXT MESSAGING
WARNING
● Laws in some jurisdictions may restrict
the use of some of the applications and
features, such as social networking and
texting.
● Laws in some jurisdictions may restrict
the use of “Text-to-Speech”. Check lo-
cal regulations before using this
feature.
● Use the text messaging feature after
stopping your vehicle in a safe location.
If you have to use the feature while
driving, exercise extreme caution at all
times so full attention may be given to
vehicle operation.
● If you are unable to devote full attention
to vehicle operation while using the text
messaging feature, pull off the road to a
safe location and stop your vehicle.
The system allows for the sending and receiving
of text messages through the vehicle interface.
Sending a text message:
1. Press the
button on the steering
wheel.
4-76Monitor, climate, audio, phone and voice recognition systems
Page 248 of 384
MANUAL TRANSMISSION (if so
equipped)
The ignition switch includes a device that helps
prevent accidental removal of the key while driv-
ing.
The key can only be removed when the ignition
switch is in the LOCK position.
On manual transmission models, to turn the igni-
tion switch to the LOCK position from the ACC or
ON position, place the ignition switch in the OFF
position, push the key in, then place the ignition
switch in LOCK position.
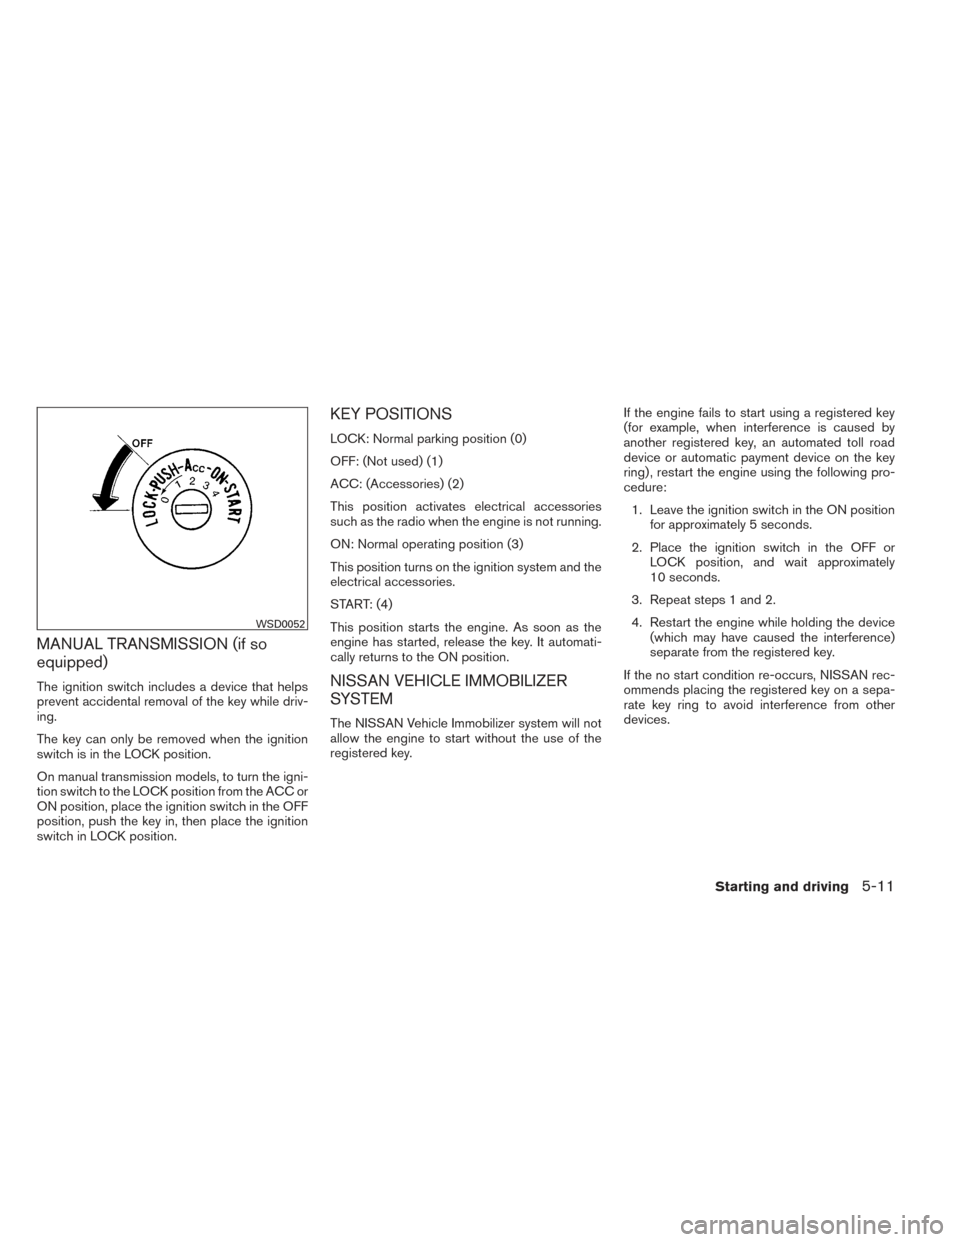
KEY POSITIONS
LOCK: Normal parking position (0)
OFF: (Not used) (1)
ACC: (Accessories) (2)
This position activates electrical accessories
such as the radio when the engine is not running.
ON: Normal operating position (3)
This position turns on the ignition system and the
electrical accessories.
START: (4)
This position starts the engine. As soon as the
engine has started, release the key. It automati-
cally returns to the ON position.
NISSAN VEHICLE IMMOBILIZER
SYSTEM
The NISSAN Vehicle Immobilizer system will not
allow the engine to start without the use of the
registered key.If the engine fails to start using a registered key
(for example, when interference is caused by
another registered key, an automated toll road
device or automatic payment device on the key
ring) , restart the engine using the following pro-
cedure:
1. Leave the ignition switch in the ON position for approximately 5 seconds.
2. Place the ignition switch in the OFF or LOCK position, and wait approximately
10 seconds.
3. Repeat steps 1 and 2.
4. Restart the engine while holding the device (which may have caused the interference)
separate from the registered key.
If the no start condition re-occurs, NISSAN rec-
ommends placing the registered key on a sepa-
rate key ring to avoid interference from other
devices.
WSD0052
Starting and driving5-11
Page 250 of 384
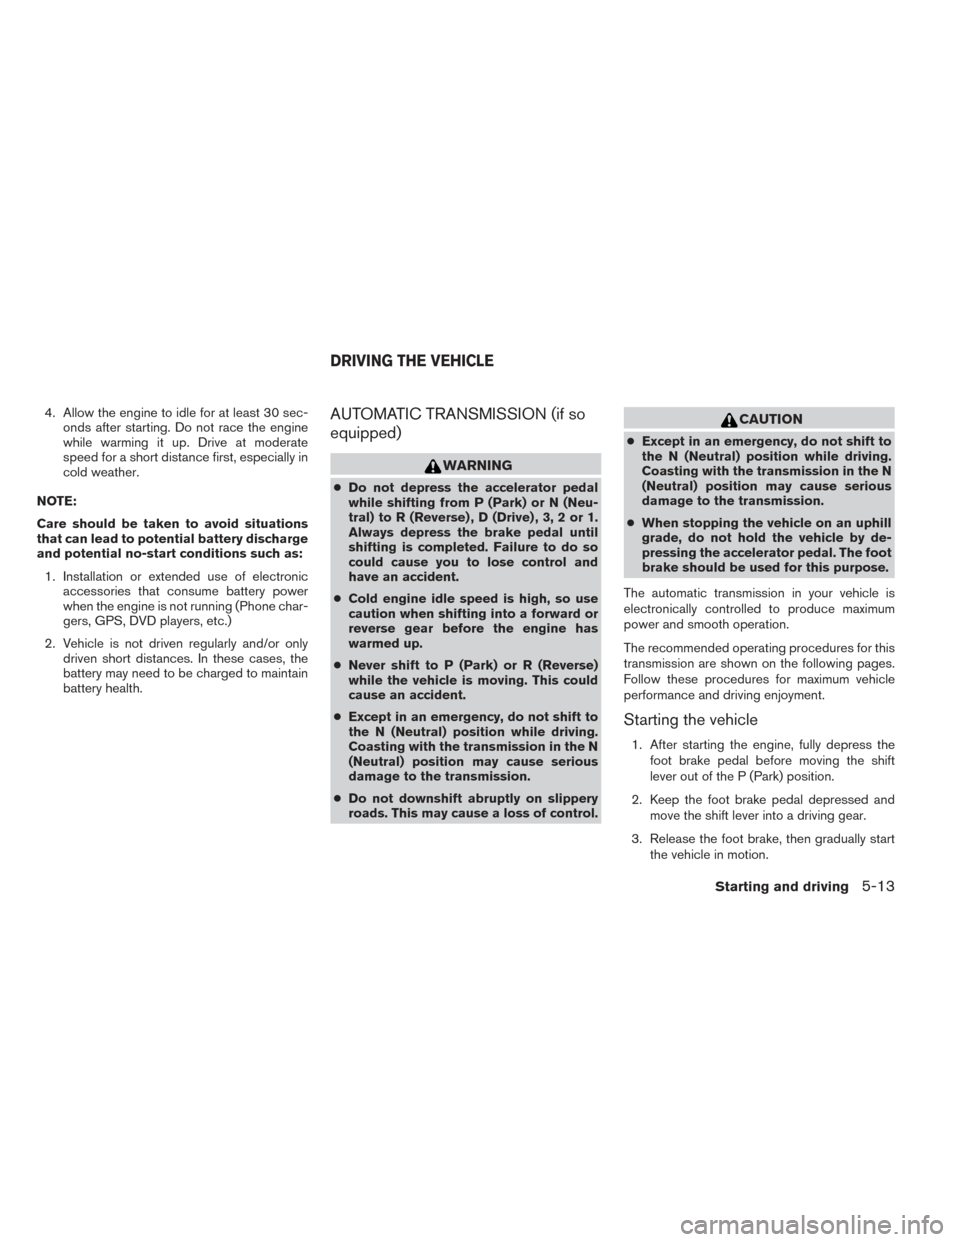
4. Allow the engine to idle for at least 30 sec-onds after starting. Do not race the engine
while warming it up. Drive at moderate
speed for a short distance first, especially in
cold weather.
NOTE:
Care should be taken to avoid situations
that can lead to potential battery discharge
and potential no-start conditions such as: 1. Installation or extended use of electronic accessories that consume battery power
when the engine is not running (Phone char-
gers, GPS, DVD players, etc.)
2. Vehicle is not driven regularly and/or only driven short distances. In these cases, the
battery may need to be charged to maintain
battery health.AUTOMATIC TRANSMISSION (if so
equipped)
WARNING
●Do not depress the accelerator pedal
while shifting from P (Park) or N (Neu-
tral) to R (Reverse) , D (Drive) , 3, 2 or 1.
Always depress the brake pedal until
shifting is completed. Failure to do so
could cause you to lose control and
have an accident.
● Cold engine idle speed is high, so use
caution when shifting into a forward or
reverse gear before the engine has
warmed up.
● Never shift to P (Park) or R (Reverse)
while the vehicle is moving. This could
cause an accident.
● Except in an emergency, do not shift to
the N (Neutral) position while driving.
Coasting with the transmission in the N
(Neutral) position may cause serious
damage to the transmission.
● Do not downshift abruptly on slippery
roads. This may cause a loss of control.
CAUTION
● Except in an emergency, do not shift to
the N (Neutral) position while driving.
Coasting with the transmission in the N
(Neutral) position may cause serious
damage to the transmission.
● When stopping the vehicle on an uphill
grade, do not hold the vehicle by de-
pressing the accelerator pedal. The foot
brake should be used for this purpose.
The automatic transmission in your vehicle is
electronically controlled to produce maximum
power and smooth operation.
The recommended operating procedures for this
transmission are shown on the following pages.
Follow these procedures for maximum vehicle
performance and driving enjoyment.
Starting the vehicle
1. After starting the engine, fully depress the foot brake pedal before moving the shift
lever out of the P (Park) position.
2. Keep the foot brake pedal depressed and move the shift lever into a driving gear.
3. Release the foot brake, then gradually start the vehicle in motion.
DRIVING THE VEHICLE
Starting and driving5-13
Page 255 of 384
Shifting
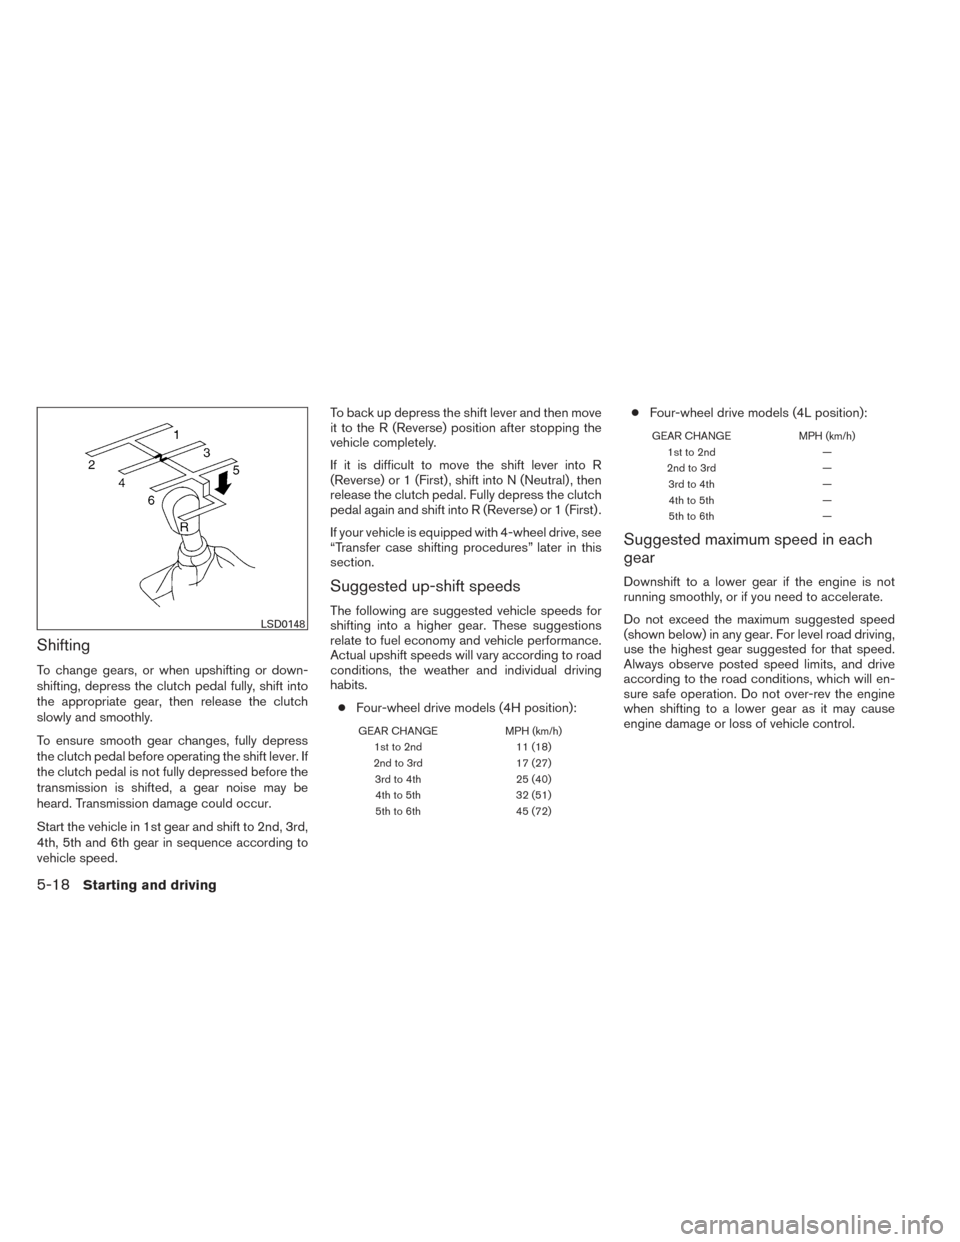
To change gears, or when upshifting or down-
shifting, depress the clutch pedal fully, shift into
the appropriate gear, then release the clutch
slowly and smoothly.
To ensure smooth gear changes, fully depress
the clutch pedal before operating the shift lever. If
the clutch pedal is not fully depressed before the
transmission is shifted, a gear noise may be
heard. Transmission damage could occur.
Start the vehicle in 1st gear and shift to 2nd, 3rd,
4th, 5th and 6th gear in sequence according to
vehicle speed.To back up depress the shift lever and then move
it to the R (Reverse) position after stopping the
vehicle completely.
If it is difficult to move the shift lever into R
(Reverse) or 1 (First) , shift into N (Neutral) , then
release the clutch pedal. Fully depress the clutch
pedal again and shift into R (Reverse) or 1 (First) .
If your vehicle is equipped with 4-wheel drive, see
“Transfer case shifting procedures” later in this
section.
Suggested up-shift speeds
The following are suggested vehicle speeds for
shifting into a higher gear. These suggestions
relate to fuel economy and vehicle performance.
Actual upshift speeds will vary according to road
conditions, the weather and individual driving
habits.
● Four-wheel drive models (4H position):
GEAR CHANGE MPH (km/h)
1st to 2nd 11 (18)
2nd to 3rd 17 (27)
3rd to 4th 25 (40)
4th to 5th 32 (51)
5th to 6th 45 (72)
●Four-wheel drive models (4L position):
GEAR CHANGE MPH (km/h)
1st to 2nd —
2nd to 3rd —
3rdto4th —
4thto5th —
5thto6th —
Suggested maximum speed in each
gear
Downshift to a lower gear if the engine is not
running smoothly, or if you need to accelerate.
Do not exceed the maximum suggested speed
(shown below) in any gear. For level road driving,
use the highest gear suggested for that speed.
Always observe posted speed limits, and drive
according to the road conditions, which will en-
sure safe operation. Do not over-rev the engine
when shifting to a lower gear as it may cause
engine damage or loss of vehicle control.
LSD0148
5-18Starting and driving
Page 261 of 384
TRANSFER CASE SHIFTING
PROCEDURES
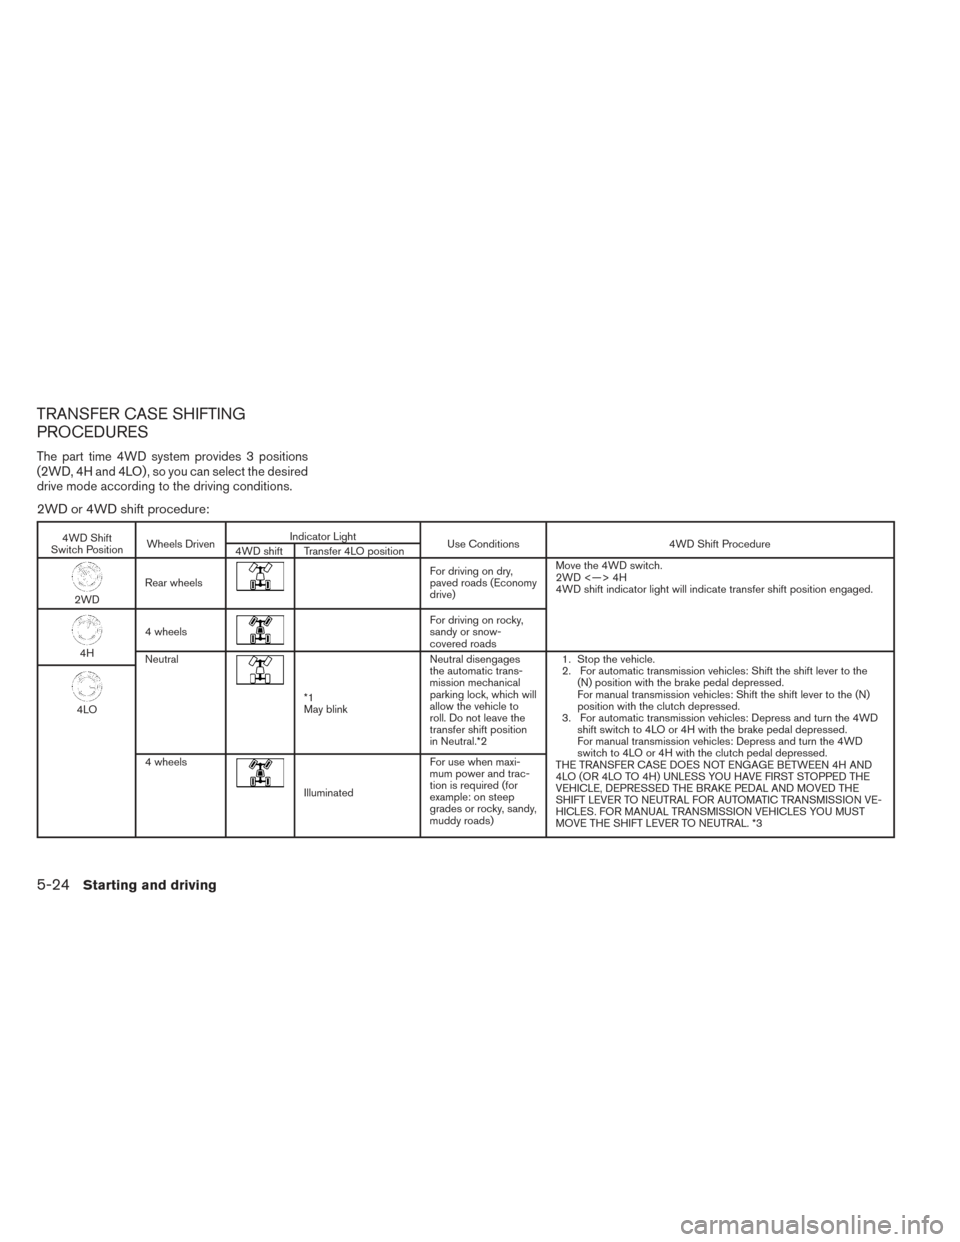
The part time 4WD system provides 3 positions
(2WD, 4H and 4LO) , so you can select the desired
drive mode according to the driving conditions.
2WD or 4WD shift procedure:
4WD Shift
Switch Position Wheels Driven Indicator Light
Use Conditions 4WD Shift Procedure
4WD shift Transfer 4LO position
2WD Rear wheels
For driving on dry,
paved roads (Economy
drive) Move the 4WD switch.
2WD <—> 4H
4WD shift indicator light will indicate transfer shift position engaged.
4H
4 wheels
For driving on rocky,
sandy or snow-
covered roads
Neutral
*1
May blink Neutral disengages
the automatic trans-
mission mechanical
parking lock, which will
allow the vehicle to
roll. Do not leave the
transfer shift position
in Neutral.*2 1. Stop the vehicle.
2. For automatic transmission vehicles: Shift the shift lever to the
(N) position with the brake pedal depressed.
For manual transmission vehicles: Shift the shift lever to the (N)
position with the clutch depressed.
3. For automatic transmission vehicles: Depress and turn the 4WD shift switch to 4LO or 4H with the brake pedal depressed.
For manual transmission vehicles: Depress and turn the 4WD
switch to 4LO or 4H with the clutch pedal depressed.
THE TRANSFER CASE DOES NOT ENGAGE BETWEEN 4H AND
4LO (OR 4LO TO 4H) UNLESS YOU HAVE FIRST STOPPED THE
VEHICLE, DEPRESSED THE BRAKE PEDAL AND MOVED THE
SHIFT LEVER TO NEUTRAL FOR AUTOMATIC TRANSMISSION VE-
HICLES. FOR MANUAL TRANSMISSION VEHICLES YOU MUST
MOVE THE SHIFT LEVER TO NEUTRAL. *34LO
4 wheels
Illuminated For use when maxi-
mum power and trac-
tion is required (for
example: on steep
grades or rocky, sandy,
muddy roads)
5-24Starting and driving
Page 263 of 384
The transfer case 4WD shift switch is used to
select either 2WD or 4WD depending on the
driving conditions. There are three types of drive
modes available, 2WD, 4H and 4LO.
The 4WD shift switch electronically controls the
transfer case operation. Rotate the switch to
move between each mode, 2WD, 4H and 4LO.
To change into or out of 4LO, the vehicle
MUST be stationary, shift the shift lever to
N (Neutral) position, and for automatic
transmission vehicles depress the brake
pedal or for manual transmission vehicles
depress the clutch pedal. The switch must
be depressed and turned when changing
into or out of 4LO.
WARNING
●When parking, apply the parking brake
before stopping the engine and make
sure that the 4WD shift indicator light is
on and the ATP warning light goes off.
Otherwise, the vehicle could unexpect-
edly move even if the automatic trans-
mission is in the P position. ●
The 4LO indicator light must stop blink-
ing and remain illuminated or turn off
before shifting the transmission into
gear. If the shift lever is shifted from the
(N) position to any other gear when the
4LO indicator light is blinking, the ve-
hicle may move unexpectedly.
CAUTION
● Never shift the 4WD shift switch be-
tween 4LO and 4H while driving.
● The 4H position provides greater trac-
tion. Avoid excessive speed, as it will
cause increased fuel consumption and
higher oil temperatures, and could
damage drivetrain components. Speeds
over 62 MPH (100 km/h) in 4H is not
recommended
● The 4LO position provides maximum
power and traction. Avoid raising ve-
hicle speed excessively, as the maxi-
mum speed is approximately 31 MPH
(50 km/h).
● When driving straight, shift the 4WD
shift switch to the 2WD or 4H position.
Do not move the 4WD shift switch when
making a turn or reversing. ●
Do not shift the 4WD shift switch (be-
tween 2WD and 4H) while driving on
steep downhill grades. Use the engine
brake and low automatic transmission
gears (D1 or D2) or manual transmis-
sion (1st gear or 2nd gear) for engine
braking.
● Do not operate the 4WD shift switch
(between 2WD and 4H) with the rear
wheels spinning.
● Do not drive on dry hard surface roads
in the 4H or 4LO position. Driving on dry
hard surfaces in 4H or 4LO may cause
unnecessary noise and tire wear.
NISSAN recommends driving in the
2WD position under these conditions.
● The 4WD transfer case may not be
shifted between 4H and 4LO at low am-
bient temperatures and the transfer
4LO position indicator light may blink
even when the 4WD shift switch is
shifted. After driving for a while you can
change the 4WD transfer case between
4H and 4LO.
When driving on rough roads, ● Set the 4WD shift switch to 4H or 4LO.
● Drive carefully according to the road surface
conditions.
5-26Starting and driving
Page 265 of 384
4WD shift indicator light
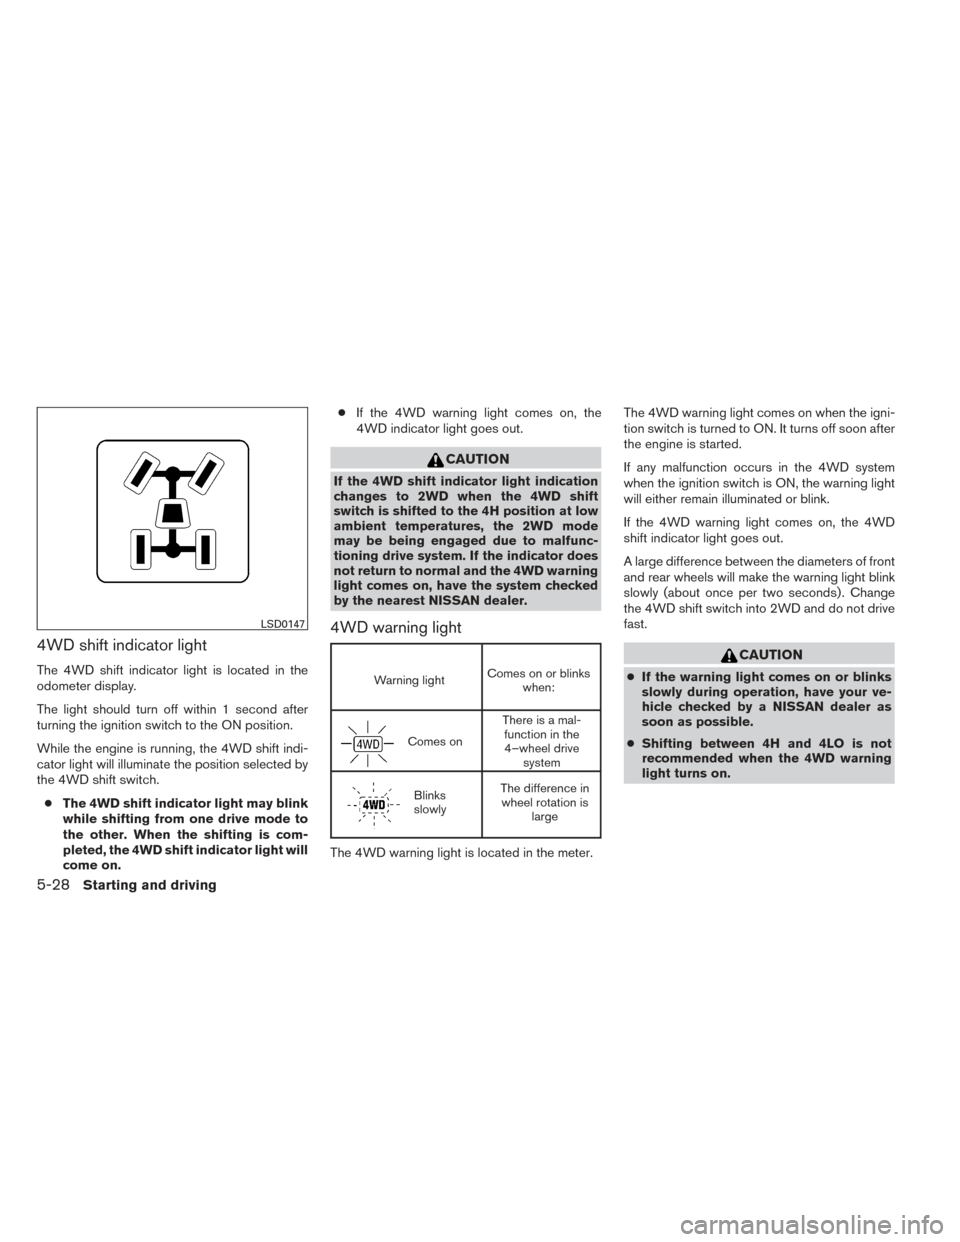
The 4WD shift indicator light is located in the
odometer display.
The light should turn off within 1 second after
turning the ignition switch to the ON position.
While the engine is running, the 4WD shift indi-
cator light will illuminate the position selected by
the 4WD shift switch.● The 4WD shift indicator light may blink
while shifting from one drive mode to
the other. When the shifting is com-
pleted, the 4WD shift indicator light will
come on. ●
If the 4WD warning light comes on, the
4WD indicator light goes out.
CAUTION
If the 4WD shift indicator light indication
changes to 2WD when the 4WD shift
switch is shifted to the 4H position at low
ambient temperatures, the 2WD mode
may be being engaged due to malfunc-
tioning drive system. If the indicator does
not return to normal and the 4WD warning
light comes on, have the system checked
by the nearest NISSAN dealer.
4WD warning light
Warning light Comes on or blinks
when:
Comes on There is a mal-
function in the4–wheel drive system
Blinks
slowly The difference in
wheel rotation is large
The 4WD warning light is located in the meter. The 4WD warning light comes on when the igni-
tion switch is turned to ON. It turns off soon after
the engine is started.
If any malfunction occurs in the 4WD system
when the ignition switch is ON, the warning light
will either remain illuminated or blink.
If the 4WD warning light comes on, the 4WD
shift indicator light goes out.
A large difference between the diameters of front
and rear wheels will make the warning light blink
slowly (about once per two seconds) . Change
the 4WD shift switch into 2WD and do not drive
fast.
CAUTION
●
If the warning light comes on or blinks
slowly during operation, have your ve-
hicle checked by a NISSAN dealer as
soon as possible.
● Shifting between 4H and 4LO is not
recommended when the 4WD warning
light turns on.
LSD0147
5-28Starting and driving