2014 NISSAN XTERRA ECO mode
[x] Cancel search: ECO modePage 101 of 384
WARNING
If the supplemental air bag warning light
is on, it could mean that the front air bag,
side air bags, curtain air bags and/or pre-
tensioners will not operate in an accident.
To help avoid injury to yourself or others,
have your vehicle checked by a NISSAN
dealer as soon as possible.
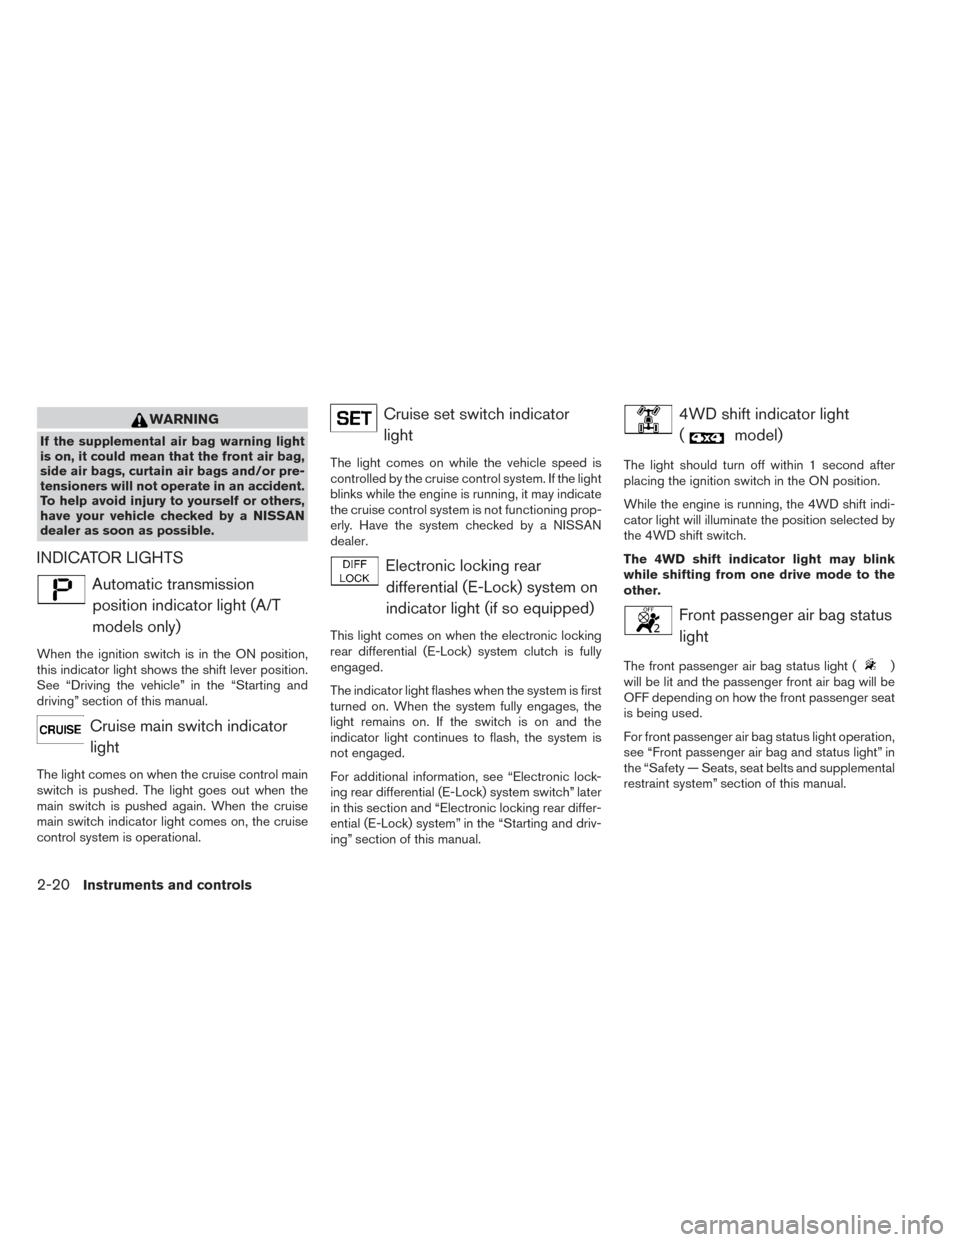
INDICATOR LIGHTS
Automatic transmissionposition indicator light (A/T
models only)
When the ignition switch is in the ON position,
this indicator light shows the shift lever position.
See “Driving the vehicle” in the “Starting and
driving” section of this manual.
Cruise main switch indicatorlight
The light comes on when the cruise control main
switch is pushed. The light goes out when the
main switch is pushed again. When the cruise
main switch indicator light comes on, the cruise
control system is operational.
Cruise set switch indicatorlight
The light comes on while the vehicle speed is
controlled by the cruise control system. If the light
blinks while the engine is running, it may indicate
the cruise control system is not functioning prop-
erly. Have the system checked by a NISSAN
dealer.
Electronic locking reardifferential (E-Lock) system on
indicator light (if so equipped)
This light comes on when the electronic locking
rear differential (E-Lock) system clutch is fully
engaged.
The indicator light flashes when the system is first
turned on. When the system fully engages, the
light remains on. If the switch is on and the
indicator light continues to flash, the system is
not engaged.
For additional information, see “Electronic lock-
ing rear differential (E-Lock) system switch” later
in this section and “Electronic locking rear differ-
ential (E-Lock) system” in the “Starting and driv-
ing” section of this manual.
4WD shift indicator light(
model)
The light should turn off within 1 second after
placing the ignition switch in the ON position.
While the engine is running, the 4WD shift indi-
cator light will illuminate the position selected by
the 4WD shift switch.
The 4WD shift indicator light may blink
while shifting from one drive mode to the
other.
Front passenger air bag statuslight
The front passenger air bag status light ()
will be lit and the passenger front air bag will be
OFF depending on how the front passenger seat
is being used.
For front passenger air bag status light operation,
see “Front passenger air bag and status light” in
the “Safety — Seats, seat belts and supplemental
restraint system” section of this manual.
2-20Instruments and controls
Page 103 of 384
The Malfunction Indicator Light may stop blinking
and come on steady. Have the vehicle inspected
by a NISSAN dealer. You do not need to have
your vehicle towed to the dealer.
CAUTION
Continued vehicle operation without hav-
ing the emission control system checked
and repaired as necessary could lead to
poor driveability, reduced fuel economy,
and possible damage to the emission con-
trol system.
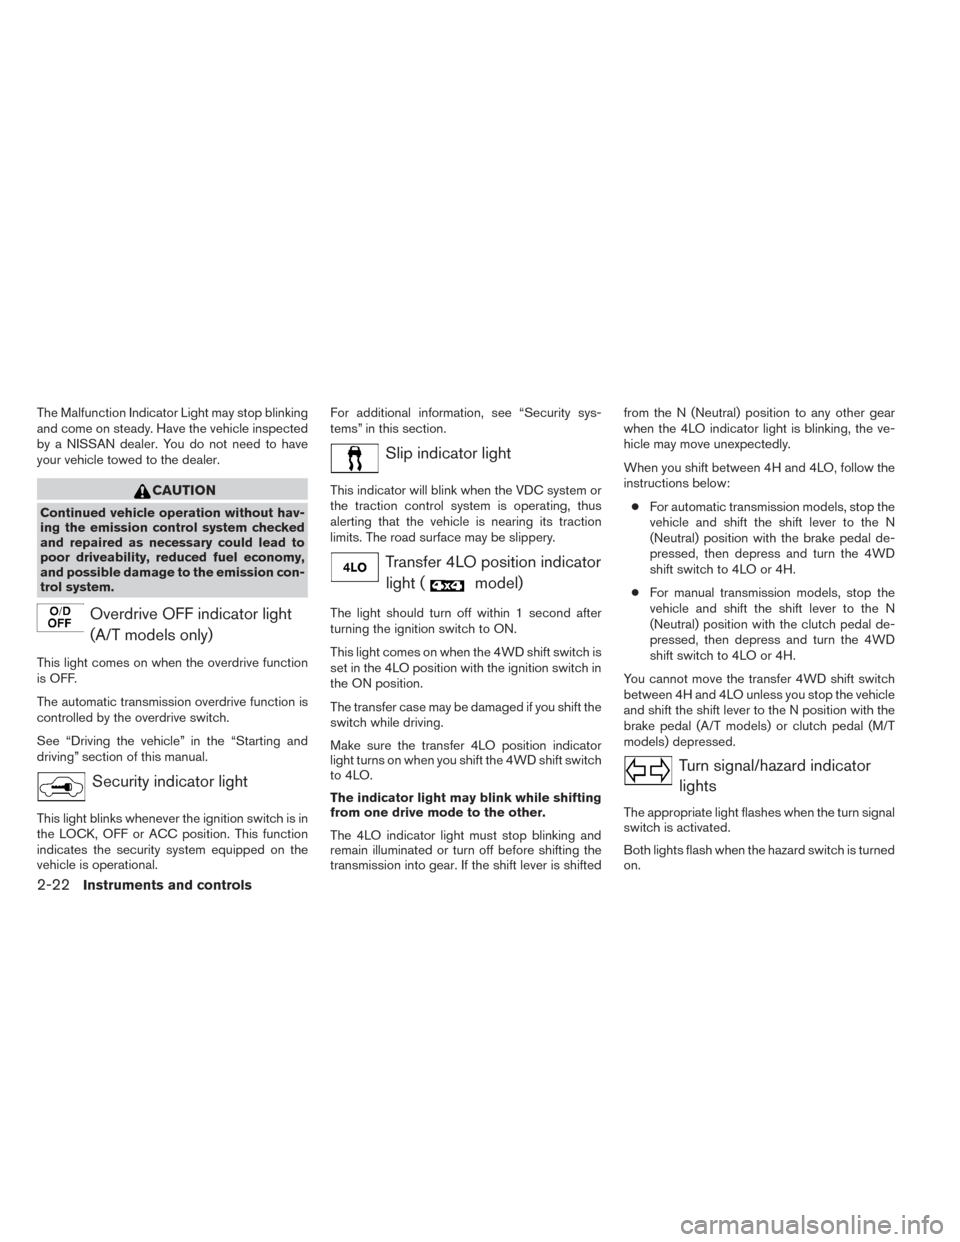
Overdrive OFF indicator light(A/T models only)
This light comes on when the overdrive function
is OFF.
The automatic transmission overdrive function is
controlled by the overdrive switch.
See “Driving the vehicle” in the “Starting and
driving” section of this manual.
Security indicator light
This light blinks whenever the ignition switch is in
the LOCK, OFF or ACC position. This function
indicates the security system equipped on the
vehicle is operational. For additional information, see “Security sys-
tems” in this section.
Slip indicator light
This indicator will blink when the VDC system or
the traction control system is operating, thus
alerting that the vehicle is nearing its traction
limits. The road surface may be slippery.
Transfer 4LO position indicator
light (
model)
The light should turn off within 1 second after
turning the ignition switch to ON.
This light comes on when the 4WD shift switch is
set in the 4LO position with the ignition switch in
the ON position.
The transfer case may be damaged if you shift the
switch while driving.
Make sure the transfer 4LO position indicator
light turns on when you shift the 4WD shift switch
to 4LO.
The indicator light may blink while shifting
from one drive mode to the other.
The 4LO indicator light must stop blinking and
remain illuminated or turn off before shifting the
transmission into gear. If the shift lever is shifted from the N (Neutral) position to any other gear
when the 4LO indicator light is blinking, the ve-
hicle may move unexpectedly.
When you shift between 4H and 4LO, follow the
instructions below:
● For automatic transmission models, stop the
vehicle and shift the shift lever to the N
(Neutral) position with the brake pedal de-
pressed, then depress and turn the 4WD
shift switch to 4LO or 4H.
● For manual transmission models, stop the
vehicle and shift the shift lever to the N
(Neutral) position with the clutch pedal de-
pressed, then depress and turn the 4WD
shift switch to 4LO or 4H.
You cannot move the transfer 4WD shift switch
between 4H and 4LO unless you stop the vehicle
and shift the shift lever to the N position with the
brake pedal (A/T models) or clutch pedal (M/T
models) depressed.
Turn signal/hazard indicator lights
The appropriate light flashes when the turn signal
switch is activated.
Both lights flash when the hazard switch is turned
on.
2-22Instruments and controls
Page 104 of 384
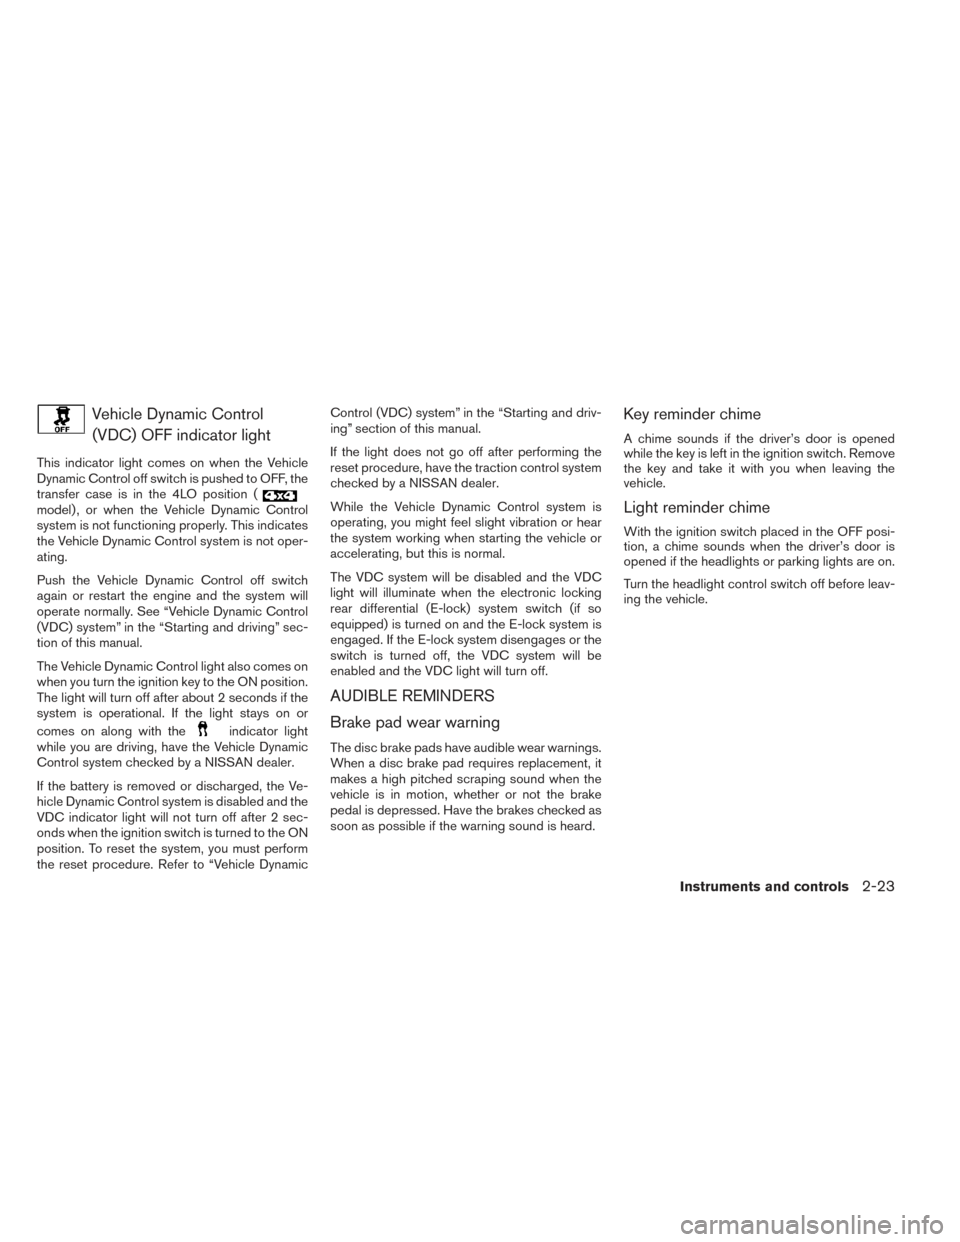
Vehicle Dynamic Control(VDC) OFF indicator light
This indicator light comes on when the Vehicle
Dynamic Control off switch is pushed to OFF, the
transfer case is in the 4LO position (
model) , or when the Vehicle Dynamic Control
system is not functioning properly. This indicates
the Vehicle Dynamic Control system is not oper-
ating.
Push the Vehicle Dynamic Control off switch
again or restart the engine and the system will
operate normally. See “Vehicle Dynamic Control
(VDC) system” in the “Starting and driving” sec-
tion of this manual.
The Vehicle Dynamic Control light also comes on
when you turn the ignition key to the ON position.
The light will turn off after about 2 seconds if the
system is operational. If the light stays on or
comes on along with the
indicator light
while you are driving, have the Vehicle Dynamic
Control system checked by a NISSAN dealer.
If the battery is removed or discharged, the Ve-
hicle Dynamic Control system is disabled and the
VDC indicator light will not turn off after 2 sec-
onds when the ignition switch is turned to the ON
position. To reset the system, you must perform
the reset procedure. Refer to “Vehicle Dynamic Control (VDC) system” in the “Starting and driv-
ing” section of this manual.
If the light does not go off after performing the
reset procedure, have the traction control system
checked by a NISSAN dealer.
While the Vehicle Dynamic Control system is
operating, you might feel slight vibration or hear
the system working when starting the vehicle or
accelerating, but this is normal.
The VDC system will be disabled and the VDC
light will illuminate when the electronic locking
rear differential (E-lock) system switch (if so
equipped) is turned on and the E-lock system is
engaged. If the E-lock system disengages or the
switch is turned off, the VDC system will be
enabled and the VDC light will turn off.
AUDIBLE REMINDERS
Brake pad wear warning
The disc brake pads have audible wear warnings.
When a disc brake pad requires replacement, it
makes a high pitched scraping sound when the
vehicle is in motion, whether or not the brake
pedal is depressed. Have the brakes checked as
soon as possible if the warning sound is heard.
Key reminder chime
A chime sounds if the driver’s door is opened
while the key is left in the ignition switch. Remove
the key and take it with you when leaving the
vehicle.
Light reminder chime
With the ignition switch placed in the OFF posi-
tion, a chime sounds when the driver’s door is
opened if the headlights or parking lights are on.
Turn the headlight control switch off before leav-
ing the vehicle.
Instruments and controls2-23
Page 151 of 384
4 Monitor, climate, audio, phone and voice
recognition systems
Control panel buttons — color screen with
Navigation System (if so equipped)..................4-2
How to use the touch screen ....................4-3
How to use the BACK button ....................4-5
How to use the APPS – i button .................4-5
button...................................4-7
How to use the ON-OFF button/VOL
(volume) control knob ...........................4-7
How to use the CAMERA button .................4-7
RearView Monitor (if so equipped) ...................4-8
How to read the displayed lines ..................4-8
Difference between predicted and actual
distances ......................................4-9
Adjusting the screen ........................... 4-11
Operating tips ................................. 4-12
Vents . .......................................... 4-13
Heater and air conditioner (manual) .................4-14
Controls ...................................... 4-14
Heater operation .............................. 4-15
Air conditioner operation .......................4-16
Air flow charts ................................. 4-17
Servicing air conditioner ........................... 4-21
Audio system .................................... 4-21Radio
........................................ 4-21
FM radio reception ............................ 4-21
AM radio reception ............................ 4-22
Satellite radio reception (if so equipped) . . . ......4-22
Audio operation precautions ....................4-22
FM/AM radio with compact disc (CD) player
(if so equipped) ............................... 4-29
FM/AM/SAT radio with compact disc (CD)
player (Type A) (if so equipped) .................4-34
FM/AM/SAT radio with compact disc (CD)
player (Type B) (if so equipped) .................4-39
USB interface (models without Navigation
System) (if so equipped) .......................4-44
USB interface (models with Navigation
System) ...................................... 4-46
iPod®* player operation without Navigation
System (if so equipped) ........................ 4-48
iPod®* player operation with Navigation
System (if so equipped) ........................ 4-50
Bluetooth® streaming audio with Navigation
System (if so equipped) ........................ 4-53
Pandora® audio (United States only)
(if so equipped) ............................... 4-54
CD care and cleaning .......................... 4-55
Page 152 of 384
Steering wheel switch for audio control..........4-56
Antenna ...................................... 4-57
NissanConnect™ App Smartphone Integration
(if so equipped) .................................. 4-58
Registering with NissanConnect™ App ...........4-58
Connect Phone ............................... 4-58
Application Download .......................... 4-58
Car phone or CB radio . . .......................... 4-58
Bluetooth® Hands-Free Phone System without
Navigation System (if so equipped) .................4-59
Regulatory Information ......................... 4-60
Using the system .............................. 4-61
Control buttons ............................... 4-63
Getting started ................................ 4-63
List of voice commands ........................ 4-65
Voice Adaptation (VA) mode ....................4-70
Manual control ................................ 4-71
Troubleshooting guide ......................... 4-72
Bluetooth® Hands-Free Phone System with
Navigation System (if so equipped) .................4-73
Regulatory Information ......................... 4-74
Voice commands .............................. 4-75Connecting Procedure
......................... 4-75
Vehicle phonebook ............................ 4-75
Making a call .................................. 4-76
Receiving a call ............................... 4-76
During a call .................................. 4-76
Ending a call .................................. 4-76
Text messaging ................................ 4-76
Bluetooth® settings ........................... 4-78
Phone settings ................................ 4-79
NISSAN Voice Recognition System
(if so equipped) . . . ............................... 4-79
Using the system .............................. 4-79
System features ............................... 4-81
Bluetooth® Hands-Free Phone System
voice commands .............................. 4-81
Navigation System voice commands .............4-82
Audio
system voice commands ..................4-83
Information voice commands ....................4-83
My Apps Voice Commands .....................4-83
Help voice commands ......................... 4-83
Troubleshooting guide ......................... 4-84
Page 157 of 384
![NISSAN XTERRA 2014 N50 / 2.G Owners Manual To select and/or adjust several functions, features
and modes that are available for your vehicle:
1. Press the [] button.
2. Touch the “Settings” key.
3. Touch the desired item.
Menu item Result
NISSAN XTERRA 2014 N50 / 2.G Owners Manual To select and/or adjust several functions, features
and modes that are available for your vehicle:
1. Press the [] button.
2. Touch the “Settings” key.
3. Touch the desired item.
Menu item Result](/manual-img/5/405/w960_405-156.png)
To select and/or adjust several functions, features
and modes that are available for your vehicle:
1. Press the [] button.
2. Touch the “Settings” key.
3. Touch the desired item.
Menu item Result
Audio See “Audio system” in this section for more information.
Navigation See the separate Navigation System Owner’s Manual for more information.
Phone & Bluetooth See “Bluetooth Hands-Free Phone System with Navigation System” in this section.
System Touch this key to select and/or adjust various functions of this system. A screen with additional options will appear.
Display Touch this key to adjust the appearance of the display.
Brightness Adjusts the brightness of the display.
Display Mode Adjusts to fit the level of lighting in the vehicle. Touch key to cycle through options. “Day” and “Night” modes are suited for the respec- tive times of day while “Auto” controls the display automatically.
Scroll Direction Adjusts the direction of the menu scroll. Choose to either move up or down.
Clock Touch this key to adjust the time.
Time Format The clock can be set to 12 hours or 24 hours.
Date Format Select from five possible formats of displaying the day, month, and year.
Clock Mode Adjust the mode for the clock. “Auto” uses the system’s GPS to automatically maintain the time. “Manual” allows you to set the clock using the “Set Clock Manually” key.
Set Clock
Manually Adjust the clock manually, Touch the “+” or “-” keys to adjust the hours, minutes, day, month and year up or down. “Clock Mode” must
be set to manual for this option to be available.
Daylight Sav-
ings Time Adjusts the daylight savings time on or off.
Time Zone Choose the applicable time zone from the list.
Language Touch this key to change the language on the display.
Camera Touch this key to change the camera settings.
4-6Monitor, climate, audio, phone and voice recognition systems
Page 158 of 384
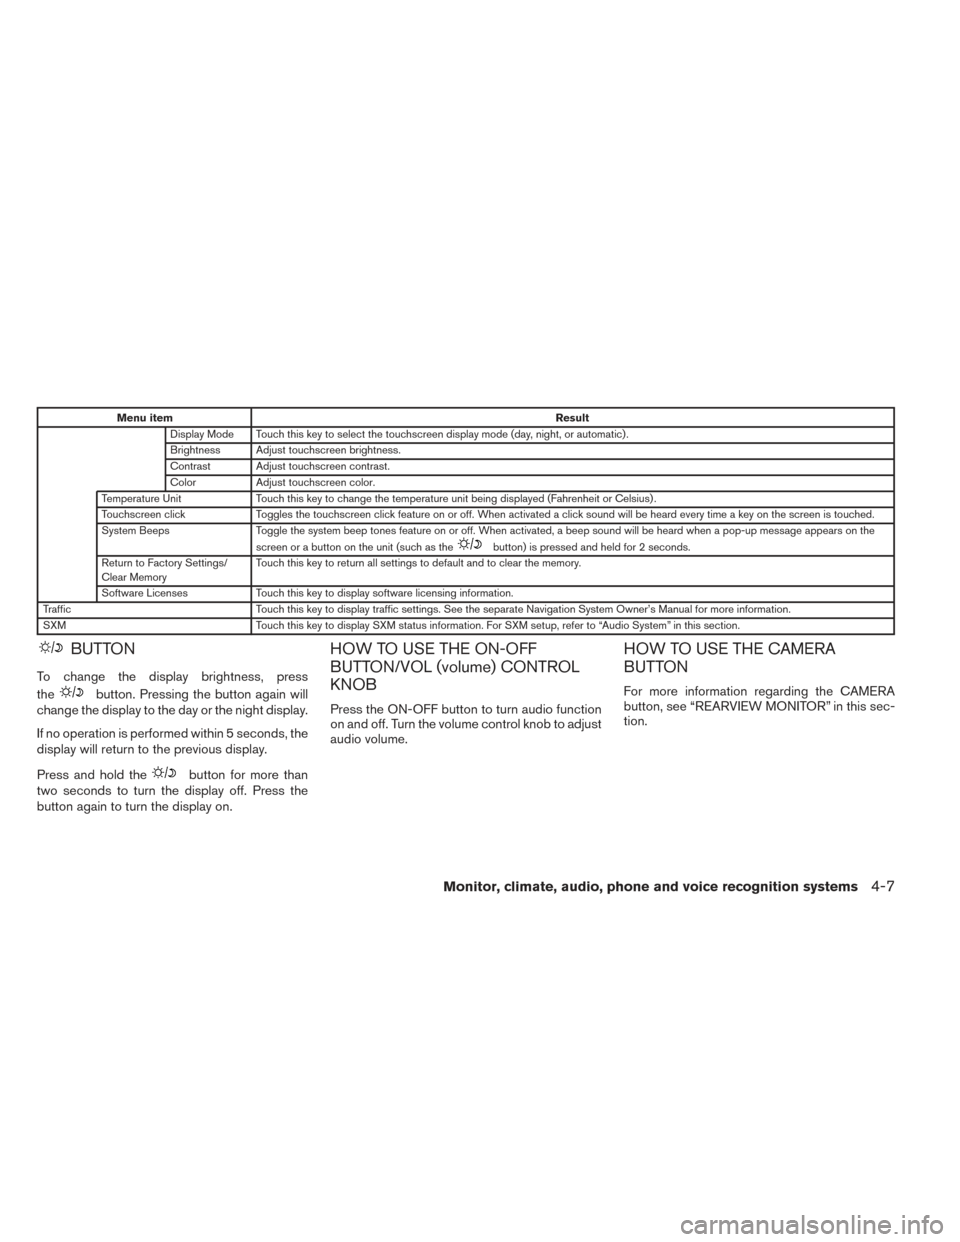
Menu itemResult
Display Mode Touch this key to select the touchscreen display mode (day, night, or automatic) .
Brightness Adjust touchscreen brightness.
Contrast Adjust touchscreen contrast.
Color Adjust touchscreen color.
Temperature Unit Touch this key to change the temperature unit being displayed (Fahrenheit or Celsius) .
Touchscreen click Toggles the touchscreen click feature on or off. When activated a click sound will be heard every time a key on the screen is touched.
System Beeps Toggle the system beep tones feature on or off. When activated, a beep sound will be heard when a pop-up message appears on the
screen or a button on the unit (such as the
button) is pressed and held for 2 seconds.
Return to Factory Settings/
Clear Memory Touch this key to return all settings to default and to clear the memory.
Software Licenses Touch this key to display software licensing information.
Traffic Touch this key to display traffic settings. See the separate Navigation System Owner’s Manual for more information.
SXM Touch this key to display SXM status information. For SXM setup, refer to “Audio System” in this section.
BUTTON
To change the display brightness, press
the
button. Pressing the button again will
change the display to the day or the night display.
If no operation is performed within 5 seconds, the
display will return to the previous display.
Press and hold the
button for more than
two seconds to turn the display off. Press the
button again to turn the display on.
HOW TO USE THE ON-OFF
BUTTON/VOL (volume) CONTROL
KNOB
Press the ON-OFF button to turn audio function
on and off. Turn the volume control knob to adjust
audio volume.
HOW TO USE THE CAMERA
BUTTON
For more information regarding the CAMERA
button, see “REARVIEW MONITOR” in this sec-
tion.
Monitor, climate, audio, phone and voice recognition systems4-7
Page 163 of 384
4. Adjust the level using the TUNE-SCROLLknob and then press the ENTER/SETTING
button to apply the adjustment.
● Do not adjust the Brightness or Contrast of
the RearView Monitor while the vehicle is
moving.
For vehicles with Navigation System:1. Press the [
] button.
2. Select the “Settings” key.
3. Select the “System” key.
4. Select the “Display” key.
5. Touch the “Brightness” key and adjust the level to the desired setting.
● Do not adjust the display of the RearView
Monitor while the vehicle is moving.
OPERATING TIPS
● When the shift lever is shifted to R (Re-
verse) , the monitor screen automatically
changes to the RearView Monitor mode.
However, the radio can be heard.
● It may take some time until the RearView
Monitor is displayed after the shift lever has
been shifted to R (Reverse) . Objects may be
distorted momentarily until the RearView
Monitor screen is displayed completely.
When the shift lever is returned to a position
other than R (Reverse) , it may take some
time until the screen changes. Objects on
the screen may be distorted until they are
completely displayed.
● When the temperature is extremely high or
low, the screen may not clearly display ob-
jects. This is not a malfunction.
● When strong light directly enters the cam-
era, objects may not be displayed clearly.
● Vertical lines may be seen in objects on the
screen. This is due to strong reflected light
from the bumper. This is not a malfunction.
● The screen may flicker under fluorescent
light. This is not a malfunction.
With Navigation System
LHA2892
4-12Monitor, climate, audio, phone and voice recognition systems