Page 121 of 365
Locking doors
1. Place the ignition switch in the LOCK posi-tion.
2. Close all doors.
3. Press the
button on the Intelligent
Key.
4. The hazard warning lights flash twice and the horn beeps once.
5. All doors will be locked.
CAUTION
After locking the doors using the Intelli-
gent Key, be sure that the doors have been
securely locked by operating the door
handles.
Unlocking doors
1. Press thebutton on the Intelligent
Key.
2. The hazard warning lights flash once.
3. Press the
button again within 5 sec-
onds to unlock all doors.
All doors will be locked automatically unless one
of the following operations is performed within
1 minute after pressing the
button:
● Opening any doors.
● Pushing the ignition switch.
WPD0359WPD0360
3-18Pre-driving checks and adjustments
Page 122 of 365

The interior light illuminates for a period of time
when a door is unlocked and the room light
switch is in the DOOR position.
The light can be turned off without waiting by
performing one of the following operations:● Placing the ignition switch in the ON posi-
tion.
● Locking the doors with the Intelligent Key.
● Switching the room light switch to the OFF
position.
Releasing the trunk lid
Press thebutton for longer than 0.5 sec-
onds to open the trunk lid. The trunk release
button will not operate when the ignition switch is
placed in the ON position.
Using the panic alarm
If you are near your vehicle and feel threatened,
you may activate the panic alarm to call attention
by pressing and holding the
button on the
Intelligent Key for longer than 0.5 seconds.
The panic alarm and headlights will stay on for a
period of time.
The panic alarm stops when: ● It has run for a period of time, or
● Any button is pressed on the Intelligent Key.
● The request switch on the driver or passen-
ger door has been pushed and the Intelligent
Key is in range of the door handle.
WPD0364WPD0361
Pre-driving checks and adjustments3-19
Page 123 of 365

Silencing the horn beep feature
If desired, the horn beep feature can be deacti-
vated using the Intelligent Key.
To deactivate:Press and hold the
andbuttonsfor at least 2 seconds.
The hazard warning lights will flash 3 times to
confirm that the horn beep feature has been
deactivated.
To activate: Press and hold the
andbuttonsfor at least 2 seconds once
more. The hazard warning lights will flash once and the
horn will sound once to confirm that the horn
beep feature has been reactivated.
Deactivating the horn beep feature does not si-
lence the horn if the alarm is triggered.
�1P (Park) position selecting warning
light
�2NISSAN Intelligent Key® warning light
WARNING LIGHTS AND AUDIBLE
REMINDERS
The Intelligent Key is equipped with a function
that is designed to minimize improper operations
and to help prevent the vehicle from being stolen.
The warning buzzer sounds and the warning light
illuminates when improper operations are de-
tected.
WPD0362
Type B meter only
LPD2094
3-20Pre-driving checks and adjustments
Page 133 of 365
VANITY MIRROR (if so equipped)
To access the vanity mirror, pull the sun visor
down and flip open the mirror cover.
CARD HOLDER (driver’s side only)
To access the card holder, pull the sun visor
down and slide card in the card holder
�A.Donot
view information while operating the vehicle.
REARVIEW MIRROR
The night position�1reduces glare from the
headlights of vehicles behind you at night.
Use the day position
�2when driving in daylight
hours.
WARNING
Use the night position only when neces-
sary, because it reduces rear view clarity.
SPA1733LPD2033WPD0126
MIRRORS
3-30Pre-driving checks and adjustments
Page 141 of 365
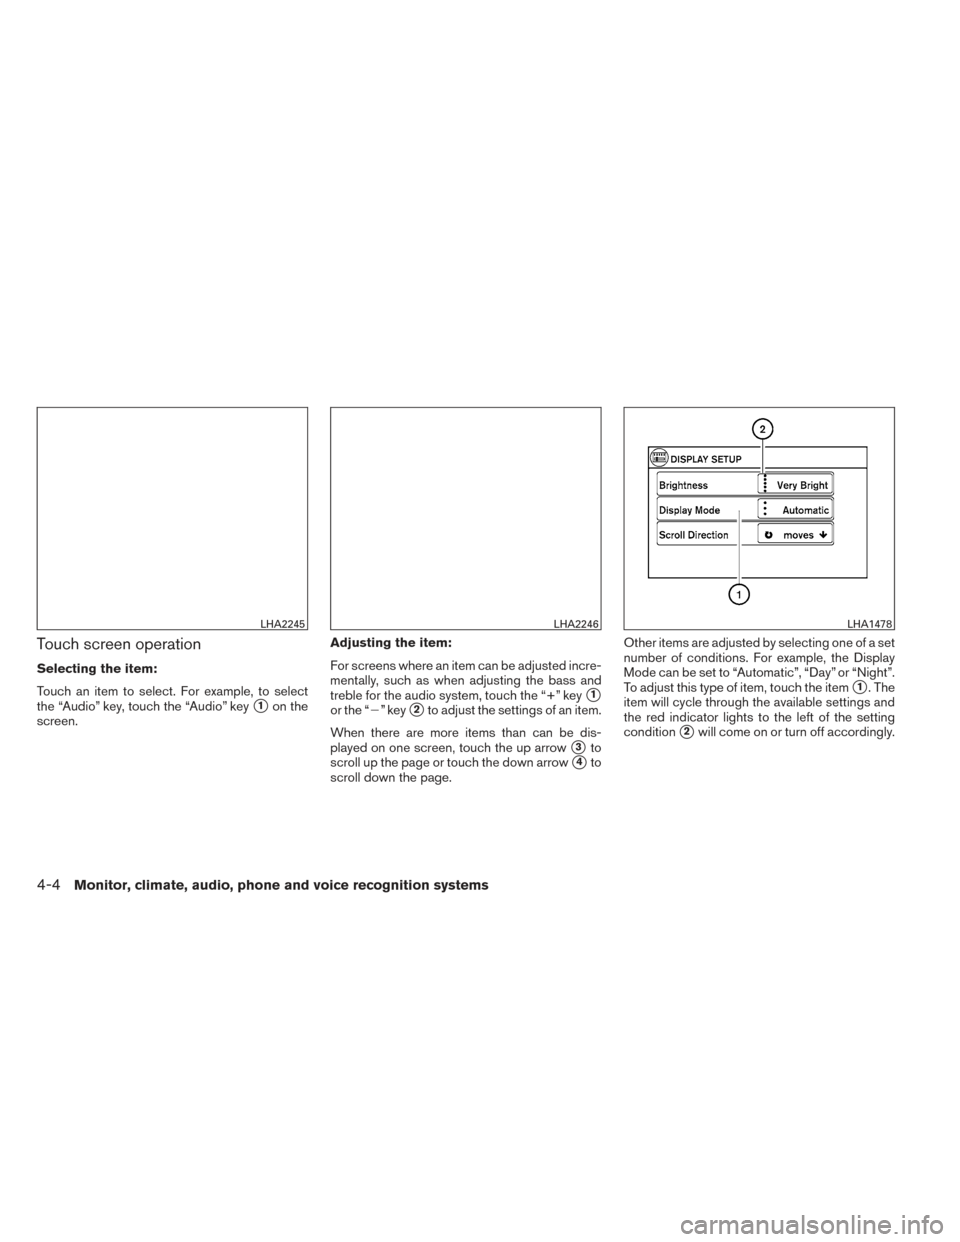
Touch screen operation
Selecting the item:
Touch an item to select. For example, to select
the “Audio” key, touch the “Audio” key
�1on the
screen. Adjusting the item:
For screens where an item can be adjusted incre-
mentally, such as when adjusting the bass and
treble for the audio system, touch the “+” key�1
or the “�” key�2to adjust the settings of an item.
When there are more items than can be dis-
played on one screen, touch the up arrow
�3to
scroll up the page or touch the down arrow
�4to
scroll down the page. Other items are adjusted by selecting one of a set
number of conditions. For example, the Display
Mode can be set to “Automatic”, “Day” or “Night”.
To adjust this type of item, touch the item
�1. The
item will cycle through the available settings and
the red indicator lights to the left of the setting
condition
�2will come on or turn off accordingly.
LHA2245LHA2246LHA1478
4-4Monitor, climate, audio, phone and voice recognition systems
Page 161 of 365
 , static or flutter")
Static and flutter: During signal interference from
buildings, large hills or due to antenna position
(usually in conjunction with increased distance
from the station transmitter) , static or flutter can
be heard. This can be reduced by adjusting the
treble control to reduce treble response.
Multipath reception: Because of the reflective
characteristics of FM signals, direct and reflected
signals reach the receiver at the same time. The
signals may cancel each other, resulting in mo-
mentary flutter or loss of sound.
AM RADIO RECEPTION
AM signals, because of their low frequency, can
bend around objects and skip along the ground.
In addition, the signals can be bounced off the
ionosphere and bent back to earth. Because of
these characteristics, AM signals are also sub-
ject to interference as they travel from transmitter
to receiver.
Fading: Occurs while the vehicle is passing
through freeway underpasses or in areas with
many tall buildings. It can also occur for several
seconds during ionospheric turbulence even in
areas where no obstacles exist.
Static: Caused by thunderstorms, electrical
power lines, electric signs and even traffic lights.
SATELLITE RADIO RECEPTION (if so
equipped)
When the satellite radio is used for the first time
or the battery has been replaced, the satellite
radio may not work properly. This is not a mal-
function. Wait more than 10 minutes with satellite
radio ON and the vehicle outside of any metal or
large building for satellite radio to receive all of
the necessary data.
No satellite radio reception is available unless
there is an active SiriusXM Satellite Radio service
subscription. Satellite radio is not available in
Alaska, Hawaii and Guam. If satellite radio is not
operational then pressing the RADIO button will
switch between FM and AM bands.
Satellite radio performance may be affected if
cargo carried on the roof blocks the satellite radio
signal.
If possible, do not put cargo over the satellite
antenna.
A build up of ice on the satellite radio antenna can
affect satellite radio performance. Remove the
ice to restore satellite radio reception.
AUDIO OPERATION PRECAUTIONS
LHA0099
4-24Monitor, climate, audio, phone and voice recognition systems
Page 247 of 365

If the battery of the vehicle is discharged,
the push-button ignition switch cannot be
moved from the LOCK position.
Some indicators and warnings for operation are
displayed in the meter. See “Warning/indicator
lights and audible reminders” in the “Instruments
and controls” section.
OPERATING RANGE
The Intelligent Key functions can only be used
when the Intelligent Key is within the specified
operating range.
When the Intelligent Key battery is almost dis-
charged or strong radio waves are present near
the operating location, the Intelligent Key sys-
tem’s operating range becomes narrower and
may not function properly.
If the Intelligent Key is within the operating range,
it is possible for anyone, even someone who does
not carry the Intelligent Key, to turn the ignition
switch to start the engine.The operating range of the engine start function
is inside of the vehicle
�1.
● If the Intelligent Key is placed on the instru-
ment panel, rear parcel shelf, inside the
glove box, storage bin or door pocket, the
Intelligent Key may not function.
● If the Intelligent Key is placed near the door
or window outside the vehicle, the Intelligent
Key may function.
PUSH-BUTTON IGNITION SWITCH
POSITIONS
LOCK (Normal parking position):
The ignition switch can only be locked in this
position.
The ignition switch will be unlocked when it is
pushed to the ACC position while carrying the
Intelligent Key or with the Intelligent Key inserted
in the port.
The ignition switch will lock when any door is
opened or closed with the ignition switched off.
OFF:
The ignition switch is in the OFF position when
the engine is turned off using the ignition switch.
No lights will illuminate on the ignition switch.WSD0165
5-12Starting and driving
Page 249 of 365

4. Push the ignition switch while depressingthe brake pedal within 10 seconds after the
chime sounds. The engine will start.
After step 3 is performed, when the ignition
switch is pushed without depressing the brake
pedal, the ignition switch position will change to
“ACC”.
NOTE: ● When the ignition switch is pushed to the
“ACC” or “ON” position or the engine is
started by the above procedures, the
NISSAN Intelligent Key® system warning
light may blink in yellow (on the meter) even
if the NISSAN Intelligent Key® is inside the
vehicle. This is not a malfunction. To stop the
warning light from blinking, touch the ignition
switch with the NISSAN Intelligent Key®
again.
● If the NISSAN Intelligent Key® system warn-
ing light in the meter is blinking in green,
replace the battery as soon as possible. See
“Battery replacement” in the “Maintenance
and do-it-yourself” section.NISSAN VEHICLE IMMOBILIZER
SYSTEM
The NISSAN Vehicle Immobilizer system will not
allow the engine to start without the use of the
registered key.
If the engine fails to start using a registered key
(for example, when interference is caused by
another registered key, an automated toll road
device or automatic payment device on the key
ring) , restart the engine using the following pro-
cedure:
1. Leave the ignition switch in the ON position for approximately 5 seconds.
2. Place the ignition switch in the OFF or LOCK position, and wait approximately
10 seconds.
3. Repeat steps 1 and 2.
4. Restart the engine while holding the device (which may have caused the interference)
separate from the registered key.
If the no start condition re-occurs, NISSAN rec-
ommends placing the registered key on a sepa-
rate key ring to avoid interference from other
devices. ●
Make sure the area around the vehicle is
clear.
● Check fluid levels such as engine oil, cool-
ant, brake and clutch fluid(if so equipped) ,
and windshield-washer fluid as frequently as
possible, or at least whenever you refuel.
● Check that all windows and lights are clean.
● Visually inspect tires for their appearance
and condition. Also check tires for proper
inflation.
● Lock all doors.
● Position seat and adjust head
restraints/headrests.
● Adjust inside and outside mirrors.
● Fasten seat belts and ask all passengers to
do likewise.
● Check the operation of warning lights when
the ignition switch is placed in the ON posi-
tion. See “Warning/indicator lights and au-
dible reminders” in the “Instruments and
controls” section of this manual.
BEFORE STARTING THE ENGINE
5-14Starting and driving


To access the vanity mirror, pull the sun visor
down and flip open the mirror cover.
CARD HOLDER (driver’s side only)
To access the card holder, pull the sun visor
dow")