Page 130 of 365

●Do not fill a portable fuel container in
the vehicle or trailer. Static electricity
can cause an explosion of flammable
liquid, vapor or gas in any vehicle or
trailer. To reduce the risk of serious
injury or death when filling portable fuel
containers:
– Always place the container on the ground when filling.
– Do not use electronic devices when filling.
– Keep the pump nozzle in contact with the container while you are fill-
ing it.
– Use only approved portable fuel con- tainers for flammable liquid.
CAUTION
●Do not use E-15 or E-85 fuel in your
vehicle. For further information see the
“Fuel Recommendation” in the “Techni-
cal and consumer information” section
of this manual. ●
Failure to tighten the fuel-filler cap
properly may cause the
Malfunc-
tion Indicator Light (MIL) to illuminate.
If the
light illuminates because
the fuel-filler cap is loose or missing,
tighten or install the cap and continue
to drive the vehicle. The
light
should turn off after a few driving trips.
If the
light does not turn off after a
few driving trips, have the vehicle in-
spected by a NISSAN dealer.
● The LOOSE FUEL CAP warning mes-
sage will display if the fuel-filler cap is
not properly tightened. It may take a
few driving trips for the message to be
displayed. Failure to tighten the fuel-
filler cap properly after the LOOSE
FUEL CAP warning message is dis-
played may cause the
Malfunc-
tion Indicator Light (MIL) to illuminate.
● For additional information, see the
“Malfunction Indicator Light (MIL)” in
the “Instruments and Controls” section
in this manual.
● If fuel is spilled on the vehicle body,
flush it away with water to avoid paint
damage. To remove the fuel-filler cap:
1. Turn the fuel-filler cap counterclockwise
�1
to remove.
2. Loop the tether strap around the hook while refueling.
To install the fuel-filler cap: 1. Insert the fuel-filler cap straight into the fuel- filler tube.
2. Turn the fuel-filler cap clockwise
�2until a
single click is heard.
SPA1755
Pre-driving checks and adjustments3-27
Page 131 of 365
Loose Fuel Cap warning message
The LOOSE FUEL CAP warning message dis-
plays in the odometer when the fuel-filler cap is
not tightened correctly after the vehicle has been
refueled. It may take a few driving trips for the
message to be displayed. To turn off the warning
message, perform the following:1. Remove and install the fuel-filler cap as pre- viously described as soon as possible.
2. Tighten the fuel-filler cap until it clicks. 3. Press the loose fuel cap warning reset but-
ton
�Ain the meter for about 1 second to
turn off the LOOSE FUEL CAP warning
message after tightening the fuel-filler cap.
Type A
LPD2126
Type B
LPD2025
3-28Pre-driving checks and adjustments
Page 137 of 365
..................4-2
How to use the touch screen .........")
4 Monitor, climate, audio, phone and voice
recognition systems
Control panel buttons — color screen with
Navigation System (if so equipped)..................4-2
How to use the touch screen ....................4-3
How to use the BACK button ....................4-5
How to use the MENU button ....................4-5
button...................................4-9
RearView Monitor (if so equipped) ...................4-9
How to read the displayed lines .................4-10
Difference between predicted and actual
distances ..................................... 4-10
Adjusting the screen ........................... 4-13
Operating tips ................................. 4-14
Vents . .......................................... 4-14
Heater and Air Conditioner (manual)
(if so equipped) .................................. 4-15
Controls ...................................... 4-16
Heater operation .............................. 4-17
Air conditioner operation (if so equipped) ........4-18
Air flow charts ................................. 4-19
Servicing air conditioner (if so equipped) ............4-23
Audio system .................................... 4-23
Radio ........................................ 4-23
FM radio reception ............................ 4-23AM radio reception
............................ 4-24
Satellite radio reception (if so equipped) . . . ......4-24
Audio operation precautions ....................4-24
FM/AM radio with compact disc (CD) player
(Type A) (if so equipped) .......................4-31
FM/AM radio with compact disc (CD) player
(Type B) (if so equipped) .......................4-34
FM/AM/SAT radio with compact disc (CD)
player (Type A) (if so equipped) .................4-39
FM/AM/SAT radio with compact disc (CD)
player (Type B) (if so equipped) .................4-44
USB interface (models without Navigation
System) (if so equipped) .......................4-51
USB interface (models with Navigation
System) ...................................... 4-52
iPod®* player operation without Navigation
System (if so equipped) ........................ 4-54
iPod®* player operation with Navigation
System (if so equipped) ........................ 4-57
Bluetooth® streaming audio without
Navigation System (if so equipped) ..............4-60
Bluetooth® streaming audio with Navigation
System (if so equipped) ........................ 4-62
Pandora® audio (if so equipped) ................4-63
Page 139 of 365
WARNING
●Do not disassemble or modify this sys-
tem. If you do, it may result in accidents,
fire, or electrical shock.
● In case you notice any foreign object in
the system hardware, spill liquid on it,
or notice smoke or smell coming from it,
stop using the system immediately and
contact your nearest NISSAN dealer. Ig-
noring such conditions may lead to ac-
cidents, fire or electrical shock.
● Do not use this system if you notice any
abnormality, such as a frozen screen or
lack of sound. Continued use of the
system may result in accident, fire or
electric shock.
1. Display screen
2.
button**
3. MAP button*
4. NAV button* 5. MENU button
6. BACK button
7. TUNE knob / AUDIO button
8.
(brightness control) button
LHA2516
CONTROL PANEL BUTTONS —
COLOR SCREEN WITH NAVIGATION
SYSTEM (if so equipped)
4-2Monitor, climate, audio, phone and voice recognition systems
Page 140 of 365
 control knob
10. CAMERA button
* For information regarding the Navigation system
control buttons, refer to the separate Navigation
System Owner’s Manual.
** For informat")
9. Power button/VOL (volume) control knob
10. CAMERA button
* For information regarding the Navigation system
control buttons, refer to the separate Navigation
System Owner’s Manual.
** For information regarding the Bluetooth®
Hands-Free Phone System control button, see
“Bluetooth® Hands-Free Phone System” in this
section.
When you use this system, make sure the engine
is running.
If you use the system with the engine not
running (ignition ON or ACC) for a long
time, it will discharge the battery, and the
engine will not start.
Reference symbols:
“Example” — Words marked in quotes refer to a
key shown only on the display. These keys can be
selected by touching the screen.HOW TO USE THE TOUCH
SCREEN
CAUTION
● The glass display screen may break if it
is hit with a hard or sharp object. If the
glass screen breaks, do not touch it.
Doing so could result in an injury.
● To clean the display, never use a rough
cloth, alcohol, benzine, thinner or any
kind of solvent or paper towel with a
chemical cleaning agent. They will
scratch or deteriorate the panel.
● Do not splash any liquid such as water
or car fragrance on the display. Contact
with liquid will cause the system to
malfunction.
To help ensure safe driving, some functions can-
not be operated while driving.
The on-screen functions that are not available
while driving will be “grayed out” or muted.
Park the vehicle in a safe location and then oper-
ate the navigation system.
WARNING
● ALWAYS give your full attention to
driving.
● Avoid using vehicle features that could
distract you. If distracted, you could
lose control of your vehicle and cause
an accident.
Monitor, climate, audio, phone and voice recognition systems4-3
Page 141 of 365
Touch screen operation
Selecting the item:
Touch an item to select. For example, to select
the “Audio” key, touch the “Audio” key
�1on the
screen. Adjusting the item:
For screens where an item can be adjusted incre-
mentally, such as when adjusting the bass and
treble for the audio system, touch the “+” key�1
or the “�” key�2to adjust the settings of an item.
When there are more items than can be dis-
played on one screen, touch the up arrow
�3to
scroll up the page or touch the down arrow
�4to
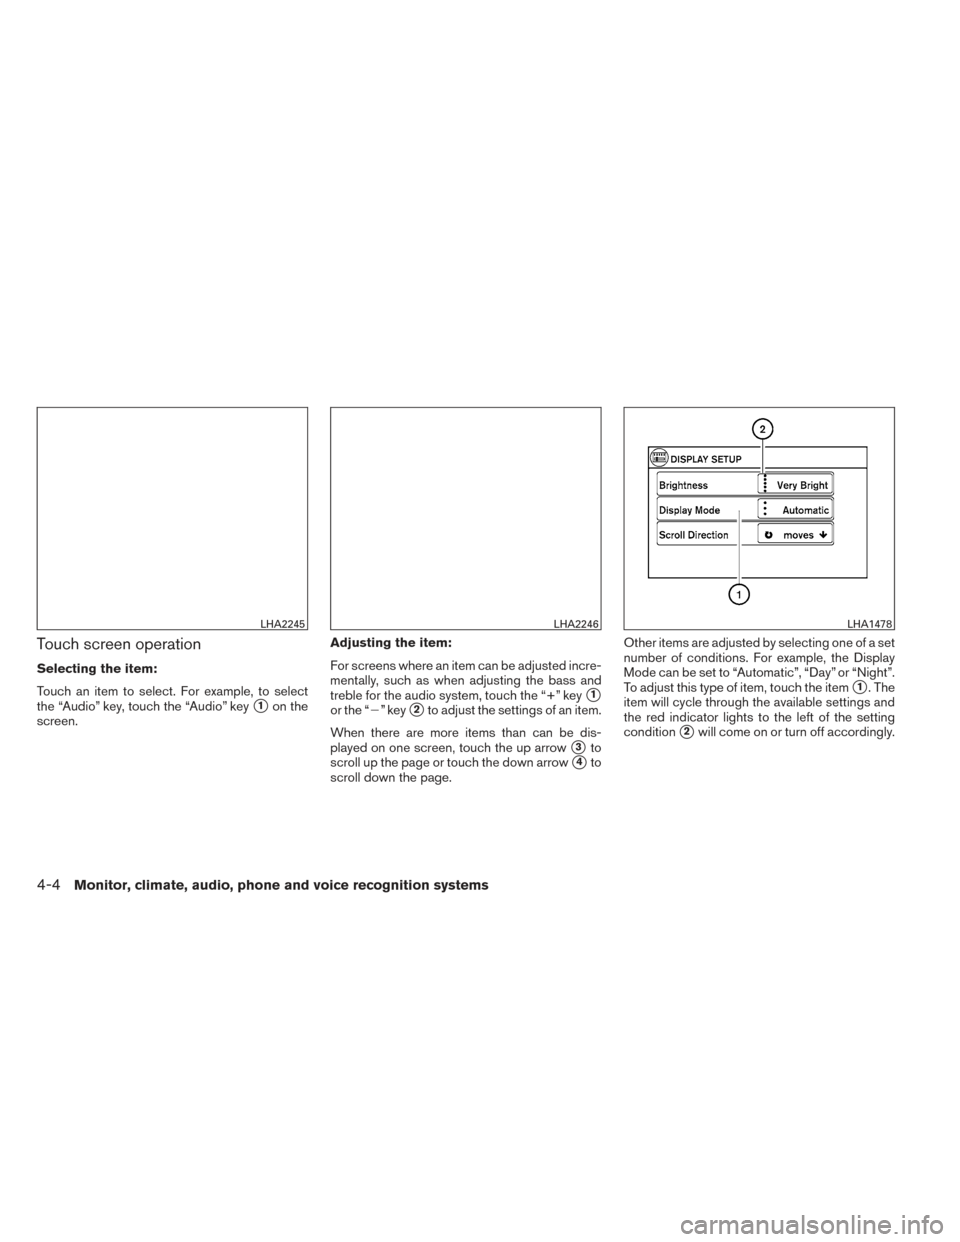
scroll down the page. Other items are adjusted by selecting one of a set
number of conditions. For example, the Display
Mode can be set to “Automatic”, “Day” or “Night”.
To adjust this type of item, touch the item
�1. The
item will cycle through the available settings and
the red indicator lights to the left of the setting
condition
�2will come on or turn off accordingly.
LHA2245LHA2246LHA1478
4-4Monitor, climate, audio, phone and voice recognition systems
Page 142 of 365

Inputting characters:
Touch the letter key
�1.
There are some options available when inputting
characters. ● 123 / ABC:
Changes the available character set to num-
bers.
● Space:
Inserts a space.
● Delete:
Deletes the last inputted character with one
touch. Touch and hold the “Delete” key to
delete all of the characters. ●
OK:
Completes the character input.
Touch screen maintenance
If you clean the display screen, use a dry, soft
cloth. If additional cleaning is necessary, use a
small amount of neutral detergent with a soft
cloth. Never spray the screen with water or de-
tergent. Dampen the cloth first and then wipe the
screen.
HOW TO USE THE BACK BUTTON
Press the BACK button to return to the previous
screen.
HOW TO USE THE MENU BUTTON
For more information about the “POIs Powered
by Google™”, “Google™ Send-To-Car, “Traffic
Information” and “Weather” features, see the
separate Navigation System Owner’s Manual.
For more information about the “Voice Com-
mands” key, see “NISSAN Voice Recognition
System” in this section.
To select and/or adjust several functions, fea-
tures and modes that are available for your ve-
hicle:
1. Press the MENU button.
2. Select the “Settings” key.
LHA2247LHA2253
Monitor, climate, audio, phone and voice recognition systems4-5
Page 144 of 365

Display:
Select the “Display” key to adjust the appearance
of the display. The following settings can be
adjusted:
Brightness
The brightness of the display can be set to Very
Bright, Bright, Default, Dark or Very Dark. Touch
the “Brightness” key to cycle through the options.Display Mode
The display can be adjusted to fit the level of
lighting in the vehicle. Touch the “Display Mode”
key to cycle through the options. “Day” and
“Night” modes are suited for the respective times
of day, while “Automatic” controls the display
automatically.
Scroll Direction
The direction that menus scroll can be adjusted.
Choose either “up” or “down”.
Clock Settings:
Select the “Clock Settings” key to adjust the time
and the appearance of the clock on the display.
The following settings can be adjusted:
Time Format
The clock can be set to 12 hours or 24 hours.
Date Format
Select from five possible formats of displaying
the day, month and year.
LHA1482LHA2250
Monitor, climate, audio, phone and voice recognition systems4-7