2014 NISSAN VERSA NOTE reset
[x] Cancel search: resetPage 5 of 24
3To view detailed instructional videos regarding these and other features, please go\
to www.nissanownersinfo.mobi
TriP CoMPuTer
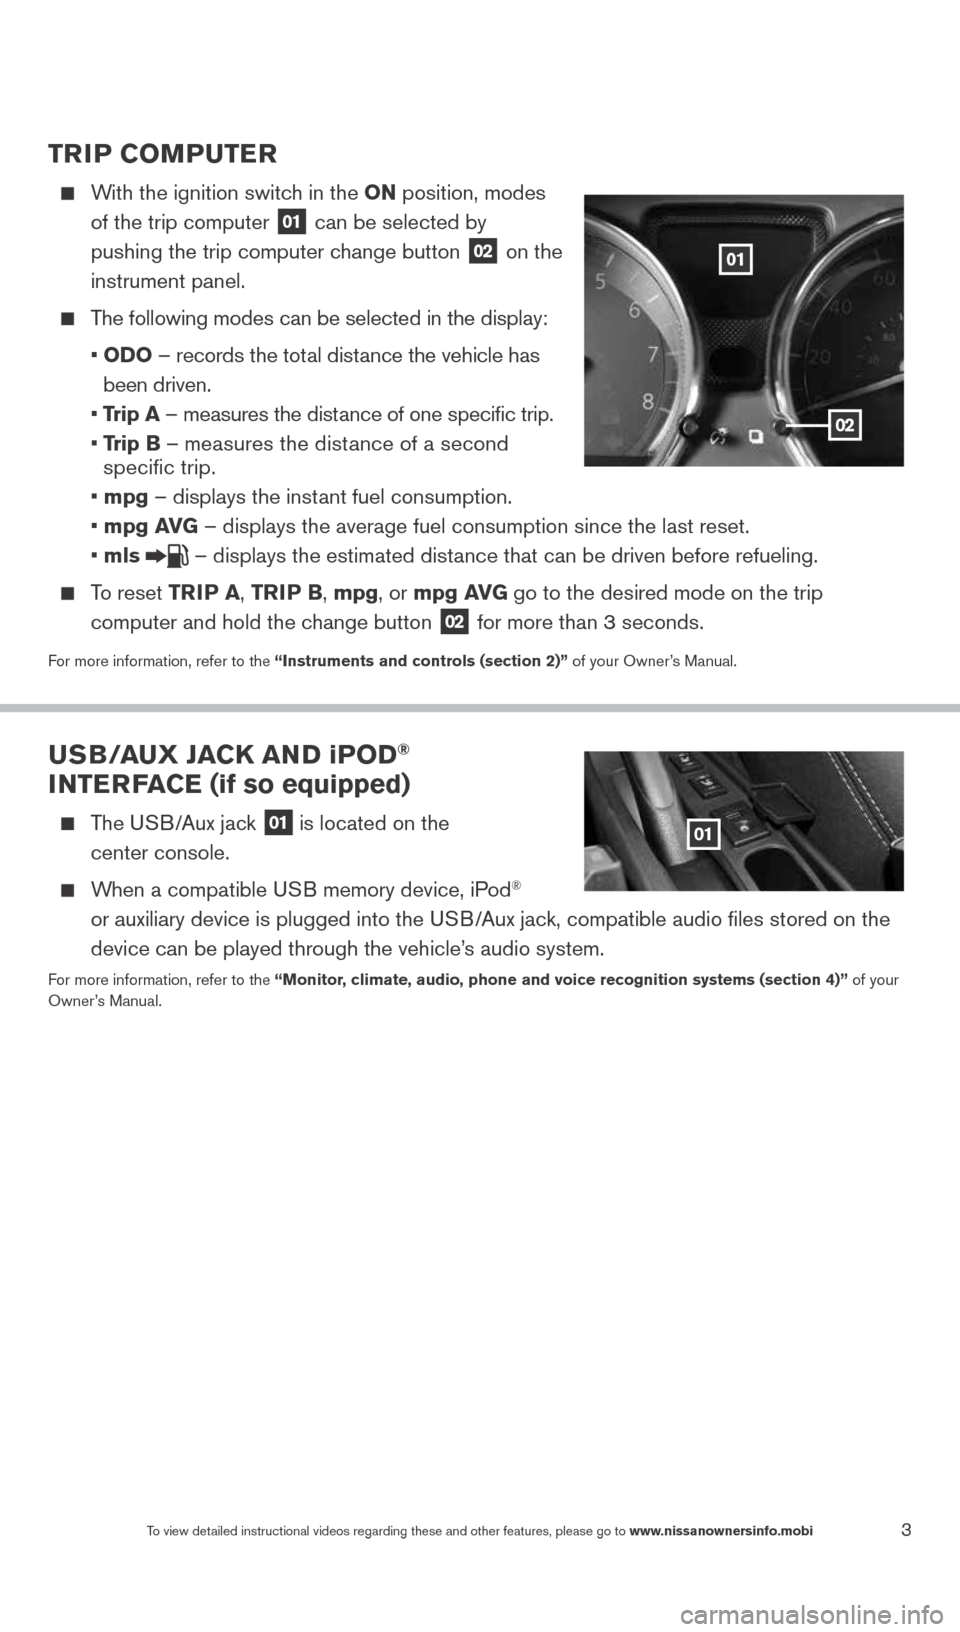
With the ignition switch in the oN position, modes
of the trip computer
01 can be selected by
pushing the trip computer change button 02 on the
instrument panel.
The following modes can be selected in the display:
• oD o – records the total distance the vehicle has
been driven.
• Trip a – measures the distance of one specific trip.
• Trip B – measures the distance of a second
specific trip.
• mpg – displays the instant fuel consumption.
• mpg av G – displays the average fuel consumption since the last reset.
• mls
– displays the estimated distance that can be driven before refueling.
To reset TriP a, Tri P B, mpg, or mpg av G go to the desired mode on the trip
computer and hold the change button
02 for more than 3 seconds.
For more information, refer to the “instruments and controls (section 2)” of your Owner’s Manual.
u SB/ auX Ja CK aND iPoD®
iNTer Fa Ce (if so equipped)
The USB/Aux jack 01 is located on the
center console.
When a compatible USB memory device, iPod®
or auxiliary device is plugged into the USB/Aux jack, compatible audio files stored on the
device can be played through the vehicle’s audio system.
For more information, refer to the “Monitor, climate, audio, phone and voice recognition systems (section 4)” of your
Owner’s Manual.
01
02
01
1598304_14b_VersaHatchback_QRG_090613.indd 39/6/13 1:44 PM
Page 7 of 24
5To view detailed instructional videos regarding these and other features, please go\
to www.nissanownersinfo.mobi
esse ntial i n for mation
Tire PreSSure M oNiTori NG SYSTe M (TPMS) wiTH
eaSY Fill Tire alerT (if so equipped)
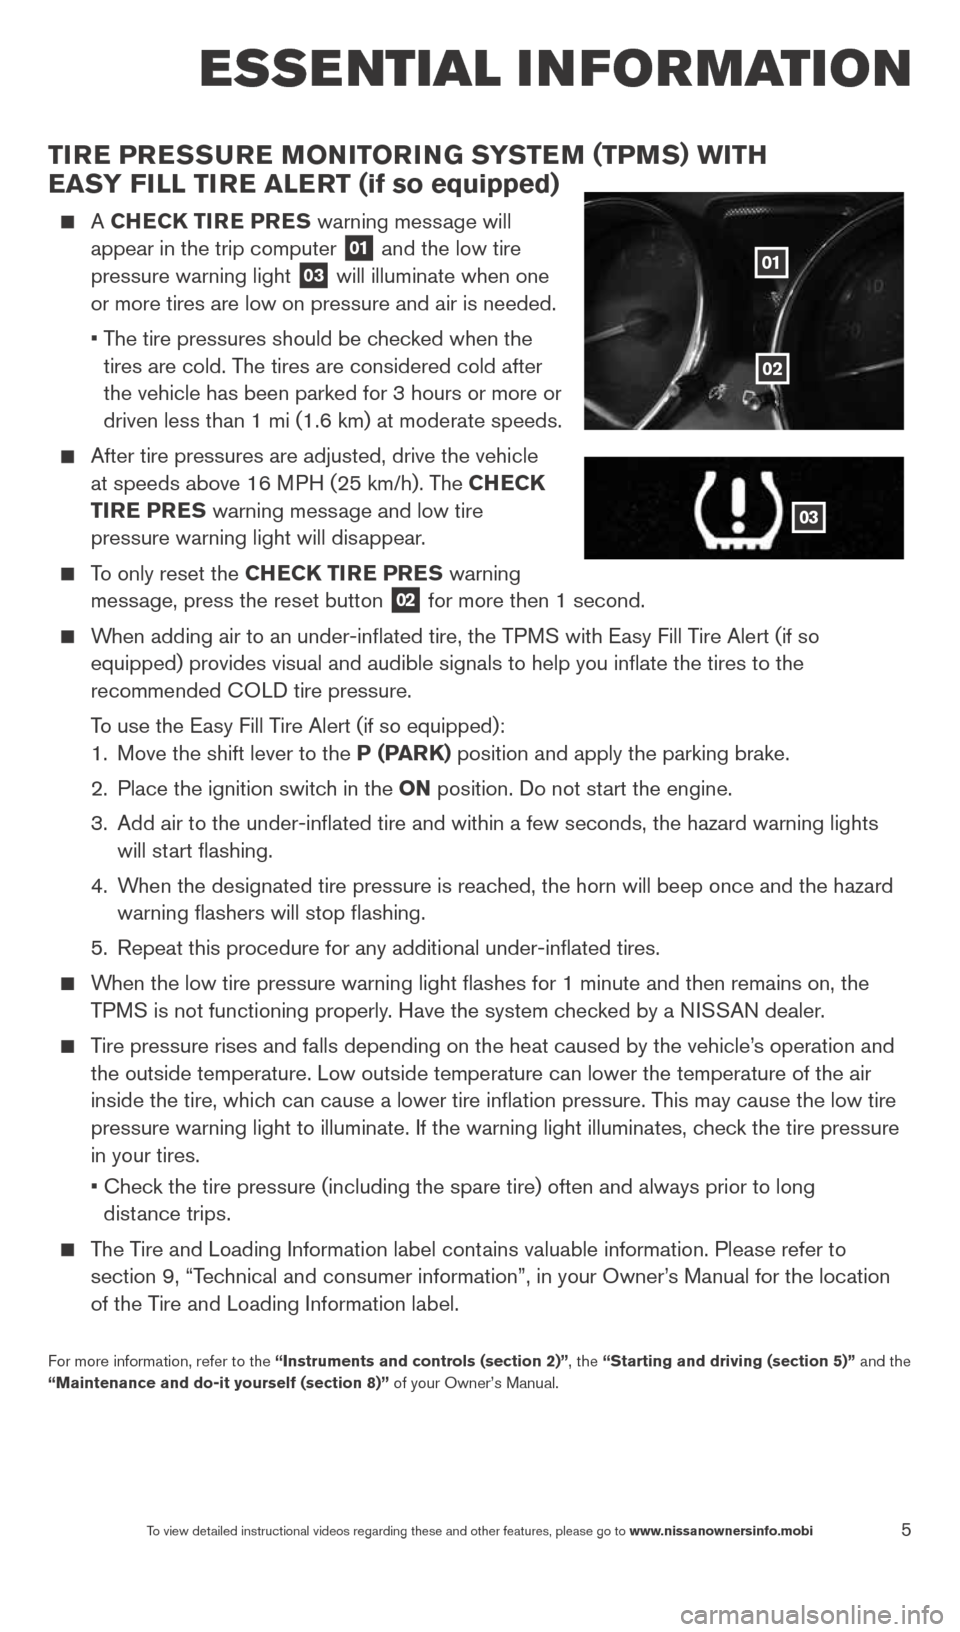
A CHe CK Tire P reS warning message will
appear in the trip computer 01 and the low tire
pressure warning light 03 will illuminate when one
or more tires are low on pressure and air is needed.
• The tire pressures should be checked when the
tires are cold. The tires are considered cold after
the vehicle has been parked for 3 hours or more or
driven less than 1 mi (1.6 km) at moderate speeds.
After tire pressures are adjusted, drive the vehicle
at speeds above 16 MPH (25 km/h). The CH eCK
Tire Pre S warning message and low tire
pressure warning light will disappear.
To only reset the CH eCK Tire Pre S warning
message, press the reset button 02 for more then 1 second.
When adding air to an under-inflated tire, the TPMS with Easy Fill Tire Alert (if so
equipped) provides visual and audible signals to help you inflate the\
tires to the
recommended c OLD tire pressure.
To use the Easy Fill Tire Alert (if so equipped):
1. Move the shift lever to the P (P arK) position and apply the parking brake.
2. Place the ignition switch in the oN position. Do not start the engine.
3. Add air to the under-inflated tire and within a few seconds, the hazar\
d warning lights
will start flashing.
4. When the designated tire pressure is reached, the horn will beep once and the hazard
warning flashers will stop flashing.
5. Repeat this procedure for any additional under-inflated tires.
When the low tire pressure warning light flashes for 1 minute and then \
remains on, the
TPMS is not functioning properly. Have the system checked by a NISSAN dealer.
Tire pressure rises and falls depending on the heat caused by the vehicle\
’s operation and
the outside temperature. Low outside temperature can lower the temperatu\
re of the air
inside the tire, which can cause a lower tire inflation pressure. This may cause the low tire
pressure warning light to illuminate. If the warning light illuminates, \
check the tire pressure
in your tires.
• check the tire pressure (including the spare tire) often and always prior \
to long
distance trips.
The Tire and Loading Information label contains valuable information. Please refer to
section 9, “Technical and consumer information”, in your Owner’s Manual for the location
of the Tire and Loading Information label.
For more information, refer to the “instruments and controls (section 2)”, the “Starting and driving (section 5)” and the
“Maintenance and do-it yourself (section 8)” of your Owner’s Manual.
01
03
02
1598304_14b_VersaHatchback_QRG_090613.indd 59/6/13 1:44 PM
Page 8 of 24
6To view detailed instructional videos regarding these and other features, please go\
to www.nissanownersinfo.mobi
esse ntial i n for mation
Fuel-Filler Door
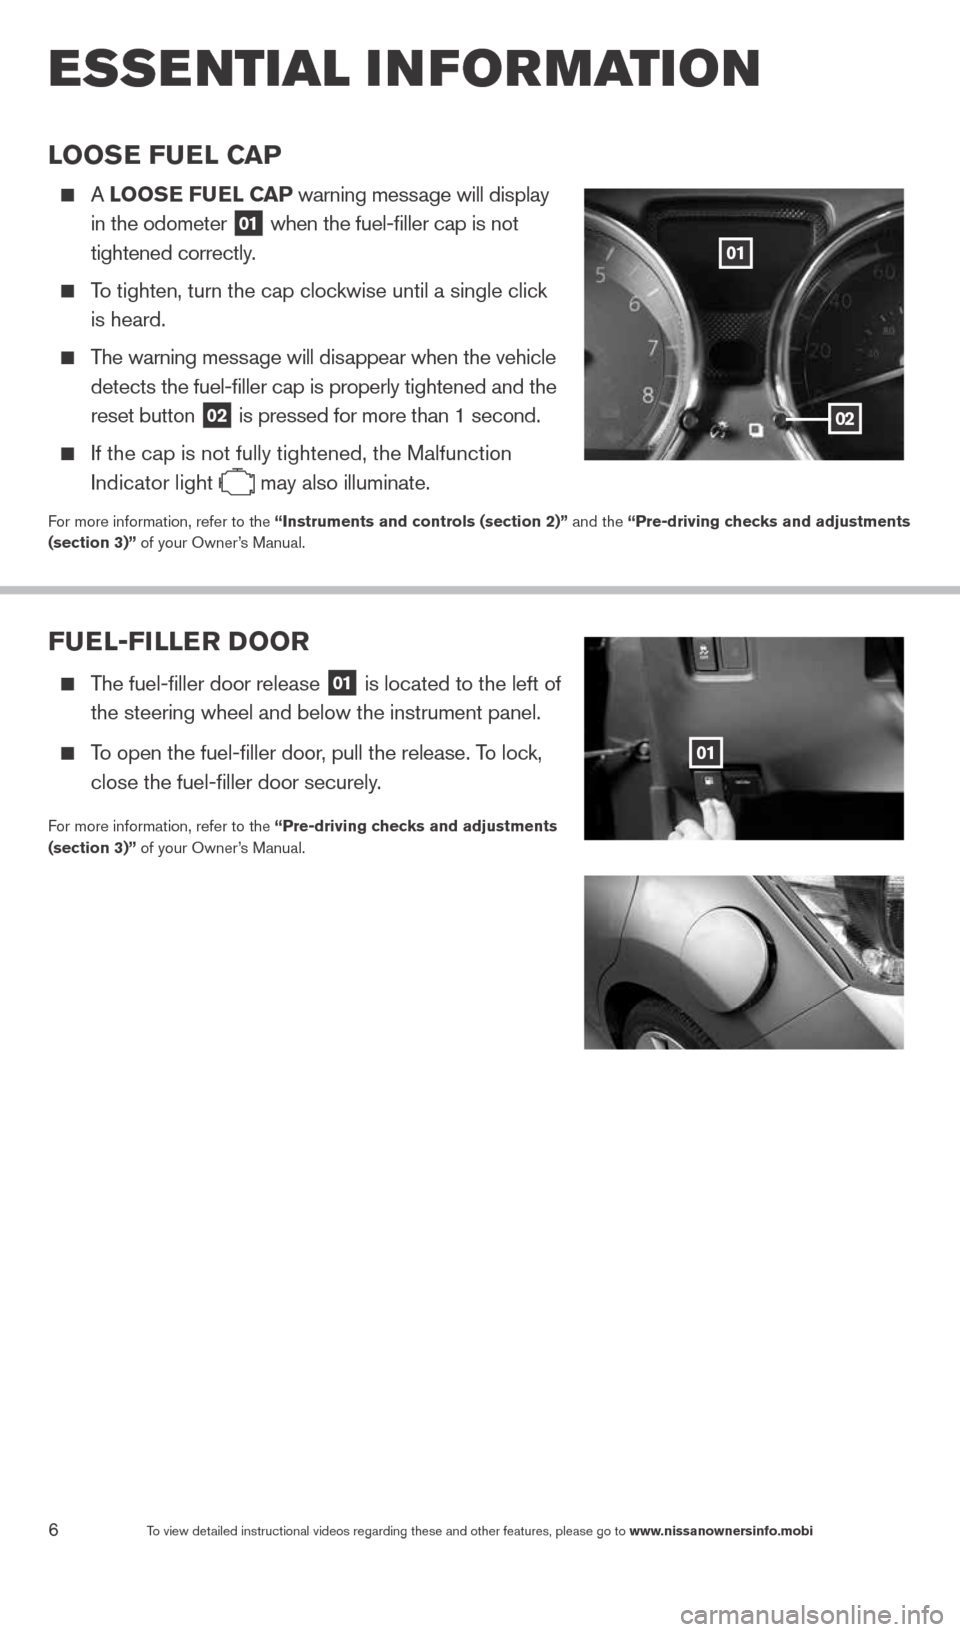
The fuel-filler door release
01 is located to the left of
the steering wheel and below the instrument panel.
To open the fuel-filler door, pull the release. To lock,
close the fuel-filler door securely.
For more information, refer to the “Pre-driving checks and adjustments
(section 3)” of your Owner’s Manual.
01
looSe Fuel C aP
A looS e Fuel CaP warning message will display
in the odometer
01 when the fuel-filler cap is not
tightened correctly.
To tighten, turn the cap clockwise until a single click
is heard.
The warning message will disappear when the vehicle
detects the fuel-filler cap is properly tightened and the
reset button
02 is pressed for more than 1 second.
If the cap is not fully tightened, the Malfunction
Indicator light
may also illuminate.
For more information, refer to the “instruments and controls (section 2)” and the “Pre-driving checks and adjustments
(section 3)” of your Owner’s Manual.
02
01
1598304_14b_VersaHatchback_QRG_090613.indd 69/6/13 1:44 PM
Page 15 of 24
13To view detailed instructional videos regarding these and other features, please go\
to www.nissanownersinfo.mobi
FM/aM/SiriusXM* Sa TelliTe raDio wiTH CD Pla Yer
(if so equipped)
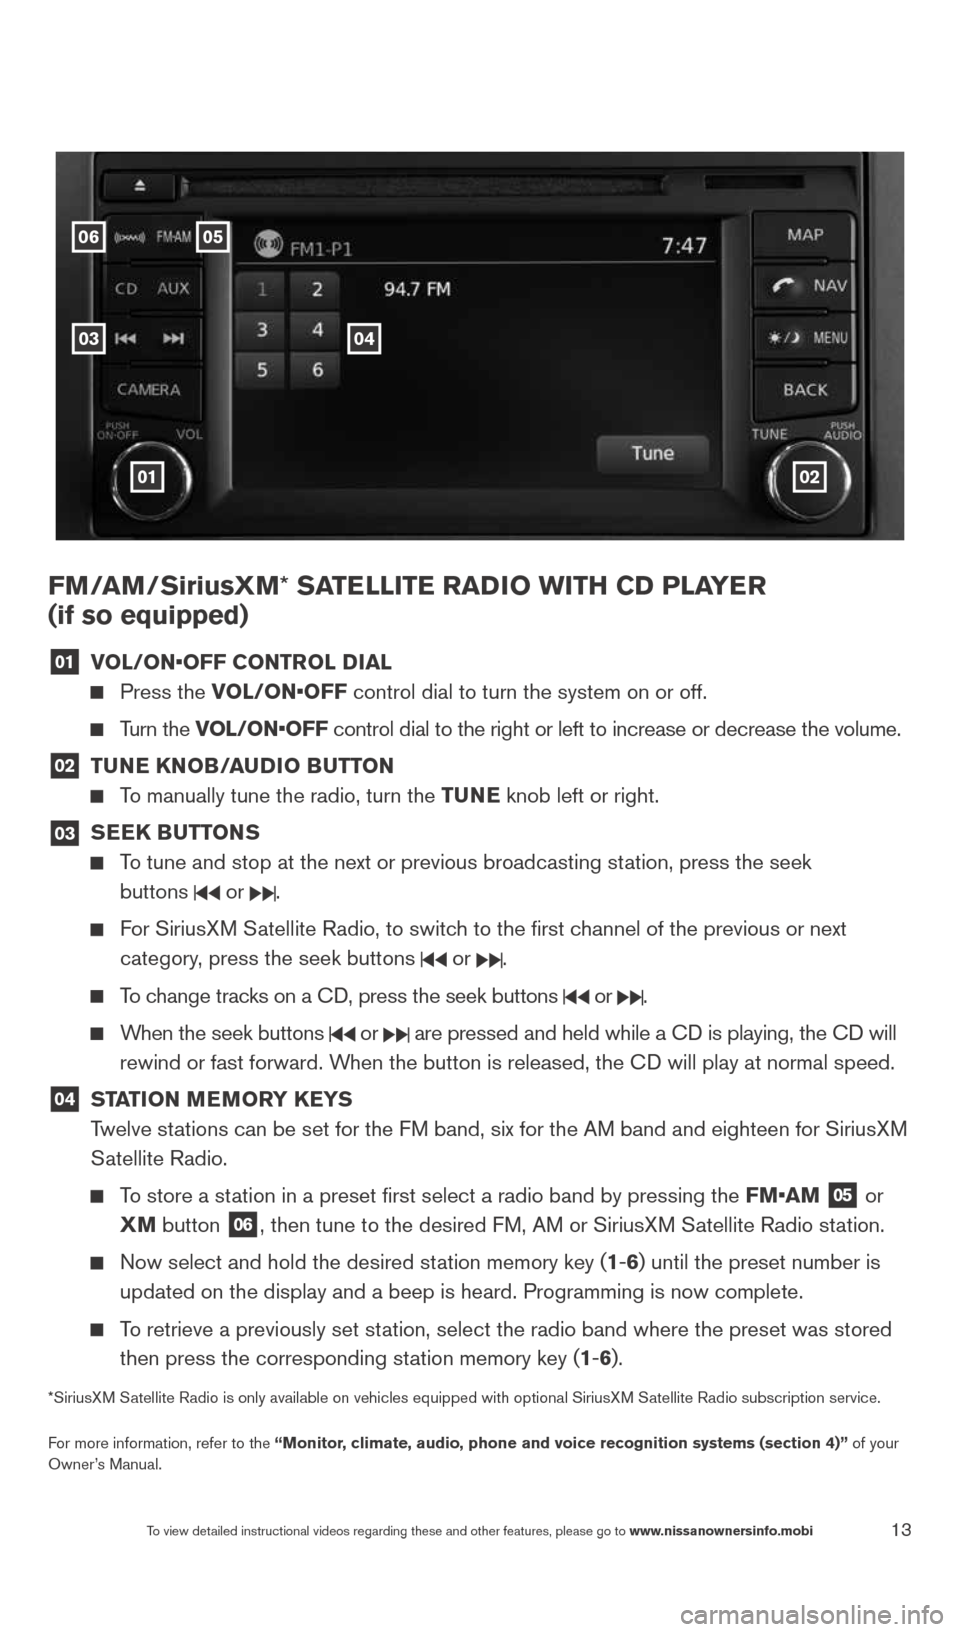
01 vol/oN•oFF CoNTrol D
ial
Press the vol/oN•oFF control dial to turn the system on or off.
Turn the vol/oN•oFF control dial to the right or left to increase or decrease the volume.
02 Tu
Ne KN oB/auDio B uTToN
To manually tune the radio, turn the Tu Ne knob left or right.
03
SeeK Bu
TToNS
To tune and stop at the next or previous broadcasting station, press the seek
buttons
or .
For SiriusXM Satellite Radio, to switch to the first channel of the previous or next
category, press the seek buttons
or .
To change tracks on a c D, press the seek buttons or .
When the seek buttons or are pressed and held while a c D is playing, the cD will
rewind or fast forward. When the button is released, the c D will play at normal speed.
04 ST
aTioN M eM or Y K eYS
Twelve stations can be set for the FM band, six for the AM band and eighteen for SiriusXM
Satellite Radio.
To store a station in a preset first select a radio band by pressing the FM•aM
05 or
XM button
06, then tune to the desired FM, AM or SiriusXM Satellite Radio station.
Now select and hold the desired station memory key (1-6) until the preset number is
updated on the display and a beep is heard. Programming is now complete.\
To retrieve a previously set station, select the radio band where the preset was stored
then press the corresponding station memory key (1-6).
*SiriusXM Satellite Radio is only available on vehicles equipped with optional Siri\
usXM Satellite Radio subscription service.
For more information, refer to the “Monitor, climate, audio, phone and voice recognition systems (section 4)” of your
Owner’s Manual.
01
05
03
06
02
04
1598304_14b_VersaHatchback_QRG_090613.indd 139/6/13 1:44 PM
Page 16 of 24
14To view detailed instructional videos regarding these and other features, please go\
to www.nissanownersinfo.mobi
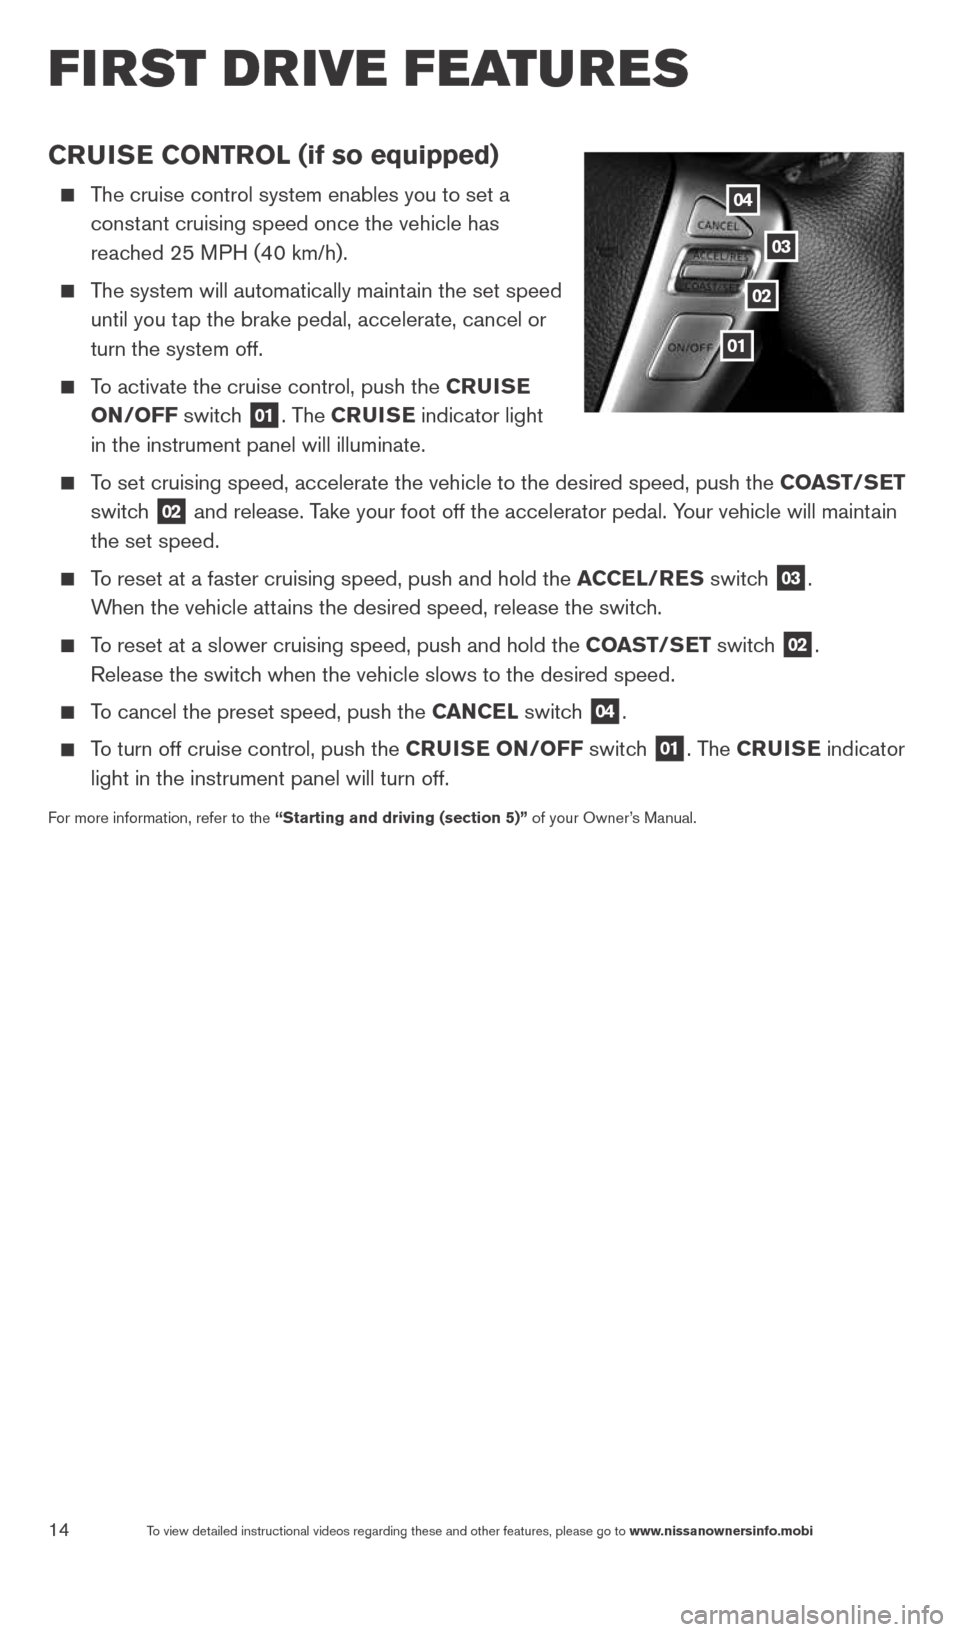
CruiSe CoNTrol (if so equipped)
The cruise control system enables you to set a
constant cruising speed once the vehicle has
reached 25 MPH (40 km/h).
The system will automatically maintain the set speed
until you tap the brake pedal, accelerate, cancel or
turn the system off.
To activate the cruise control, push the C ruiSe
oN/oFF switch
01. The CruiSe indicator light
in the instrument panel will illuminate.
To set cruising speed, accelerate the vehicle to the desired speed, push \
the CoaST/S eT
switch
02 and release. Take your foot off the accelerator pedal. Your vehicle will maintain
the set speed.
To reset at a faster cruising speed, push and hold the a CCel/reS switch
03.
When the vehicle attains the desired speed, release the switch.
To reset at a slower cruising speed, push and hold the CoaST/S eT switch
02.
Release the switch when the vehicle slows to the desired speed.
To cancel the preset speed, push the C aNCel switch
04.
To turn off cruise control, push the Crui Se oN/oFF switch
01. The CruiSe indicator
light in the instrument panel will turn off.
For more information, refer to the “Starting and driving (section 5)” of your Owner’s Manual.
04
03
02
01
first drive features
1598304_14b_VersaHatchback_QRG_090613.indd 149/6/13 1:44 PM