Page 110 of 372

The map light has a three-position switch and
operates regardless of ignition switch position.
When the switch is in the ON position
�3, the
map light illuminates, regardless of door position.
The light will go off after a period of time unless
the ignition switch is placed in the ACC or ON
position.
When the switch is in the DOOR position
�2, the
map light will stay on for a period of time when:
● The doors are unlocked by the keyfob (if so
equipped) , a key or the power door lock
switch while all doors are closed and the
ignition switch is placed in the OFF position. ●
The driver’s door is opened and then closed
while the key is removed from the ignition
switch.
● The key is removed from the ignition switch
while all doors are closed.
The light will turn off while the timer is activated
when: ● The driver’s door is locked by the keyfob (if
so equipped) , a key, or the power door lock
switch.
● The ignition switch is placed in the ON po-
sition.
When the switch is in the OFF position
�1, the
map light does not illuminate, regardless of door
position.
The light will turn off automatically after a period
of time while doors are open to prevent the bat-
tery from becoming discharged.
CAUTION
Do not use for extended periods of time
with the engine stopped. This could result
in a discharged battery. The light illuminates when the rear hatch is
opened. When the rear hatch is closed, the light
will turn off.
The light also illuminates with other interior lights
when the interior light switch is in the DOOR
position. See “Interior light” in this section.
The lights will turn off automatically after a period
of time while doors are open to prevent the bat-
tery from becoming discharged.
LIC2126
MAP LIGHT (if so equipped)
LUGGAGE COMPARTMENT LIGHT
Instruments and controls2-37
Page 111 of 372
MEMO
2-38Instruments and controls
Page 115 of 372

●Wetting may damage the Intelligent
Key. If the Intelligent Key gets wet, im-
mediately wipe until it is completely dry.
● Do not place the Intelligent Key for an
extended period in an area where tem-
peratures exceed 140°F (60°C) .
● Do not attach the Intelligent Key with a
key holder that contains a magnet.
● Do not place the Intelligent Key near
equipment that produces a magnetic
field, such as a TV, audio equipment and
personal computers.
Mechanical key
The Intelligent Key contains the mechanical key,
which can be used in case of a discharged bat-
tery.
To remove the mechanical key, release the lock
knob on the back of the Intelligent Key.
To install the mechanical key, firmly insert it into
the Intelligent Key until the lock knob returns to
the lock position.
The mechanical key can be used for operation in
the same way as an ordinary key.
CAUTION
Always carry the mechanical key installed
in the Intelligent Key slot.
See “Doors” in this section and “Storage” in the
“Instruments and controls” section of this manual.
NISSAN VEHICLE IMMOBILIZER
SYSTEM KEYS (if so equipped)
You can only drive your vehicle using the master
keys which are registered to the NISSAN Vehicle
Immobilizer System components in your vehicle.
These keys have a transponder chip in the key
head.
The master key can be used for all the locks.
Never leave these keys in the vehicle.
Additional or replacement keys:
If you still have a key, the key number is not
necessary when you need extra NISSAN Vehicle
Immobilizer System keys. Your dealer can dupli-
cate your existing key. As many as 4 NISSAN
Vehicle Immobilizer System keys can be used
with one vehicle. You should bring all NISSAN
Vehicle Immobilizer System keys that you have to
your NISSAN dealer for registration. This is be-
cause the registration process will erase the
memory of all key codes previously registered
into the NISSAN Vehicle Immobilizer System.
SPA1951
3-4Pre-driving checks and adjustments
Page 116 of 372

After the registration process, these components
will only recognize keys coded into the NISSAN
Vehicle Immobilizer System during registration.
Any key that is not given to your dealer at the time
of registration will no longer be able to start your
vehicle.
CAUTION
Do not allow the immobilizer system key,
which contains an electrical transponder,
to come into contact with water or salt
water. This could affect system function.When the doors are locked using one of the
following methods, the doors cannot be opened
using the inside or outside door handles. The
doors must be unlocked to open the doors.
WARNING
●
Always have the doors locked while
driving. Along with the use of seat belts,
this provides greater safety in the event
of an accident by helping to prevent
persons from being thrown from the
vehicle. This also helps keep children
and others from unintentionally open-
ing the doors, and will help keep out
intruders.
● Before opening any door, always look
for and avoid oncoming traffic.
● Do not leave children unattended inside
the vehicle. They could unknowingly ac-
tivate switches or controls. Unattended
children could become involved in seri-
ous accidents.
LOCKING WITH KEY
Manual (if so equipped)
To lock a door, turn the key toward the front of the
vehicle
�1. To unlock, turn the key toward the rear
of the vehicle
�2.
Driver’s side and Passenger side (if so equipped)
LPD2160
DOORS
Pre-driving checks and adjustments3-5
Page 121 of 372

Press thebutton on the keyfob again
within 5 seconds.
● All doors and the rear hatch unlock.
● The hazard warning lights flash once if all
doors are completely closed.
The interior lights can be turned off without wait-
ing by inserting the key into the ignition switch
and placing the ignition switch in the ON or
START position, locking the doors with the key-
fob or pushing the interior light switch to the OFF
position.
Auto relock
When thebutton on the keyfob is pressed,
all doors will lock automatically within 1 minute
unless one of the following operations is per-
formed:
● Any door is opened.
● A key is inserted into the ignition switch and
the switch is cycled from OFF to ON.Using the panic alarm
If you are near your vehicle and feel threatened,
you may activate the panic alarm to call attention
by pressing and holding the
button on the
keyfob for longer than 0.5 seconds.
The panic alarm and headlights will stay on for a
period of time.
The panic alarm stops when: ● it has run for a period of time, or
● any button is pressed on the keyfob.
Using the interior light
Press thebutton on the keyfob once to
turn on the interior lights.
For additional information, refer to “Interior light”
in the “Instruments and controls” section in this
manual.
LPD2041
3-10Pre-driving checks and adjustments
Page 132 of 372

The hazard warning lights will flash once and the
horn will sound once to confirm that the horn
beep feature has been reactivated.
Deactivating the horn beep feature does not si-
lence the horn if the alarm is triggered.
�1P (Park) position selecting warning
light (if so equipped)
�2NISSAN Intelligent Key® warning light
WARNING LIGHTS AND AUDIBLE
REMINDERS
The Intelligent Key is equipped with a function
that is designed to minimize improper operations
and to help prevent the vehicle from being stolen.
The warning buzzer sounds and the warning light
illuminates when improper operations are de-
tected.
CAUTION
When the buzzer sounds and the warning
light illuminates, be sure to check both the
vehicle and the Intelligent Key.
WARNING SIGNALS
To help prevent the vehicle from moving unex-
pectedly by erroneous operation of the Intelligent
Key or to help prevent the vehicle from being
stolen, a chime or buzzer sounds from inside and
outside the vehicle and a warning is displayed in
the instrument panel.
When a chime or beep sounds or a warning is
displayed, be sure to check the vehicle and the
Intelligent Key.
See the “Troubleshooting guide” that follows and
“Warning/indicator lights and audible reminders”
in the “Instruments and controls” section of this
manual.
LPD2094
Pre-driving checks and adjustments3-21
Page 138 of 372

FUEL-FILLER CAP
WARNING
●Gasoline is extremely flammable and
highly explosive under certain condi-
tions. You could be burned or seriously
injured if it is misused or mishandled.
Always stop the engine and do not
smoke or allow open flames or sparks
near the vehicle when refueling.
● Do not attempt to top off the fuel tank
after the fuel pump nozzle shuts off
automatically. Continued refueling may
cause fuel overflow, resulting in fuel
spray and possibly a fire.
● Use only an original equipment type
fuel-filler cap as a replacement. It has a
built-in safety valve needed for proper
operation of the fuel system and emis-
sion control system. An incorrect cap
can result in a serious malfunction and
possible injury. It could also cause
the
Malfunction Indicator Light
(MIL) to come on.
● Never pour fuel into the throttle body to
attempt to start your vehicle. ●
Do not fill a portable fuel container in
the vehicle or trailer. Static electricity
can cause an explosion of flammable
liquid, vapor or gas in any vehicle or
trailer. To reduce the risk of serious
injury or death when filling portable fuel
containers:
– Always place the container on the ground when filling.
– Do not use electronic devices when filling.
– Keep the pump nozzle in contact with the container while you are fill-
ing it.
– Use only approved portable fuel con- tainers for flammable liquid.
CAUTION
●Do not use E-15 or E-85 fuel in your
vehicle. For further information see the
“Fuel Recommendation” in the “Techni-
cal and consumer information” section
of this manual. ●
The LOOSE FUEL CAP warning mes-
sage will be displayed if the fuel-filler
cap is not properly tightened. It may
take a few driving trips for the message
to be displayed. Failure to tighten the
fuel-filler cap properly after the LOOSE
FUEL CAP warning message is dis-
played may cause the
Malfunc-
tion Indicator Light (MIL) to illuminate.
● Failure to tighten the fuel-filler cap
properly may cause the
Malfunc-
tion Indicator Light (MIL) to illuminate.
If the
light illuminates because
the fuel-filler cap is loose or missing,
tighten or install the cap and continue
to drive the vehicle. The
light
should turn off after a few driving trips.
If the
light does not turn off after a
few driving trips, have the vehicle in-
spected by a NISSAN dealer.
● For additional information, see the
“Malfunction Indicator Light (MIL)” in
the “Instruments and Controls” section
in this manual.
● If fuel is spilled on the vehicle body,
flush it away with water to avoid paint
damage.
Pre-driving checks and adjustments3-27
Page 142 of 372
The outside mirror remote control only operates
when the ignition switch is placed in the ACC or
ON position.
Move the small switch
�1to select the right or left
mirror. Adjust each mirror to the desired position
using the large switch
�2.
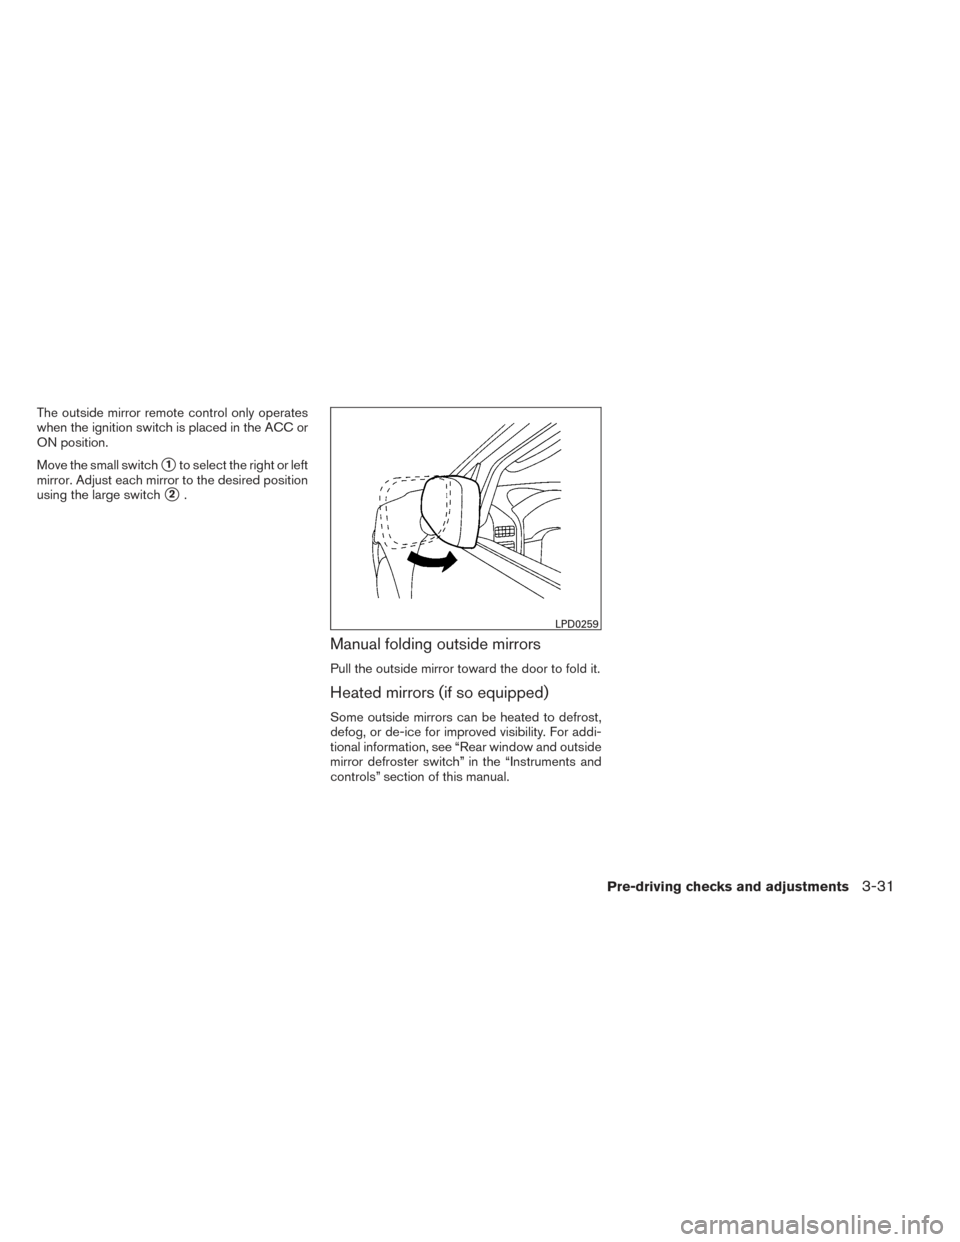
Manual folding outside mirrors
Pull the outside mirror toward the door to fold it.
Heated mirrors (if so equipped)
Some outside mirrors can be heated to defrost,
defog, or de-ice for improved visibility. For addi-
tional information, see “Rear window and outside
mirror defroster switch” in the “Instruments and
controls” section of this manual.
LPD0259
Pre-driving checks and adjustments3-31