Page 132 of 442
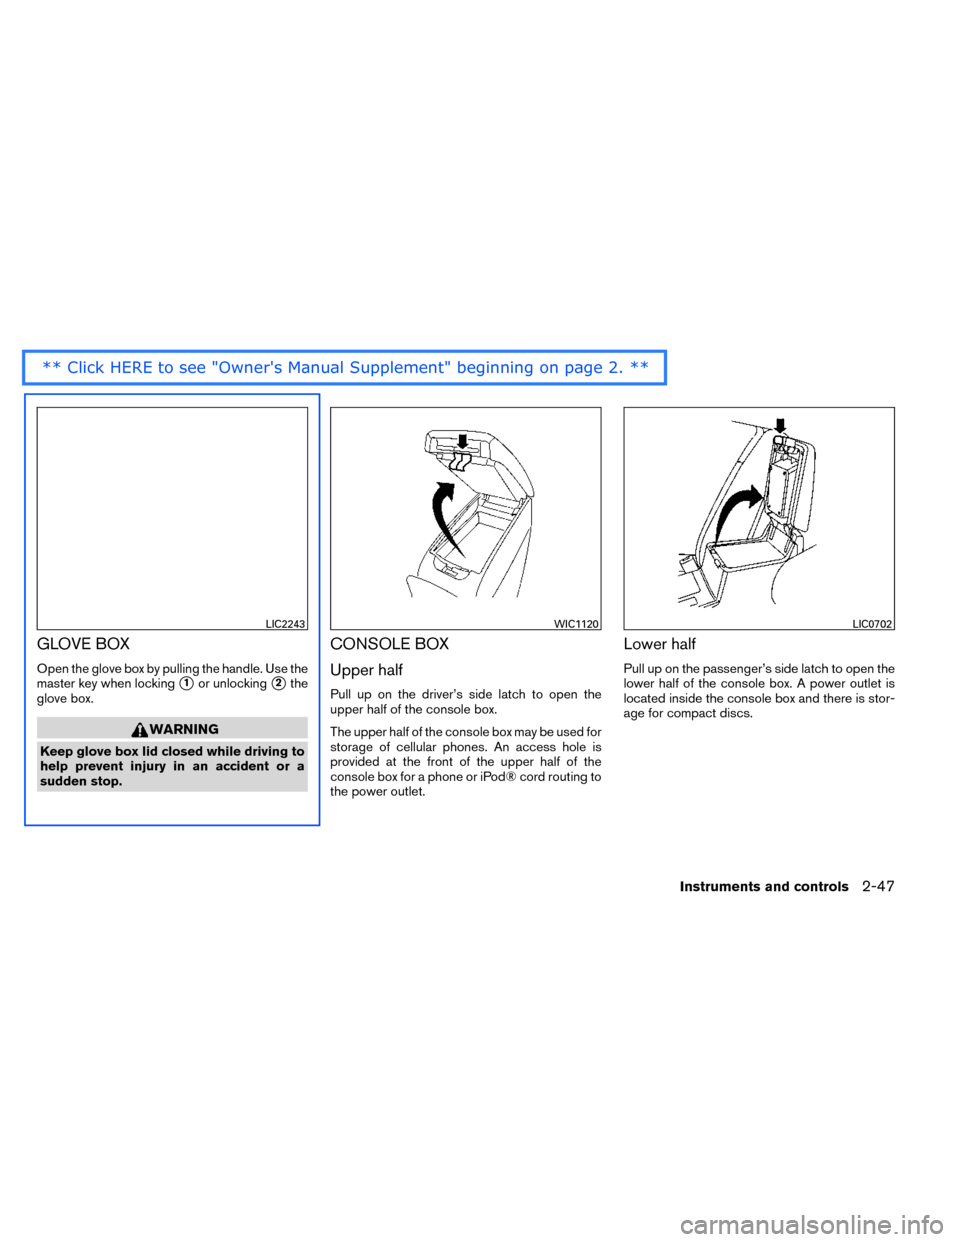
GLOVE BOX
Open the glove box by pulling the handle. Use the
master key when locking
�1or unlocking�2the
glove box.
WARNING
Keep glove box lid closed while driving to
help prevent injury in an accident or a
sudden stop.
CONSOLE BOX
Upper half
Pull up on the driver’s side latch to open the
upper half of the console box.
The upper half of the console box may be used for
storage of cellular phones. An access hole is
provided at the front of the upper half of the
console box for a phone or iPod® cord routing to
the power outlet.
Lower half
Pull up on the passenger’s side latch to open the
lower half of the console box. A power outlet is
located inside the console box and there is stor-
age for compact discs.
LIC2243WIC1120LIC0702
Instruments and controls2-47
Page 135 of 442
 on the Divide-N-Hide® while in the
mid position. In the upper position, ob-
jects should not weigh more than 30 lbs
(14 kg) .
There are multipl")
WARNING
Do not put objects heavier than 165 lbs
(75 kg) on the Divide-N-Hide® while in the
mid position. In the upper position, ob-
jects should not weigh more than 30 lbs
(14 kg) .
There are multiple positions for the adjust-
able floor. The upper position allows for
additional storage below the adjustable
floor. To move the adjustable floor from the
lower position to the upper position:
1. Use the handle to lift the adjustable floor.
2. Move the adjustable floor to the upper guide track and ensure it is secure in place.
POWER WINDOWS
WARNING
●Make sure that all passengers have
their hands, etc. inside the vehicle while
it is in motion and before closing the
windows. Use the window lock switch to
prevent unexpected use of the power
windows.
● Do not leave children unattended inside
the vehicle. They could unknowingly ac-
tivate switches or controls and become
trapped in a window. Unattended chil-
dren could become involved in serious
accidents.
The power windows operate when the ignition
switch is placed in the ON position, or for a
period of time after the ignition switch is placed in
the OFF position. If the driver’s or passenger’s
door is opened during this period of time, the
power to the windows is canceled.
LIC2646LIC2647
WINDOWS
2-50Instruments and controls
Page 136 of 442

1. Window lock button
2. Power door lock switch
3. Driver side automatic switch
4. Front passenger side switch
5. Left rear passenger side switch
6. Right rear passenger side switch
Driver’s side power window switch
The driver’s side control panel is equipped with
switches to open or close all of the windows.
To open a window, push the switch to the first
detent and continue to hold down until the de-
sired window position is reached. To close a
window, pull the switch to the first detent and
continue to hold up until the desired window
position is reached.
Locking passengers’ windows
When the window lock switch is depressed, only
the driver’s side window can be opened or
closed. Push it again to cancel the window lock
function.
Front passenger’s power window
switch
The passenger’s window switch operates only
the corresponding passenger’s window. To open
the window partially, push the switch down
�1
lightly until the desired window position is
reached. To close the window partially, pull the
switch up
�2until the desired window position is
reached.
LIC2668LIC2309
Instruments and controls2-51
Page 140 of 442
 , step lights (if so
equipped) , map lights and rear personal lights
will automatically turn on and stay on for a period
of time wh")
When the ON switch�1is pressed, the footwell
lights (if so equipped) , step lights (if so
equipped) , map lights and rear personal lights
will automatically turn on and stay on for a period
of time when:
● The doors are unlocked by the Intelligent
Key, a key or the request switch (if so
equipped) while all doors are closed and the
ignition switch is in the OFF position.
● When individually pushed.
When the OFF switch
�2is pushed, the interior
lights do not illuminate even when pushed. NOTE:
The footwell lights and step lights illumi-
nate when the driver and passenger doors
are open regardless of the interior light
switch position. These lights will turn off
automatically after a period of time while
doors are open to prevent the battery from
becoming discharged.
CAUTION
Do not use for extended periods of time
with the engine stopped. This could result
in a discharged battery.
CONSOLE LIGHT (if so equipped)
The console light will turn on whenever the park-
ing lights or headlights are illuminated.
The console light brightness can be adjusted
with the illumination brightness control.
LIC2302LIC2303
INTERIOR LIGHT
Instruments and controls2-55
Page 141 of 442
Push the button to turn the map lights on. To turn
them off, press the button again.
CAUTION
Do not use for extended periods of time
with the engine stopped. This could result
in a discharged battery.To turn the rear personal lights on, press the
switch. To turn them off, press the switch again.
The cargo light on the overhead trim has a three-
position switch. To operate, push the switch to
the desired position.�1ON: The light is illuminated.
�2DOOR: The light illuminates when the lift-
gate is opened. The light turns off when the
liftgate is closed.
�3OFF: The light does not illuminate regardless
of liftgate position or lock status.
LIC2304
Rear personal lights
LIC1083SIC2063A
MAP LIGHTS PERSONAL LIGHTS (if so equipped) CARGO LIGHT
2-56Instruments and controls
Page 142 of 442

CAUTION
Do not use for extended periods of time
with the engine stopped. This could result
in a discharged battery.The HomeLink® Universal Transceiver provides
a convenient way to consolidate the functions of
up to three individual hand-held transmitters into
one built-in device.
HomeLink® Universal Transceiver:
● Will operate most Radio Frequency (RF)
devices such as garage doors, gates, home
and office lighting, entry door locks and se-
curity systems.
● Is powered by your vehicle’s battery. No
separate batteries are required. If the vehi-
cle’s battery is discharged or is discon-
nected, HomeLink® will retain all program-
ming.
When the HomeLink® Universal Trans-
ceiver is programmed, retain the original
transmitter for future programming proce-
dures (Example: new vehicle purchases) .
Upon sale of the vehicle, the programmed
HomeLink® Universal Transceiver buttons
should be erased for security purposes. For
additional information, refer to “Program-
ming HomeLink®” in this section.
WARNING
● Do not use the HomeLink® Universal
Transceiver with any garage door
opener that lacks safety stop and re-
verse features as required by federal
safety standards. (These standards be-
came effective for opener models
manufactured after April 1, 1982) . A ga-
rage door opener which cannot detect
an object in the path of a closing garage
door and then automatically stop and
reverse, does not meet current federal
safety standards. Using a garage door
opener without these features in-
creases the risk of serious injury or
death.
● During the programming procedure
your garage door or security gate will
open and close (if the transmitter is
within range) . Make sure that people or
objects are clear of the garage door,
gate, etc. that you are programming.
● Your vehicle’s engine should be turned
off while programming the HomeLink®
Universal Transceiver.
HOMELINK® UNIVERSAL
TRANSCEIVER (if so equipped)
Instruments and controls2-57
Page 148 of 442
 ............3-2
NISSAN Intelligent Key® (if so equipped) .........3-3
N")
3 Pre-driving checks and adjustments
Keys .............................................3-2Remote keyless entry (if so equipped) ............3-2
NISSAN Intelligent Key® (if so equipped) .........3-3
NISSAN Vehicle Immobilizer System keys .........3-4
Doors ............................................3-5
Locking with key ................................3-5
Opening and closing windows ...................3-5
Locking with inside lock knob ....................3-6
Locking with power door lock switch .............3-6
Automatic door locks ...........................3-6
Child safety rear door lock .......................3-7
Remote keyless entry system (if so equipped) .........3-7
How to use remote keyless entry system ..........3-8
NISSAN Intelligent Key® (if so equipped) ...........3-11
Operating range ............................... 3-12
Door locks/unlocks precaution ..................3-13
NISSAN Intelligent Key® Operation .............3-14
How to use the remote keyless entry
function ...................................... 3-17
Warning signals ............................... 3-20
Troubleshooting guide ......................... 3-20Hood
........................................... 3-22
Liftgate .......................................... 3-23
Operating the manual liftgate
(if so equipped) ............................... 3-23
Operating the power liftgate (if so equipped) .....3-23
Power liftgate main switch ......................3-26
Liftgate release ................................ 3-26
Liftgate position setting ........................ 3-27
Fuel-filler door ................................... 3-27
Opener operation .............................. 3-27
Fuel-filler cap ................................. 3-27
Tilt/telescopic steering ............................ 3-29
Manual operation .............................. 3-30
Sun visors ....................................... 3-30
Vanity mirrors ................................. 3-31
Card holder (driver’s side only) ..................3-31
Mirrors .......................................... 3-31
Rearview mirror (if so equipped) .................3-31
Automatic anti-glare rearview mirror
(if so equipped) ............................... 3-32
Outside
mirrors ............................... 3-33
Page 149 of 442

CAUTION
Do not leave the ignition key inside the
vehicle when you")
1. Jackknife type key
2. Integrated door lock keyfob with tran-sponder chip
3. Key number plate
REMOTE KEYLESS ENTRY (if so
equipped)
CAUTION
Do not leave the ignition key inside the
vehicle when you leave the vehicle.
A key number plate is supplied with your keys.
Record the key number and keep it in a safe place
(such as your wallet) , not in the vehicle. If you lose
your keys, see a NISSAN dealer for duplicates by
using the key number. NISSAN does not record
key numbers so it is very important to keep track
of your key number plate.
A key number is only necessary when you have
lost all keys and do not have one to duplicate
from. If you still have a key, your NISSAN dealer
can duplicate it.
Storing remote keyless entry
To lock or unlock the vehicle using the key press
the release button
�1to unfold the key from the
fob.
When storing the key press the release button
�1
and push key�2to fold the key back into fob slot
�3.
Never leave keys in vehicle.
LPD2197LPD2192
KEYS
3-2Pre-driving checks and adjustments